background image

En

ENGLISH

 3

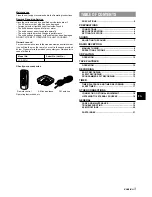
TABLE OF CONTENTS

PRECAUTIONS ................................................................... 2

PREPARATIONS

CONNECTIONS ................................................................. 4
BEFORE OPERATION ........................................................ 6
SETTING THE  CLOCK ........................................................ 6

SOUND

ADJUSTING THE  SOUND .................................................. 7

RADIO RECEPTION

MANUAL TUNING ............................................................... 8
PRESETTING STATIONS ................................................... 9

CD PLAYING

OPERATION ..................................................................... 10

TAPE PLAYBACK

OPERATION ..................................................................... 12

RECORDING

BASIC RECORDING ........................................................ 13
AI EDIT RECORDING ...................................................... 14
PROGRAMMED EDIT RECORDING ............................... 15

TIMER

TIMER PLAYBACK AND TIMER RECORDING .............. 16
SLEEP TIMER .................................................................. 17

OTHER CONNECTIONS

CONNECTING OPTIONAL EQUIPMENT ....................... 18
LISTENING TO EXTERNAL SOURCES ......................... 18

GENERAL

CARE AND MAINTENANCE ........................................... 19
TROUBLESHOOTING ..................................................... 19
SPECIFICATIONS ............................................................ 20

PARTS INDEX .................................................................. 21

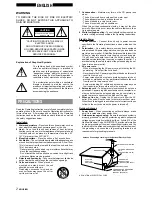
Maintenance
Clean the unit only as recommended in the Operating Instructions.

Damage Requiring Service
Have the units serviced by a qualified service technician if:
- The AC power cord or plug has been damaged
- Foreign objects or liquid have gotten inside the unit
- The unit has been exposed to rain or water
- The unit does not seem to operate normally
- The unit exhibits a marked change in performance
- The unit has been dropped, or the cabinet has been damaged
DO NOT ATTEMPT TO SERVICE THE UNIT YOURSELF.

Owner’s record
For your convenience, record the model number and serial number
(you will find them on the rear of your set) in the space provided
below.  Please refer to them when you contact your Aiwa dealer in
case of difficulty.

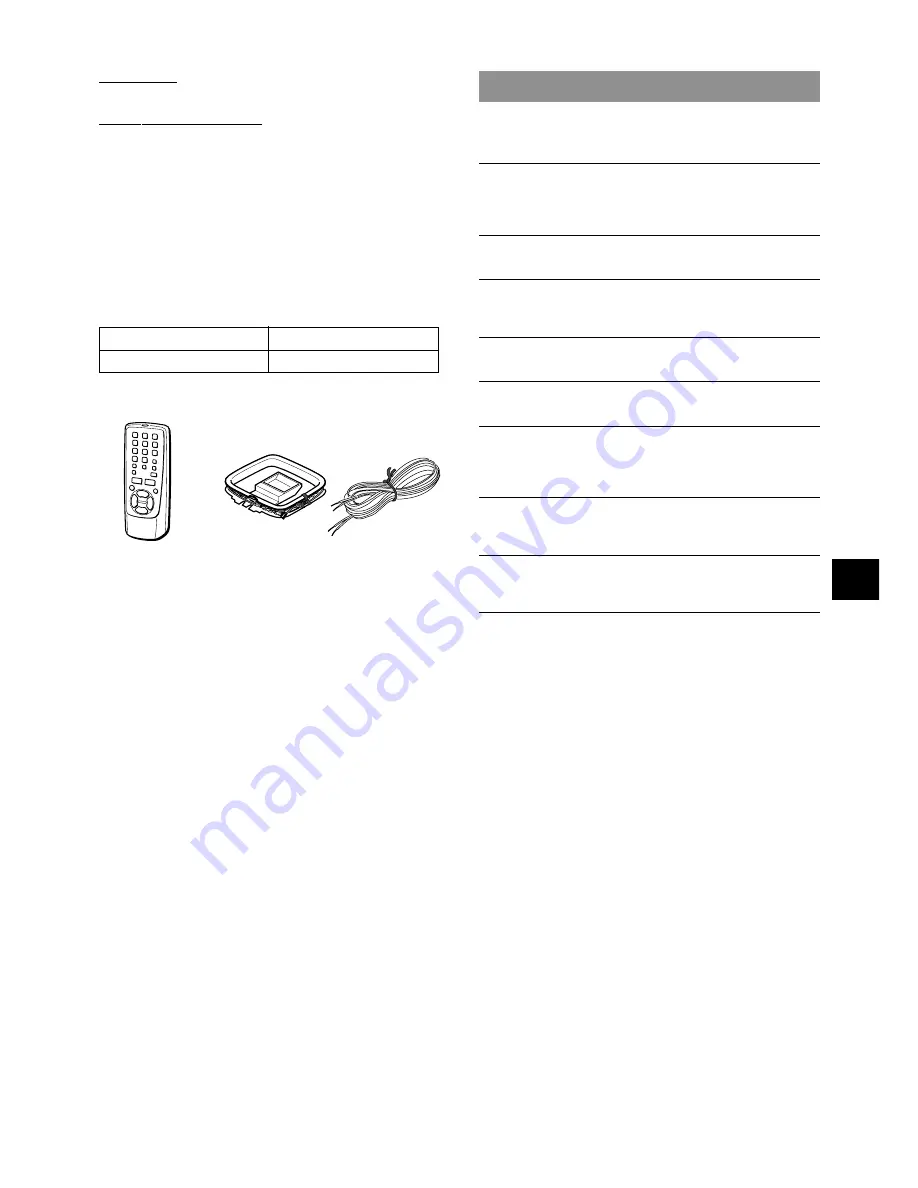
Check your accessories

Operating Instructions, etc.

Model No.

Serial No. (Lot No.)

LCX-357U

FM antenna

AM loop antenna

Remote control

Содержание LCX-357

Страница 1: ...AINE STEREO AVEC LE LECTEUR DE DISQUE COMPACT LCX 357 OPERATING INSTRUCTIONS MANUAL DE INSTRUCCIONES MODE D EMPLOI En English E Español F Français U 8A CLA 903 01 000105AYK H B For assistance and information call toll free 1 800 BUY AIWA United States and Puerto Rico ...

Страница 2: ...unit has condensation inside it may not function normally Should this occur leave the unit for a few hours then try to operate again 8 Wall or ceiling mounting The unit should not be mounted on a wall or ceiling unless specified in the Operating Instructions Electric Power 1 Power sources Connect this unit only to power sources specified in the Operating Instructions and as marked on the unit 2 Po...

Страница 3: ...d in the Operating Instructions Damage Requiring Service Have the units serviced by a qualified service technician if The AC power cord or plug has been damaged Foreign objects or liquid have gotten inside the unit The unit has been exposed to rain or water The unit does not seem to operate normally The unit exhibits a marked change in performance The unit has been dropped or the cabinet has been ...

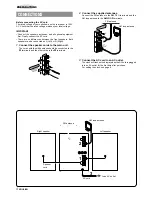
Страница 4: ...ted voltage of your unit shown on the rear panel is 120 V AC Check that the rated voltage matches your local voltage IMPORTANT Connect the speakers antennas and all optional equipment first Finally connect the AC cord There are no differences between the front speakers Both speakers can be connected as L Left or R Right 1 Connect the speaker cords to the main unit The cords with the white stripes ...

Страница 5: ...NNA For better FM reception use of an outdoor antenna is recommended Connect the outdoor antenna to FM 75 Ω terminals To connect other optional equipment page 18 PREPARATIONS REMOTE CONTROL Inserting batteries Detach the battery cover on the rear of the remote control and insert two size AA R6 batteries R6 AA When to replace the batteries The maximum operational distance between the remote control...

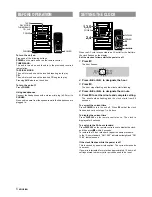
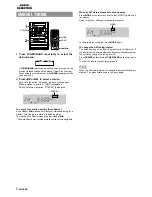
Страница 6: ...ff 1 Press a The hour flashes 2 Press f or g to designate the hour 3 Press a The hour stops flashing and the minute starts flashing 4 Press f or g to designate the minute 5 Press a to set the minute and complete setting The minute stops flashing and the clock starts from 00 seconds To correct the current time Press POWER to turn the unit off Press a so that the clock flashes and carry out steps 1 ...

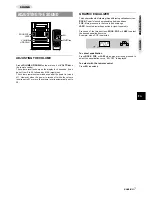
Страница 7: ...or more the volume level is automatically set to 20 GRAPHIC EQUALIZER This unit provides the following three different equalization curves ROCK Powerful sound emphasizing treble and bass POP More presence in the vocals and midrange JAZZ Accented lower frequencies for jazz type music Press one of the three buttons ROCK POP or JAZZ to select the desired equalization curve Example when POP is selecte...

Страница 8: ...After tuning in a station the search stops To stop the Auto Search manually press f or g The Auto Search may not stop at stations with very weak signals RADIO RECEPTION When an FM stereo broadcast contains noise Press MODE on the remote control so that MONO lights up on the display Noise is reduced although reception is monaural MONO To restore stereo reception press MODE again To change the AM tu...

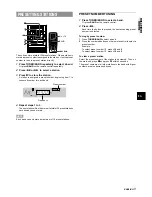
Страница 9: ...s have already been stored NOTE Each band can only store a maximum of 16 preset stations Preset number Frequency PRESET NUMBER TUNING 1 Press TUNER BAND to select a band Or press BAND on the remote control 2 Press d Each time the button is pressed the next ascending preset number is selected Tuning by preset number 1 Press TUNER BAND to select a band 2 Press the numbered buttons on the remote cont...

Страница 10: ...nues to the end of the disc NOTE The unit may not play a CD R RW disc that is recorded on personal computers or some kinds of CD R RW recorders because of differences in recording platforms Do not attach any seal or label to either side the recordable side or the labeled side of a CD R RW disc It may cause malfunction Do not use irregular shape CDs example heart shaped octagonal ones It may result...

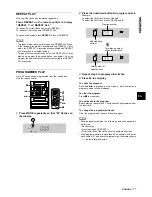
Страница 11: ...MODE repeatedly so that M flashes on the display 2 Press the numbered buttons to program a track Example To select the 12th track press 10 and 2 To select the 20th track press 10 10 and 0 3 Repeat step 2 to program other tracks 4 Press c to start play To check the program Each time g is pressed in stop mode a track number and program number will be displayed To clear the program Press s in stop mo...

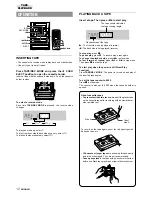
Страница 12: ...play press again To change the playback side press d in play mode To fast forward or rewind press f or g in stop mode Then press s to stop the tape To start play when the power is off Direct Play Function Press TAPE REV MODE The power is turned on and play of the inserted tape begins To set the tape counter to 0000 Press s in stop mode The counter is also set to 0000 when the cassette holder is op...

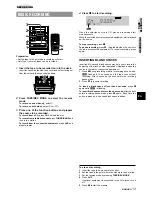
Страница 13: ...n the source To stop recording press s To pause recording press a Applicable when the source is the radio or connected equipment To resume recording press again INSERTING BLANK SPACES Insertion of 4 second blank spaces may help you to locate the beginning of the track on other equipment Applicable when the source is the radio or connected equipment 1 Press w during recording or while in recording ...

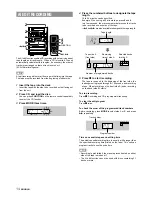
Страница 14: ...s the tracks to be recorded on each side of the tape f and g are also available to designate the tape length 5 Press w to start recording The tape is rewound to the beginning of the front side the lead segment is played through for 10 seconds and recording starts When recording on the front side A ends recording on the back side B starts To stop recording Press s Recording and CD play stop simulta...

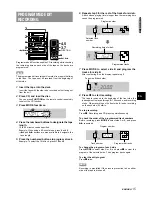
Страница 15: ...at step 5 for the rest of the tracks for side A A track whose playing time is longer than the remaining time cannot be programmed 7 Press MODE to select side B and program the tracks for side B After confirming B on the display repeat step 5 8 Press w to start recording The tape is rewound to the beginning of the front side the lead segment is played through for 10 seconds and recording starts Whe...

Страница 16: ...nt connected to the AUX jacks select AUX 5 Select the duration for the timer activated period with f or g and press a The duration for the timer activated period can be set between 5 to 240 minutes in 5 minute steps 6 Prepare the source For timer play of a CD load the CD For timer play of a tape insert the tape For timer play recording of a radio broadcast press TUNER BAND to select the band and t...

Страница 17: ...again from the beginning To cancel timer standby mode temporarily Press TIMER SLEEP repeatedly so that TM OFF is displayed 5 and 4 disappear on the display SLEEP TIMER f g a 1 2 3 The unit can be turned off automatically at a specified time 1 PressTIMER SLEEP so that SLEEP appears on the display 2 Within 4 seconds press a 3 Within 4 seconds press f or g to specify the time until the power is off E...

Страница 18: ...se jacks Use a cable with RCA phono plugs to connect audio equipment turntables LD players VCRs etc Connect the red plug to the R right jack and the white plug to the L left jack When connecting a turntable Use an AIWA turntable equipped with a built in equalizer amplifier 3SUPER WOOFER JACK Connect an optional powered sub woofer with a built in amplifier to the jack LISTENING TO EXTERNAL SOURCES ...

Страница 19: ...n reset by disconnecting the AC cord and repeat step 2 TROUBLESHOOTING If the unit fails to perform as described in these Operating Instructions check the following guide GENERAL There is no sound Is the AC cord connected properly Is there a bad connection page 4 Was an incorrect function button pressed The sound becomes inaudible or the unit is turned off suddenly There may be a short circuit in ...

Страница 20: ...ubject to change without notice COPYRIGHT Please check the laws on copyright relating to recordings from discs radio or external tape for the country in which the machine is being used NOTE This equipment has been tested and found to comply with the limits for a Class B digital device pursuant to Part 15 of the FCC Rules These limits are designed to provide reasonable protection against harmful in...

Страница 21: ... 12 sCLEAR 9 10 15 wREC REC MUTE 13 15 f r t g TUNING DOWN UP 6 8 10 12 16 17 6 Cassette holder 12 7 PHONES 6 8 TIMER SLEEP 16 17 9 VOLUME UP DOWN 7 Name Page 0 Numbered buttons 9 10 11 14 15 DISPLAY 6 EQ 7 MODE 8 10 11 14 15 BAND 8 9 POWER 6 16 cPLAY 5 11 sSTOP 6 9 15 f r t g SKIP SEARCH 6 8 10 12 16 17 REPEAT 11 FUNCTION 5 VOL k i 7 aPAUSE 6 9 10 12 13 16 17 PARTS INDEX 0 GENERAL 8 9 5 6 7 4 3 2...

Страница 22: ...o deje en reposo la unidad durante unas pocas horas y repita de nuevo la operación 8 Montaje en pared o techo La unidad no se deberá montar en una pared ni en el techo a menos que se especifique lo contrario en el manual de instrucciones Energía eléctrica 1 Fuentesdealimentación Conecteestaunidadsóloalasfuentesde alimentación especificadas en el manual de instrucciones y como está marcado en la un...

Страница 23: ...e la unidad sólo como se recomienda en el manual de instrucciones Daños que necesitan ser reparados Haga que un técnico en reparaciones cualificado le repare las unidades si El cable de alimentación de CA o su clavija está estropeado Objetos extraños o líquidos han entrado en la unidad La unidad ha estado expuesta a la lluvia o al agua La unidad no parece funcionar normalmente La unidad muestra un...

Страница 24: ...al de su unidad mostrada en el panel trasero es una corriente alterna CA de 120 V Compruebe que la tensión nominal sea la misma que la empleada en su localidad IMPORTANTE Conecte primero los altavoces las antenas y todos los demás equipos opcionales Finalmente conecte el cable eléctrico de CA No existen diferencias entre los altavoces delanteros Puede conectarlos como L izq o R der indistintamente...

Страница 25: ... CONEXIÓN DE UNA ANTENA EXTERIOR Para una mejor recepción de la FM se recomienda utilizar una antena exterior Conecte la antena exterior a los terminales FM 75 Ω Para conectar otro equipo opcional página 18 PREPARACIONES MANDO A DISTANCIA Cómo insertar las baterías Abra la tapa de la parte trasera del mando a distancia y coloque dos baterías de tamaño AA R6 R6 AA Cuándo cambiar las baterías La máx...

Страница 26: ...a 2 Pulse f o g para designar la hora 3 Pulse a La hora deja de parpadear comenzando a hacerlo los minutos 4 Pulse f o g para designar los minutos 5 Pulse a para establecer los minutos y completar la configuración Los minutos dejan de parpadear y el reloj comienza a contar desde los 00 segundos Cómo corregir la hora actual Pulse POWER apagar la unidad Pulse a para que el reloj comience a parpadear...

Страница 27: ...máticamente a 20 ECUALIZADOR GRÁFICO Esta unidad proporciona las siguientes tres diferentes curvas de ecualización ROCK Sonidos potentes con realce de agudos y graves POP Mayor presencia de voces y gamas de registro medio JAZZ Frecuencias bajas acentuadas para la música tipo jazz Pulse uno de los siguientes botones ROCK POP o JAZZ para seleccionar la curva de ecualización deseada Ejemplo Al selecc...

Страница 28: ...sintonice una emisora Para detener manualmente la búsqueda automática pulse f o g La búsqueda automática tal vez no se detenga en emisoras con señales muy débiles RECEPCIÓN DE LA RADIO Cuando una emisión en FM estéreo contenga ruido Pulse MODE en el mando a distancia para que MONO se encienda en la pantalla Se reducirá el ruido aunque la recepción será monoaural MONO Para regresar a la recepción e...

Страница 29: ... almacenarse un máximo de 16 presintonías por banda Número de presintonía Frecuencia RECEPCIÓN MEDIANTE PRESINTONÍA 1 PulseTUNER BAND en el mando a distancia para seleccionar una banda Alternativamente pulse BAND en el mando a distancia 2 Pulse d Cada vez que pulse el botón se seleccionará el número de presintonía más alto siguiente Sintonización mediante presintonía 1 Pulse TUNER BAND para selecc...

Страница 30: ... continuando hasta el final de ese disco NOTA La unidad quizás no pueda reproducir un disco CD R RW que haya sido grabado en una computadora personal o algunos tipos de CD R RW debido a las diferencias en las plataformas de grabación No una ningún sellaje ni etiqueta a ningún lado lado de la etiqueta o lado de la grabación de un disco CD R RW Puede provocar un mal funcionamiento No utilice discos ...

Страница 31: ... d 2 1 4 1 Pulse MODE repetidamente de modo que M parpadee en la pantalla 2 Pulse los botones numerados para programar una pista Ejemplo Para seleccionar la pista nº 12 pulse 10 y 2 Para seleccionar la pista nº 20 pulse 10 10 y 0 3 Repita el paso 2 para programar otras pistas 4 Pulse c para iniciar la reproducción Cómo verificar el programa Cada vez que se pulse el botón g en modo de parada aparec...

Страница 32: ...ulse a Para reanudar la reproducción púlselo de nuevo Para cambiar el lado de reproducción pulse d en modo de reproducción Para hacer avanzar rápidamente la cinta o rebobinar pulse f o g en modo de parada A continuación pulse s para detener la cinta Cómo iniciar la reproducción con la unidad apagada Función de Reproducción Directa Pulse TAPE REV MODE La unidad se enciende y comienza la reproducció...

Страница 33: ... a Esta instrucción aplica cuando la fuente sea la radio o equipo conectado Para reiniciar la grabación pulse ese botón de nuevo INSERCIÓN DE ESPACIOS EN BLANCO La inserción de espacios en blanco de 4 segundos de duración puede ayudarle a localizar el principio de la pista al realizar la reproducción en otro equipo Esta instrucción aplica cuando la fuente sea la radio o equipo conectado 1 Pulse w ...

Страница 34: ...ra de la cinta También dispone de f y g para designar la longitud de la cinta 5 Pulse w para iniciar la grabación La cinta se rebobina hasta el principio de la cara delantera se reproduce el segmento inicial unos 10 segundos y comienza la reproducción Cuando termine la grabación en la cara delantera cara A comenzará la grabación en la cara de atrás cara B Cómo detener la grabación Pulse s La graba...

Страница 35: ...ramarse una pista cuyo tiempo de reproducción sea más largo que el tiempo restante 7 Pulse MODE para seleccionar la cara B y programe las pistas de la cara B Después de confirmar B en la pantalla repita el paso 5 8 Pulse w para iniciar la grabación La cinta se rebobina hasta el principio de la cara delantera se reproduce el segmento inicial unos 10 segundos y comienza la reproducción Cuando termin...

Страница 36: ... grabación del equipo conectado a las tomas AUX seleccione AUX 5 Seleccione la duración del período de activación del temporizador con f o g y pulse a La duración del período de activación del temporizador puede establecerse entre 5 y 240 minutos en pasos de 5 minutos 6 Prepare la fuente Para la reproducción con temporizador de un disco compacto cargue un disco compacto Para la reproducción con te...

Страница 37: ... de nuevo el temporizador desde el principio Cómo cancelar el modo de standby temporalmente Pulse TIMER SLEEP repetidamente para que TM OFF aparezca en pantalla 5 y 4 desaparecerán de la pantalla TEMPORIZADOR DE APAGADO f g a 1 2 3 La unidad puede apagarse automáticamente a la hora que determine Ud 1 PulseTIMER SLEEP para que aparezca SLEEP en pantalla 2 Antes de que pasen 4 segundos pulse a 3 Ant...

Страница 38: ...un cable con fonoconectores RCA para conectar equipo de audio tocadiscos reproductores LD VCRs etc Conecte el conector rojo a la toma R derecha y el conector blanco a la toma L izquierda Cuando conecte un tocadiscos Utilice un tocadiscos AIWA equipado con un amplificador ecualizador incorporado TOMA 3 SUPER WOOFER Conecte un subaltavoz realzador de graves con ecualizador integrado a esta toma AUDI...

Страница 39: ...en el paso 1 debido a un mal funcionamiento reiníciela desconectando el cable de alimentación de CA y repita el paso 2 SOLUCIÓN A PEQUEÑOS PROBLEMAS Si el aparato no funciona como se describe en el manual de instrucciones inspeccione los puntos de esta guía GENERAL No se escucha ningún sonido El cable de CA está bien conectado La conexión está mal hecha página 4 Se pulsó un botón de función incorr...

Страница 40: ...aspecto exterior están sujetos a cambios sin previo aviso DERECHOS DE AUTOR Consulte las leyes de los derechos de autor relacionadas con las grabaciones de discos programas de radio o cintas externas del país en el que se utilice la unidad NOTA Este equipo ha sido probado y se ha determinado que cumple con los límites de la Clase B de aparatos digitales de acuerdo con la Parte 15 de las Reglas de ...

Страница 41: ...CLEAR 9 10 15 wREC REC MUTE 13 15 f r t g TUNING DOWN UP 6 8 10 12 16 17 6 Portacasetes 12 7 PHONES 6 8 TIMER SLEEP 16 17 9 VOLUME UP DOWN 7 Nombre Página 0 Botones numerados 9 10 11 14 15 DISPLAY 6 EQ 7 MODE 8 10 11 14 15 BAND 8 9 POWER 6 16 cPLAY 5 11 sSTOP 6 9 15 f r t g SKIP SEARCH 6 8 10 12 16 17 REPEAT 11 FUNCTION 5 VOL k i 7 aPAUSE 6 9 10 12 13 16 17 ÍNDICE DE LOS COMPONENTES 0 GENERAL 8 9 ...

Страница 42: ...el quelques heures avant d essayer à nouveau de le faire fonctionner 8 Montage mural ou au plafond Cet appareil ne doit pas être monté au mur ou au plafond sauf indication contraire dans le Mode d emploi Alimentation 1 Sources d alimentation Raccordez cet appareil à une des sourcesélectriquesspécifiéesdansleModed emploi etcomme indiqué sur l appareil 2 Polarisation Comme caractéristique de sécurit...

Страница 43: ...reil seulement comme indiqué dans ce Mode d emploi Dommages exigeant une réparation Faites réparer l appareil par un réparateur qualifié si Le cordon ou la prise d alimentation sont endommagés Un matériau étranger ou du liquide a pénétré dans l appareil L appareil a été exposé à la pluie ou à l eau L appareil ne semble pas fonctionner correctement L appareil présente un changement de performance i...

Страница 44: ... panneau arrière est de 120 V c a Vérifiez qu elle correspond à la tension secteur locale IMPORTANT Raccordez d abord les enceintes les antennes et tous les autres appareils en option Puis raccordez le cordon d alimentation secteur en dernier Il n y a pas de différence entre les enceintes avant Elles peuvent être raccordées indifféremment aux prises L gauche et R droite 1 Raccordez les cordons d e...

Страница 45: ...ntenne cadre AM PRÉPARATIFS RACCORDEMENT D UNE ANTENNE EXTÉRIEURE L emploi d une antenne extérieure est recommandé pour améliorer la réception FM Raccordez l antenne extérieure aux bornes FM 75 Ω Pour raccorder un autre appareil en option page 18 TÉLÉCOMMANDE Insertion des piles Détachez le couvercle du logement des piles au dos de la télécommande et insérez deux piles format AA R6 R6 AA Quand rem...

Страница 46: ...sur a L heure clignote 2 Appuyez sur f ou g pour désigner les heures 3 Appuyez sur a L heure s arrête de clignoter et les minutes commencent à clignoter 4 Appuyez sur f ou g pour désigner les minutes 5 Appuyez sur a pour régler les minutes et compléter le réglage Les minutes s arrêtent de clignoter et l horloge démarre à 00 secondes Pour corriger l heure en cours Appuyez sur POWER pour mettre hors...

Страница 47: ...iquement réglé à 20 ÉGALISEUR GRAPHIQUE Cet appareil offre les trois différents types de courbe d égalisation suivants ROCK Son puissant avec aigu et grave accentués POP Plus grande présence des voix et du registre médium JAZZ Fréquences plus basses accentuées pour la musique de type jazz Appuyez sur l une des touches suivantes ROCK POP ou JAZZ pour sélectionner la courbe d égalisation souhaitée E...

Страница 48: ...e station Pour arrêter la recherche automatique manuellement appuyez sur l une des touches f ou g La recherche automatique risque de ne pas s arrêter aux stations dont les signaux sont très faibles RÉCEPTION RADIO Quand une émission FM stéréo contient des parasites Appuyez sur MODE sur la télécommande pour que MONO s allume dans l afficheur Les parasites sont réduits mais la réception est monaural...

Страница 49: ...un maximum de 16 stations préréglées Numéro de préréglage Fréquence ACCORD D UNE STATION PRÉRÉGLÉE 1 Appuyez surTUNER BAND pour sélectionner une bande Ou appuyez sur BAND sur la télécommande 2 Appuyez sur d Chaque pression de la touche sélectionnera le numéro de préréglage ascendant suivant Accord par numéro de préréglage 1 Appuyez sur TUNER BAND pour sélectionner une bande 2 Appuyez sur les touch...

Страница 50: ...in du disque REMARQUE Il se peut que l appareil ne lise pas de disque CD R RW enregistré sur des ordinateurs personnels ou certains types de CD R RW enregistreurs à cause des différentes plate formes d enregistrement Ne joignez aucun cachet ni étiquette sur aucune des deux faces face avec étiquette ou face d enregistrement de disques CD R RW Cela pourrait provoquer un mauvais fonctionnement N util...

Страница 51: ...sieurs fois sur MODE afin que M clignote dans l afficheur 2 Appuyez sur les touches numérotées pour programmer une piste Exemple Pour sélectionner la piste 12 appuyez sur 10 et 2 Pour sélectionner la piste 20 appuyez sur 10 10 et 0 3 Répétez l opération 2 pour programmer d autres pistes 4 Appuyez sur c pour démarrer la lecture Pour vérifier le programme À chaque pression de g en mode d arrêt un nu...

Страница 52: ...ur changer de face de lecture appuyez sur d dans le mode de lecture Pour avancer ou reculer rapidement appuyez sur f ou g dans le mode d arrêt Appuyez ensuite sur s pour arrêter la cassette Pour démarrer la lecture quand l appareil est hors tension Fonction de Lecture Directe Appuyez sur TAPE REV MODE L appareil se met sous tension et la lecture de la cassette insérée commence Pour régler le compt...

Страница 53: ...ture de cette source Pour arrêter l enregistrement appuyez sur s Pour arrêter temporairement l enregistrement appuyez sur a Applicable quand la source est la radio ou un appareil raccordé Pour reprendre l enregistrement appuyez à nouveau INSERTION D ESPACES VIERGES Des espaces vierges de 4 secondes peuvent être insérés à l emplacement souhaité lors de l enregistrement Applicable quand la source es...

Страница 54: ...e f et g sont également valables pour désigner la longueur de bande 5 Appuyez sur w pour démarrer l enregistrement La cassette est rebobinée depuis le début de la face dirigée vers le haut l amorce est lue pendant 10 secondes et l enregistrement démarre À la fin de l enregistrement sur la face dirigée vers le haut face A l enregistrement sur la face contraire face B démarre Pour arrêter l enregist...

Страница 55: ...est plus long que le temps restant ne peut être programmée 7 Appuyez sur MODE pour sélectionner la face B et programmez les pistes pour la face B Après la confirmation de B dans l afficheur répétez l opération 5 8 Appuyez sur w pour démarrer l enregistrement La cassette est rebobinée depuis le début de la face dirigée vers le haut l amorce est lue pendant 10 secondes et l enregistrement démarre À ...

Страница 56: ...la lecture enregistrement temporisés d un appareil raccordé aux prises AUX sélectionnez AUX 5 Sélectionnez la durée pour la période d activation par minuterie avec f ou g et appuyez sur a La durée pour la période d activation par minuterie peut être réglée entre 5 et 240 minutes par unités de 5 minutes 6 Préparez la source Pour la lecture temporisée d un CD chargez le CD Pour la lecture temporisée...

Страница 57: ...e de la minuterie depuis le début Pour annuler temporairement le mode d attente temporisé Appuyez plusieurs fois sur TIMER SLEEP afin que TM OFF s affiche 5 et 4 disparaissent de l afficheur MINUTERIE DE SOMMEIL f g a 1 2 3 Vous pouvez couper l alimentation de l appareil automatiquement à une heure précise 1 Appuyez sur TIMER SLEEP afin que SLEEP apparaisse dans l afficheur 2 Dans les 4 secondes a...

Страница 58: ...ises RCA pour raccorder un appareil audio tourne disques lecteurs LD magnétoscopes etc Raccordez la fiche rouge à la prise R droite et la fiche blanche à la prise L gauche Au raccordement d un tourne disque Utilisez un tourne disque à amplificateur égaliseur intégré AIWA PRISE 3 SUPER WOOFER EXTRÊME GRAVE Raccordez à cette prise une enceinte d extrême grave alimentée optionnelle munie d un amplifi...

Страница 59: ...ent réinitialisez en déconnectant le cordon secteur et répétez l opération 2 GUIDE DE DÉPANNAGE Vérifiez les points suivants si l appareil ne fonctionne pas comme indiqué dans ce mode d emploi GÉNÉRALITÉS Absence de son Le cordon d alimentation secteur est il raccordé correctement N y a t il pas un mauvais raccordement page 4 Une touche de fonction erronée a t elle été pressée Le son devient inaud...

Страница 60: ...érieur sont sujets à modifications sans préavis DROITS D AUTEUR Veuillez vérifier les lois concernant les droits d auteur des enregistrements des disques de la radio ou de cassettes extérieures du pays dans lequel cet appareil est utilisé REMARQUE Cet appareil a été testé et jugé conforme aux limites des appareils numériques de Classe B conformément à la Partie 15 des Règles FCC Ces limites sont c...

Страница 61: ... 12 sCLEAR 9 10 15 wREC REC MUTE 13 15 f r t g TUNING DOWN UP 6 8 10 12 16 17 6 Logement à cassette 12 7 PHONES 6 8 TIMER SLEEP 16 17 9 VOLUME UP DOWN 7 Nom Page 0 Touches numérotées 9 10 11 14 15 DISPLAY 6 EQ 7 MODE 8 10 11 14 15 BAND 8 9 POWER 6 16 cPLAY 5 11 sSTOP 6 9 15 f r t g SKIP SEARCH 6 8 10 12 16 17 REPEAT 11 FUNCTION 5 VOL k i 7 aPAUSE 6 9 10 12 13 16 17 INDEX 0 GÉNÉRALITÉS 8 9 5 6 7 4 ...

Страница 62: ...Printed in China For assistance and information call toll free 1 800 BUY AIWA United States and Puerto Rico ...

Отзывы: