background image

PREP

ARA

TION

27

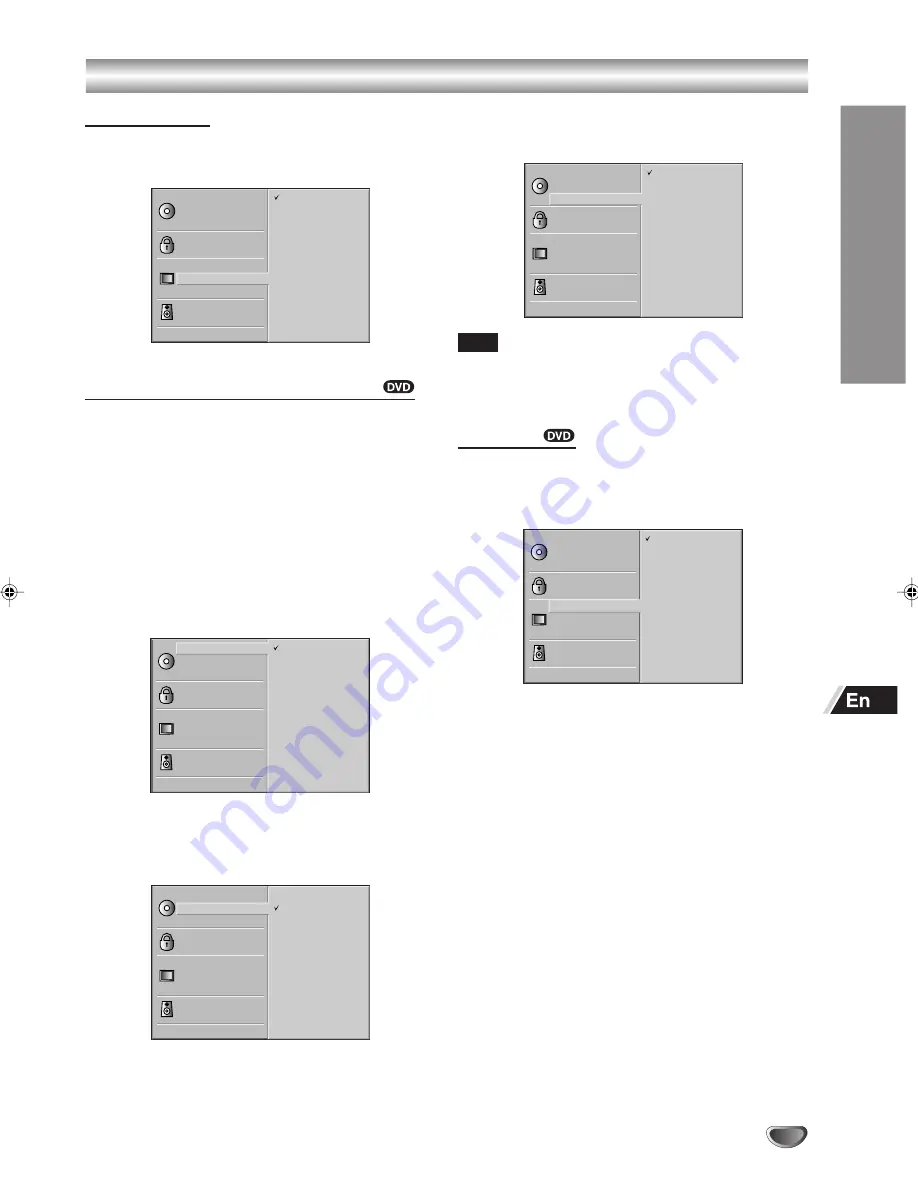
Menu Language

You choose what languages are displayed for the
setup menu.

Disc Subtitle

Disc Menu

Rating

TV Aspect

Menu Language

Digital Audio Output

Disc Audio

Others

Country Code

Progressive Scan

English

Italian

Spanish

French

German

Portuguese

Disc Audio / Disc Subtitle / Disc Menu 

You can set the default language for Disc Audio, Disc
Subtitle and Disc Menu. Other and Original are also
available.

Original:

 The original language set for the disc.

Other:

 To select a language not listed use 

i

+/

k

– to

select Other _ _ _ _. Input a 4-digit number for the
language you want (see “Language Code List” on
page 56) and press OK/ENTER.

Disc Audio

All 8 languages, Original and Other

Disc Subtitle

Disc Menu

Rating

Country Code

TV Aspect

Menu Language

Digital Audio Output

Disc Audio

Others

Original

Spanish

English

Chinese

Polish

Hungarian

French

German

Italian

Other  – – – –

Disc Subtitle

All 8 languages, Off, Original and Other

Off

Other  – – – –

Disc Subtitle

Disc Menu

Rating

TV Aspect

Menu Language

Digital Audio Output

Disc Audio

Others

Country Code

Progressive Scan

Original

Spanish

English

Chinese

Polish

Hungarian

French

German

Italian

Disc Menu

All 8 languages, Original and Other

Original

Spanish

English

Chinese

Polish

Hungarian

French

German

Italian

Other  – – – –

Disc Subtitle

Disc Menu

Rating

TV Aspect

Menu Language

Digital Audio Output

Disc Audio

Others

Country Code

Note

Language selection for Disc Audio, Disc Subtitle and Disc
Menu may not be available on the DVD and so will not be
displayed even though you have selected them.

TV Aspect 

Select the appropriate display format, depending on
whether you are using a conventional (4:3) or wide-
screen (16:9) TV.

4:3 Letterbox

4:3 Panscan

16:9 Wide

Disc Subtitle

Disc Menu

Rating

TV Aspect

Menu Language

Digital Audio Output

Disc Audio

Others

Country Code

Progressive Scan

4:3 Letterbox:

Select when a standard 4:3 TV is connected. The
theatrical images with masking bars above and below
the picture are displayed.

4:3 Panscan:

Pictures cropped to fill your TV screen are displayed.
The right and left edges of the picture are cut off.

16:9 Wide:

Select when a 16:9 wide TV is connected.

Before Operation – DVD Part (Continued)

 PM/HV-DH1(EH)/Eng/25-31

4/16/03, 5:03 PM

27

Содержание HV-DH10

Страница 1: ...PAL 9 885 031 37 2003 Sony Corporation DVD Player Stereo Video Cassette Recorder HV DH10E ...

Страница 2: ... to be operated in a horizontal position only Keep the unit and discs away from equipment with strong magnets such as microwave ovens or large loudspeakers Do not place heavy objects on the unit Do not place the unit on surfaces rugs blankets etc or near materials curtains draperies that may block the ventilation slots Caution For use of the VCR Television programs films video tapes and other mate...

Страница 3: ...24 Before Operation DVD Part 25 General Explanation 25 On Screen Display 25 Initial Settings 26 Operation Operation with Tape 32 Playing a Tape 32 One Touch Recording OTR 33 ShowView Programming 34 Timer Recording Using On Screen Display 36 Copying from DVD to VCR 38 Recording from another Video Recorder 38 On Screen Display 39 Turning On Off the On Screen Display 39 Child Lock 39 REC End Search 4...

Страница 4: ...mat MP3 format that conforms to ISO9660 Level 1 Level 2 or its extended format Joliet JPEG format that conforms to ISO9660 Level 1 Level 2 or its extended format Joliet Data part of CD Extras DVD R RWs DVD RWs in VR mode DVD ROMs DVD Audio discs HD layer on Super Audio CDs A logical format of files and folders on CD ROMs defined by ISO International Standard Organization Also the unit cannot play ...

Страница 5: ...on developed by Macrovision Copy protection signals are recorded on some discs When recording and playing the pictures of these discs on a VCR picture noise will appear This product incorporates copyright protection technology that is protected by method claims of certain U S patents and other intellectual property rights owned by Macrovision Corporation and other rights owners Use of this copyrig...

Страница 6: ...obtain a clear picture This unit is a high tech precision device If the optical pick up lens and disc drive parts are dirty or worn the picture quality will be poor Regular inspection and maintenance are recommended after every 1 000 hours of use This depends on the operating environment For details please contact your nearest dealer Before Use Continued Notes on Discs Handling Discs Do not touch ...

Страница 7: ... u z EJECT button i AV 3 IN VIDEO L AUDIO R o REC button 0 a PAUSE button 1 g fast forward button 2 f rewind button 3 CHANNEL buttons 4 Remote Sensor 5 Display window 6 DVD VIDEO select button TRK COPY VCR REC PM TV DVD q w e r t y u i o q DVD indicator w Disc indicator e Repeat indicator r TIMER indicator t Tape indicator y VCR indicator u REC indicator i TV indicator o Total playing time elapsed...

Страница 8: ...r q AERIAL antenna input jack w EURO AV2 DECODER jack e DVD VIDEO OUT AUDIO L R jacks r DVD EXCLUSIVE OUT AUDIO L R jacks t COAXIAL audio output jack DVD EXCLUSIVE OUT y EURO AV1 AUDIO VIDEO VIDEO IN OUT DVD OUT jack u RF OUT DVD VIDEO OUT jack Do not touch the inner pins of the jacks on the rear panel Electrostatic discharge may cause permanent damage to the unit ...

Страница 9: ...EN CLOSE button w DVD select button e I 6 POWER button r DISC MENU button t OK ENTER button y vRETURN button u sSTOP button i t SLOWT button o C PLAY button 0 PROGRAM button 1 CLEAR button 2 SEARCH button 3 MARK button 4 ZOOM button 5 A B repeat button 6 RANDOM button 7 REPEAT button 8 ANGLE button 9 C LOCK button 0 SUBTITLE button 1 AUDIO button 2 Numeric buttons 0 9 3 r button 4 aPAUSE button 5 ...

Страница 10: ... the VIDEO button q z EJECT button w VIDEO select button e I 6 POWER button r INPUT SELECT button t REC END SEARCH button y OK ENTER button u wREC button i sSTOP button o t SLOWT button 0 C PLAY button 1 CLEAR button 2 SHOWVIEW button 3 SP LP button 4 CM SKIP button 5 C LOCK button 6 AUDIO button 7 Numeric buttons 0 9 8 r button 9 aPAUSE FRAMEF button 0 i SETUP button 1 CH TRACKING i k j l left ri...

Страница 11: ...ontrol for a long period of time Using the Remote Control Point the remote control toward the remote sensor 30 30 7m Remote sensor Notes The remote control may not operate when there is any obstruction between the remote control and the remote sensor Strong ambient light sources such as a fluorescent lamp or direct sunlight may cause unreliable operation Using a TV with the same type of infrared r...

Страница 12: ...his unit 2 Connect the supplied antenna cord to the RF OUT DVD VIDEO OUT jack on this unit and the aerial jack on your TV 3 Connect the optional 21 pin scart cord to the EURO AV1 AUDIO VIDEO jack on this unit and the 21 pin scart jack on your TV 4 Connect the AC power cord to the AC outlet Notes All connections should be made with both the unit and your TV unplugged from the AC outlet If your TV h...

Страница 13: ... on the TV screen Refer to the TV operating instructions for tuning Whenever you want to play back a tape select this channel position If there is interference on the picture wavyline picture roll etc 1 During power off press and hold CHANNEL or on the front panel for more than 4 seconds RF 36 appears on the display window and the following picture will be displayed on the TV screen i RF CHANNEL 3...

Страница 14: ...scart cord to the EURO AV2 DECODER jack on this unit and the 21 pin scart jack on your Pay TV satellite receiver cable box or decoder Notes If your satellite receiver or cable box has more than two scart jacks use the TV jack to connect to this unit and not the VIDEO jack Otherwise you may not receive a proper picture If you connect this unit to a cable box or satellite receiver please refer to th...

Страница 15: ...M or Stream PCM for that input Otherwise set the output to PCM see Initial Settings on page 28 for details DO NOT select DOLBY DIGITAL PCM or Stream PCM for the Digital Audio Output setting in the setup menu when connecting to an AV receiver not equipped with a Dolby Digital or DTS decoder with a coaxial connecting cord Merely attempting to play a disc may cause a screeching noise that could be ha...

Страница 16: ...DEO OUT COAXIAL DVDEXCLUSIVE OUT Audio cord not supplied to the audio input L R jacks Additional Connections Continued Connecting to an AV Receiver Equipped with a Dolby Pro Logic Decoder Connect the Left and Right DVD EXCLUSIVE OUT AUDIO jacks on this unit to the audio left right in jacks on your AV receiver ...

Страница 17: ...n this unit and the audio input jacks on your stereo system L R VIDEO OUTPUT AUDIO OUTPUT AV 3 IN REC L AUDIO R VIDEO CHANNEL Jack panel of Accessory Front of the unit Accessory Component VCR Camcorder Video Camera Satellite Receiver Laser Disc Player Accessory Audio Video A V Connections to the Unit Connect the AV 3 IN jacks on the unit to the audio video out jacks on your accessory component usi...

Страница 18: ...tions in your area A scan bar appears on the TV screen 01 C02 00 ARD E S i Pr12 ACMS In about ten minutes after the unit has finished setting the VCR channels and time a list of channels appears on the screen 02 C03 00 ZDF 03 C04 00 WDR 3 04 C05 00 BR3 05 C06 00 HR3 06 C07 00 N 3 07 C08 00 NDR 3 08 C09 00 SWF3 01 C02 00 ARD OK i DELETE MOVE PSET R The name of the TV station is displayed if the bro...

Страница 19: ...ock setting see p 23 SYSTEM To set the Color TV System see p 42 ABC OSD To change the language setting for OSD see p 24 f OSD ON OFF Turn the on screen display on or off see p 39 16 9 4 3 To select the aspect ratio of your TV see p 42 DECODER To use a Pay TV decoder or Satellite with the unit see p 24 OPR To improve the playback picture see p 33 NIC To activate or deactivate the NICAM digital soun...

Страница 20: ... 09 00 PSET R C10 i OK ZDF WDR 3 BR3 HR3 N 3 NDR3 SWF3 ARD 7 Press i k to select a station name from the list Press OK ENTER to select it If your station name isn t on the list do not press OK ENTER but go to step 8 PR CH MFT 09 00 PSET R C10 i OK ZDF WDR 3 BR3 HR3 N 3 NDR3 SWF3 ARD 8 You can change a TV station name manually rather than using the standard names Press l Press i k to select letters...

Страница 21: ...04 05 C06 00 PR 05 06 C07 00 PR 06 07 C08 00 PR 07 08 C09 00 PR 08 01 C02 00 PR 01 OK i DELETE MOVE PSET R 4 Press i k to select the program number you want to move for example PR 03 then press l C04 00 PR 03 02 C02 00 PR 01 PR 02 C03 00 04 C05 00 PR 04 05 C06 00 PR 05 06 C07 00 PR 06 07 C08 00 PR 07 08 C09 00 PR 08 01 OK i 03 PSET R 5 Press i k to select the program number you want to move to for...

Страница 22: ... 08 C09 00 PR 08 01 C02 00 PR 01 OK i DELETE MOVE PSET R 4 Press i k to select the program number you want to delete for example PR 03 C04 00 PR 05 02 C02 00 PR 01 C03 00 PR 02 04 C05 00 PR 03 05 C06 00 PR 04 06 C07 00 PR 06 07 C08 00 PR 07 PR 08 08 C09 00 01 03 OK i DELETE MOVE PSET R 5 Press j After a short while the selected station will be deleted If you wish to delete other TV stations repeat...

Страница 23: ... enter the tens digit and then press the buttons 1 through 9 to enter the ones digit You can also select the hour using i k then press l Please note the unit uses a 24 hour clock e g 1pm will be displayed as 13 00 HH MM DD MM YY i 1 2 TIME DATE 5 Set the minutes day month and year in the same way as in step 4 The day of the week will appear automatically when you enter the year If you make a mista...

Страница 24: ... DEUTSCH FRANCAIS ITALIANO ESPAÑOL DUTCH i 5 Press i SETUP to return to the normal screen Using the Pay TV Decoder When the Pay TV decoder is connected to the EURO AV2 DECODER jack on the rear set DECODER in the menu to ON 1 Press VIDEO to switch out to the VCR 2 Press i SETUP and the main menu will appear 3 Press j l to select the DECODER then press OK ENTER REC SYS TEM A B C OSD OSD ON OFF OSD f...

Страница 25: ... Shows the current audio soundtrack language j l AUDIO and Digital Audio encoding method and channel number and Output mode changes the setting Subtitle language 1 ENG Shows the current subtitles language and j l SUBTITLE changes the setting Angle 1 1 Shows the current angle number and j l ANGLE changes the angle number Sound NORM Shows the current sound mode and j l changes the setting On screen ...

Страница 26: ...VD 2 Press i SETUP The setup menu appears Disc Subtitle Disc Menu Rating Country Code TV Aspect Menu Language Digital Audio Output Disc Audio Others Original Spanish English Chinese Polish Hungarian French German Italian Other 3 Select the desired item with i k then press l to move to options Disc Subtitle Disc Menu Rating Country Code TV Aspect Menu Language Digital Audio Output Disc Audio Others...

Страница 27: ... Language Digital Audio Output Disc Audio Others Country Code Progressive Scan Original Spanish English Chinese Polish Hungarian French German Italian Disc Menu All 8 languages Original and Other Original Spanish English Chinese Polish Hungarian French German Italian Other Disc Subtitle Disc Menu Rating TV Aspect Menu Language Digital Audio Output Disc Audio Others Country Code Note Language selec...

Страница 28: ...TS or other special decoder DO NOT select DOLBY DIGITAL PCM or Stream PCM for the Digital Audio Output setting in the setup menu when connecting to an AV receiver not equipped with a Dolby Digital or DTS decoder with a coaxial connecting cord Merely attempting to play a disc may cause a screeching noise that could be harmful to your ears and damage the speakers Be sure to select PCM for the Digita...

Страница 29: ...difference between the loudest and the quietest sounds so that you can listen to a movie or music at a low volume without losing the clarity of sound On Select this to play a disc at a low volume Off Select this to play a disc without DRC Note DRC only works for analog audio outputs of the unit while playing a DVD recorded in Dolby Digital AC 3 Format Before Operation DVD Part Continued PBC Playba...

Страница 30: ...function with DVDs which do not contain parental control information Parental control does not function if the parental control information on the DVD does not match the country code setting next page 1 Select Rating on the setup menu using i k then press l 8 7 6 5 4 3 2 1 Change Disc Subtitle Disc Menu Rating TV Aspect Menu Language Digital Audio Output Disc Audio Others Country Code Progressive ...

Страница 31: ...Code on the setup menu using i k then press l Code Set Disc Subtitle Disc Menu Rating TV Aspect Menu Language Digital Audio Output Disc Audio Others Country Code Progressive Scan U S 2 Carry out step 2 of Rating on the previous page 3 Press i k to select the first character of the country code and press l Refer to the country code list on pages 54 and 55 4 Press i k to select the second character ...

Страница 32: ... protection tab removed playback of the cassette will start automatically 3 Press aPAUSE FRAMEF to still a picture Press aPAUSE FRAMEF repeatedly to advance the tape frame by frame Tapes can be paused for up to 5 minutes After 5 minutes the unit will stop the tape to prevent damaging the tape or the unit Still picture quality can be improved slightly by pressing CH TRACKING i k 4 Slow motion Durin...

Страница 33: ...ates Long Play LP which enables you to record up to twice the amount of time on a video cassette For example an E 180 will record up to 180 minutes using Standard Play SP using LP you will be able to record up to 360 minutes Please note there will be a slight loss in picture and sound quality when using LP 1 Make sure that you have correctly connected the unit as described earlier in this book Tur...

Страница 34: ...TV guide magazines they can vary one to nine numbers in length 1 Press VIDEO to switch out to the VCR 2 Make sure that TV channels have been tuned and stored in correct ShowView order Insert a video cassette with protection tab into the unit 3 Press SHOWVIEW ONCE OK i 0 9 SHOWVIEW REC 4 Press i k to select the recording type ONCE To record once DAILY To record every day except Saturday and Sunday ...

Страница 35: ...V screen in step 2 7 programs are already set Cancel an unnecessary program Video Program System VPS The Video Program System VPS ensures that the TV program that you have programmed for timer recording will be recorded exactly from their beginning to end even if the actual broadcasting time differs from the scheduled time due to delayed start or if the program is extended beyond its scheduled tim...

Страница 36: ...SP SP i 6 Press the numeric buttons to enter the station that you wish to record When selecting stations 1 9 press 0 first then the channel number for example Stations 3 03 You may also select Channels by pressing i k Once selected press l If you wish to record from the EURO AV 1 2 or AV 3 IN jacks press INPUT SELECT to select for correct display AV1 AV2 or AV3 PR DATE TIME SP SP SP SP SP SP PR 01...

Страница 37: ... timer program list and PROGRAM FULL appear on the TV screen in step 4 7 programs are already set Cancel an unnecessary program Delete or change the settings in timer event memory If at a later date you wish to delete or change any of the settings in timer event memory you may do so without having to enter all the timer event information again 1 Display the timer event screen 2 Press i k to select...

Страница 38: ...s sSTOP to end the copy You must stop the Copy process manually when the DVD movie ends or the unit may replay and record over and over again Operation with Tape Continued Recording from another Video Recorder With this unit you can make recordings from an external source such as copying from another video recorder or a camcorder Note In the following description this unit will be one used for rec...

Страница 39: ...the On Screen Display Set the OSD off when dubbing a tape to another tape 1 Press i SETUP and the main menu will appear 2 Press j l to select the f OSD ON OFF then press OK ENTER REC OK i SYS Pr12 ACMS TEM OSD ON OFF OSD f 16 9 4 3 OPR DECO DER NIC PSET R 1 2 TIME DATE OSD ON OFF OSD f A B C OSD 3 Press i k to select ON or OFF REC SYS Pr12 ACMS TEM OSD ON OFF OSD f 16 9 4 3 OPR DECO DER NIC PSET R...

Страница 40: ... j or l repeatedly during playback Each press varies the playback speed gradually as follows Press The VCR switches l once forward playback at twice speed l twice forward search j once forward slow motion playback j twice still j 3 times reverse playback j 4 times reverse playback at 3 times speed j 5 times reverse search During still Press j or l repeatedly during still Each press varies the play...

Страница 41: ... sound is recorded on the Hi Fi tracks and the mono track of the video tape without any separation 2 Press AUDIO repeatedly until the desired audio mode appears The choice is STEREO LEFT RIGHT and MONO In BIL NICAM playback the primary language is output on the left channel and the secondary channel is output simultaneously from the right channel when audio output is set to STEREO The primary lang...

Страница 42: ...k and recording Normal format recordings 4 3 16 9 Only for playing back and recording Wide Screen format recordings 16 9 NIC REC i Pr12 ACMS PSET R 1 2 TIME DATE OSD ON OFF OSD f 16 9 4 3 16 9 4 3 OPR SYS TEM A B C OSD DECO DER AUTO 4 3 16 9 5 Press i SETUP to return to the normal screen To Set the Color System Normally the AUTO setting is sufficient If the playback picture color is abnormal selec...

Страница 43: ...u screen If Rating is set and the disc is not within the rating settings not authorized the 4 digit password must be entered and or the disc must be authorized see Rating on page 30 DVDs may have a region code Your unit will not play discs that have a region code different from your unit The region code for this unit is 2 About the Symbol Display may appear on the TV screen during operation This i...

Страница 44: ...nother title as follows 1 Press DISPLAY 2 Press i k to select title icon 3 Press j l to select a title number or enter the number of a title The newly selected title begins Moving to another CHAPTER TRACK 1 28 1 10 When a title on a disc has more than one chapter or a disc has more than one track you can move to another chapter track as follows Press r or t briefly during playback to return to the...

Страница 45: ...TV screen 2 Press A B again at your chosen end point A B appears briefly on the TV screen and the repeat sequence begins 3 To cancel the sequence press A B Still Picture and Frame by frame Playback 1 Press aPAUSE during playback The unit will now go into PAUSE mode 2 You can advance the picture frame by frame by pressing aPAUSE repeatedly on the remote control 3 To return to playback press C Searc...

Страница 46: ...reen display The appears in the Time Search box 3 Within 10 seconds use the number buttons to enter the required start time Enter hours minutes and seconds from left to right in the box If you enter the wrong numbers press CLEAR to remove the numbers you entered Then enter the correct numbers 4 Within 10 seconds press OK ENTER to confirm the start time Playback starts from the selected time on the...

Страница 47: ...1 9 MARKER SEARCH 1 2 3 4 5 6 7 You can start playback from a memorized point Up to 9 points can be memorized To enter a mark follow these steps 1 During disc playback press MARK when playback reaches the spot that you want to memorize The Marker icon will appear on the TV screen briefly 2 Repeat step 1 to enter up to 9 Marker points on a disc To Recall a Marked Scene 1 During disc playback press ...

Страница 48: ...ill stop at the end of the disc or the last track within a folder 4 To stop playback at any other time press sSTOP Pause 1 Press aPAUSE during playback 2 To return to playback press C or aPAUSE Moving to another Track Press r or t briefly during playback to go to the next track or to return to the beginning of the current track Press r twice briefly to step back to the previous track Or select the...

Страница 49: ...ct Select NORM in step 3 above Notes on MP3 Discs About MP3 An MP3 file is audio data compressed by using MPEG1 the audio layer 3 file coding scheme We call files that have the mp3 file extension MP3 files The unit cannot read an MP3 file that has a file extension other than mp3 The unit cannot read a fake MP3 file that has a file extension mp3 MP3 disc compatibility with this unit is limited as f...

Страница 50: ... Clear All TRACK 5 TRACK 3 TRACK 10 TRACK 7 7 Press i k to select a track to start playback on the program list To move to the next page press TOP MENU To move to the previous page press DISC MENU 8 Press C or OK ENTER Playback starts from the selected track in the programmed order Playback stops after the last programmed track on the program list has been played To return to normal playback Press...

Страница 51: ...3 Press i k to select a JPEG file To move to the next page press TOP MENU To move to the previous page press DISC MENU JPEG jpg Off 1024X683 Slide Speed 1 300 DSCF 0001 DSCF 0002 DSCF 0003 DSCF 0004 DSCF 0005 DSCF 0006 DSCF 0007 A preview of each file selected from the list of the left is displayed on the right and directory information is displayed at the bottom of the screen 4 Press C or OK ENTE...

Страница 52: ...e Place the disc with the playback side down Place the disc on the disc tray correctly inside the guide Clean the disc Cancel the Rating function or change the rating level Point the remote control at the remote sensor of the unit Operate the remote control within 7 m Remove the obstacle Replace the batteries with new ones When using a VCR first press the VIDEO button When using a DVD first press ...

Страница 53: ...is off Unit INPUT SELECT is not set to AV3 Clock in the unit is not set to correct time Timer has been programmed incorrectly The unit is in Timer Recording mode Moisture Condensation Moisture condensation can occur In locations where moisture condensation may occur When the unit is moved from a cold place to a warm Keep the unit plugged into an AC outlet with POWER On place This will help prevent...

Страница 54: ...lkland Islands FM Micronesia FO Feroe Islands FR France FX France European Territory Code Country GA Gabon GB Great Britain GD Grenada GE Georgia GF French Guyana GH Ghana GI Gibraltar GL Greenland GM Gambia GN Guinea GP Guadeloupe French GQ Equatorial Guinea GR Greece GS S Georgia S Sandwich Isles GT Guatemala GU Guam USA GW Guinea Bissau GY Guyana HK Hong Kong HM Heard and McDonald Islands HN Ho...

Страница 55: ...SI Slovenia SJ Svalbard and Jan Mayen Islands SK Slovak Republic SL Sierra Leone SM San Marino SN Senegal SO Somalia SR Suriname ST Saint Tome and Principe SU Former USSR SV El Salvador SY Syria SZ Swaziland TC Turks and Caicos Islands TD Chad TF French Southern Territories TG Togo TH Thailand TJ Tadjikistan TK Tokelau TM Turkmenistan Code Country TN Tunisia TO Tonga TP East Timor TR Turkey TT Tri...

Страница 56: ...an 8076 Polish 8084 Portuguese 8185 Quechua 8277 Rhaeto Romance 8279 Romanian 8285 Russian 8377 Samoan 8365 Sanskrit 7168 Scots Gaelic 8382 Serbian 8372 Serbo Croatian 8378 Shona 8368 Sindhi Code Language 8373 Singhalese 8375 Slovak 8376 Slovenian 8379 Somali 6983 Spanish 8385 Sudanese 8387 Swahili 8386 Swedish 8476 Tagalog 8471 Tajik 8465 Tamil 8484 Tatar 8469 Telugu 8472 Thai 6679 Tibetan 8473 T...

Страница 57: ... 33 35 mm sec LP 16 67 mm sec EP 11 12 mm sec Rewind time Approx 1 min with E 180 tape Specifications Channel coverage VHF E02 E12 UHF E21 E69 CATV S01 S41 RF output 66 dBµ Video input 1 0 Vp p 75 ohm unbalanced Video output 1 0 Vp p 75 ohm unbalanced Horizontal resolution 240 lines at SP Video S N 43 dB at SP Audio track 3 tracks Hi Fi sound 2 tracks Normal sound 1 track Audio input 6 dBs 47 K oh...

Страница 58: ...Sony Corporation Printed in Indonesia http www aiwa com ...

Отзывы: