background image

17

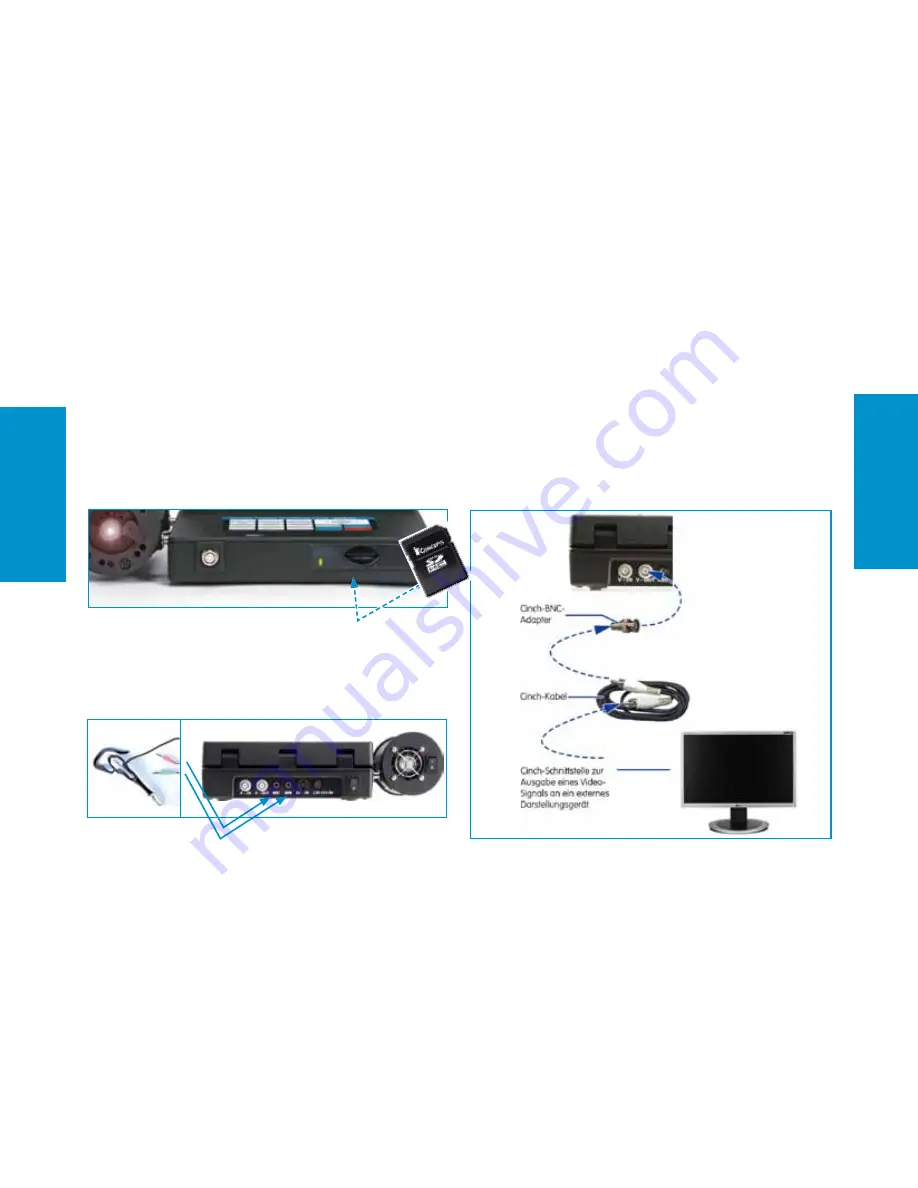
Inserting a SD Card

Put  a  formatted  SD  Card(32  GB  max.)  into  to  SD 

Card slot. The SD Card included in the scope of de-

livery is already properly formatted.

Connecting a Headset

Establish following connections:

- Microphone Plug (pink) to MIC Socket

- Headphones Plug (green) to SPK Socket.

Connecting Output Devices

Different  output  devices  can  be  connected  to  the 

Video-  OUT  socket  by  using  the  Cinch  Cable  and 

the  Cinch/BNC  Adapter  included  in  the  scope  of 

delivery:

Preparing the iTool

Содержание iTool

Страница 1: ...1 Operation Manual iTool Digital Video Recorder Zoom 1 0x Flip N Integr Standard 11 9 ...

Страница 2: ... 20 Image Control 21 Format SD Card 22 Setting Time and Date 23 Creating and saving Image Captures Choosing a Standard Setting 24 Image Capture and Video Recording in Mode OFF 25 Image Capture and Video Recording in Mode ON 26 Comparative Measuring with the iTool 28 Playback of saved Images and Recordings 29 Optimising Camera Settings Camera Setting 32 Camera Setting Standard 33 Camera Setting Sho...

Страница 3: ...Series Videoscope and an iPack iCase or iCaseplus The diversity of inspection objects materials and lightning conditions often makes it difficult to get high quality images It is easy to adjust the iTool to your application to receive optimal inspection images even in extreme situations Always keep the Operation Manual with the iTool It contains all information for safe and efficient operation How...

Страница 4: ...lication Electric Shock No unauthorised opening of the casing There is high danger of electric shock due to Parts being under voltage Caution Never look directly into the light emitting part of the Videoscope or of the Light Source There is ultraviolet and infrared as well as highly intense visible light coming from the Light Source These can cause injuries of eyes and skin Always switch off the L...

Страница 5: ... switch off the iTool before connecting a Videoscope or a Video Camera Take care that there always is enough free space for ventilation behind and in front of the iTool The iTool is not watertight Operate the iTool in dry environment only The iTool is not water proof and must not be immerged into water Only use the iTool as intended Warning Notices and Precautions ...

Страница 6: ...lus Components see figure on the right You will find additional Accessories in this Operation Manual on Page 39 in our Accessories Catalogue or on our Homepage under www itcworld de We are certainly pleased being at your disposal for personal consulting as well Scope of Delivery BNC Cinch Adapter 5 pin Cable short AC Adapter Screwdriver Cinch Cable Card Reader Power Supply Cable SD Card ...

Страница 7: ... dark cavities Videos and images are shown on the TFT Display Overlay texts can be attached to them Video recordings can also be saved with additional audio comments System Presentation TFT Display Keypad SD Card Slot Zoom 1 0x Flip N Integr Standard 11 9 Status Indicator Line 24W Metal Halide Light Source Light Guide Connector Brightness Control 5 pin Connector for Videoscope or Camera Overview i...

Страница 8: ...System Presentation BNC Connector IN for Videoscope or Camera BNC Connector OUT for Hard Disk Monitor etc Microphone Connector 12V DC Input S Video IN Headphones Connector Overview iTool ...

Страница 9: ... to open it completely For cleaning of the distal end or changing the Objective switch of the Light Source or remove the Light Guide Cable from it The Metal Halide Lamp installed needs 30 seconds from engaging to generate full and steady luminance An untimely 30sec power down extremely reduces the durability of the lamp or can even lead to its destruction High Voltage Danger to Life Always have a ...

Страница 10: ...System Presentation The iTool Control Panel Using the control panel you can navigate through the menu structure select and confirm functions ...

Страница 11: ...ANDARD INTEGRATION Automatic optimisation of the Camera Settings SHORT INTEGRATION Optimised Camera Settings for low lighting conditions LONG INTEGRATION Optimised Camera Settings for very low lighting conditions MANUAL INTEGRATION Individual Camera Settings TEXT Open Text Generator Input via alpha numeric keypad arrow keys and OK button MENU Open Close On Screen Menu MEMORY Open Quit Memory Mode ...

Страница 12: ...14 System Presentation Videoscope Light Guide Connector Camera 5pin Cable SD Card iTool Interfaces ...

Страница 13: ...S Video IN Headset Camera S Video IN cable Camera Cinch Cable BNC Cinch Adapter Monitor Cinch Cable BNC Cinch Adapter AC Adapter Battery Belt Cigarette Lighter Cable iTool Interfaces ...

Страница 14: ...20 240V shockproof socket As an option the iTool can be energised by the po werBelt Art Nr 900 06000 0030 V or a Vehicle Electric System Car Battery Cable 900 05000 0004 or Cigarette Lighter Cable 900 00002 0012 Install eines iSeries Videoendoscops Plug the Light Guide Connector in the Light Source until engagement Connect the iSeries Videoscope to the 5pin Video Cable black to white Connect the i...

Страница 15: ...roperly formatted Connecting a Headset Establish following connections Microphone Plug pink to MIC Socket Headphones Plug green to SPK Socket Connecting Output Devices Different output devices can be connected to the Video OUT socket by using the Cinch Cable and the Cinch BNC Adapter included in the scope of delivery Preparing the iTool ...

Страница 16: ...The boot sequence is visible on the TFT Display Switch off the iTool but not the Light Source when connecting a new device or chan ging the device and switch it on afterward Menu Structure and Operation After having followed the steps before you may start inspection now Using the control panel you can select and control functions A detailed description can be found on pages 12 13 Starting Inspecti...

Страница 17: ...Italian To change the language set proceed as follows MENU System Setting OK Select Language the menu is directly shown in the selected language to quit press MENU again Starting Inspection Status Line ON Freeze Frame OFF Language English Date Time Press OK SD info Press OK SD format Press OK Fabric Settings Press OK Software Status P010 55 Serial Number 20110815 Language English Image Control Cam...

Страница 18: ...System Setting Safety remove SD System Setting Status Line ON Freeze Frame OFF Language English Date Time Press OK SD info Press OK SD format Press OK Fabric Settings Press OK Software Status P010 55 Serial Number 20110815 Fabric Settings Press OK Image Control Camera Control Annotation Dimension System Setting Safety remove SD System Setting Status Line ON Freeze Frame OFF Language English Date T...

Страница 19: ...he OK Button Caution The image parameters set are effective to the image displayed as well as to all images and videos to be saved Images and videos will be saved exactly as they are displayed except for Dimming TFT Display Notice The above mentioned image settings can also be adjusted directly via the iTool keypad except for Dimming TFT Display Starting Inspection Image Control Camera Control Ann...

Страница 20: ...tem SD format and press OK again Now a confirmation prompt appears on the display Select by using the arrow keys and press OK to confirm Starting Inspection Image Control Camera Control Annotation Dimension System Setting Safety remove SD System Setting Status Line ON Freeze Frame OFF SD format Press OK Date Time Press OK SD info Press OK SD format Press OK Fabric Settings Press OK Software Status...

Страница 21: ...m Setting and press OK By using the arrow keys now choose the menu item Date Time and press OK again Set Time and Date by using the arrow keys and press OK to confirm Starting Inspection Image Control Camera Control Annotation Dimension System Setting Safety remove SD System Setting Status Line ON Freeze Frame OFF SD format Press OK Date Time Press OK SD info Press OK SD format Press OK Fabric Set...

Страница 22: ...ame and select ON or OFF Notice With the text generator you have the possibi lity to add commentary a single line with 40 charac ters to all images Creating and saving Image Captures Image Control Camera Control Annotation Dimension System Setting Safety remove SD System Setting Status Line ON Freeze Frame OFF Language English Date Time Press OK SD info Press OK SD format Press OK Fabric Settings ...

Страница 23: ...Nr 1 Einzelbild OFF Creating and saving Image Captures Image Capture iSeries iTool iTool Start Stop Video Recording iSeries Image captures can be saved during proceeding as follows Standard Setting No 1 Freeze Frame OFF ...

Страница 24: ...ozen appears on the screen Back to Live Mode Text input possible Save Image 1 short Push Push 1 x iTool Save Image Push 1 x 1 long Push iTool Image freeze Frozen appears on the screen Back to Live Mode 1 short Push Push 1 x 1 long Push Standard Setting No 2 Freeze Frame ON ...

Страница 25: ...t maybe inserted before Video starten und stoppen Push 1 x Save image Push 1 x iTool iTool Save image 1 long Push iSeries Pause Continue Video Push 1 x iTool Pause Continue Video 1 short Push Start Video Stop recording Push 1 x ...

Страница 26: ...lag displayed in white to one side of the geometry Press OK to switch between the flags and lead the second flag to the end of the geo metry When both flags are on the desired positions press CALIBRATION The Calibration Window opens Please insert the measure as value in front of the and the unit e g mm behind of it End Calibration by pressing RECORD The inserted unit now appears in the display To ...

Страница 27: ... x 480 pixel Location Folder Picture Video Format avi Resolution 800 x 600 pixel Location Folder HVR Subfolder DAY Unterordner HOUR Name All files images as well as video recordings are named by the system Each image and video recor ding gets an automatically created name consisting of date and time Playback of saved Images and Recordings 4 000 MM 2011 04 05 10 25 45 IT CONCEPTS INSPEKTION ...

Страница 28: ... folder structure by using the arrow keys and the OK button Playback of saved Images and Recordings BROWSER SD HVR 1 Folders 0 File 0KB HVR PICTURE BROWSER SD HVR File Browser HVR 0429 HVR 1 Folders 0 File 0KB 0430 BROWSER SD HVR 0430 File Browser HVR 11 HVR 1 Folders 0 File 0KB 10 ...

Страница 29: ...fter having selected the desi red file you may control by means oft he arrow keys and the OK button as follows OK Start Stop Pause a recording Left Rewind Right Fast forward Cancel Quit Additionally you have the possibility to choose further functions in the context menu Playback of saved Images and Recordings BROWSER SD HVR 0430 10 File Browser T20111910172205 AVI 5MB HVR 1 Folders 0 File 0KB T20...

Страница 30: ...Camera Control and press OK Choose the desired Camera Setting by using the arrow keys Note The above mentioned Camera Settings can as well be selected by using the irect action keys on the control panel Optimising Camera Settings Kameraeinstellung Standard Detector Type Mean Manual Shutter 50 Manual Gain 50 AGC Level 50 Gamma 2 White Balance Press OK Image Control Camera Control Annotation Dimensi...

Страница 31: ... an alternative light source affords to execute a white balance to have the colours optimal displayed 1 For this hold the distal end of the videoscope in front of a white non reflecting sheet of paper 2 Switch on the light source 3 Put the distal end in a position where no irradiations are visible in the picture 4 Select the feature Whitebalance and confirm by pressing OK 5 Now hold OK until the w...

Страница 32: ...ring and adjusts the signal bright ness based on the measured brightness and the AGC level set Detector type PEAK The camera control system adjusts the image brightness depending on the brightest line detected Application Better per ceptibility of details in image areas with high bright ness AGC level Auto Gain Control This feature adjusts the optimal image brightness with the bright ness adjustme...

Страница 33: ...the measured brightness and the AGC level set Detector type PEAK The camera control system adjusts the image brightness depending on the brightest line detected Application Better perceptibility of details in image areas with high brightness AGC level Auto Gain Control This feature adjusts the optimal image brightness with the brightness adjustment level being predefined by the AGC level high valu...

Страница 34: ... sensor This allows image capture at poor lighting conditions Manual gain Setting image brightness by adjusting the signal gain But this will increase electric signal noise and reduce image quality Gamma With the Gamma correcting the video signal can be optimized regarding brightness and contrast Optimising Camera Settings Kameraeinstellung Standard Detector Type Mean Manual Shutter 50 Manual Gain...

Страница 35: ... least 3 minutes until the lamp has cooled down Open the cover on the front of the light source by releasing the two cross drive screws Pull out the cover of the lamp socket until the plug of the metal halide lamp is visible Remove the plug from the defective metal halide lamp and move the lamp sideways off the socket At this mind the nib on the ceramic ring Maintenance Caution Do not touch Reflec...

Страница 36: ... crossdrive screws in the threads and tighten them After having replaced the 24W Metal Halide Lamp it is necessary to execute a white balance as described on page 40 Cleaning the iTool The iTool should be cleaned regularly For this always use a soft an clean cloth or cotton swaps soaked with common dilution of water and neutral ph solution non detergent I ein 0 aus 1 2 cut power supply tighten scr...

Страница 37: ...in Cable Type I Cinch Video Cable with BNC Adapter USB Memory Card Reader Operation Manual Connector Cables and Supplies 900 05000 0026 USB Memory Card Reader 830 00001 0003 4 GB SD Memory Card 930 00500 0003 P Video Cable Typ I0 3 5 Pin to 5 Pin 0 3m 930 00500 0019 P Video Cable Typ I1 0 5 Pin to 5 Pin 1 0m 930 00500 0001 P Video Cable Typ I1 8 5 Pin to 5 Pin 1 8m ...

Страница 38: ...003 V Power Supply 12V DC 5 5A 900 05000 0004 Car Battery Connector Cable 900 05000 0006 Cigarette Lighter Plug Connector Cable 900 06000 0030 V powerBelt Battery Belt incl charger and connector cable Carrying Solution 900 00002 0004 standardBelt with clip system 900 06000 0030 V powerBelt Battery Belt incl charger and connector cable 900 00002 0012 maxhold lockable Inspection Arm for iTool and En...

Страница 39: ...elp us to efficiently execute any maintenance or repair of the product we ask you to contact us directly Thank you Contact Service Tel 1 321 610 8977 Advanced Inspection Technologies Inc www aitproducts com ...

Отзывы: