


AirVelocity 1500 Installation Guide
DUG01560
Airspan Commercial and Internal Use
28
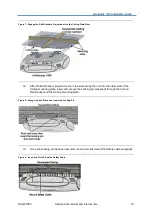
Option 2
– installation on the outside of a window
1. Remove the paper from one side of the double sided sticker and attach the sticker on the
back side of the antenna.
2. Thoroughly clean the area of the window where you intend to attach the GPS antenna.
3. Remove the paper from the other side of the sticker and fix the antenna on the outside of the
window. Verify there are no obstacles blocking the window and the outside (so the antenna
can access
“clear sky”).
Position the antenna either on a sealed (un-openable) window or close to the
hinged
side.
4. Drill a hole near the window to pass the 10m RF cable through. Make sure to leave enough
RF cable on the outside so the window can be opened without applying any strain on the RF
cable.
5. Connect the 10m RF cable to the antenna. Make sure to firmly tighten the SMA connector.
6. Seal the hole with a sealing material (RTV or similar).
7. Route the cable to the base station and connect it to the GPS port on the base station. Make
sure to firmly tighten the SMA connector.
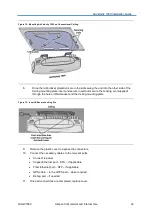
Option 3
– installation on a mounting bracket
1. Take the supplied bracket and attached it to the wall using one or two screws and appropriate
wall plugs (screws are not supplied).
2. Remove the paper from one side of the double sided sticker and attach the sticker on the
back side of the antenna.
3. Remove the paper from the other side of the sticker and mount the antenna on the bracket.
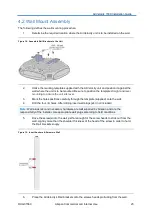
4. Verify there are no obstacles blocking the antenna and there are
“clear sky” conditions.
5. Drill a hole near the bracket to pass the 10m RF cable through. Make sure to leave enough
RF cable on the outside so there isn’t any strain on the RF cable.
6. Connect the 10m RF cable to the antenna. Make sure to firmly tighten the SMA connector.
7. Route the cable to the base station and connect it to the base station GPS port. Make sure to
firmly tighten the SMA connector.