background image

7

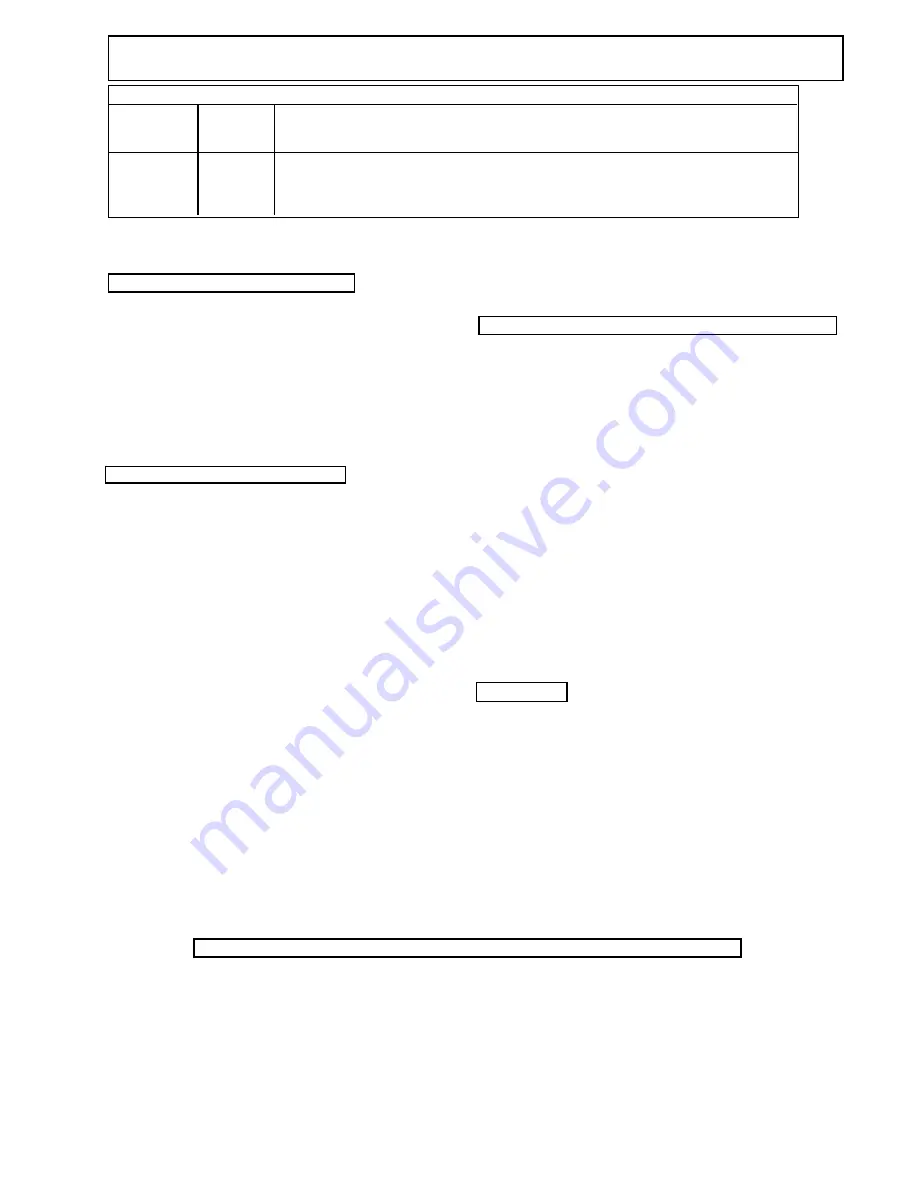
UL RECOMMENDATION FOR MINIMUM GAUGE EXTENSION CORD

AMPERAGE
RATING
RANGE

5 - 6
6 - 8
8 - 10
10 - 12

VOLTAGE

120
120
120
120

500

Always follow recommended pressure and operating
instructions.

KEEP CLEAR OF MOVING PARTS

Keep clear of moving parts when starting or operating
the sprayer. Do not put your iginfers into any openings
to avoid amputation by moving parts or burns on hot parts.
Precaution is the best insurance against an acci-
dent.  When starting the motor, maintain a safe
distance from moving parts of the equipment.
Before adjusting or servicing any mechanical part of
the sprayer, follow the PRESSURE RELIEF PROCE-
DURE on page 6.

AVOID COMPONENT RUPTURE
This sprayer operates at 3000 psi (205 bar).  Always
be sure that all components and accessories have a
maximum working pressure of at least 3000 psi to avoid
rupture which can result in serious bodily injury includ-
ing injection and property damage.
NEVER leave a pressurized sprayer unattended to avoid
accidental operation of it which could result in serious
bodily injury.
ALWAYS follow the PRESSURE RELIEF PROCEDURE
whenever you stop spraying and before adjusting, re-
moving or repairing any part of the sprayer.
NEVER alter or modify any part of the equipment to
avoid possible component rupture which could result in
serious bodily injury and property damage.
NEVER use weak or damaged or non-conductive paint
hose. Do not allow kinking or crushing of hoses or allow
it to vibrate against rough or sharp or hot surfaces.
Before each use, check hoses for damage and wear
and ensure all fluid connections are secure.
REPLACE any damaged hose. NEVER use tape or any
device to mend the hose.
NEVER attempt to stop any leakage in the line or fit-
tings with your hand or any part of the body. Turn off
the unit and release pressure by following PRESSURE
RELIEF PROCEDURE,

ALWAYS use approved high pressure fittings and re-
placement parts.
ALWAYS ensure fire extinquishing equipment is readily
available and properly maintained.

PREVENT STATIC SPARKING FIRE/EXPLOSIONS

ALWAYS be sure all equipment & objects being sprayed
are properly grounded. Always ground sprayer, paint
bucket and object being sprayed. See grounding on
page 6 for grounding information.

Vapors created when spraying can be ignited by sparks.
To reduce the risk of fire, always locate the sprayer at
least 20 feet (6 m.) away from spray area. Do not plug
in or unplug any electrical cords in the spray area, which
can create sparks, when there is any chance of ignit-
ing vapors still in the air. Follow the coating & solvent
manufacturers safety warnings and precautions.

Use only conductive fluid hoses for airless applications.
Be sure gun is grounded through hose connections.
check ground continuity in hose & equipment. Overall
(end to end) resistance of unpressurized hose must not
exceed 29 megohms for any coupled length or combi-
nation of hose length. Use only high pressure airless
hoses with static wire approved for 3000 psi.

FLUSHING

Reduce the risk of injection injury, static sparking or
splashing by following the specific cleaning process.
ALWAYS  follow the PRESSURE RELIEF PROCEDURE
on page 6.
ALWAYS remove the spray tip before flushing. Hold a
metal part of the gun firmly to the side of a metal pail
and use the lowest possible fluid pressure during flush-
ing.
NEVER use cleaning solvents with flash points below
140 degrees F. Some of these are: acetone, benzene,
ether, gasoline, naptha. Consult your supplier to be sure.
NEVER SMOKE in the spraying/cleaning area.

WHEN SPRAYING & CLEANING WITH FLAMMABLE PAINTS AND THINNERS

1. When spraying with flammable liquids, the unit must be located a minimum of 25 feet away from the spraying
area in a well ventilated area. Ventilation must be sufficient enough to prevent the accumulation of vapors.
2. To eliminate electrostatic discharge, ground the spray unit, paint bucket & spraying object. See GROUNDING
on pg. 6. Use only high pressure airless hoses approved for 3000 psi which is conductive.
3. Remove spray tip before cleaning gun and hose. Make contact of gun with bucket and spray without the tip in
a well ventilated area, into the grounded steel bucket.
4. Never use high pressure in the cleaning process. USE MINIMUM PRESSURE.
5. Do not smoke in spraying/cleaning area.

50

100

150

250

200

25

18
18
18
16

16
16
14
14

12
10
10

8

10
10

8

8

10

8
8
6

300

8
6
6
6

400

8
6
6
4

6
6
4
4

12
12
12
10

WARNINGS

Содержание slow stroker II 3600SL

Страница 1: ......

Страница 2: ......

Страница 3: ...g oil base paint flush with mineral spririts only Before using water base paint flush with mineral spirits followed by soapy water then a clean water flush 2 Changing Colors Flush with a compatible so...

Страница 4: ...o Fig 2 9 Allow the pump to operate until clean solvent comes from the gun 10 Release the trigger and engage the gun safety latch 11 If you are going to start spraying place the suction tube into the...

Страница 5: ...s recommendations 3 Place the suction tube into the material container 4 Starting the Sprayer See Fig 5 above a Prime Valve must be open priming position b Pressure control knob must be in Low Pressur...

Страница 6: ...only after the tip is removed from the gun Follow the Pressure Relief Procedure on Page 6 8 When shutting off the sprayer a Whenever you stop spraying even for a short break follow the Pressure Relie...

Страница 7: ...before each use MEDICAL TREATMENT If any fluid appears to penetrate your skin get EMERGENCY CARE AT ONCE DO NOT TREAT AS A SIMPLE CUT Go to an emergency room immediately Tell the doctor you suspect a...

Страница 8: ...mber the heavier the cord 2 Air Hoses use only grounded hoses 3 Fluid hose use only grounded hoses 4 Spray gun or dispensing valve grounding is ob tained through connection to a properly grounded flui...

Страница 9: ...roperly grounded Always ground sprayer paint bucket and object being sprayed See grounding on page 6 for grounding information Vapors created when spraying can be ignited by sparks To reduce the risk...

Страница 10: ...ats on spray tip are laigned with ears of tip guard spray tip is installed properly when flats recess into tip guard cavity FIG A RELEASED TRIGGER LOCK SAFETY LATCH LOCKED Insert tip guard Place tip g...

Страница 11: ...run or sag Do not wave the spray gun This waving is called arching Instead hold the spray gun at a 12 to 15 inch distance perpendicular from the work If you are not familiar with spraying techniques...

Страница 12: ...NPAINTCOATOVERLAPHALF THEWIDTHOFEACHPAINTSTROKE TOTAL SPRAYGUN MOVEMENT arm movement full sweep TRIGGER POINT TRIGGER POINT The Actual Paint Stroke Adjust pressure control knob so that paint is comple...

Страница 13: ...ication too heavy Reduce pressure and or use tip in next larger nozzle group Coating fails to Material too viscous Thin cautiously close smooth over Spray pattern irreg Orifice clogged Clean carefully...

Страница 14: ...ART NO DESCRIPTION Tungsten Carbide Spray Tip See Spray Tip Selection Tip Holder with Guard Deliberately Omitted Tip Washer Screw 3 Guard Valve Seat Complete Valve Ball with Holder Valve Spring Unit S...

Страница 15: ...a 3 16 nut driver on front of valve spring unit and turn clockwise tightening the valve spring unit until you feel a positive stop At that point continue tightening the valve spring another 1 8 turn...

Страница 16: ...005 Guard 120 044 Trigger 120 008 Tip Washer 120 045 Retainer Pin 122 009 Valve Spring Unit 120 046 Washer 120 020 Retainer 120 048 Lock 120 021 Nut 120 049 Retaining Ring 120 082 Seal 120 055 Wave W...

Страница 17: ...gun movement and distance to surface SPRAY TIP SELECTION Two tips having the same tip size but different pattern widths will deliver the same amount of paint over a different area wider or narrower st...

Страница 18: ...e future required inspection Standard Leeson brushes have an initial length of 1 and 1 4 When the brushes are worn to a length of 5 8 they should be replaced TO CHANGE THE BRUSHES 1 Unplug the machine...

Страница 19: ...cement pump operates but paint pres sure is too low or none The displacement pump oper ates but the output is too low on the downstroke or both strokes The displacement pump oper ates but the output i...

Страница 20: ...pressure control unit board is defective and must be replaced STEP 7 If the green light is ON the power source circuit breaker and thermal coupler are okay Use a multimeter to test the resistance bet...

Страница 21: ...IBRATION 1 Attach a 50 1 4 airless hose airless gun with 0 017 tip and a 5000 psi pressure guage to the pump 2 Place the suction tube into a bucket of Coro chek and water 3 Turn Prime pressure relief...

Страница 22: ...DC Motor 4100 3600 Toggle Switch 35A Circuit Breaker 1 2 3 4 5 1 3 4 6 7 8 9 10 2 5 ELECTRICAL SYSTEM GRN WHT BLK BLK BLK BLK BLK WHT RED RED BLK WHT LCDZERO PRESSURE MASTER VOLTAGE SENSOR NOT USED 11...

Страница 23: ...age 20 for wiring diagram REPLACEMENT OF THERMAL CIRCUIT BREAKER 1 Ensure that the machine is OFF and unplugged 2 Detach the pressure control unit from the frame by unscrewing the eight screws 3 Unplu...

Страница 24: ...46 Slide sleeve over coupling halfs Secure with retaining ring 189 048 4 Secure the fluid pump housing to the tie rods 100 328 and screw locknuts with washers on loosely 5 Tighten the tie rod locknuts...

Страница 25: ...valve nut 187 018 off the pump and remove lower check valve 4 Loosen the packing nut and push the piston rod down and out of the housing 5 Place rod holder Part No 187 248 in a vise Slide the rod int...

Страница 26: ...024 f Slide on distance tube 187 315 g Three Belleville Spring 187 031 starting with the first spring facing down and next facing up and the third facing down h Slide on upper male gland 187 025 with...

Страница 27: ...25 FLUID PUMP 187 310 FIG 10...

Страница 28: ...6 7 5 4 3 3 2 1 10 9 8 7 6 5 3 4 3 2 1 FIG 13 PARTS LIST ITEM NO PART NO DESCRIPTION 1 2 3 4 5 6 7 8 9 10 141 008 301 545 301 516 301 544 100 165 188 377 100 128 100 012 100 126 100 385 Inlet Straine...

Страница 29: ...sure Control Ass y Not part of Paint System FIG 15 PARTS LIST PN 301 395 ITEM NO PART NO DESCRIPTION PAINT SYSTEM PN 301 395 Plug 1 4 NPT 4 Bowl Spring Screen Support O ring Head Swivel 3 8 NPS M X 1...

Страница 30: ...SPRAYER FIG 16 1 2 3 4 5 6 41 7 12 60 16 14 15 13 63 26 27 28 29 31 32 33 36 37 38 61 62 54 55 56 39 67 35 42 66 20 46 47 50 49 48 64 16 30 57 58 59 45 18 19 21 25 22 23 24 44 10 11 65 43 8 51 52 53...

Страница 31: ...Screw 6 Grommet 6 Retaining Ring Woodruff Key Power Cord Spacer Tube 2 Stud 2 Washer Lock 2 Nut 2 Bracket Return Tube Screw 3 Screw 3 Nut Sheave Set Screw 4 Key Cover Frame Pressure Control Ass y PCA...

Отзывы: