background image


INSTRUCTIONS FOR INSTALLATION AND USE 


Ceiling Fan Model Cosmos (FN71132) 


BEFORE YOU START


Proper use:   

-

  This product is intended exclusively for non-commercial use as ceiling fan. 

-

  The product has to be installed and used in accordance with these instructions. 

-

  Any use of this product that is not in accordance with these instructions will void the legal 

warranty of the manufacturer. 

Please keep the original carton and packaging material as the warranty will only be honored if product 

is returned in complete original packaging. 


FOR YOUR OWN SAFETY


General safety instructions: 

-

  For the safe use of this product, you need to have read and understood these instructions 

before installing or using the product. 

-

  Please follow all safety instructions! If you ignore these safety instructions, you will endanger 

yourself and others. 

-

  Keep these instructions for future reference. 

-

  All parts of this product have to be installed properly in order to ensure safe operation. 

-

  Modification of the product and use of non-approved parts are prohibited. 

-

  This product is not intended for use by persons (including children) with reduced physical, 

sensory or mental capabilities, or lack of experience and knowledge, unless they have been 
given supervision or instruction concerning the use of the product by a person responsible for 
their safety. Children should be supervised to ensure that they do not play with the product. 


Electrical safety: 

-

  The electrical installation must be performed by a qualified electrician and must be in 

accordance with national and local regulations. 

-

  Use a fault-current circuit breaker with a rated residual current of no more than 30 mA. 

-

  Make sure to install an all-pole disconnection switch having a contact separation of at least 

3mm between poles in the supply wiring to the ceiling fan. 

-

  Before connecting the appliance to the electrical grid, make sure that it will only be operated 

within the specified parameters. 

-

  The fan must be properly grounded to avoid the risk of electric shocks. 

-

  Switch off the power before connecting, repairing or cleaning the fan. 

-

  Install only bulbs of the type intended for your fan. 


Storage and transport: 

-

  Always store the fan in a dry environment. 

-

  Protect the fan from damages during transport. 


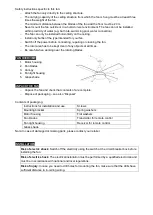
Содержание Cosmos

Страница 1: ...do por personas niños incluidos que tengan las capacidades sensoriales o psíquicas limitadas ni por personas con poca experiencia o conocimientos a menos que sean supervisadas o hayan recibido instrucciones en relación con el uso del producto por una persona responsable de su seguridad Los niños deben estar supervisados para asegurarse de que no juegan con el producto Seguridad eléctrica La instal...

Страница 2: ... Palas del ventilador 3 Embellecedor 4 Caja de la lámpara 5 Pantalla de cristal DESEMBALAJE DEL VENTILADOR Desembale el ventilador y compruebe que el contenido está completo Tire el embalaje Véase también el apartado Tratamiento de residuos Contenido del embalaje Instrucciones de instalación y uso Tornillos Soporte de montaje Arandelas de resorte Caja del motor Arandelas planas Palas del ventilado...

Страница 3: ...la regleta y están atornillados Nota a La regleta en el gráfico está preinstalada en la caja de montaje b Los cables de conducción de la casa pueden tener colores diferentes puede que no haya disponible una condución por toma de tierra c No separe en ningún caso el hilo gris del sensor 5 1 Ajuste dos tornillos del paquete de herramientas en el fondo del soporte de montaje 5 2 Guarde todos los cabl...

Страница 4: ...ador Riesgo de daños Antes de cambiar la dirección de rotación del ventilador este se ha de apagar y dejar que se detenga por completo Compruebe que el ventilador está en buen estado para su funcionamiento Revise y asegúrese de que no hay defectos visibles Verifique que todas las piezas están correctamente instaladas y unidas Mando a distancia El mando a distancia requiere una pila de 12 Voltios T...

Страница 5: ...cuando el receptor registre una tensión de más de 80W en el motor se interrumpirá de forma autmática el suministro elétrico y el funcionamiento se paralizará Para encender de nuevo el ventilador desconcecte este de la corriente eléctrica y concecte de nuevo al cabo de 5 segundos LIMPIEZA Riesgo de daños Desconecte siempre la corriente desde el interruptor automático principal y espere hasta que el...

Страница 6: ...el ventilador No llega corriente Revise el interruptor automático Las pilas del mando a distancia están gastadas Coloque pilas nuevas El ventilador vibra El ventilador no está instalado adecuadamente Instálelo siguiendo rigurosamente las instrucciones de instalación La luz no funciona La bombilla está defectuosa Cambie la bombilla Si no puede resolver el fallo usted mismo póngase en contacto con s...

Страница 7: ...ts are prohibited This product is not intended for use by persons including children with reduced physical sensory or mental capabilities or lack of experience and knowledge unless they have been given supervision or instruction concerning the use of the product by a person responsible for their safety Children should be supervised to ensure that they do not play with the product Electrical safety...

Страница 8: ...rotating blades FAN OVERVIEW 1 Motor housing 2 Fan blades 3 Canopy 4 Fan light housing 5 Glass shade UNPACK THE FAN Unpack the fan and check that contents of are complete Dispose of packaging see also Disposal Contents of packaging Instructions for installation and use Screws Mounting bracket Spring washers Motor housing Flat washers Fan blades Transmitter for remote control Fan light housing Rece...

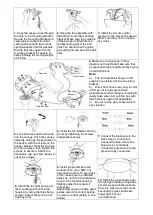
Страница 9: ...sor wire in any situation 5 Tuck all wires and the antenna into the canopy Push the canopy upwards lining up the keyholes on the bottom with the screws on the hanger bracket Twist the Canopy to lock it in place then tighten the screws to secure it Attach the decorative cap up to the canopy to cover the screws 6 Install the fan blades onto the motor by tightening the screws and washers evenly 7 Con...

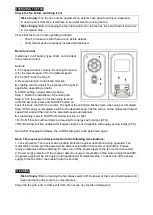
Страница 10: ... completed Step 3 After setup is completed switch to the desired speed The fan will run on the highest and lowest speed first and will then turn to the selected speed automatically 6 Light setting selects On Off or Dimming function for light D On Off function without dimming required for energy saving lamps CFL ON Dimming function enabled for tungsten lamps not compatible with energy saving lamps ...

Страница 11: ...st malfunctions are caused by small errors which you can easily resolve by yourself Please check the following table before contacting your retailer This way you can spare yourself a lot of effort and cost Malfunction Underlying cause error Solution Fan does not turn Fan switched off Switch on fan No mains voltage Check circuit breaker Batteries of remote control empty Install new batteries Fan vi...

Страница 12: ...reien Betrieb sicherzustellen Umbauten eigenmächtige Veränderungen am Gerät sowie die Verwendung nicht zugelassener Teile sind untersagt Kinder Personen mit eingeschränkten geistigen Fähigkeiten sowie Personen mit mangelnder Kenntnis oder Erfahrung im Umgang mit dem Deckenventilator sind vom Gerät fernzuhalten Elektrische Sicherheit Eine Elektroinstallation darf nur durch eine Elektrofachkraft unt...

Страница 13: ... Abdeckung 4 Leuchtengehäuse 5 Leuchtenschirm 6 Richtungsschalter AUSPACKEN Gerät auspacken und auf Vollständigkeit prüfen Verpackung entsorgen siehe auch Entsorgung Lieferumfang Installations und Bedienungsanleitung Schrauben Montagebügel Federringe Deckenventilator Unterlegscheiben Rotorblätter Fernbedienung Auswucht Kit Empfänger für Fernbedienung Leuchtenschirm Hinweis Sollte eines der Teile f...

Страница 14: ... Unterseite des Montagebügels durch die Öffnungen in der Abdeckung ragen Arretieren Sie nun die Abdeckung indem Sie sie leicht drehen und sichern Sie sie indem Sie die beiden Schrauben anziehen Befestigen Sie nun den Abdeckring an der Abdeckung 6 Befestigen Sie die Rotorblätter mit den Schrauben und Unterlegscheiben an der Unterseite des Motors Ziehen Sie die Schrauben gleichmäßig an 7 Schließen S...

Страница 15: ...entilators zweimal kurz auf Schritt 3 Nach erfolgter Einstellung wählen Sie die gewünschte Geschwindigkeit Der Deckenventilator läuft zunächst auf höchster und niedrigster Geschwindigkeit und schaltet dann automatisch auf die von Ihnen gewählten Geschwindigkeit 6 Licht Einstellung wählt An Aus oder Dimmfunktion für das Licht je nach Leuchtmitteltyp D An Aus Funktion ohne Dimmung erforderlich für E...

Страница 16: ...ühren Meistens können Sie diese leicht selbst beheben Bitte sehen Sie zuerst in der folgenden Tabelle nach bevor Sie sich an den Verkäufer wenden So können Sie sich viel Mühe und eventuell auch Kosten ersparen Fehler Störung Ursache Abhilfe Gerät läuft nicht Gerät ausgeschaltet Gerät einschalten Keine Netzspannung Sicherung prüfen Batterien der Fernbedienung leer Neue Batterien einsetzen Gerät vib...

Отзывы: