AIPTEK PocketCam 4000 Скачать руководство пользователя страница 38

2. Connecting your camera to your 

computer

36

Set the 

Mode dial

 on your camera to        ,      ,      or       .

Turn on your computer.
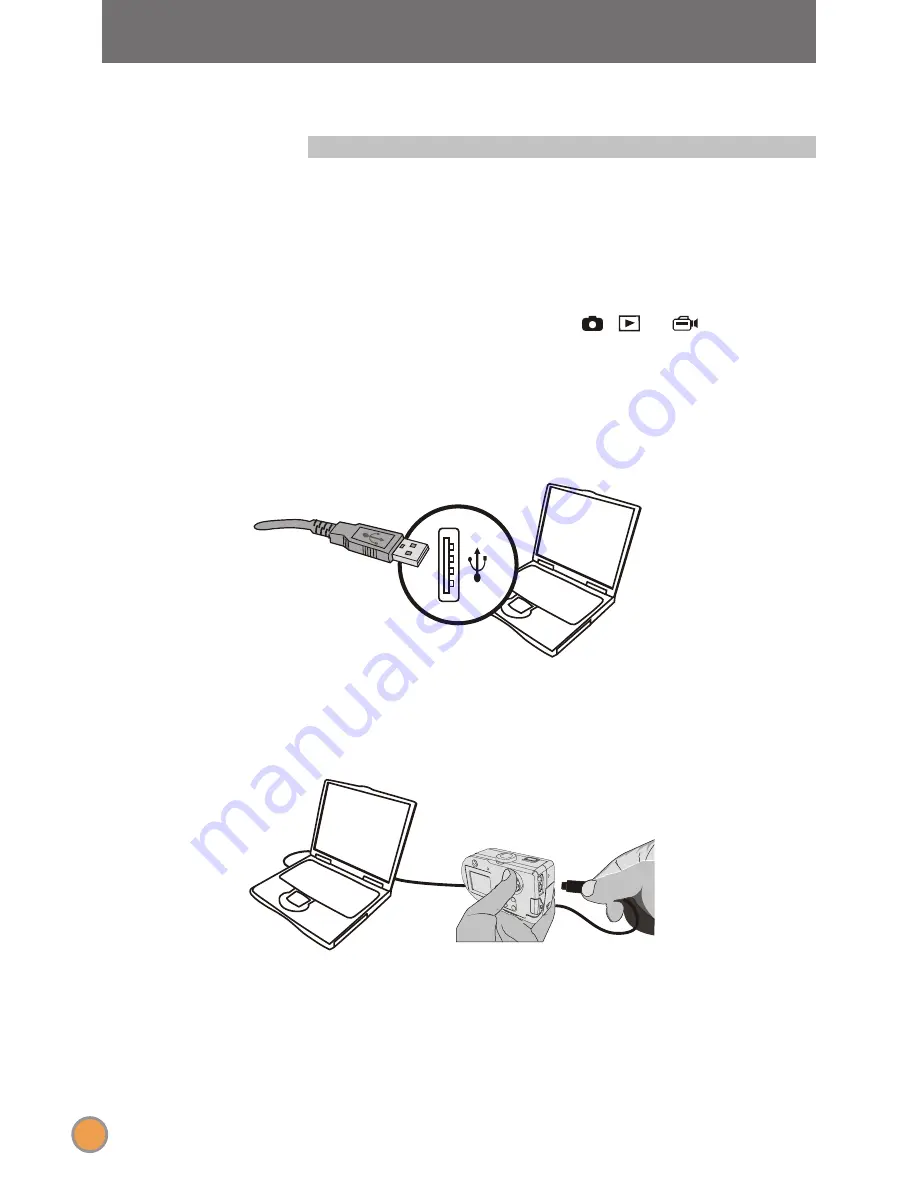
1

2

Insert the USB cable to the USB port on your computer.

3

Insert the other end of the USB cable to the USB port on your 
camera.

4

OFF

Содержание PocketCam 4000

Страница 1: ...PocketCam 4000 User s Manual...

Страница 2: ...mera body For your own safety avoid using the camera when there is a storm or lightning Avoid using batteries of different brands or types at the same time There is potential of explosion from using i...

Страница 3: ...eration 1 Switching on and off 2 Setting the Mode dial 3 Taking still pictures 4 Recording movies The LCD display information under mode The LCD display information under mode Snapshot Making a movie...

Страница 4: ...8 Real time display on TV Adjusting the exposure value EV compensation Setting the date stamp Enjoying your Images on the computer 1 Installing the AF Cam driver 2 Connecting your camera to your compu...

Страница 5: ...settings Properties settings 4 Advanced settings Troubleshooting Other Information 1 Battery life 2 LED indicator events 3 Storage capacity 4 More on flicker 5 Specifications 44 44 45 46 48 48 48 49 4...

Страница 6: ...15 16 17 18 Control button Zoom in out RESOLUTION button Flash strobe LCD display Viewfinder Eject button MENU OK button Control button Flash Control button Self timer USB port TV out port Battery co...

Страница 7: ...into the battery cover with the correct and ends Close inward and slide upward the battery cover to lock it 1 We recommend you to use rechargeable 1 2 V Ni MH batteries as this will increase time of...

Страница 8: ...h o C m p a c t F l a s h o C m p a c t F l a s h o C m p a c t F l a s h o C m p a c t F l a s h o C m p a c t F l a s h o C m p a c t F l a s h o C m p a c t F l a s h o C m p a c t F l a s h o p c...

Страница 9: ...ng the tripod Use the tripod to minimize camera movement and ensure optimal image quality particularly while taking self portraits longer movies video conferencing or in the macro mode Attach the trip...

Страница 10: ...ve battery power press any key to wake up the camera If you do not operate this camera for over 3 minutes the camera will shut down automatically 2 Setting the Mode dial This camera provides five mode...

Страница 11: ...1 Zoom Number of pictures and movies taken Still picture mode 1 2 3 4 Zoom frame Battery life Storage mode Resolution Flash status CF card Flash memory non icon White balance four modes Back light B W...

Страница 12: ...display or viewfinder then press the Shutter button halfway down to start the auto focus Taking a still Press the Shutter button all the way down to take a shot MENU EFFECT CF CARD MENU EFFECT CF CAR...

Страница 13: ...t If your target subject is not in the center of the image AF lock Focus Compose the view that you wish to take Center the target subject in the AF frame then press the Shutter button halfway down AF...

Страница 14: ...4 Recording movies The LCD display information under mode 1 Movie mode Number of pictures and movies taken 1 2 3 4 Zoom 1 2 5 3 4 Battery life 5 Storage mode CF card Flash memory non icon 12...

Страница 15: ...F CARD MENU EFFECT CF CARD MENU EFFECT CF CARD O F F The count indicator starts and the icon flashes while recording is in progress MENU EFFECT CF CARD Movie mode Rotate the Mode dial to Movie mode Zo...

Страница 16: ...ormation under mode 1 Zoom frame Picture or movie number Zoom 1 2 3 4 Number of pictures and movies taken Type you are viewing 5 1 3 4 7 5 2 6 Picture Movie 8 9 6 Storage mode CF card Flash memory non...

Страница 17: ...p look F OF Press the Control button to select the next image or the Control button to select the previous one If you want to take a closer look press the Control button to zoom in The zoom of the Pla...

Страница 18: ...ing press any button to pause the movie While playing a movie on the camera sound playback is not available Please copy the movie to your computer for details see page 33 to view it with sound playbac...

Страница 19: ...highlight the icon then press the MENU OK button to bring up a confirmation screen Press the Control button to select the icon Then press the MENU OK button to complete the action of deletion Playbac...

Страница 20: ...the icon then press the MENU OK button Press the Control button to select the icon Then press the MENU OK button The camera provides five languages English German French Spanish and Italian Press the...

Страница 21: ...select the icon then press the MENU OK button to bring up the setting screen as Press the Control button to change the year Then press the MENU OK button to confirm Use the same method described above...

Страница 22: ...de the Viewfinder flashes 1 2 When the lighting is not sufficient for your shooting environment the flash can provide the extra light you need MENU EFFECT CF CARD Flash off Auto Red eye reduction Flas...

Страница 23: ...ay When the Shutter button is pressed the camera will have ten seconds delay with the Self timer lamp flashing and ten beeps emitting before taking a picture After the shutter fires the self timer wil...

Страница 24: ...ng option Select the 2272x1704 type when you want to develop 6 8 photos or smaller The most memory saving option This selection is suitable for computer screen displays and email Select the 1600x1200...

Страница 25: ...camera as well as view the real time change of effects on the LCD display Cloudy Fluorescent Tungsten Auto Sunny This item determines the best white balance setting automatically for your shooting en...

Страница 26: ...utton to enter the MENU The MENU provides more advanced features for you to fine tune the camera MENU White balance WB p 25 Effect p 26 Exposure p 27 EV compensation p 28 Date stamp p 29 User setting...

Страница 27: ...press the MENU OK button to confirm 2 WB selected 1 1 2 2 1 1 2 2 WB sub menu 2 2 Cloudy Fluorescent Tungsten Auto Sunny This item determines the best white balance setting automatically for your shoo...

Страница 28: ...ss the MENU OK button to bring up a sub menu as Press the Control button to select a tone that you wish to add a personal touch to your picture Then press the MENU OK button to confirm Effect selected...

Страница 29: ...priate to the source of light in your shooting environment Then press the MENU OK button to confirm 2 Exposure selected 1 1 2 2 1 1 2 2 Setting screen 2 2 Auto Based on the frame to automatically dete...

Страница 30: ...ss the Control button to increase the value of the exposure compensation or press the Control button to reduce the value Then press the MENU OK button to confirm 2 EV Comp selected 1 1 2 2 1 1 2 2 Set...

Страница 31: ...hen press the MENU OK button to bring up the sub menu as The camera allows you to determine whether a date stamp appears on the pictures taken Press the Control button to select the date stamp On or O...

Страница 32: ...the Control button to select the icon then press the MENU OK button to bring up the sub menu as Press the Control button to highlight a setting mode that you wish to configure Then press the MENU OK b...

Страница 33: ...sounds when operating the camera This item allows you to set the flicker to prevent nosie and get the best image The default flicker value depends on your country For details see the More on flicker s...

Страница 34: ...your camera to TV Turn on your TV and switch to AV mode Insert the video and audio ends of the AV cable to the AV in port on your TV Insert the other end of the AV cable to the TV out port on your ca...

Страница 35: ...installation Enjoying your Images on the computer 33 For Windows XP users Skip step 1 Installing the AF Cam driver and go to step 2 Connecting your camera to your computer if you do not use the PC Ca...

Страница 36: ...ick Next Then follow the on screen instructions to continue 4 Fig 1 1 The Digital Signature Not Found dialogue box might show twice Please simply click Yes The camera works well for Windows 2000 Notic...

Страница 37: ...not a Windows XP user or never install DirectX 8 0 or above click Yes If you are a Windows XP user or you have already installed DirectX 8 0 or above click No When a window as Fig 3 or Fig 4 appears...

Страница 38: ...mera to your computer 36 Set the Mode dial on your camera to or Turn on your computer 1 2 Insert the USB cable to the USB port on your computer 3 Insert the other end of the USB cable to the USB port...

Страница 39: ...sers 1After connecting your camera with the computer a window will automatically appear as Fig 5 Select the Open folder to view files using Windows Explorer item and then click OK For Windows 2000 ME...

Страница 40: ...older 3 Drag the picture to the My Documents file folder to copy your picture or movie to the computer 4 For Windows XP users For Windows 2000 ME 98SE users You can find the files of your pictures and...

Страница 41: ...the computer please follow these steps Notice on disconnecting the camera from the computer for Windows 2000 ME users 1 Double click on the task bar 2 Click USB Disk then click Stop 3 Select the came...

Страница 42: ...d go to step 2 Connecting your camera to your computer If you never install the AF Cam driver please finish the installation first For details please see step 1 in the Enjoying your Images on the comp...

Страница 43: ...ht appear twice please simply click Yes This camera works well for Windows 2000 For Windows ME users Please select Automatic search for a better driver when a window as Fig 7 appears For Windows 98SE...

Страница 44: ...This manual provides information related to PC Camera function only 1 Double click the icon on the desktop to execute the program then you can begin to capture immediate images on your computer Click...

Страница 45: ...43 Preview window Record Stop Recordings Snapshot Format Setting Preview or Stop Preview Open Album Video Source Click the Open Album icon at the bottom on the PC Camera panel or go to the follow pat...

Страница 46: ...owing functions according to your needs Color Space Compression 1 Output Size 2 RGB 24 Better image quality I420 The file will be compressed to add advantage for faster speed transformation Set output...

Страница 47: ...using PC Camera function change the Banding Filter item on the Video Setting tab to avoid noise Select 50Hz or 60Hz until the screen stops flickering If you want to restore the default setting select...

Страница 48: ...n The storage is full Please free some space of the CF card or flash memory Check if the camera is under the status of charging batteries Check if the CF card is set to protected If the MEMORY ERROR m...

Страница 49: ...ra or capture device If you have any other camera or capture device completely remove the camera and its driver from the computer to avoid a driver conflict The image is too blurred Keep the camera st...

Страница 50: ...be taken Number 1 Taking snapshot at low temperature 2 Switching on off power repeatedly 3 Focusing subject frequently before taking a picture 2 LED indicator events Status LED indicator Flash strobe...

Страница 51: ...lution and color saturation 30 60 120 240 480 20 40 80 160 320 15 30 60 120 240 CF card 512MB 480 640 960 64 4 More on flicker The default flicker setting of your camera depends on your country When u...

Страница 52: ...x240 pixels up to 20 fps Video conferencing LCD display Digital zoom Exposure White balance Image effect Lens Self Timer Interface Power saving Built in microphone Built in flash strobe Battery Dimens...

Отзывы: