background image

Connecting the camcorder to a TV

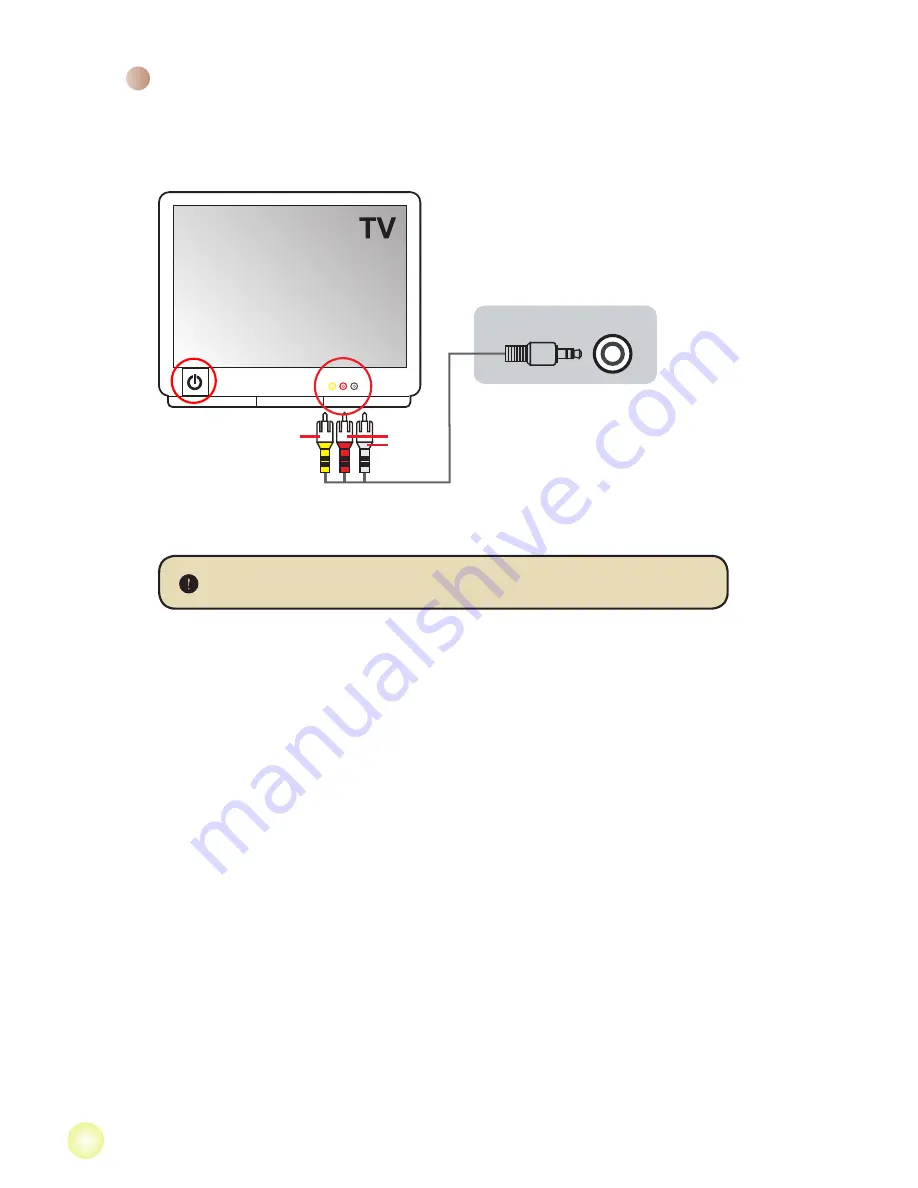
Connect your camcorder and TV via the accessory AV cable for real-time display. 

You can display your video clips, still pictures, and audio recordings directly on 

your TV, sharing them with your friends and family.


AV mode

Video

Audio

TV Out

1. 

Turn on your TV and switch the TV to AV mode.


 The TV system is different across countries. 


2. 

Connect the audio and video ends of the AV cable to the TV.

3. 

Turn on the camcorder.

4. 

Connect the other end of the AV cable to your camcorder.

Содержание MZ-DV

Страница 1: ...User s Manual User s Manual ...

Страница 2: ...Earphone AV out connector Previous button Fast backward button LCD monitor Zoom in out button Record button Menu button Next button Fast forward button Play Pause button Macro mode switch LED lights switch White balance switch Flash switch OK key 4 3 16 9 display switch USB connector LED lights Microphone Status LED left Charging LED right Mode button AV in connector optional inside the cover ...

Страница 3: ...2 The charging LED turns red and the charge starts 3 When the charging is interrupted or the battery pack is fully charged the charging LED will turn green When using a PC to charge the battery do not power on the camcorder or the charge will stop Installing the battery 1 Slide the battery cover open as indicated 2 Place the accessory Li Ion battery into the compartment Note that the metallic cont...

Страница 4: ...the slot Inserting a memory card optional Open the LCD monitor or press and hold down the Power button for 1 second to turn on the camcorder To turn off the camcorder press and hold down the Power button for 1 3 seconds or close the LCD monitor Turning on off your camcorder If the camcorder is not turned on after pressing the Power button please check 1 The battery pack is well installed in the ca...

Страница 5: ...ail Highlight box Mode icon File type Setting language and time Language Power on Press the Mode button Enter the Setting mode Use the Direction buttons to select the Language item and press the OK button to enter Use the Direction buttons to select a suitable language and press the OK button to confirm Time Power on Press the Mode button Enter the Setting mode Use the Direction buttons to select ...

Страница 6: ...d you need to wait for a few seconds for the camcorder to complete auto focusing before you can use digital zoom 3 Press the Record button to start recording 4 Press the Record button again to stop recording The camcorder takes a few seconds on auto focusing every time you adjust the zoom ratio The zoom function is also available during recording except in macro mode If the surroundings are dark y...

Страница 7: ...button fully down to take a still picture Taking a still picture Adjust other advanced settings if necessary If the surroundings are dark you can switch the LED lights mode to On or Auto to help focus and lighting Zoom in Zoom out Recording a voice clip 1 Press the Mode button and use the Direction buttons to select the Voice mode Then press the OK key to enter 2 Press the Record button to start r...

Страница 8: ...ons to move left or right Picture Zoom in out Use the Direction buttons to move up or down Lock Release zoom ratio When the zoom ratio is greater than 1 0x press the OK key Browse the enlarged picture When the zoom ratio is locked use the Direction buttons to browse the picture Video Audio Start playing When selected in full screen mode the file automatically starts playing Pause Resume playing Du...

Страница 9: ... pictures and audio recordings directly on your TV sharing them with your friends and family AV mode Video Audio TV Out 1 Turn on your TV and switch the TV to AV mode The TV system is different across countries 2 Connect the audio and video ends of the AV cable to the TV 3 Turn on the camcorder 4 Connect the other end of the AV cable to your camcorder ...

Страница 10: ...ls 10M Set picture resolution to 10 mega pixels 11 mega pixel camcorder 1M Set picture resolution to 1 mega pixels 3M Set picture resolution to 3 mega pixels 5M Set picture resolution to 5 mega pixels 11M Set picture resolution to 11 mega pixels Date Stamp On Off Print a date mark on each picture when enabled Stabilizer On Off Minimize image blur caused by hand shake when enabled WB Auto The camer...

Страница 11: ...een display icons to display on the screen Video 10 mega pixel camcorder VGA Set the video resolution to VGA 640x480 pixels QVGA Set the video resolution to QVGA 320x240 pixels 11 mega pixel camcorder D1 Set the video resolution to D1 720x480 pixels VGA Set the video resolution to VGA 640x480 pixels QVGA Set the video resolution to QVGA 320x240 pixels NightShot On Off Enabling this setting allows ...

Страница 12: ...e Menu button to stop the slide show Print One Print current image when connected to a PictBridge ready printer All Print all images when connected to a PictBridge ready printer Cancel Cancel action If there are no files in the camera no items will be seen Menu items in Voice mode Power on Press the Mode button Enter the Voice mode Press the Menu button Item Description Delete One Delete current v...

Страница 13: ... Off Enable Disable OSD icons to display on the screen LCD Bright 2 2 Set LCD brightness A positive value makes the LCD brighter while a negative value makes the LCD dimmer Format Yes Format the storage medium Note that all files stored in the medium will be gone No Cancel action Auto Off Off Disable Auto off function 1 min The camera automatically shuts down when staying inactive for over 1 minut...

Страница 14: ...s table Region England Germany France Italy Spain Netherlands Russia Setting 50Hz 50Hz 50Hz 50Hz 50Hz 50Hz 50Hz Region Portugal America Taiwan China Japan Korea Thailand Setting 50Hz 60Hz 60Hz 50Hz 50 60Hz 60Hz 50Hz Note The flicker setting is based on the frequency standard of your local power supply Icon Description Full battery life Moderate battery life white Low battery life If the indicator ...

Страница 15: ... Storage Capacity Memory Video min Audio min D1 VGA QVGA Maximum SD MMC card 128MB 12 7 40 85 SD MMC card 256MB 25 20 85 175 SD MMC card 512MB 50 40 175 350 SD MMC card 1GB 100 80 350 720 Memory Still picture 1M 3M 5M 10M 11M SD MMC card 128MB 600 250 160 80 70 SD MMC card 256MB 1200 500 320 160 140 SD MMC card 512MB 2400 1000 640 320 280 SD MMC card 1GB 4800 2000 1280 640 560 Note The actual valu...

Страница 16: ...Advanced Instructions English ...

Страница 17: ...ppear automatically double click on My Computer and then the CD ROM drive Then start the Setup exe program manually 2 Start the installation Click on the icon to launch the installation of the driver Notice for Windows 2000 users During the installation process a warning message regarding digital signature may appear twice or more Please click on Yes to continue the process The software is fully c...

Страница 18: ...s to complete the installation 5 Install Direct X 9 0c or above After the codecs installation is completed you will be prompted to install Direct X 9 0c or above if the program is not yet installed in your computer Please click on Yes to continue Windows Media Player Codecs and Direct X 9 0c or above are necessary for viewing the video clips recorded by the camcorder 6 Restart the computer After t...

Страница 19: ...USB Mode section for more information USB mode Power on Press the Mode button Enter the Setting mode USB Mode Menu When connected to a PC the camcorder displays a menu for you to choose a desired connection mode Disk When connected to a PC the camcorder automatically enters Disk removable disk mode Notice for Windows 2000 XP users If you want to disconnect the camcorder from your computer please f...

Страница 20: ...er a removable disk will appear in your computer The removable disk actually represents the storage medium of your camcorder In the disk you can find all of your recordings Refer to the figure below to see where the files are stored For multimedia files For MP3 files ...

Страница 21: ...ome space from the SD MMC card or the internal memory The camcorder is recharging the flash strobe Wait until the flash strobe is fully charged Using a protected SD card Set the SD card to be writable The LCD screen displays MEMORY ERROR or CARD ERROR message Or the camcorder cannot read the memory card The format of the memory card is not compatible with the camcorder Use the camcorder Format funct...

Страница 22: ...aking pictures Add extra light sources or enable video light when recording video clips Noises occur when viewing images on the LCD screen or on the computer The flicker setting does not match the standard of the country you are staying Adjust the flicker setting For more information please refer to the Flicker Settings table I want to restart the serial number of the file name PICTxxxx The counting ...

Страница 23: ...ver and other related programs Follow the installation steps in the manual to re install the driver The camcorder has been connected to the PC via the USB cable before installing the driver Install the driver before plugging in the USB cable The TV screen does not display after connecting the camcorder to the TV The camcorder is not correctly connected to the TV Reconnect the camcorder to TV corre...

Страница 24: ...ediately Memory Full The storage memory is full and can not store any more files Please change the SD MMC card or delete some files to free some memory space Card Error The inserted card is not compatible with the camcorder Please change the card or try formatting the card Memory Error The camcorder can not access data in the internal memory Please format the medium to solve this problem Strobe Is C...

Страница 25: ...at the same time It s easy Three simple steps are all it takes Please refer to Converted files section for more information System requirements To install and run the MediaConverter your system must meet the following minimum requirements Microsoft Windows 2000 XP Home or Professional 50 MB free hard drive space 256 MB RAM DirectX 9 DirectX 9c recommended Microsoft Windows Media Player 9 0 for conv...

Страница 26: ... Supported file types for conversion AVI Microsoft Video 1 format Cinepak Intel Indeo uncompressed etc MPEG 1 in MPEG MPG MPE DAT VCD MPEG1 MPEG 4 in AVI format MPEG 4 in ASF WMV QuickTime MOV QuickTime 6 5 and Windows Media Player 9 0 or above are required for QuickTime MOV and WMV file conversion respectively Supported file types for export AVI MPEG 4 SP WMV ASF MPEG 4 SP ...

Страница 27: ...11 Appendix B Converted files ...

Страница 28: ...e types you d like to display b Preview highlighted files to be sure that they re the ones you want Check the AutoPlay box to start the playback automatically after you click a file 3 Repeat steps 1 and 2 above until all the files you want are added In addition to using the above method you can also drag and drop files directly to the file list in the program window Removing files To delete a file from t...

Страница 29: ...nected and then click Select Destination and choose the device Settings Various program settings can be accessed by clicking the Settings button Each section lets you select one of two settings Optimize for the selected device and Use custom conversion settings Optimize for the selected device This is the default setting The program will automatically set the conversion parameters according to you...

Страница 30: ...0 default and 29 97 Selecting Optimize for the selected device uses the default values above where applicable After viewing modifying the various settings select either Save or Cancel to return to the main screen Click Save if you d made changes that you d like to keep Otherwise click Cancel Step 3 Convert When you re ready select highlight the files you d like to convert from the list and then cl...

Страница 31: ... ASF files 2 Open Windows Explorer to find a Removable Disk appeared in My Computer 3 Double click on the icon of Removable Disk 4 Double click on the DCIM file folder 5 Double click on the 100MEDIA file folder 6 Paste the files into 100MEDIA file folder 7 Change the file names to CLIP ASF could be any 4 digit number from 0001 to 9999 The file name must follow the naming principle of your camcorder so tha...

Страница 32: ... System Windows 2000 XP Macintosh Support File Upload Only CPU Pentium 4 1 5GHz or above System RAM 256MB or above 512MB recommended Graphic Card 64MB 24 bit true color CD ROM speed 4x or above Software Direct X 9 0c or above Other USB connector ...

Отзывы: