AGRI EASE BE-LS22TL3PT Скачать руководство пользователя страница 26

Page 19


                          WARNING!

 Do not make any adjustments without first stopping the tractor engine, setting the brake,  

                          removing  the key, disconnecting the


hoses from the tractor hydraulic ports. Wait 10 minutes to allow all 

                          parts to cool down. Always wear safety glasses during operation or while performing any adjustments or 
                          repairs. 


Beam and Splitting Wedge 

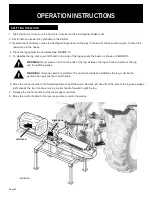
     Lubricate top, sides and bottom of the beam and where it comes into contact with the splitting wedge with engine oil  

     before each use. 
     If the wedge becomes dull or nicked, it can be sharpened.  


Moving around 


                       WARNING!


ALWAYS shut off your tractor hydraulic controls and your splitter controls to the “Neutral”  

                       position before moving the log splitter on your tractor. Failure to do so may lead to improper performance  
                       and compromise safety.  


WARNING!

 Never 

attempt to move this machine on your tractor over hilly or uneven terrain without a tow 

                        vehicle or adequate help. 
 

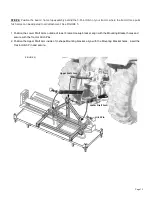
1.   Set the splitter beam to its horizontal position. Make certain the beam is locked securely with the horizontal beam lock. 

2.   

ALWAYS

 check before moving to make sure that the log splitter is correctly and securely attached to the three point  

      hitches, and the hydraulic hoses to the pressure ports of tractor pump. 

2.   Lift the tractor 3-Point Hitch Arms to lift the log splitter the full height of the 3-Point Hitch range carefully for safely                                          

      transport.  

3.   

ALWAYS

 be careful when backing up with your log splitter behind your tractor. It could jackknife. 


    Off-Season Storage 

     If the log splitter will not be used for more than 30 days, prepare it for storage as follows: 


                       WARNING!

 Never store the machine attached to the Tractor.  


1.   Clean the log splitter thoroughly. 

     NOTE: 

The use of pressure washers or a garden hose to clean the splitter is not recommended. They may cause 

     damage to the bearings. The use of water will result in a shortened life and reduce serviceability. 

2.   Wipe the machine with an oiled rag to prevent rust, especially on the wedge and the beam. 
3.   Store the log splitter in a clean, dry area. Do not store it next to corrosive materials, such as fertilizer. 

     NOTE: 

If storing in an unventilated or metal storage shed, be certain to rustproof the equipment by coating it with a light    

     oil or silicone.


MAINTENANCE & ADJUSTMENTS 


Page 22


Содержание BE-LS22TL3PT

Страница 1: ...HITCH 22 TON LOG SPLITTER MODEL NO BE LS22TL3PT Owner s Manual ASSEMBLY OPERATING INSTRUCTIONS Purchase Date_________Model NO __________ _ Serial NO ______________ Dealer______________________________...

Страница 2: ......

Страница 3: ...turer s manual If you have any problems or questions concerning the machine phone an authorized service dealer or contact us directly Agriease s customer support phone number website and mailing addre...

Страница 4: ...tructions 10 17 Unpacking the Container 10 11 Assembling and Set up 12 16 Know Controls Features 17 Operation Instructions 18 21 Know Your Tractor 18 Operating Positions 18 Lubricate Beam and Wedge 18...

Страница 5: ...r death DANGER This machine was built to be operated according to the safe operation practices in this manual As with any type of power equipment carelessness or error on the part of the operator can...

Страница 6: ......

Страница 7: ...adult who loads and stabilizes the log must be the person who operates control handle WARNING PRESSURIZED FLUID Never check for hose leaks with your hands High pressure fluid can escape through a pin...

Страница 8: ...n hole opening can penetrate your skin and cause blood poisoning gangrene or death Give attention to the following instructions at all times a Do not check for leaks with your hand b Do not operate ma...

Страница 9: ...or logs to fall off 8 ALWAYS lock beam in either the horizontal or vertical position 9 ALWAYS keep the work area clean Remove split wood around the log splitter immediately so that you don t stumble...

Страница 10: ...dge and the square end placed toward the end plate 10 When splitting in the vertical position stabilize the log before moving the control handle Split as follows a Place log on the end plate and turn...

Страница 11: ...the log splitter in another location can result in serious injury or death a Horizontal Operating Position Stand on the control lever side of the log splitter and stabilize log as shown if needed See...

Страница 12: ...ifications may lead to improper performance and compromise safety 6 The hydraulic system of your log splitter requires careful inspection along with the mechanical parts Be sure to replace frayed kink...

Страница 13: ...fety 3 NEVER carry any cargo or wood on your log splitter when moving around on your tractor 4 NEVER allow anyone to sit or ride on your log splitter 5 ALWAYS check before moving to make sure that the...

Страница 14: ...n only Exceptions if any will be specified Unpacking tools needed 1 Wrench 14mm 2 Scissors or knife 3 Pry bar or claw hammer Step 1 Use a 14mm wrench to remove all the bolts and washers on the metal c...

Страница 15: ...lic hoses to the beam at this time until you do all the assembly procedures Step 4 Inspect all component assemblies parts and accessories according to the packing list attached in this manual Page 27...

Страница 16: ...splitter 2 Check the three Hitch Pins are available for your log splitter 3 Different tractor needs different types and sizes of Tractor Hydraulic Connectors For this reason the Splitter Hoses do not...

Страница 17: ...nt See FIGURE 5 1 Position the Lower Draft Arms outside of lower Frame Hookup bracket align with the Mounting Bracket holes and secure with the Tractor Hitch Pins 2 Position the Upper Draft Arm inside...

Страница 18: ...e four Frame Legs After the Frame Legs installed and tightened lower down the Splitter and allow it standing firmly on the ground See FIGURE 6 REF NO DECSRIPTION QTY 4 Frame leg 4 5 Hardware Kit 12 no...

Страница 19: ...anging from the valve on the handle link See FIGURE 7 1 Remove the clevis pin and bow tie cotter pin from the control handle 2 Rotate the control handle into the operating position and secure with the...

Страница 20: ...s You need to prepare the correct type size connectors for your application The Splitter Hose Threads are 1 2 NTP Male 3 Route the hoses down the underside of the Beam to the rear and plug the connect...

Страница 21: ...in the horizontal position The horizontal beam lock is located on the beam support latch bracket Log Tray The log tray is designed to catch the log after it is split Splitting Wedge The wedge is used...

Страница 22: ...o keep hands away from any possible pinch points 2 How to place the beam in the Vertical Position Pull the horizontal beam lock out to release the beam and pivot the beam to the vertical position See...

Страница 23: ...ward the cylinder When the wedge is fully retracted the control handle returns to the NEUTRAL position automatically Do not hold the handle in the REVERSE position when fully retracted NOTE The REVERS...

Страница 24: ...3 WARNING Never place a hand on the ends of the log between the log and the end plate or the log and the splitting wedge WARNING Only one operator permitted The adult who loads and stabilizes the log...

Страница 25: ...pipe dope on all hydraulic fittings 5 Split wood along the grain lengthwise only Never 1 Use when fluid is below 20 F or above 150 F 2 Operate through relief valve for more than 5 seconds 4 Attempt to...

Страница 26: ...beam lock 2 ALWAYS check before moving to make sure that the log splitter is correctly and securely attached to the three point hitches and the hydraulic hoses to the pressure ports of tractor pump 2...

Страница 27: ...ng internally 5 Internally damaged cylinder 6 Excessive air in the hoses 1 See authorized service dealer 2 Check oil level 3 Drain oil clean reservoir and refill 4 See authorized service dealer 5 See...

Страница 28: ...Tons Maximum Log Length 25 in Wedge Height 8 in Cycle Time Forward 8 Seconds Reverse 5 Seconds Height Horizontal Vertical Position 41 8 72 3 in Length Horizontal Vertical Position 72 3 54 6 in Width...

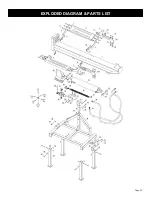
Страница 29: ...Page 22 EXPLODED DIAGRAM PARTS LIST Page 25...

Страница 30: ...tting Wedge w Guides 1 27 560 422 Hydraulic Hose for A Capacity 1 2 572 1 28 560 377 Protective Spring 27 540 1 5 1 29 510 339 Hydraulic Adaptor for A Capacity 1 30 510 467 Hydraulic Adapter for B Cap...

Страница 31: ...Page 24 Beam Frame asembly x 1 Instruction manual x 1 U shape mounting bracket bar x 1 Hardware kits box x 1 Frame leg x 4 PACKING LIST Page 27...

Страница 32: ...Page 25 Page 28...

Страница 33: ...uctions as specified in this operator s manual This warranty does not apply to any damage to the product that is the result of improper maintenance or to any product that has been altered or modified...

Страница 34: ...Page 27...

Страница 35: ...Page 28...

Страница 36: ...Page 29 Phone 1 877 588 3311 Fax 1 800 665 7334 WWW BRABEREQ COM...

Отзывы: