background image


8


N5101-90001  

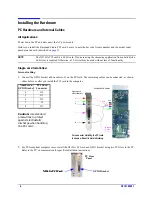
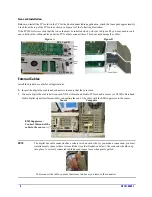
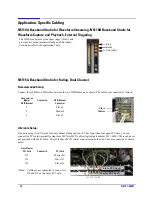
Two-card Installation:

Before you install the PCI cards in the PC for the dual-channel fading application, attach the foam pads approximately 
1 inch from the top of the PCI card as shown in Figure A of the following illustration.

If the PCI/ISA slots are such that the two cards must be installed side-by-side (as in Figure B), you may need to route 
one or both of the ribbon cables under the PCI cards to connect them. This does not damage the cables.

External Cables

Install the digital bus cable for all applications.

1.

Inspect the digital bus cable and connectors to ensure that they are clean.

2. Connect a digital bus cable between each N5101A Baseband Studio PCI card and a source (or N5102A Baseband 

Studio digital signal interface module), connecting the end of the cable with the EMI suppressor to the source.

NOTE

The digital bus cable connector has a release latch on each side. As you make a connection, you must 
simultaneously squeeze these release latches (see the illustration below); the connector should snap 
into place. A securely connected cable does not come loose when gently pulled.

To disconnect the cable, squeeze the release latches as you remove the connector.

Figure A

Figure B

    Foam
      Pad

 Foam
   Pad

1"

Front Top

Back Top

PCI Card A

PCI Card B

Foam Pads

       Source                               Computer

EMI Suppressor:

Connect this end of the
cable to the source.

Содержание N5101A

Страница 1: ...internal PCI card hardware see page 6 for external cabling see page 8 4 Install the Baseband Studio PCI card driver see page 9 After the PCI card installation is complete the procedure directs you to...

Страница 2: ...06 Replaceable Parts of GPIO Bracket SMB to MCX Cable P N 8121 0655 Ribbon Cable Assembly P N N5101 60004 7 PCI card ISA Retainer Screws Retainer P N 1400 3295 Screws P N 0624 0858 2 each 4 SMB to SMB...

Страница 3: ...quire a license file to be fully functional The entitlement certificate shipped with your application purchase lists the products purchased and has two of the four numbers required to obtain the licen...

Страница 4: ...Application specific requirements Table 2 N5110A Baseband Studio for Waveform Streaming Streaming Rate Slow 5 MSa s Medium 20 MSa s Fast 40 MSa s Processor Pentium 4 2 GHz or greater Pentium 4 2 GHz o...

Страница 5: ...Dual Channel Configuration Two 32 bit 33 MHz and two additional PCI slot openings Operating System Windows XP Professional SP 1 or greater or Windows 2000 Professional SP 3 or greater Table 5 Require...

Страница 6: ...the GPIO bracket ribbon cable to J3 on the PCI card The remaining cables can be connected as shown either before or after you install the PCI card in the computer 2 For PCI compliant computer cases i...

Страница 7: ...shielding using the two screws provided See the illustration below The extender will slip into the guides at the front of the ISA compliant PC case as shown in the illustration above 5 Secure the rear...

Страница 8: ...s to ensure that they are clean 2 Connect a digital bus cable between each N5101A Baseband Studio PCI card and a source or N5102A Baseband Studio digital signal interface module connecting the end of...

Страница 9: ...seband Studio PCI Card page click the Baseband Studio PCI Card Driver link and follow the download instructions Application Software To install the Baseband Studio application software refer to the Ag...

Страница 10: ...Software CD 2 Insert the software CD into your PC s CD ROM drive 3 In the Found New Hardware wizard click Next Follow the instructions in this wizard and accept the driver N5101A inf If the wizard doe...

Страница 11: ...When you initially run a Baseband Studio application it looks for the required license file Configuring the Vector Signal Generator Using the LAN Interface Direct LAN Connection between PC and Vector...

Страница 12: ...ice 7 Enter the signal source s IP address a device name is not required 8 Click OK OK OK OK to close IO Config windows 9 As verification run the Agilent IO Libraries Visa assistant program Start Prog...

Страница 13: ...lect Properties In the Device status area you should see the message This device is working properly If not the N5101A Baseband Studio PCI card is probably not seated properly in the PC N5101A PCI Car...

Страница 14: ...internally using three MCX to MCX cables Agilent part number 8121 0620 These cables are not provided with the PCI card The cables have MCX male connectors on both ends They are connected as shown belo...

Страница 15: ...to contact your local Agilent office http www agilent com find assist If you do not have access to the Internet please contact your field engineer NOTE In any correspondence or telephone conversation...

Страница 16: ...ent web site search tool to search for the document part number Agilent N5101A Baseband Studio PCI Card Memory Upgrade Installation Note Agilent part number N5101 90003 Agilent Technologies Software I...

Отзывы: