


7-96
Chapter 7
Programming Examples
List-Frequency and Limit-Test Table Examples
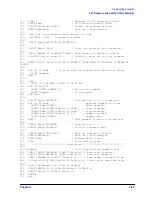
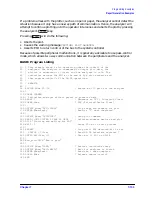
560 OUTPUT @Nwa;”POIN;” ! Send number of points to display
570 OUTPUT @Nwa;”OUTPACTI;” ! Output active function value
580 ENTER @Nwa;Table(I,3) ! Read number of points
590 !
600 IF I=18 THEN ! Pause if more than 17 segments
610 INPUT “PRESS RETURN FOR MORE”,A$ ! Read Return to continue
620 END IF
630 ! Print new header for segment data
640 IMAGE 4D,6X,4D.6D,3X,4D.6D,3X,4D ! Format image to disp segment data
650 PRINT USING 640;I;Table(I,1)/1.E+6;Table(I,2)/1.E+6;Table(I,3)
660 RETURN
670 !
680 END
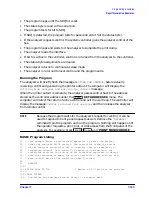
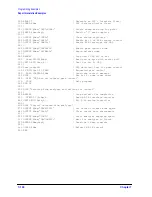
Using Limit Lines to Perform PASS/FAIL Tests
There are two steps to performing limit testing on the analyzer via GPIB. First, limit
specifications must be defined and loaded into the analyzer. Second, the limits are
activated, the device is measured, and its performance to the specified limits is signaled by
a pass or fail message on the analyzer's display.
Example 6D illustrates the first step, setting up limits. Example 6E performs the actual
limit testing.
Example 6D: Setting Up a Limit-Test Table
The purpose of this example is to show how to create a limit-test table and transmit it to
the analyzer.
The command sequence for entering a limit-test table imitates the key sequence followed
when entering a table from the analyzer's front panel: there is a command for every
key-press. Editing a limit line is also the same as the key sequence, but remember that the
analyzer automatically re-orders the table in order of increasing start frequency.
The limit-test table is also carried as part of the learn string. While it cannot be modified
as part of the learn string, the learn string can be stored and recalled with very little
effort. See
“Example 5A: Using the Learn String” on page 7-79
Calibration-Kit String” on page 5-7
for details on using learn strings.
This example takes advantage of the computer's capabilities to simplify creating and
editing the table. The table is entered and completely edited before being transmitted to
the analyzer. To simplify the programming task, options such as entering offsets are not
included.
This example automates the front-panel operation of entering a limit-test table.
Front-panel operation and limits are discussed in your analyzer’s user’s guide.
The following is an outline of the program's processing sequence:
• An I/O path is assigned for the analyzer.
• The system is initialized.
• The limit lines are edited and cleared.
Содержание 8719ES
Страница 15: ...1 1 1 Alphabetical Command Reference ...
Страница 293: ...2 1 2 Introduction to Instrument Control ...
Страница 310: ...3 1 3 GPIB Programming ...
Страница 334: ...4 1 4 Reading Analyzer Data ...
Страница 343: ...5 1 5 Data Processing Chain ...
Страница 350: ...6 1 6 Error Reporting ...
Страница 364: ...7 1 7 Programming Examples ...
Страница 502: ...A 1 A Preset Conditions ...
Страница 517: ...B 1 B Command Listings ...


