background image

Chapter 5  Setting Up the Software for a Measurement

Setting Up the Laser Software for Your Measurement

5-18

Getting Started Guide

5

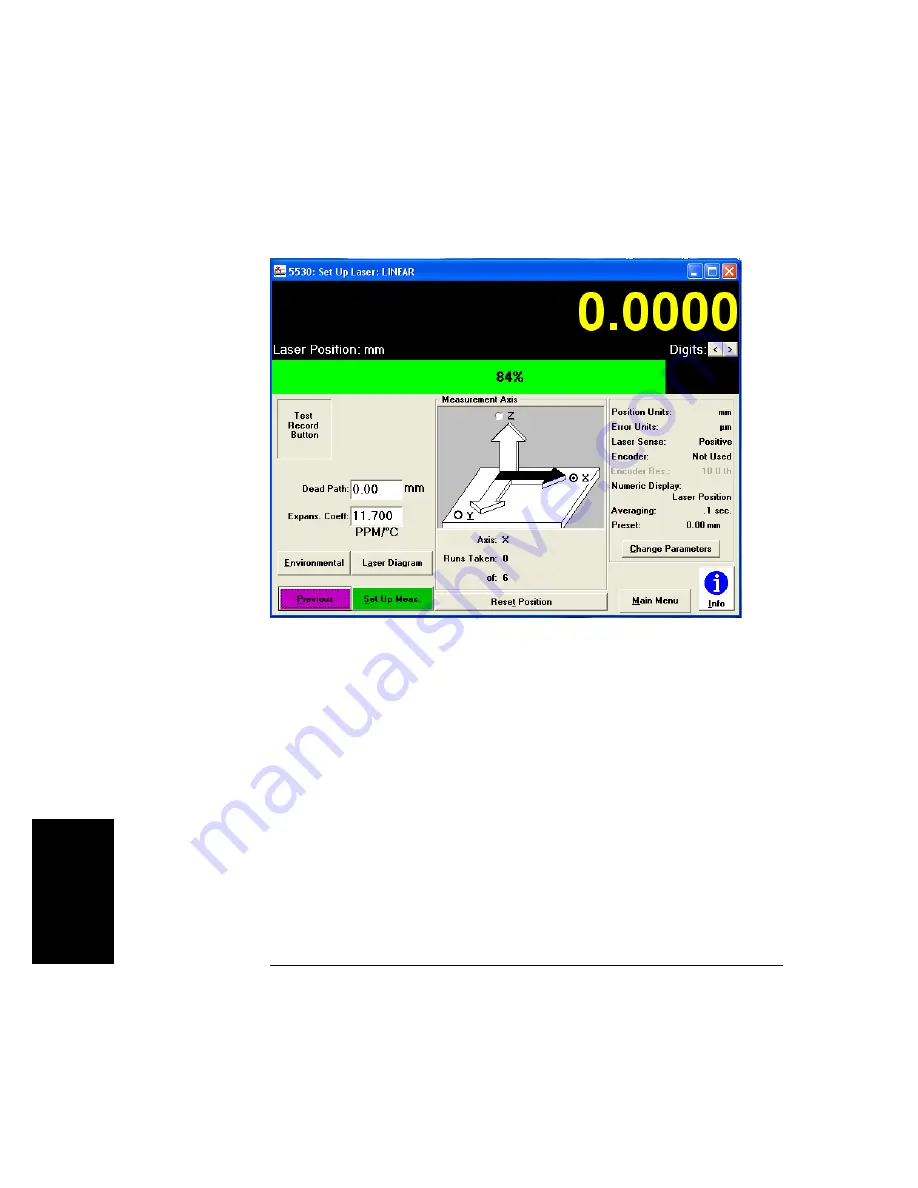
Figure 5-7. Set Up Laser: LINEAR screen

Verifying the hardware setup

The Set Up Laser screen automatically verifies the following:

The laser head is connected and is ready to make a measurement. 

The return beam has sufficient strength to make the measurement. 

The Agilent E1735A USB Axis Module and Agilent E1736A USB 
Sensor Hub are installed and working.

If any of these verifications fail, an error message replaces the numeric 
display at the top of the screen.

Содержание 5530

Страница 1: ...Agilent 5530 Dynamic Calibrator Getting Started Guide ...

Страница 2: ......

Страница 3: ...Agilent 5530 Dynamic Calibrator Getting Started Guide ...

Страница 4: ...ations General This product and related documentation must be reviewed for familiarization with this safety markings and instructions before operation This product is a safety Class I instrument provided with a protective earth terminal Before Applying Power Verify that the product is set to match the available line voltage and the correct fuse is installed Refer to instructions in Chapter 1 of th...

Страница 5: ...fety Labeling 2 2 General Safety Precautions 2 3 Using the Laser Head Safely 2 4 Using Components Safely 2 4 Protecting the Optics 2 5 3 Installing the Software and Connecting Components Introduction 3 2 Installing the Metrology Software 3 2 Computer Requirements 2 Installing the software 4 To start the Metrology Software general 5 To exit the Metrology Software general 5 Connecting the Axis Modul...

Страница 6: ... Task 3 Aligning the Optics 4 10 Task 4 Making the Measurements 4 13 Task 5 Displaying and Saving Data 4 17 Displaying analysis data 17 Saving data 19 Task 6 Exiting the Metrology Software 4 20 5 Setting Up the Software for a Measurement Introduction 5 2 Terms to Know 5 4 Conventions Used in the Software 5 6 Entering data 6 Using buttons 7 Using Online Help 5 7 Accessing the Software 5 8 Selecting...

Страница 7: ... Head on the Tripod 6 2 Collecting Measurement Data 6 7 Recording Measurement Data 6 8 Erasing Measurement Data 6 9 7 Analyzing Transferring and Printing Measurement Data Introduction 7 2 Displaying the Analyze Data Screen 7 3 Changing the Data Display 7 4 Autoscaling 4 Adding text to your graph 4 Displaying and editing measurement data 5 Printing the data analysis graph 7 Transferring Data to Ano...

Страница 8: ...ss squareness and parallelism measurements 9 Ensuring the accuracy of straightness reflector mirrors 9 Correcting for slope 10 Compensating for environmental factors 11 Optimizing Repeatability From One Calibration to the Next 8 13 Improving Resolution 8 14 9 Troubleshooting and Maintenance Introduction 9 2 Troubleshooting the Agilent 5530 9 2 Maintaining the Agilent 5530 9 4 Maintaining the optic...

Страница 9: ...nts Getting Started Guide vii Maintaining material temperature sensor 6 Cleaning 6 Checking accuracy quickly 6 Returning sensors to Agilent for calibration 6 Agilent Service Agreement 6 A Glossary G 2 Index ...

Страница 10: ...Contents viii Getting Started Guide ...

Страница 11: ...when using the Agilent 10747F Metrology Software use the online help feature This guide includes the following chapters Chapter 1 Introducing the Agilent 5530 Describes the system and discusses its capabilities and ease of use It also provides an overview of laser calibration Chapter 2 Making Laser Measurements Safely Provides the information you need to use the system safely Chapter 3 Installing ...

Страница 12: ...a measurement and collect data Chapter 7 Analyzing Transferring and Printing Measurement Data Explains how to use data you collected during the measurement Chapter 8 Ensuring Repeatability Accuracy and Resolution Explains how you can ensure your measurements are as consistently accurate as possible Chapter 9 Troubleshooting and Maintenance Provides instructions for user level troubleshooting and r...

Страница 13: ...1 Introducing the Agilent 5530 ...

Страница 14: ...in a typical system configuration Figure 1 1 Agilent 5530 set up for a typical linear measurement 1 Agilent 5519A B Laser Head 2 Agilent 10766A Linear Interferometer with an Agilent 10767A Linear Retroreflector attached 3 Height adjuster 4 Personal Computer PC 5 Agilent 10888A Remote Control Unit optional 6 Agilent E1738A Air Sensor optional 7 Agilent 10767A Linear Retroreflector 8 Agilent E1737A ...

Страница 15: ...and reports including environmental and machine data You can save the data in a format compatible with popular electronic spreadsheets such as Microsoft Excel for custom data analysis You can also store and recall measurement setups and default settings so you do not need to reenter them for each measurement The Agilent 5530 allows you to select resolution and error limits and choose the number of...

Страница 16: ...ology Software The USB sensor hub provides the interface between the air and material temperature sensors and your PC The sensors provide digital signals that the software uses to calculate compensation factors These factors adjust for changes in the system s operating environment Typical sensors used with this hub are an Agilent E1738A Air Sensor and one to three Agilent E1737A Material Temperatu...

Страница 17: ... 1 2 angular displacement about the axis measured pitch yaw roll translational perpendicular displacement about the axis measured straightness in the horizontal plane straightness in the vertical plane linear displacement Squareness and parallelism of travel between two or more axes characterize how the axes are positioned relative to each other Both measurements are accomplished by performing two...

Страница 18: ...her types of calibration systems The Agilent 5530 offers even more reliability because it uses Agilent s two frequency laser technique which virtually eliminates problems resulting from changes in beam intensity Figure 1 2 Six degrees of freedom 1 Pitch 2 Yaw 3 Roll 4 Horizontal straightness 5 Vertical straightness 6 Linear displacement 1 2 3 4 5 6 ...

Страница 19: ...w straight the machine will cut a part Squareness measurements consists of two perpendicular straightness measurements Parallelism measurements consist of two straightness measurements There are two types of parallelism measurements linear or coplanar and rotational Linear parallelism measurements are made along two axes that are parallel to each other Rotational parallelism measurements are made ...

Страница 20: ...Chapter 1 Introducing the Agilent 5530 Types of Measurements 1 8 Getting Started Guide 1 ...

Страница 21: ...2 Making Laser Measurements Safely ...

Страница 22: ...e your protection and the protection of the equipment Familiarize yourself with all these guidelines before setting up or using the Agilent 5530 Safety Labeling The following symbols appear on the Agilent 5530 When you see this symbol refer to the instruction manual for help This symbol indicates hazardous voltages Use caution This symbol indicates a ground terminal ...

Страница 23: ...and if necessary repaired it If an autotransformer is used for voltage reduction make sure the common terminal is connected to the earth terminal of the power source Use only fuses with the correct rating and specified type Do not use a repaired fuse or a short circuited fuse holder This could cause a shock or fire hazard WARNING This word identifies information that if ignored could result in per...

Страница 24: ...uct into which the Agilent 5519A B is designed Care must be taken to ensure that the end product complies with all applicable national and local laser safety regulations Using Components Safely When using any Agilent 5530 calibrator system s electronic component including the laser head air and temperature sensors and remote control unit observe the following guidelines Before connecting a compone...

Страница 25: ...id touching the exposed glass surfaces of the optics Fingerprints scratches and dirt reduce the beam intensity This does not affect the accuracy or system specifications but it does make alignment more difficult Heating and cooling of the optics affect the accuracy of your measurements To minimize this problem follow these guidelines Keep the optics away from sources of heat or cold such as air ve...

Страница 26: ...Chapter 2 Making Laser Measurements Safely Protecting the Optics 2 6 Getting Started Guide 2 ...

Страница 27: ...3 Installing the Software and Connecting Components ...

Страница 28: ...t 10747F Metrology Software on your PC Computer Requirements The Metrology software is compatible with any computer running the Windows operating system version XP or Windows Vista 32 bit with at least two USB 2 0 ports and a CD drive NOTE If your computer is equipped with only one USB port you will need to add a powered USB 2 0 hub If your PC is running Windows Vista only the 32 bit version of Vi...

Страница 29: ... You must be logged on to your PC as an administrator Navigate to the Microsoft download center by connecting to the Microsoft web site at www microsoft com and clicking on the appropriate link s Choose the link for the recommended downloads for Vista and then use the search feature on the Vista site to find winhelp32 exe Click on the appropriate link Allow Microsoft to validate your Vista softwar...

Страница 30: ...automatically use Explorer to display the contents of the CD and double click on the file setup exe 4 A small screen first appears to allow you to select the language for your installation Figure 3 2 Language Selection screen Follow the instructions of the installation program to install the Metrology software After the installation program is complete the Laser Metrology group is displayed in the...

Страница 31: ...3 2 Select Programs on the pop up menu see Figure 3 3 3 Select the Laser Metrology group 4 Select Laser Metrology see Figure 3 3 then select the 5530 icon To exit the Metrology Software general To exit the software follow these steps 1 Return to the Main Menu then select Quit A window is displayed asking if you are sure you want to quit 2 Select Yes to quit Select No or press Enter to return to th...

Страница 32: ...is Hub or the Sensor Module to the PC are identical 1 Connect the USB cable to the Axis Module see Figure 3 4 Figure 3 4 The Axis Module or Sensor Hub USB connector 2 Connect the USB cable to the Sensor Hub The Sensor Hub connection port is identical to the one on the Axis Module see Figure 3 4 above 1 Agilent E1735A USB Axis Module or Agilent E1736A USB Sensor Hub 2 USB connection port 3 COM read...

Страница 33: ...o a USB port on your PC or a powered USB 2 0 port connected to your PC 4 A screen will appear on your PC that states Welcome to the Found New Hardware Wizard Answer the question Can Windows connect to Windows Update to search for software by selecting the radio button No not this time see Figure 3 5 Figure 3 5 Installing the driver for the USB Axis Module screen 1 5 Click on Next ...

Страница 34: ...r Hub 3 8 Getting Started Guide 3 6 On the new screen that appears answer the question What do you want the wizard to do by selecting the radio button Install from a list or specific location Advanced see Figure 3 6 Figure 3 6 Installing the driver for the USB Axis Module screen 2 7 Click on Next ...

Страница 35: ...Getting Started Guide 3 9 3 8 On the new screen that appears select the radio button Search for the best driver in these locations Below this selection check the box for Search removable media floppy CD ROM see Figure 3 7 Figure 3 7 Installing the driver for the USB Axis Module screen 3 9 Click on Next ...

Страница 36: ... found and installed on your PC see Figure 3 8 Click on Finish to close the wizard 11 Next connect the USB cable from the Sensor Hub to a USB port on your PC or a powered USB 2 0 port connected to your PC 12 The Found New Hardware Wizard screen will again appear on your PC see Figure 3 5 Repeat steps 4 through 7 to install the driver for the Sensor Module Figure 3 8 Installing the driver for the U...

Страница 37: ...nectors for loose or damaged pins Look for evidence of oil or coolant on the cable or in the connectors If any of these conditions exist clean or replace the cable as needed NOTE Be aware that the sensors contain magnets to enable them to be easily attached to steel surfaces The E1738A Air Sensor must be connected to port 4 of the Sensor Hub any additional air sensors if used may be connected to a...

Страница 38: ...is may damage the pins inside of the connector The cable connector includes a spring loaded locking mechanism to hold the cable securely to the sensor To disconnect the cable release the lock by sliding back the knurled sleeve on the connector The cable connector should disconnect easily from the sensor Figure 3 9 Connecting a Sensor NOTE The Metrology software identifies a sensor by the number of...

Страница 39: ...ctor while inserting it This may damage the pins inside of the connector The cable connector includes a spring loaded locking mechanism to hold the cable securely to the Sensor Hub To disconnect the cable release the lock by sliding back the knurled sleeve on the connector The cable connector should disconnect easily from the Sensor Hub 1 4 Sensor connection ports 5 Agilent E1736A USB Sensor Hub 6...

Страница 40: ...he laser on the tripod will be given in Chapter 6 1 To plug the connector into the laser head port on the USB axis module orient the red dot on the connector to the key on the port labeled Laser Head see Figure 3 11 2 Insert the connector into the port When the connector is properly aligned it will slide into the port and lock Figure 3 11 Connecting the Laser to the Axis Module 1 Agilent E1736A US...

Страница 41: ...e 3 18 To use the USB axis module s A quad B encoder input connect it to the A quad B encoder output of the machine being calibrated using an Agilent 10887 60202 A quad B cable assembly Some preparation of the cable may be necessary Refer to additional information in Agilent 10887 60202 A quad B Cable Assembly on page 3 17 1 Power connector 2 Power switch 3 Port for Agilent 10882A cable that conne...

Страница 42: ... cable line up the red mark on the cable connector with the small circle above the port labelled Remote on the Axis Module When the connector is properly aligned it will slide into the port and lock Figure 3 13 Connecting the Remote Control Unit to the Axis Module 1 Agilent E1735A Axis Module 2 Module connector alignment mark 3 Cable connector alignment mark 4 Axis Module connector 5 Cable connect...

Страница 43: ... supplied with a mating connector for the Agilent E1735A module on one end The other end is unterminated allowing you to make the connections you need for use with your machine s encoder The cable s signal versus pin connections are listed in the table below Connector Front mating side Connector Rear View wire side Pin Number Wire Color Signal Name 1 Drains GND 2 White A 3 Black A 4 Wht Grn Gry 5V...

Страница 44: ... Manual selection of power source voltage is not required The laser head s internal power supply automatically adjusts to operate from any power source whose voltage and frequency range combination are listed next to the laser head s rear panel line power module 3 Press the Power switch on the laser head to the I position This turns on the laser head 4 Connect the PC power cord and turn on the PC ...

Страница 45: ...4 Using the Agilent 5530 for the First Time ...

Страница 46: ...you set it up on a machine to make an actual calibration For this tutorial you need a straightedge and the measurement template provided on page 4 21 in addition to the Agilent 5530 components Figure 4 1 shows the components set up for the tutorial Figure 4 1 Components set up for the tutorial 1 Personal computer with metrology hardware and software installed 2 Straightedge 3 Retroreflector assemb...

Страница 47: ...template on your work surface Then place the straightedge on top of it along the line indicated 3 Place the laser head on the measurement template so that its two front feet are on the circles on the template Make sure the straightedge extends at least 225 mm 9 inches in front of the laser head 4 Connect and turn on the system by following instructions in Chapter 3 Installing the Software and Conn...

Страница 48: ...te the direction of the arrows on the interferometer label These arrows indicate the direction of the laser beam as it exits the interferometer Make sure one arrow points to the retroreflector 7 Assemble the retroreflector as shown in Figure 4 3 8 Place the retroreflector against the straightedge as shown in Figure 4 1 1 Linear retroreflector 2 Height adjuster and post 3 Base 4 Linear interferomet...

Страница 49: ...the two to touch 9 Mark the positions of the interferometer assembly and retroreflector on the template with a pencil or piece of tape You will later move the optics and will have to return them to the position you marked You are now ready to set up the metrology software Figure 4 3 Assembling the retroreflector 1 Linear retroreflector 2 Post and height adjuster 3 Base 1 0 7 8 5 A H E I G H T A D ...

Страница 50: ...trology Software and general software information see Chapter 5 For most of your measurements you follow a basic path through the software setting up the laser and hardware setting up the measurements collecting data analyzing the data you collected To help you navigate through the measurements the button for the next screen in the basic path is colored green This is not necessarily the same as th...

Страница 51: ...2 Setting Up the Software Getting Started Guide 4 7 4 Figure 4 4 Sample Windows screen showing the metrology menu 3 Open the metrology software by selecting Agilent 5530 Dynamic Calibrator as shown in Figure 4 4 The Metrology Main Menu is displayed Figure 4 5 ...

Страница 52: ...nd press the mouse button once click If your mouse has more than one button press the left one If you do not want to use a mouse do one of the following Press the Tab key until the button is highlighted and press Enter Press the Alt key simultaneously with the letter that is underlined on the button The Set Up Laser LINEAR screen is displayed Figure 4 6 Use this screen to help set up the laser and...

Страница 53: ...9 4 Figure 4 6 Set Up Laser LINEAR screen 5 If the Position Units field to the right of the Measurement Axis diagram is not set to mm follow these steps a Select Change Parameters b Select mm in the Position Units box c Select OK You are now ready to align the optics to each other and to the laser beam path ...

Страница 54: ...rning the lower aperture control 3 Pass your finger between the interferometer assembly and retroreflector One of the alignment dots on the laser head should flicker This is the retroreflector return beam The other is the interferometer assembly return beam NOTE You may need to adjust the height of the interferometer and or the reflector to see both return beams on the target in the lower port on ...

Страница 55: ...ngth field on the Set Up Laser LINEAR screen does not display at least 60 percent follow these steps a Remove the interferometer assembly Using only the retroreflector the beam strength should be near 100 percent If the beam strength is not 100 percent Verify the laser head turret is in the Other position see Figure 4 7 Check the retroreflector lens for oily films fingerprints or physical damage I...

Страница 56: ...nd check the beam strength again Realign the optics if necessary 9 Move the retroreflector back to the starting zero point and check the beam strength again If strength is less than 60 percent repeat steps 1 through 9 10 Secure the straightedge to the work surface with tape 11 On the Set Up Laser LINEAR screen select Reset Position This resets the laser and establishes the current positions of the...

Страница 57: ... 1 On the Set Up Laser LINEAR screen select Set Up Meas The Set Up Measurement LINEAR screen is displayed Figure 4 8 This screen is used to define the parameters that are related to the actual measurement Note the value in the Target Window field near the top center of the display This is how close to each position you must move the reflector during the measurement Figure 4 8 Set Up Measurement LI...

Страница 58: ...r to determine values that are consistent with the one you entered 4 In the End Position field type 75 The value 75 mm is the position you will move the retroreflector to last 5 In the No of Points per direction field type 4 The value 4 represents the number of measurements you will make beginning with the start position 0 You do not need to fill in the interval the software calculates the interva...

Страница 59: ...select Record The Laser Position field displays the measurement position which is the current location of the optics In an actual measurement this would be the distance the machine moved from the zero point The Target field displays the distance that the retroreflector was supposed to move The system calculates this position from the numbers you entered earlier in the Start Position End Position a...

Страница 60: ... as they are collected The position and error values are shown in the table in the lower left corner of the screen 11 Select Record 12 Move the retroreflector another 25 mm 1 inch away from the interferometer assembly 13 Select Record 14 Move the retroreflector another 25 mm 1 inch away from the interferometer assembly 15 Select Record After you have made the specified number of measurements or cl...

Страница 61: ...Task 5 Displaying and Saving Data There are a number of ways you can use the data you collected during your measurement In this tutorial you will display your data on the screen and save it to a file using the Analyze Data screen Figure 4 10 Displaying analysis data The system allows you to create a graphic and statistical display of the measurement data ...

Страница 62: ...ws you to display the following information for each measurement point the actual measurement recorded the target position the amount of error in the measurement To display this information select Show Data on the Analyze Data LINEAR screen The Show Data Set LINEAR screen is displayed Figure 4 11 Figure 4 11 Show Data Set LINEAR screen ...

Страница 63: ...rement data follow these steps 1 Select Main Menu The Metrology Main Menu is displayed 2 Select Save Data The Save Data screen is displayed Figure 4 12 Figure 4 12 Save Data screen 3 If necessary select the drive on which you want to save the data The default is displayed at the top of the Disk Drives box To change the default follow these steps ...

Страница 64: ... eight characters in the File Name field below the files box 6 Select OK The system saves the file and returns you to the Metrology Main Menu Task 6 Exiting the Metrology Software To exit the software follow these steps 1 Return to the Main Menu then select Quit A window is displayed asking if you are sure you want to quit 2 Select Yes to quit Select No or press Enter to return to the Metrology Ma...

Страница 65: ...Getting Started Guide 4 21 Measurement Template 1 Laser feet positions 2 Straightedge position 2 1 1 ...

Страница 66: ......

Страница 67: ...5 Setting Up the Software for a Measurement ...

Страница 68: ...up the software for the laser head optics and measurement type making the measurement and collecting data analyzing and outputting the results of the measurements including transferring the data to a spreadsheet This chapter covers the first function chapters 6 and 7 cover the second and third Figure 5 1 provides an overview of the metrology software screens The specific instructions required to u...

Страница 69: ...lel Diagonal Time Base LIN ANG STR Recall Data Setup Only Setup Data Quit No Other Laser Diagram Yes Exit Program Quit OK Set Up Plotter OK Save Data OK Environ Laser Diagram Set Up Measurement Collect Data Collect Data Analyze Data Show Data Comp Table Analyze Data Save Data Show Data Next Axis Machine Info Set Up Graph Plot Linear Compensation Table Set Up Graph Machine Info OK OK Save Data Prin...

Страница 70: ...on use the left one Unless otherwise stated clicking has the same effect as moving the cursor to a button and pressing Enter default The software may supply information in a field or highlight a button based on a previous selection or the standard information flow This information is called the default dimmed fields If a field is dimmed or grayed it cannot be selected double click Press and releas...

Страница 71: ... field Only one choice can be selected in an option box To select an option click the mouse anywhere on the option s name or in the circle to the left of the option Options define system parameters Generally no direct action occurs when you select an option However changing an option may cause other system parameters to change For example switching from inches to millimeters on the Set Up Measurem...

Страница 72: ...that field is highlighted indicating that it will be replaced by what you enter from the keyboard If you use the arrow keys to move to the next field or click once in the field you are in insert mode and the information you type will be added to the existing information You can only work with one screen at a time However you can move to the PC Windows operating system without exiting the metrology...

Страница 73: ... move directly to the Metrology Main Menu OK Select this button to accept changes and close a window Previous Select this button to display the screen that logically precedes this screen You will notice that one button on the screen has a black frame around the text this is the default value You can select this button in the normal way or by pressing Enter Using Online Help This guide does not pro...

Страница 74: ... runs under the Windows operating system To use the metrology software you should be able to do the following in Windows select an item from a pull down menu or file list use a mouse to select or click a button icon open an application icon If you do not know how to do these tasks refer to the documentation provided with your Windows software To display the Metrology Main Menu follow these steps 1...

Страница 75: ...asurement Accessing the Software Getting Started Guide 5 9 5 Figure 5 2 Sample Windows screen showing the metrology icon 3 Open the metrology software by selecting Agilent 5530 Dynamic Calibrator The Metrology Main Menu is displayed Figure 5 3 ...

Страница 76: ...y Main Menu Selecting a Measurement Type The Metrology Main Menu shown in Figure 5 3 is your gateway to the Agilent 10747F Metrology Software You start with this screen to perform the following functions select your measurement type recall saved measurement or setup data save measurement and setup data exit the metrology software ...

Страница 77: ... 5 11 5 1 To make a linear angular or straightness measurement select the button for that measurement The Set Up Laser screen for that measurement type is displayed 2 Select the Other Meas button to display a menu of additional measurement types as shown in Figure 5 4 Figure 5 4 Other Measurements Menu ...

Страница 78: ...led without recalling the measurement data When you recall a file you are in effect recreating the measurement setup You can even return to a point in the measurement process where you left off See Saving Setup Data and Measurement Data Files in this chapter for instructions on saving files To recall a file follow these steps CAUTION Recalling a file erases all unsaved data You may want to save th...

Страница 79: ...lect the disk drive where the file is stored Click the arrow or press the Alt key and the down arrow key simultaneously to display available disk drives Then select the name of the drive you want 3 Select the directory where the file is stored A list of files is displayed The three character file extension indicates the type of measurement for example type lin for linear ...

Страница 80: ...setup data from the file is recalled The measurement data is erased and the Set Up Laser screen is displayed NOTE To return to the Metrology Main Menu without recalling a file click Previous The setup is not changed and your unsaved measurement data is not erased Saving Setup Data and Measurement Data Files You can save measurement data at any time during your measurement using the following steps...

Страница 81: ... key simultaneously to display available disk drives Then select the name of the one you want 4 Select the directory where the file is stored 5 To replace an existing file with the new file select a file name from the list To create a new file type a new file name in the File Name box To select a name from the list that is displayed click on the file name or highlight the file name and press Enter...

Страница 82: ...defaults to the type of measurement selected on the Metrology Main Menu at the beginning of the measurement NOTE To return to the previous screen without saving the file select Previous 6 Select OK to save the file The file is saved and you return to the Metrology Main Menu 7 Click Previous to return to the screen you were using before moving to the Metrology Main Menu or Analyze Data screen Exiti...

Страница 83: ...se it to perform the following functions verify that the hardware is connected and working and that the optics are aligned test the remote control set up environmental compensation define laser parameters reset the laser position The Set Up Laser screen is customized for each measurement type Figure 5 7 shows the version of this screen for linear measurements If you haven t already done so connect...

Страница 84: ...setup The Set Up Laser screen automatically verifies the following The laser head is connected and is ready to make a measurement The return beam has sufficient strength to make the measurement The Agilent E1735A USB Axis Module and Agilent E1736A USB Sensor Hub are installed and working If any of these verifications fail an error message replaces the numeric display at the top of the screen ...

Страница 85: ...entative for additional help Setting up environmental compensation To display the Set Up Environmental Compensation screen Figure 5 8 select Environmental on the Set Up Laser screen This screen performs the following functions If you are using sensors and automatic compensation this screen displays the environmental readings that affect measurements the wavelength of light compensation factor and ...

Страница 86: ... you can redefine the following parameters Position Units and Error Units determine the measurement units Laser Direction Sense determines which direction of travel will increase the measurement number Encoder Type and Resolution determines if the machine tool s encoder pulses are used as the reference to the machine tool s position If the encoder pulses are used this parameter determines the meas...

Страница 87: ... yielding a more stable display Choose a period that is shorter than the machine dwell time at each point Choices are 0 sec turns averaging off 1 sec default 1 sec or 10 sec Preset this value determines the offset from zero when the laser position is reset This is different from deadpath compensation works both on the preset distance and the measured distance Refer to the online help for more info...

Страница 88: ...ready to begin the measurement The laser beam was blocked or it lost its lock and you corrected the problem The Encoder is changed from Not Used to A quad B or Up Down To reset the laser position select Reset Position on the Set Up Laser screen You are now ready to use the Set Up Measurement screen Setting Up Your Measurement After completing your laser software setup select Set Up Meas on the Set...

Страница 89: ...rward and reverse Bidirectional or backward and forward for one point at a time Pilgrim Trigger determines if the remote control machine tool encoder or an automatic trigger will signal the software to record a measurement See the Agilent 5530 Dynamic Calibrator Measurements Reference Guide for information on selecting a triggering mode The Record Button manual trigger is used unless Auto or Encod...

Страница 90: ...rement 5 24 Getting Started Guide 5 Set Up Targets defines the target list To display and edit the target list Figure 5 11 press Show Targets Figure 5 11 Set Up Measurement screen with Set Up Targets window open You are now ready to begin making the measurement See Chapter 6 ...

Страница 91: ...6 Making the Measurement ...

Страница 92: ...pod see Figure 6 1 and follow these steps 1 Remove the tripod and mounting plate from the transit case 2 Spread the tripod legs fully and extend each leg to the approximate height you require 3 Place the mounting plate on the tripod The base of the mounting plate fits into over the top of the tripod Align the mounting plate as shown in Figure 6 1 4 Hand tighten the mounting plate screw that secure...

Страница 93: ...Laser head 2 Handle 3 Elevation adjustment nut 4 Azimuth adjustment knob 5 Slide adjustment knob 6 Mounting plate retention screw 7 Tripod 8 Knob to lock height adjustment in place 9 Leg locks 10 Knob to stiffen leg support 11 Height adjustment knob 12 Knob to lock the rotation of the mounting plate 13 Mounting plate 2 1 13 12 3 4 5 6 7 8 9 9 10 11 ...

Страница 94: ...unting plate b Place the laser head s rear foot in the groove on the azimuth adjustment screw Turning the azimuth adjustment knob rotates the laser head in the horizontal plane The related movement of the laser head s front feet is enabled by the flexure that attaches their supporting pedestals to the main part of the mounting plate 7 Secure the laser head to the mounting plate The laser head s fr...

Страница 95: ...r head s rear foot 5 Azimuth adjustment screw 6 Azimuth adjustment knob 7 Slide adjustment for translating the laser head 8 Slide adjustment knob 9 Groove for lower edge of the mounting clamp 10 Knob to lock the rotation of the mounting plate 11 Mounting plate base 12 Retaining screw View of the top side of the mounting plate assembly View of the underside of the mounting plate assembly 1 1 7 8 6 ...

Страница 96: ... clamp in place With the laser head secured to the mounting plate ensure that the rear foot screw moves easily and the laser head responds to its adjustment the tripod is level and stable You can now use the handle on the laser head to carry the laser head and tripod as a unit 1 Knurled knob for pedestal captive screw 2 Elevation adjustment screw 3 Elevation screw locknut 4 Clamp for rear foot 1 2...

Страница 97: ...nd the measurement portions of the software you are ready to collect measurement data On the Set Up Measurement screen select Collect Data The Collect Data screen is displayed Figure 6 4 The Collect Data screen displays the results of your measurement in three ways numeric displays Position Error list box graph of data as it is recorded Figure 6 4 Collect Data screen ...

Страница 98: ...of the screen You cannot edit the values in the list box but you can remove points by selecting Erase Data See Erasing Measurement Data in this chapter for more information A status message is displayed beneath the list box indicating the travel mode and run status for example Bidir Run 3 of 10 run 3 out of a total of 10 runs in bidirectional mode Recording Measurement Data The procedure for recor...

Страница 99: ...r measurement you record data you do not want or if you need to collect additional data the metrology software enables you to erase one or more data points Follow these steps 1 On the Collect Data screen select Erase Data The Erase Data window is displayed Figure 6 5 Figure 6 5 Collect Data screen with Erase Data window open ...

Страница 100: ... target value so you can retake the measurement Erase last data run erases the current partial data run or the last run if there is no data in the current run and sets up data collection at the beginning of the run Erase to beginning erases all data for the current axis and sets up data collection at the beginning of the first run for that axis 3 Select Erase If you do not want to erase any data s...

Страница 101: ...7 Analyzing Transferring and Printing Measurement Data ...

Страница 102: ...atability mean backlash slope This chapter describes how to use the system to make these analyses It also explains how to alter the way the data is displayed on the screen transfer the data to a spreadsheet program print the data and the analysis See Chapter 5 Setting Up the Software for a Measurement for information on saving the data NOTE This guide does not provide instructions for completing e...

Страница 103: ...yed Figure 7 1 Figure 7 1 Analyze Data LINEAR screen The Analyze Data screen presents graphical data and numerical analysis of the data set Use the Set Up Graph screen by selecting the Set Up Graph button to specify what numerical analysis is to be performed on the data what analysis is to be plotted on the graph shown on the Analyze Data screen On the Analyze Data graph the horizontal axis repres...

Страница 104: ...hapter 5 Setting Up the Software for a Measurement for instructions on saving data After the data is saved you return to the Analyze Data screen Changing the Data Display Autoscaling To alter the display to show only the portion of the graph that contains data select Autoscale Vertical The display remains the same size and the axes are scaled to display only the measurement data Adding text to you...

Страница 105: ... hidden 3 Type your text The text scrolls to fit the shape of the box If the text overflows the box it will scroll out of sight 4 To move or resize the box click Add Text again which causes the box to disappear Then click and drag again which causes the box to reappear at the new location and size still containing the entered text Displaying and editing measurement data To display the measurement ...

Страница 106: ...ved To change an individual measurement value follow these steps 1 In the table on the Show Data Set screen highlight the value you want to change 2 Type the new value in the Change Error box 3 Press Enter on the keyboard or select another measurement value from the list Figure 7 2 Show Data Set LINEAR screen For linear measurements you can create a compensation table See Creating a compensation t...

Страница 107: ...ze Data screen select Plot then click Plot again in the pop up Plot Type menu Alternatively click the Plot ISO 230 2 button to print the graph in that format If the required number of data runs have not been taken a warning message will be displayed In either case a standard Windows Print screen is displayed Figure 7 3 See your Windows documentation for instructions on using this screen Figure 7 3...

Страница 108: ...t Data to File screen is displayed 4 Type a file name in the File name box or use the suggested default Use the browser to specify the desired drive and folder then click OK The data is saved as an ASCII file with tab separated values and can now be used as input to a spreadsheet program or other application software After the data is saved you will automatically return to the Show Data Set screen...

Страница 109: ...and graphical analyses If you alter any of the settings dictated by the industry standard selected when you select OK and return to the Analyze Data screen the comment box will show the standard followed by modified along with the results of the numerical analysis The numerical analysis figures present a single calculated value for all data points in the measurement The graphical analysis enables ...

Страница 110: ...s the following legend machine information See Entering machine information for more information environmental data numerical analysis Entering machine information To display the Machine Information screen Figure 7 5 select Machine Info on the Set Up Laser or Set Up Graph screen This screen records information about the machine you are calibrating This information is stored with the data files for...

Страница 111: ... select Comp Table from the Show Data Set screen The Linear Compensation Table screen is displayed Figure 7 6 Compensation is based on the data as it appears in the Show Data Set screen The Linear Compensation Table screen presents compensation values in the user s machine units and can interpolate where target positions do not match the machine s compensatable positions Compensation can be based ...

Страница 112: ...Chapter 7 Analyzing Transferring and Printing Measurement Data Setting Up the Data Analysis Graph 7 12 Getting Started Guide 7 Figure 7 6 Linear Compensation Table screen ...

Страница 113: ...8 Ensuring Repeatability Accuracy and Resolution ...

Страница 114: ...you should understand their meanings To help visualize these terms think of a sharpshooter firing at a target Figure 8 1 Figure 8 1 Example of repeatability accuracy and resolution Repeatability is the range among a group of measurements at a target position In the sharpshooter example the compactness of the shot pattern is a measure of repeatability for that person using that weapon in that envir...

Страница 115: ...ion of a group of measurements and the location of the target position for those measurements Accurate parts are exactly like the drawing for those parts repeatable parts are exactly like each other A batch of parts all rejected for the same flaw are repeatable but not accurate Resolution is the smallest increment of scale In the sharpshooter example resolution is the distance between rings in the...

Страница 116: ...u can use remote air sensors such as the Agilent E1738A and remote material temperature sensors such as the Agilent E1737A Or if you are receiving environmental data from another source you can enter compensation parameters through the Set Up Environmental Compensation screen The metrology software uses this data to calculate a total compensation factor The system references measurement readings t...

Страница 117: ...ases in proportion to the size of the angular offset and the distance of the linear offset To minimize this error you should make your measurement as close as possible to what you are measuring For example if you want to determine the accuracy of a machine s lead screw or scale make your measurement as close as possible to the screw or scale If on the other hand you want to measure how accurately ...

Страница 118: ...ollowing formula Deadpath error Deadpath is the part of the measurement path that the retroreflector never moves through In other words it is the distance between the interferometer and the retroreflector when they are closest together see Figure 8 3 Measurement axis at lead screw Measurement axis at probe or tool path 1 Measurement axis 2 Work piece 3 Abbé offset 4 Error in measurement 5 Measured...

Страница 119: ...measurement axis are not parallel Figure 8 4 When the laser path is not properly aligned with the machine travel the laser beam travels at an angle to the actual machine travel As a result the recorded measurement is shorter than the actual distance the machine traveled The error increases as the angle or distance grows 1 Laser head 2 Interferometer assembly 3 Deadpath distance for first interfero...

Страница 120: ...tch for irregularities in your linear measurements If the amount of error is steadily increasing you may have significant cosine error Allow the temperature of the optics to stabilize before making the measurement approximately 5 to 10 minutes 1 Laser head 2 Interferometer assembly 3 Retroreflector at the first measurement position 4 Displacement along the axis of measurement 5 Retroreflector at t...

Страница 121: ...ness and parallelism measurements The accuracy of your straightness measurement can be reduced by the following factors the accuracy of the straightness reflector mirrors misalignment slope between the machine travel and the laser measurement axis environmental factors Ensuring the accuracy of straightness reflector mirrors The accuracy of the straightness measurement depends on the two plane mirr...

Страница 122: ...ector along a path parallel to the machine travel axis Figure 8 5 You can have the Agilent 10747F software automatically adjust for the effects of slope on your measurement Figure 8 5 Example of slope in a straightness measurement To have the software adjust for slope follow these steps 1 Go to the Set Up Graph screen 2 If necessary turn on the slope correction feature by selecting it 3 Select the...

Страница 123: ...ct of thermal expansion follow these guidelines Allow the machine and optic temperatures to stabilize before making your measurement Try to minimize the total time of your measurement If your work area is not temperature controlled parts of the machine may expand or contract at different rates throughout the day Excessive vibration and air turbulence can be identified by the following signs random...

Страница 124: ...ents You can also help factor out the vibrational effects by averaging successive runs or averages Air turbulence is caused by temperature differences in the air To minimize the effect of air turbulence follow these steps 1 Remove sources of temperature fluctuations such as open doors motors lamps exhaust fans 2 Stir the air along the measurement path with a large fan to stabilize the temperature ...

Страница 125: ...in the same place each time Standardize the machine environment for example Match the conditions surrounding the measurement as closely as possible from one calibration to the next Be sure the machine s foundation is rigid and will not move with the machine s motion Keep the temperature around the machine as stable as possible Remember unless your work area is temperature controlled the temperatur...

Страница 126: ...e resolution of your system depends on the optics you are using and the size of your sample To get the best resolution from your optics follow these guidelines Be sure to use the optics most appropriate for your measurements Examine the optics to be sure they are clean and in good condition If your measurement requires extra high resolution you may need to use the following optics used with the Ag...

Страница 127: ...9 Troubleshooting and Maintenance ...

Страница 128: ...e using the Agilent 5530 and provides solutions Table 9 1 Problems and Solutions Problem Solution Lost motion or backlash Check the physical condition of the machine tool This problem could be caused by the following lack of lubrication the gib is too tight the thrust bearing or ball screw is bad unbalanced tuning of the servo control card Measurement results drift when the optics are at rest Make...

Страница 129: ...ed on the Set Up Environmental Compensation screen Record button does not work If using the remote control unit make sure the cable is connected properly Loss of beam strength before end of travel path Check the alignment of the optics and laser head Clean the optics if necessary See Maintaining the optics in this chapter for instructions Table 9 1 Problems and Solutions Continued Problem Solution...

Страница 130: ...ses adequately CAUTION Do not use pressurized air to clean lenses that are recessed into an optic such as the lenses on an Agilent 10736A Interferometer Cleaning with lens tissue and methanol or alcohol If pressurized air does not clean the lens adequately you may need to use lens tissue and methanol or alcohol 1 Fold the lens tissue into an approximately 25 mm 1 inch square 2 Wet the tissue with ...

Страница 131: ...leaning solution such as Simple Green applied to a soft cloth or paper wipe Be careful not to spray cleaner into the sensor case openings Do not open the casing to clean inside Checking accuracy quickly Check the air sensor s temperature reading by placing the sensor next to an Agilent E1737A material temperature sensor The material temperature sensor must be facing up After stabilization allow 5 ...

Страница 132: ... C 0 9 F you can assume that the sensor is inaccurate If the E1737A Air Sensor s accuracy is outside these guidelines return the sensor to Agilent for calibration Returning sensors to Agilent for calibration A sensor s accuracy is based on a 1 year calibration cycle Every 12 months you should return the air and material temperature sensors to Agilent for calibration See the Service and Support pag...

Страница 133: ...Glossary ...

Страница 134: ...s For example ambient temperature refers to the temperature of the machine s environment AMT Association of Manufacturing Technology ANSI American National Standards Institute arcsec arcseconds 1 3 600 of one degree of arc equivalent to approximately 4 85 micro units per unit ASME American Society of Mechanical Engineers azimuth 1 The lateral deviation of the laser beam from the machine travel pat...

Страница 135: ...static sensitive electronic components such as PC boards far end of travel The point in a measurement setup when the measurement optics are at their farthest distance apart interferometer An optic that separates a beam of light into two or more paths and subsequently recombines the beams after they traverse different optical paths ISO International Organization for Standardization JIS Japanese Ins...

Страница 136: ...entage pitch The angular motion of a carriage or slide designed for linear motion that is perpendicular to the desired linear motion and perpendicular to the yaw of the carriage ppm Parts per million referent The point or object that is used as a reference For example the position of the interferometer repeatability The range among a group of measurements at a target position resolution The smalle...

Страница 137: ...state translation of the laser head Linear movement of the laser head without changing its angle tilt to direct the laser beam as required for your measurement wavelength of light WOL compensation Correction for the small changes in the wavelength of light due to changes in the refractive index of air WOL Wavelength of light yaw Rotation about a vertical axis see Figure G 1 VDI Verein Deutscher In...

Страница 138: ...Glossary G 6 Getting Started Guide Glossary ...

Страница 139: ...lyze Data Linear screen illustrated 4 17 Analyze Data screen illustrated 7 3 Analyze Data Linear screen illustrated 4 17 assembling optics tutorial 4 3 assembling the interferometer illustrated 4 4 assembling the retroreflector illustrated 4 5 autoscaling 7 4 B buttons using 5 7 C cable assembly Agilent 10887 60202 A Quad B 3 17 calibrating the laser overview 1 5 changing the data display 7 4 clea...

Страница 140: ...iting software 5 16 exiting the software 4 20 extended resolution 8 14 F font of the laser head illustrated 4 10 front of the laser head illustrated 4 10 G glossary G 2 Graph screen illustrated 7 9 graph data analysis printing 7 7 H help online 5 7 I illustrated 6 7 improving resolution 8 14 industrial standards 1 3 industry standard selecting 7 9 inspecting components 3 11 installing software 3 4...

Страница 141: ...ents menu illustrated 5 11 overview system 1 4 overview of system 1 4 P parameters defining 5 20 PC calibrator board overview 1 4 PC compensation board overview 1 4 physical setup errors 8 4 power and turn on the system 3 18 power connector laser head 3 15 Print window illustrated 7 7 printing the data analysis graph 7 7 protecting optics 2 5 R Recall Data screen illustrated 5 13 recalling files 5...

Страница 142: ... 5 21 Set Up Laser Linear screen illustrated 5 18 Set Up Linear screen illustrated 4 9 Set Up Measurement screen illustrated 5 23 5 24 Set Up Measurement Linear screen 4 13 setting up environmental compensation 5 19 for tutorial illustrated 4 2 the data analysis graph 7 8 the laser software 5 17 setting up the software 4 6 Show Data screen illustrated 7 6 Show Data Linear screen illustrated 4 18 s...

Страница 143: ...Index Getting Started Guide Index 5 U using buttons 5 7 using online help 5 7 V verifying the hardware setup 5 18 W wavelength of light WOL 5 19 Windows screen 5 9 Windows screen illustrated 4 7 ...

Страница 144: ...Index Index 6 Getting Started Guide ...

Страница 145: ...measurement product or application you can find a list of local service representatives on the web site listed above If you do not have access to the Internet one of the following centers can direct you to your nearest representative Asia Pacific Hong Kong SAR Tel 852 2599 7777 Fax 852 2506 9284 Australia New Zealand Blackburn Victoria Australia Tel 61 3 9210 5555 Canada Mississauga ON Canada Tel ...

Страница 146: ...001 A3 2003 CISPR 11 1990 EN 55011 1990 Group 1 Class A IEC 61000 4 2 1995 A1 1998 EN 61000 4 2 1995 4 kV CD 8kV AD IEC 61000 4 3 1995 EN 61000 4 3 1996 3 V m 80 1000MHz IEC 61000 4 4 1995 EN 61000 4 4 1995 0 5 kV signal lines 1 kV power lines IEC 61000 4 5 1995 EN 61000 4 5 1995 0 5 kV line line 1kV line ground IEC 61000 4 6 1996 EN 61000 4 6 1996 3 V 0 15 80 MHz 1 cycle 100 IEC 61000 4 11 1994 E...

Страница 147: ...s Act Supplier Code N279 CISPR 22 1993 EN 55022 1994 AS NZS 2064 1 2 Class A IEC 801 2 1991 EN 50082 1 1992 4 kV CD 8 kV AD IEC 801 3 1984 EN 50082 1 1992 3 V m IEC 801 4 1988 EN 50082 1 1992 0 5 kV Signal Lines 1 kV Power Lines The requirements of the European Council Directive 73 23 EEC IEC 1010 1 1990 A2 EN 61010 1 1993 Date December 12 1995 _ Bruce Euler Quality Engineering Manager Contact you...

Страница 148: ...up to the greater of 300 000 or the actual amount paid for the product that is the subject of the claim and for damages for bodily injury or death to the extent that all such damages are determined by a court of competent jurisdiction to have been directly caused by a defective Agilent product TO THE EXTENT ALLOWED BY LOCAL LAW THE REMEDIES IN THIS WARRANTY STATEMENT ARE CUSTOMER S SOLE AND EXCLUS...

Страница 149: ......

Страница 150: ... 10747 90061 Manual Part Number 10747 90061 Printed in U S A OCTOBER 13 2008 ...

Отзывы: