background image

[email protected] 

Page | 26 

 713-893-4514 

Firstly, make sure your router is wireless capable. You will not be able to use wireless without a wireless 
router. 

Make sure the Wi-Fi antenna is properly installed to the back of your camera. Twist the connector onto 
the camera’s Wi-Fi port so it is connected tightly. 
 

Login to the camera and sign in to get to the main camera screen with live video. To get to the Wireless 
Settings page, hover over “Network Settings,” and click on the option that reads “Wireless LAN Settings.” 
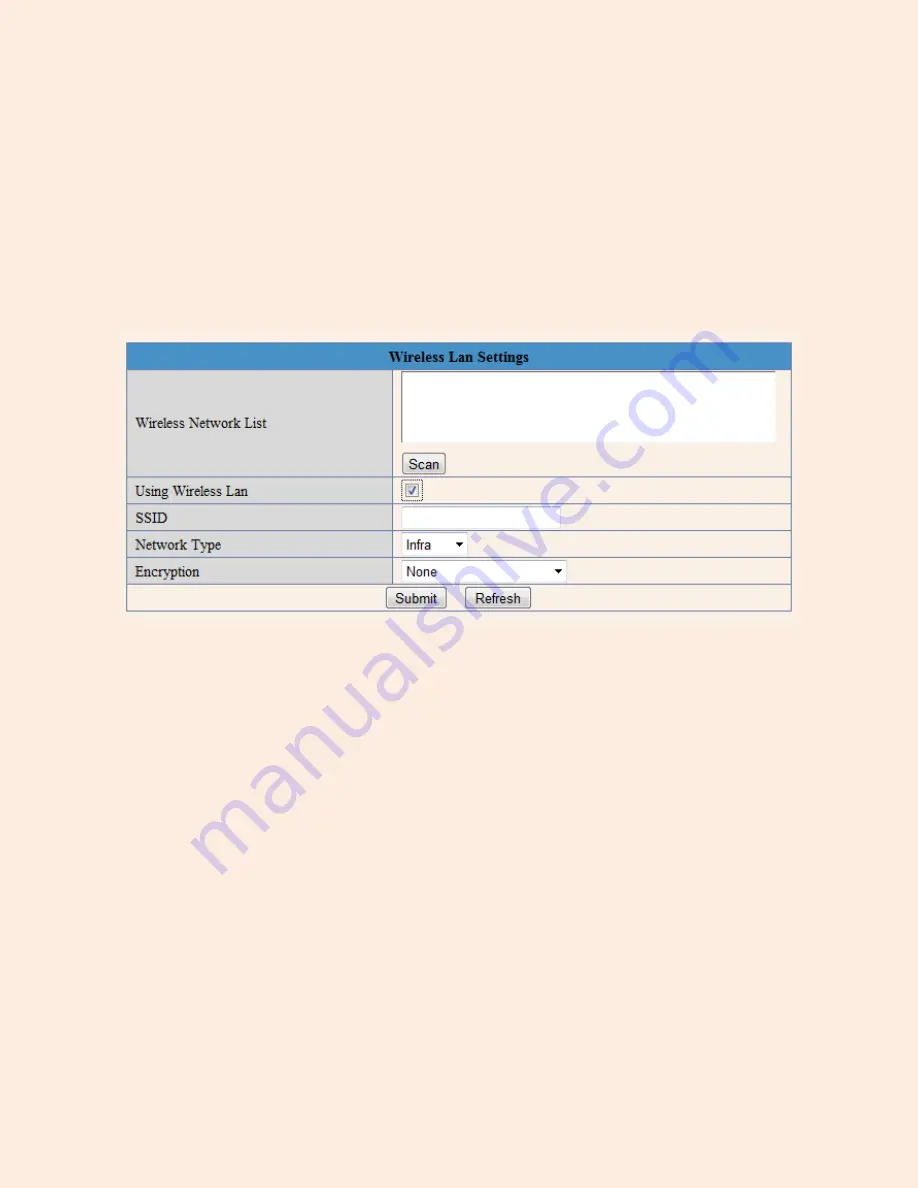
Make sure to check the option that reads “Using Wireless LAN.” You will be brought to the screen as 
pictured below. 


Figure 13.1 

– The Wireless LAN Settings page 


On this page you will see a few different fields; they are explained in further detail below. 

Wireless Network List 

– 

All wireless networks within the vicinity of the camera will appear in this list. In 

order to see the networks, please push the “Scan” button 

twice

. You should see a list of all available 

networks, and you can click on a network to have the rest of the fields automatically populated, except for 
the 

Share Key 

field. 

Using Wireless LAN 

– When using wireless, this box must be checked. 

SSID 

– This is the name of your Wireless Network, you may have a default name set by the router 

(2WIRExxx for ATT customers as an example) or you may have set a custom name for your router. That 
name goes in this field. 

Network Type 

– This field describes the type of network the camera is running on. There are two options, 

Infra and Adhoc. Currently, Adhoc networks are not supported by the cameras, so this option must 
remain on 

Infra

Содержание A622W

Страница 1: ...support agasio com Page 0 713 893 4514 Wireless Wired Network IP Camera Night Vision and Remote Operation A622W Wireless PT Camera User Manual www agasio com...

Страница 2: ...IP outdoor dome PTZ cameras and IP Indoor PT cameras Please check the packaging to make sure you have received all items including the camera accessories as follows Agasio IP Camera Wi Fi Antenna If...

Страница 3: ...me Firefox Safari Page 17 9 Main Menu Interface Page 18 10 Administrative Settings Page 21 11 Multi Device Settings Page 22 12 Basic Network Settings Page 25 13 Wireless Settings Page 25 14 ADSL Setti...

Страница 4: ...oduct with a power source that supplies more than the specified voltage which is 100 240 V AC 2 Never insert anything metallic into the camera Inserting metal objects into the camera can cause electri...

Страница 5: ...n conjunction with any other antenna or transmitter 2 Product Specifications Agasio cameras adopt high performance strong function media processors 32 Bit RSIC High sensor CMOS Optimized MJPEG video c...

Страница 6: ...l wiring for outdoor cameras or on the back of the camera for indoor cameras and plug in the other side of the RJ 45 cable to a port on your router switch 4 It takes approximately 30 seconds to boot u...

Страница 7: ...4514 4 Software Installation Firstly insert the CD into your CD drive and then open the CD to see the files on your computer Figure 4 1 Double click your CD DVD Drive to browse the CD files Figure 4...

Страница 8: ...his file and a dialogue box should appear that reads The installation finished successfully Press OK 2 Next click the application named Search tool The program will begin to run automatically from the...

Страница 9: ...ollows Figure 5 1 Search Tool IP Camera Software Note The Search Tool IP Camera Software searches for cameras directly connected to the Local Area Network LAN of the router the computer is connected t...

Страница 10: ...the total number is displayed in the Equipment field as shown in Figure 5 1 1 Current Computer Fields under this section indicate the Computer s IP Address information 2 Equipment information This sec...

Страница 11: ...always 255 255 255 0 You can find the subnet mask under the Current Computer section of the software in the field Sub Mask Gateway Just like the IP address make sure all four sections of the Gateway a...

Страница 12: ...ddress of the camera This IP address can be entered in any browser s URL field to bring up the camera login You can also push the button on the right of the field that reads Open This will open the ca...

Страница 13: ...support agasio com Page 12 713 893 4514 Figure 5 5 Login is required Default username is admin with no password Figure 5 6 You can choose which option to sign in as depending on your browser...

Страница 14: ...ble within mobile phone browsers 7 Viewing with Internet Explorer Choose Active Mode For IE Browser and sign in When logging into the camera for the first time you may receive an ActiveX prompt as see...

Страница 15: ...rnet Explorer s security settings using the following steps Note You may need to disable your firewall firstly to see if this is not causing the issue You will need to change the ActiveX settings with...

Страница 16: ...Scroll down on this screen to where it reads ActiveX controls and plug ins as the parent option and set the child options to Enable The most important options to keep enabled are the following Enable...

Страница 17: ...e parent category named Security Check the option which states Allow software to run or install even if the signature is invalid This is pictured below Note Make sure that your firewall or anti virus...

Страница 18: ...ch as Play Stop Record Audio Talk and Snapshot If you want to use these functions please use IE Browser Note There is an extension for Chrome and Firefox that allows you to open an Internet Explorer t...

Страница 19: ...This navigational circle controls the camera pan and tilt You can click the arrows around the circle to pan and tilt accordingly The Pan Tilt feature will only work if a camera has this function avail...

Страница 20: ...Settings then clicking PT Settings The lower the value the faster the Pan Tilt Speed will be This button is for setting a preset for the camera Set the camera to your desired area then click this but...

Страница 21: ...e enabled on the computer it can be used to talk into the camera and the sound will be heard from the camera speakers This option enables Camera to User audio If the operator on the computer has speak...

Страница 22: ...y will be administrators visitors or operators Visitors Users with visitor access can only view the live video of the camera Operators Users with operator access can pan and tilt the camera using the...

Страница 23: ...navigate to the Multi Device Settings page hover over Device Settings and click on Multi Device Settings On the configuration page you will be able to see all the cameras currently connected to your...

Страница 24: ...st and the fields should automatically populate with the IP address Alias and HTTP port Enter the username and password for that camera and click Add You can repeat this process for up to 9 cameras If...

Страница 25: ...p view click on Live Video on the left side of the interface You can then change the view from single to 4 view or 9 view depending on how many cameras you have added This option is seen pictured belo...

Страница 26: ...ess in the future for any reason you can do so from here as an alternative rather than using the Search Tool This section has an extra field named Obtain IP from DHCP Server This option allows an IP a...

Страница 27: ...ee a few different fields they are explained in further detail below Wireless Network List All wireless networks within the vicinity of the camera will appear in this list In order to see the networks...

Страница 28: ...k is running This is different for all routers The most popular encryptions are WEP WPA and WPA2 You can find this information by going to the Control Panel on your computer and navigating to Network...

Страница 29: ...l need to use to determine the value of the Encryption field in the Wireless Settings Page In the example in Figure 13 3 the value we would use in the Wireless Settings page would be WPA2 Personal AES...

Страница 30: ...will take 30 seconds to reboot It will go through the same pan tilt cycle if it is a pan tilt camera just as it does when it is powered up This indicates the wireless settings being uploaded to the ca...

Страница 31: ...meaning any computer with an internet connection and the proper system requirements will be able to see the camera as long as you input the correct the external IP address into your browser You can ev...

Страница 32: ...will be prompted to log in Log in with a username of admin and password of admin or leave it blank These are default values if these do not work consult the router s user manual If you have changed t...

Страница 33: ...the category Enabled Remember to click Continue when you are finished Figure 15 1 An example of how port forwarding should look in a Linksys router After this is done your camera should be set up to...

Страница 34: ...For example we would type in our browser the following 50 79 253 205 99 and push Enter This should take us to our camera Remember to always add a colon and the port number after the external IP addre...

Страница 35: ...formation Check the box under the category that reads Enabled Type a general description of the application in this case it will be an Agasio Camera so type IPCAM Type the port s that you have specifi...

Страница 36: ...To see if you can access your camera with the external IP address find out your external IP address by going to http whatismyipaddress com The IP address there is your external IP address which you wi...

Страница 37: ...med Advanced Next click the button on the left side that reads Port Forwarding The Port Forwarding settings page will appear As listed in Figure 15 3 type in the information of the camera into the rel...

Страница 38: ...e us to our camera Remember to always add a colon and the port number after the external IP address 16 Dynamic DNS Settings DDNS Dynamic DNS is a service used specifically for users who have Dynamic I...

Страница 39: ...ere is a free trial for Dynamic DNS Service available from Dyn com DynDNS com Below are the steps to sign up for a free account and use one free host name Enter the following URL into your browser htt...

Страница 40: ...the field that reads IP Address Dyn com will show you your current location s IP address in the example above it is 50 79 253 205 You can click the link listed there to automatically populate the fie...

Страница 41: ...ter a Username and Password you would like to use with your Dyn com account In this example we used the username Agasio and password Agasio Enter your e mail address and type in the numbering on the s...

Страница 42: ...he e mail address you provided Check your e mail to find the e mail from Dyn com asking you to confirm your account Click on the link listed in the e mail and it will take you back to the next steps o...

Страница 43: ...cel your trial within 14 days A valid credit card is needed for your DynDNS trial you may cancel this trial any time after creation within 14 days to keep one free host name which is all you need for...

Страница 44: ...ort agasio com Page 43 713 893 4514 Figure 16 6 The screens above indicate the completion of your trial account setup note that you can always cancel your trial and keep one hostname free without a ch...

Страница 45: ...pport agasio com Page 44 713 893 4514 Figure 16 7 As seen above cancelling your trial has no effect on the first host name you register thus allowing you to use this host name for free for your camera...

Страница 46: ...ll that needs to be done is to push Submit Once you have entered the information in the service settings and pushed Submit you should be able to access your camera using the provided host name In this...

Страница 47: ...ate Client and installed it onto your computer The update client automatically updates your IP address as it changes so that the hostname will always be updated with the external IP address even if it...

Страница 48: ...should be your e mail address for example Agasio gmail com Receiver 1 4 These fields are for the e mail addresses you would like notifications sent to Put your own e mail address as well as any addit...

Страница 49: ...the end into the SMTP User field and the password into the SMTP password field Note Please make sure to push Submit before pushing Test Once you push Submit you can then test the e mail by pushing th...

Страница 50: ...a linkage alarm GPIO When triggered there are three different alarm modes The first is IO alarm linkage where the camera is connected with linkage directly to the alarm box through GPIO and sounds the...

Страница 51: ...ss the camera anymore Figure 19 1 The bottom of an Agasio indoor model camera the reset button is located on the right To perform a hard reset take the end of a paper clip and push the button that is...

Страница 52: ...rmware page when hovering over Device Settings then clicking on Upgrade Device Firmware You can upgrade the firmware by clicking Browse locating the downloaded firmware on your computer selecting it a...

Страница 53: ...ver Device Settings and clicking the button which reads Reboot Device Once you click this button a window similar to Figure 21 1 will appear click OK to confirm and wait about one minute for the camer...

Страница 54: ...eturned item upon the receipt of shipment 4 RMA turnaround time is within two 2 weeks 10 business days after receipt of returned items The replacement item s will be ready for return shipment by this...

Отзывы: