


GB & IE
41
IMPORTANT NOTE: THE HANDSET IS PAIRED WITH THE VALVE IN THE FIRE DURING
MANUFACTURE. PAIRING IS NOT LOST IF BATTERIES ARE REMOVED.
THE DISPLAY ON THE
HANDSET MAY LOSE RECORD OF THE TIME IF BATTERIES ARE REMOVED BUT PAIRING WITH
THE VALVE WILL REMAIN. REFER TO INSTRUCTIONS RELATING TO SETTING THE TIME TO
RESTORE TIME TO THE DISPLAY.
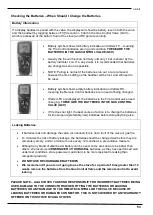
If the green indicator light is flashing like a heartbeat, the handset is not communicating with the valve
(on the display handset the communication symbol will be missing)
Communication can be lost for various reasons including, but not limited to:-
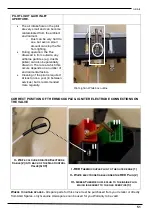
The slide switch on the valve not in
ON
(I) position.
The batteries in the valve being low on power, or out of power.
The handset being too far from the fire.
If the above are all in order and the handset is still flashing, pairing with the valve may have been
unintentionally altered. The handset will need to be reset, and a new pairing with the valve established
(see section on restoring handset communication).
R
ESTORING COMMUNICATION WITH THE REMOTE HANDSET
.
If the handset has lost communication with the control valve, when activated the handset will display a
constant green light which pulses brighter periodically, and the symbol will be missing from the
display.
The handset will need to be reset to allow it to accept a new pairing, in order to do this follow the steps
below:-
1. Ensure good batteries are firmly and correctly mounted in the handset.
2. Hold the handset firmly to unlock the keypad (keep hold of the handset during the remaining
steps).
3. Press and hold the
SET
button (approx. 3 seconds) until you hear a second beep.
4. Release
SET
button. PROG and SETUP should now be visible at the top of the display.
5. With SETUP flashing, press and release
SET
to enter the menu.
6. Keep pressing
SET
until CA 0 is displayed on screen.
7. Press
+
or
-
to change CA 0 to CA 1, then press
SET
.
8. The display should now read
7ESC rX
(where
X
is a number).
The handset has now been reset to factory settings and is ready to receive a new pairing instruction


