background image

Customizing Your Monitor 

This section covers the LCD monitor’s On-Screen Display (OSD), and 

front panel control buttons.   

Important! You can press the “Automatic” button 

  to have the monitor complete its 

automatic configuration. However, if difficulties in optimization occur because of the 
particular video card used in your computer, please use the OSD menu to adjust the 
settings for the monitor’s various parameters and achieve the desired display results. 


  OSD Control Buttons 

1. Press 

the  ,   , 


or


  button to bring up the OSD menu. 

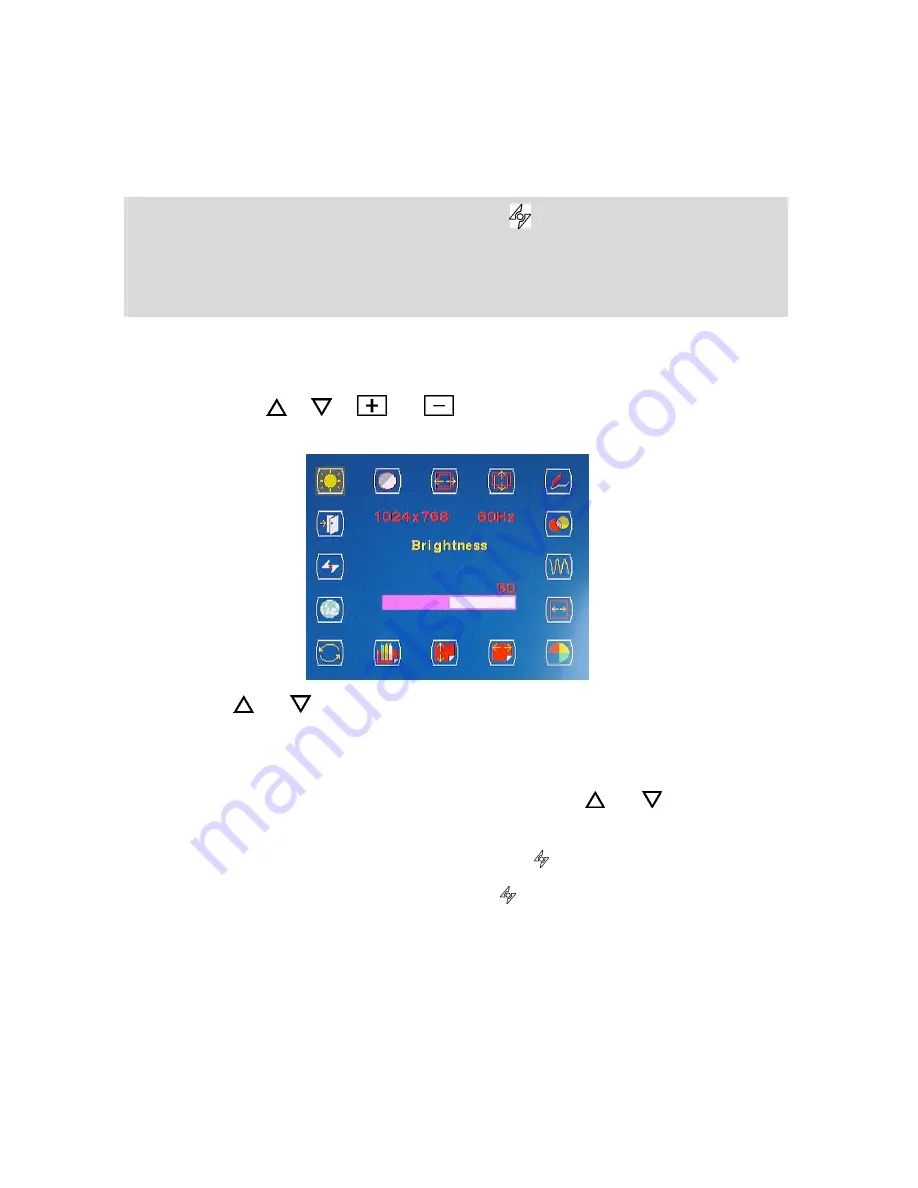
Sixteen OSD icons are represented in the main menu. 


2. Press  or    to highlight the desired icon to be adjusted or 

selected. 

3. Then 

press 

+

 or 

 to adjust or select a sub-menu. 

4. 

In case a sub-menu has been selected, press 

 or   to confirm 

selection.  

5. 

If the OSD menu is not displayed, press    for auto adjustment. 

6. 

If the OSD menu is displayed, press   to exit. 


17

Содержание TS-15C

Страница 1: ...Touch Series TFT LCD Display 15 17 User s manual ...

Страница 2: ... 8 Setup 10 Connections 11 Software Configuration 15 Identifying Parts and Controls 16 Customizing Your Monitor 17 OSD Control Buttons 17 15 OSD Menus 18 17 OSD Menus 22 Warning Messages and Troubleshooting 26 Warning Messages 26 Troubleshooting 27 Technical Features and Specifications 28 Specifications 28 Plug Play 29 Regulations 30 FCC compliance 30 WEEE 31 Hg 31 1 ...

Страница 3: ...uch as a space heater or exhaust vent nor in direct sunlight Do not place this device in any location subject to vibration or other physical shocks Warning on power connection Use an appropriate power cord to connect the monitor to a power outlet The outlet should be installed near the monitor and be easily accessible Do not allow anything to rest on the power cord Disconnect the power plug from t...

Страница 4: ... insert sharp objects or spill liquid into the monitor through ventilation holes This may cause accidental fire electric shock or failure of the device Do not attempt to service this product yourself as opening or removing covers may expose you to dangerous voltages or other risks Transportation When you transport this monitor for repair or shipment use the original carton and packing materials Re...

Страница 5: ...or the dial is set to the Base Lock position To open the base stand you only need to turn the dial slightly counterclockwise to Base Release position and release it will automatically turn clockwise and reset to Neutral Now you can push with little force to open the base stand When the monitor is tilted at an angle less than 25 the dial again to go clockwise until it reaches the title limit Fold L...

Страница 6: ...again and then press down the monitor until it is fully retracted Remember to turn the dial counterclockwise to Base Lock position to ensure that the base stand is really secure 5 ...

Страница 7: ... and is installed by the following steps 1 Retract the base stand Refer to the section Retracting the base stand before doing so 2 Secure the base stand to the display s housing with two M4 18mm screws AG Neovo s wall mountable products come with two such screws 3 The base stand has four M4 screw holes and conforms to the VESA FPMPMI standard measuring 75 x 75 mm AG Neovo wall mountable products w...

Страница 8: ... 2 The 17 monitor is supplied with two stud bolts First tighten these two bolts on the rear housing of the monitor 3 There are two holes on the rear housing and two holes for M4 screws on the base stand which comply with the installation interface standard for a VESA Flat Panel Display FPD of 100 100mm AG Neovo wall mountable products wall mount kit WMK series are recommended 7 ...

Страница 9: ...LE 9702B 5012 Power cable The included power cable conforms to the IEC 60227 standard or relevant national standard with conductors providing a cross sectional area of 3 x 0 75min type H05VV F or H03VV F D sub 15 pin VGA signal cable DVI signal cable 1 17 accessory Touch Screen Cables The following accessories are supplied depending on models RS 232 signal cable USB signal cable 1 8 ...

Страница 10: ... Touch screen supporting bracket 1x and screws 2x 15 17 AG Neovo Disk User s Manual and driver software Touch screen Disk Touch screen driver Quick Guide Stud bolts for 17 monitor wall mounting only 9 ...

Страница 11: ...hing the Touch Monitor Support To prevent undesired movement of the display when its touch screen feature is being used the support strut should be installed prior to using this feature as shown in the illustration 15 17 3 Tilting angle adjustmentlt The screen can be tilted at any angle between 5 and 25 from vertical Once the monitor support is secured the tilting angle for the monitor is fixed at...

Страница 12: ...Connections 15 Rear View DC 12V Power Jack Provides 12V DC power to the monitor VGA In D sub 15 pin connector for the VGA signal Touch Screen Connector RS232 connector for the touch screen signal 11 ...

Страница 13: ... sub 15 pin connector for the VGA signal DVI Input Connect to a DVI signal source by using the DVI D 24 pin video cable Touch Screen Connectors select one of the following connectors RS232 Touch screen signal cable connector USB Touch screen signal cable connector 12 ...

Страница 14: ...r video source please connect a RS232 signal cable to the monitor The included RS232 signal cable can be used to connect the monitor to compatible computer equipment If the computer you use does not have a RS232 port but does have a USB port you can purchase a RS232 to USB adapter to use for this connection 3 Connect the power adapter and power cable With the monitor switched off connect the cable...

Страница 15: ...ooting section of this User s Manual for further details 5 Optimize the video quality of your system To obtain the best possible results it is recommended that you first adjust the video signal resolution on your computer to 15 1024x768 60Hz and 17 1280X1024 60Hz We also recommend that you press the automatic button to automatically adjust the display parameters to achieve the best results 14 ...

Страница 16: ...uded AG Neovo CD To ensure smooth operation after initial installation you can refer to the installation guide which can also be found on the CD 2 Installing Touch Screen Drive Use the supplied touch screen driver disk to install the touch screen driver using the standard Windows installation After installation make sure you calibrate the touch screen 15 ...

Страница 17: ...to press this button the first time you use the monitor or every time you change the resolution and or refresh rate of the input signal UP button Activates the On Screen Display menu Moves the selected item clockwise Down button Activates the On Screen Display menu Moves the selected item counterclockwise Increase button Activates the On Screen Display menu Functions as the increase button when ad...

Страница 18: ...se use the OSD menu to adjust the settings for the monitor s various parameters and achieve the desired display results OSD Control Buttons 1 Press the or button to bring up the OSD menu Sixteen OSD icons are represented in the main menu 2 Press or to highlight the desired icon to be adjusted or selected 3 Then press or to adjust or select a sub menu 4 In case a sub menu has been selected press or...

Страница 19: ...15 OSD Menus Brightness Adjustment Contrast Adjustment Horizontal Position Adjustment Vertical Position Adjustment 18 ...

Страница 20: ...Sharpness Adjustment Note 15 If the computer resolution is 1024 X 768 it is not possible to adjust sharpness OSD Transparency Adjustment Phase Adjustment Frequency Adjustment 19 ...

Страница 21: ...n Note The RGB color temperature can be adjusted in the User sub menu Horizontal OSD Position Adjustment Vertical OSD Position Adjustment Graphic Text Selection Note If the resolution is 640 350 or 640 400 please select Text 20 ...

Страница 22: ...ll Selection Note Please use the Recall function to return to the previous settings in case the adjustments made were not satisfactory Language Selection EUR USA Auto adjustment Selection Exit Selection 21 ...

Страница 23: ...erature is set to sRGB the brightness function is fixed and cannot be adjusted Contrast Adjustment Note If the color temperature is set to sRGB the contrast function is fixed and cannot be adjusted Horizontal Position Alignment Vertical Position Alignment 22 ...

Страница 24: ...Sharpness Adjustment Note 17 If the computer resolution is 1280 X 1024 it is not possible to adjust the sharpness OSD Transparency Adjustment Phase Adjustment Frequency Adjustment 23 ...

Страница 25: ...color adjustments When sRGB is selected the brightness and contrast functions are fixed and cannot be adjusted OSD Horizontal Position Alignment OSD Vertical Position Alignment Graphic Text Mode Selection Note When the resolution is 640 350or 640 400 it is recommended the user select text mode 24 ...

Страница 26: ...Recall Selection Note Please use the Recall function to return to the previous settings in case the adjustments made were not satisfactory Language Selection Signal Switching Exit Selection 25 ...

Страница 27: ... your computer is in the ON position Check that the video signal cable is properly connected Ensure that no pins of the signal cable are bent OSD Lock Out The main control menu On Screen Display menu is locked to avoid unwanted adjustment Press the buttons simultaneously for 5 seconds to unlock the main control menu Auto Adjusting The monitor is detecting the input signal and automatically adjusti...

Страница 28: ...the video signal cable is properly connected The texts are not solid Check that the resolution of the video signal is set to 15 1024 x 768 17 1280x1024 Press the Auto button to run automatic adjustment Adjust Clock and Phase in the OSD menu to fine tune Adjust Sharpness in the OSD menu if you are not using 1024 by 768 resolution Screen image is not Centered properly Some lines missing Press the Au...

Страница 29: ... 60kHz 50Hz 75Hz 80MHz Power 3 Pin AC Plug ON 32W Standby 3W Power OFF 3W Physical characteristics Weight Net 4 6Kg 10 1 lb Tilting angle 5º 25º Touch Screen TS 15S SAW Surface Acoustic Wave Panel connection RS 232 Panel pixel 4096 x 4096 Action force 3 ounces Position accuracy 1 of true position Note Specifications are based on those of the delivered product Any change of the above specifications...

Страница 30: ...TS 17S SAW Surface Acoustic Wave Panel connection RS 232 Panel pixel 4096 x 4096 Action force 3 ounces Position accuracy 1 of true position TS 17R Resistive 5 Wire Panel connection RS 232 Panel pixel 1024 x 1024 Action force 300g Position accuracy 2 of true position Note The specifications are based on those of the delivered product Any changes to the above specifications will be made without prio...

Страница 31: ...cordance with the instructions may cause harmful interference to radio communications However there is no guarantee that interference will not occur in a particular installation If this equipment does cause harmful interference to radio or television reception which can be determined by turning the equipment off and on the user is encouraged to try to correct the interference by one or more of the...

Страница 32: ...ment recycling For information about your recycling drop off area please contact your local related electrical and electronic equipment waste management authority or the retailer where you bought the product Hg Lamp Disposal LAMP S inside this product contain mercury and must be recycled or disposed of according to local state or federal laws For more information contact the electronic industries ...

Отзывы: