4
CONSOLE CABLES
HANDLEBARS
CENTER BAR
BOLTS (F)
SPRING WASHERS (G)
ARC WASHERS (H)
A Open
hardware for step 4
.
B Connect the
console cables
, discard the
twist tie and slide the
console cables
into the
center bar.
C Attach
handlebars
to
center bar
using 4
bolts (e)
, 4
spring washers (f)
and 4
arc
washers (g)
.
BOLT (F)
12 mm
Qty: 4
SPRING WASHER (G)
6.2 mm
Qty: 4
ARC WASHER (H)
6.2 mm
Qty: 4
ASSEMBLY STEP 4
HARDWARE fOR STEP 4 :
NOTE: Do not tighten bolts until step 5 is complete.
Do not pinch wires while assembling the handlebars.
ASSEMBLY STEP 5
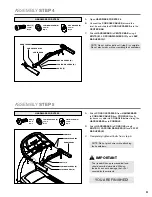
A Attach
console cables
from
handlebars
to
console cables
from
console
. Gently
tuck excess cable into
console
before sliding the
handlebars
onto
console
.
B Attach
handlebars
to
console
using 6
bolts (i)
, 6
spring washers (b)
and 6
flat
washers (e)
.
C
Completely tighten all bolts from step 4.
BOLT (I)
15 mm
Qty: 6
FLAT WASHER (E)
8.2 mm
Qty: 6
SPRING WASHER (B)
8.2 mm
Qty: 6
HARDWARE fOR STEP 5 :
FLAT WASHERS (E)
SPRING WASHERS (B)
BOLTS (I)
HANDLEBARS
CONSOLE CABLES
CONSOLE
NOTE: Do not pinch wires while attaching
the handlebars.
YOU ARE FINISHED!
This treadmill has a pre-waxed belt and
should never be lubricated. Waxing
the belt can cause damage that is not
covered by the warranty.
IMPORTANT


