3
ASSEMBLY STEP 2
A
Open
hardware for step 2
.
B
With the
console
upside down, attach the
console mast caps
to the
console
using 6
bolts (d)
, 6
spring washers
(b)
and 6
flat washers (e)
.
BOLT (D)
20 mm
Qty: 6
FLAT WASHER (E)
8.2 mm
Qty: 6
SPRING WASHER (B)
8.2 mm
Qty: 6
HARDWARE fOR STEP 2 :
FLAT WASHERS (E)
CONSOLE MAST CAP
SPRING WASHERS (B)
BOLTS (D)
CONSOLE (upside down)
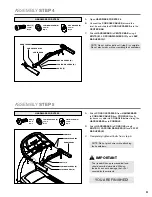
ASSEMBLY STEP 3
BOLTS (A)
SPRING WASHERS (B)
ARC WASHERS (C)
CONSOLE MAST
CONSOLE CABLES
ASSEMBLE
THIS SIDE
FIRST
CONSOLE MAST CAP
CONSOLE
HARDWARE fOR STEP 3 :
A
Open
hardware for step 3
.
B
Connect the
console cables
, carefully
tucking wires in masts to avoid damage. It may
be helpful to have a second person for this step.
C
Gently place the
console
on top of the
console masts
. Attach the
left side
first
using 3
bolts (g)
, 3
spring washers (b)
and 3
arc washers (c)
.
D
Attach the
right side
of the
console
using 3
bolts (g)
, 3
spring washers (b)
and 3
arc washers (c)
.
E
Completely tighten all bolts from step 1.
NOTE: Be careful not to pinch any wires
while assembling the masts.
BOLT (A)
20 mm
Qty: 6
SPRING WASHER (B)
8.2 mm
Qty: 6
ARC WASHER (C)
8.2 mm
Qty: 6


