


22
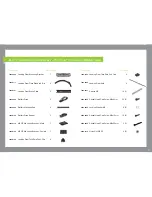
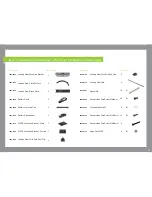
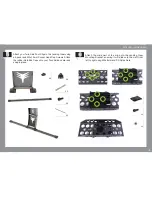
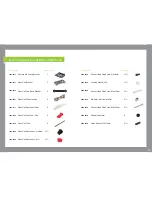
PART 1: GEAR RAIL ASSEMBLY – PARTS LIST
1
2
2
2
2
2
2
4 (1)
4 (1)
Socket Head Cap Screw M3x8mm
Locking Washer M3
Socket Head Cap Screw M4x30mm
M4 Nyloc Nut (low profile)
Socket Head Cap Screw M3x25mm
Rubber Grommet
Nylon Spacer M3x15mm
4 (1)
4 (1)
2 (1)
2 (1)
4 (1)
8
4 (1)
Camera Mounting Bracket
Gear Rail Bracket
Gear Rail Dog Bone Bracket
Gear Rail Main Housing
Gear Rail Dampener Seat
Gear Rail Lock Tab - Red
Gear Rail Tube
Gear Rail Dampener - medium
Gear Rail Dampener - firm
Parts + Spares
Parts + Spares
2503-0030
2504-0030
2505-0080
2505-0150
2506-0490
2506-0250
2506-0420
Product Code
Product Code
1404-0011
1404-0031
1404-0040
1404-0281
1406-0111
1406-0120
1406-0145
1406-0322
1406-0320
Содержание XM Titanium
Страница 1: ...1 B u i l d M a n u a l...
Страница 3: ...3 F l i g h t o p e r a t i o n a n d s a f e t y...
Страница 8: ...8 P r e b u i l d C h e c k l i s t...
Страница 10: ...10 A s s e mb l y I n s t r u c t i o n s...
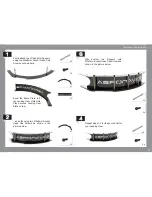
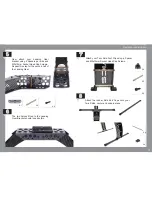
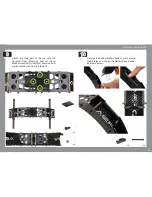
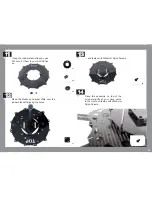
Страница 21: ...21 P a r t 2 G e a r R a i l a s s e mb l y...
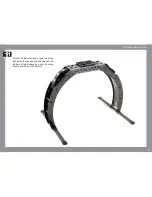
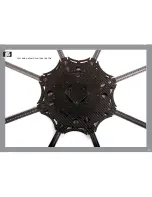
Страница 37: ...37 15 Your setup should now look like this...
Страница 38: ...38 P a r t 3 XM BATTERY MOUNT PLATES 1 Battery Mounting Position...
Страница 40: ...40 3 x1 Your setup should now look like this 4 Screw the top mounting posts firmly on top of the grub screws...
Страница 43: ...43 Landing Gear Assembly Core Assembly Gear Rail Assembly P a r t 5 M a i n C o m p o n e n t A s s e mb l y...
Страница 45: ...45 2 Once clipped on secure with M3x20mm Socket Head Cap Screws and M3 Locking Washers as shown below x2 x2...
Страница 52: ...52 Your final setup should now look like this 5...
Страница 59: ...59 8 Your final setup should now look like this...


