background image

English

59

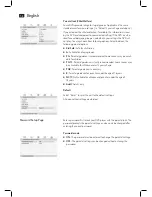
Password

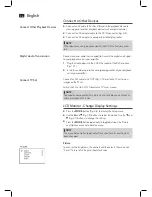
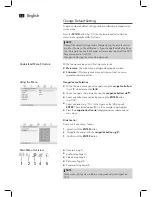
This menu allows you to change the password for the parental lock.
To change the password first enter the old password. The master pass-
word is “1369”.


NOTE: 

In case you forget your password you can deactivate the parental lock 
with the master password.

Follow these steps to change the password: 

1.

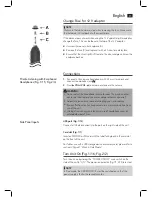
  Enter the current password with the 

numeric buttons

 (Fig. 3/22) on 

the remote control in the field “Old Password”. 
The screen shows “XXXX” to avoid that unauthorized person can 
read the password.

2.

  Enter the new password with the 

numeric buttons

 on the remote 

control in the field “New password”.

3.

  Enter the new password again in the filed “Confirm Password”. Press 

ENTER

 (Fig. 3/18) to confirm.

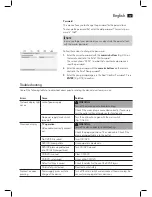
Troubleshooting

Consult the following table to troubleshoot errors prior to sending the device to customer service.

Errors 

Cause 

Solution

Network display light 
not on

Lack of power supply


WARNING:

Turn off the device prior to troubleshooting.
Check if the mains plug is connected correctly. If necessary, 
test the outlet with another device for functionality.

No power supply/ main switch 
turned off

Turn the unit back on again with the main switch  
(Fig. 1/16; 2/2).

No screen display

TV operation:  

Video cable incorrectly connect-
ed.


WARNING:

Turn of the device prior to troubleshooting.
Check the proper position of the video cable. Check if the 
plug is plugged tightly into the out let.

No DVD/CD inserted 

Insert CD/DVD.

DVD/CD incompatible 

Use compatible media only.

DVD/CD placed upside down 
into CD/DVD-compartment

Turn CD/DVD around.

CD/DVD is soiled 

Clean CD/DVD. 

CD/DVD is damaged 

Use another CD/DVD.

Default settings incorrect 

Check the default settings of the DVD-Players. 

Child safety is activated

Deactivate child safety. 

No reaction upon 
pressing

Power supply issues or static 
charge of the device.

Turn off the main switch and disconnect the mains plug. Re-
connect mains plug and turn device on.

Содержание DVD 4551

Страница 1: ...Bedienungsanleitung Garantie 05 Instruction Manual 36 DVD Car Cinema DVD 4551 D DVD Car Cinema GB DVD Car Cinema ...

Страница 2: ...te Seite 3 4 Bedienungsanleitung Seite 5 Technische Daten Seite 6 Entsorgung Seite 32 Garantie Seite 33 English Contents Overview of the components Page 3 4 Instruction Manual Page 36 Technical Specifications Page 37 Disposal Page 60 Inhalt 2 ...

Страница 3: ...Übersicht der Bedienelemente 3 Overview of the Components Abb Fig 1 DVD Monitor Abb Fig 2 LCD Monitor ...

Страница 4: ...Übersicht der Bedienelemente 4 Overview of the Components Abb Fig 3 ...

Страница 5: ... 9 Erneuter Druck erhöht um jeweils 10 4 DISPLAY Wiedergabestatus auf Bildschirm anzeigen 5 AUDIO Audio Einstellungen verändern 6 MENU PBC Hauptmenü der DVD VCD anzeigen Playback Control bei VCD anzeigen 7 Die Wiedergabe starten Bild anhalten Film weiter abspielen mit der Taste Wiedergabe stoppen 8 MODE Blendet das Video Einstellmenü ein 9 Richtungstasten Navigation im Bildschirmmenü 10 VOL VOL La...

Страница 6: ...sc CD R RW K K Video CD von CD Disc CD R RW K K MP3 files von CD DVD Disc DVD R K K RW CD R RW Regionalcode 2 Europa Grönland Südafrika Ägypten und Naher Osten Japan Zubehör AC DC Adapter Strom AV Verbindungs kabel Fernbedienung inkl Batterie 2x Stereo Ohrhörer Kabel für die Stromver sorgung am Fahrzeug Zigarettenanzünder 4x Befestigungsgurte Inhaltsverzeichnis Geräteteile 5 Fernbedienung 5 Techni...

Страница 7: ...sonders gekennzeichnet Beachten Sie diese Hinweise unbedingt um Unfälle und Schäden am Gerät zu vermeiden WARNUNG Warnt vor Gefahren für Ihre Gesundheit und zeigt mögliche Verletzungs risiken auf ACHTUNG Weist auf mögliche Gefährdungen für das Gerät oder andere Gegenstände hin HINWEIS Hebt Tipps und Informationen für Sie hervor Herstelleranschrift ETV Elektro technische Vertriebsgesellschaft mbH I...

Страница 8: ...ktrischem Strom betrieben daher besteht grund sätzlich die Gefahr eines elektrischen Schlags Achten Sie daher beson ders auf Folgendes Fassen Sie den Stecker niemals mit nassen Händen an K K Wenn Sie den Stecker aus der Steckdose herausziehen wollen ziehen K K Sie immer direkt am Stecker Ziehen Sie niemals am Kabel es könnte reißen Achten Sie darauf dass das Stromkabel nicht geknickt eingeklemmt K...

Страница 9: ...ss die Lüftungsschlitze nicht blockiert werden Schützen Sie das Gerät vor mechanischen Erschütterungen K K Stellen Sie das Gerät immer auf eine feste ebene Unterlage K K Schützen Sie die Fernbedienung vor Witterungseinflüssen Feuchtig K K keit und hohen Temperaturen z B durch direktes Sonnenlicht Das Gerät nicht während der Fahrt in einem Kfz nutzen K K Betrieb Das Gerät kann ein Standbild unbesch...

Страница 10: ...rtieren versenden Sie das Gerät grundsätzlich immer in der Originalverpackung damit es keinen Schaden nimmt Heben Sie dazu die Verpackung auf Entsorgen Sie nicht mehr benötigtes Verpackungs material entsprechend der in Ihrem Land geltenden Vorschriften HINWEIS Sollten Sie einen Transportschaden bemerken wenden Sie sich umge hend an Ihren Händler Aufstellen 1 Klappen Sie den Aufsteller an der Rücks...

Страница 11: ...G Beachten Sie beim Entsorgen alter Batterien die im jeweiligen Land geltenden gesetzlichen Vorschriften und Umweltbestimmungen Werfen Sie Batterien niemals ins Feuer HINWEIS Die Lithium Zelle im Batteriefach der Fernbedienung wurde für den K K Transport ggf mit einer Folie gesichert Dies verlängert die Lebens dauer der Batterie Vor der ersten Anwendung entfernen Sie bitte diese Folie um die Fernb...

Страница 12: ...trom AV Verbindungskabel mit der Buchse DC OUT AV OUT vom DVD MONITOR Abb 1 11 14 und der Buchse DC IN AV IN vom LCD MONITOR Abb 2 5 4 3 Verbinden Sie den Wechselstromadapter mit einer vorschriftsmäßig installierten Schutzkontaktsteckdose Die Ladeanzeige leuchtet rot Abb 1 9 ACHTUNG Der mitgelieferte Wechselstromadapter ist nur für dieses Gerät K K bestimmt Nicht für andere Geräte verwenden Wird d...

Страница 13: ...ckt wird Nach dem Gebrauch den 12 V Adapter wieder vom Gerät und von K K der Zigarettenanzünderbuchse abstecken C Mit dem aufladbaren Akku Vor dem Gebrauch den Akku in geschlossenen Räumen aufladen K K Der aufladbare Akku ist für den tragbaren Gebrauch zu verwenden K K und um auch im Freien DVDs sehen zu können Aufladen des Akkus ACHTUNG Den Akku nicht direkt nach dem Betrieb aufladen Lassen Sie d...

Страница 14: ... die Wieder K K gabe Wird im Bildschirm die Anzeige LOW BATTERY eingeblendet K K ist der Ladezustand des Akkus niedrig Der Akku muss aufgeladen werden Den Akku kurz vor dem nächsten Gebrauch laden K K Das Aufladen des Akkus über den Zigarettenanschluss ist ebenfalls K K möglich ACHTUNG Die Klemmen nicht kurzschließen K K Nur das Original Aufladegerät verwenden um den Akku aufzuladen K K Austausch ...

Страница 15: ...n Einschub Abb 1 1 Schieben Sie eine MMC SD bzw MS Speicherkarte mit dem Label nach hinten in den Karteneinschub des Gerätes Den weiteren Betrieb mit einem USB Speichermedium oder Speicherkar te entnehmen Sie sich bitte dem Abschnitt Seite 22 Im Dateimodus arbeiten Geräte einschalten Abb 1 16 Abb 2 2 Schalten Sie den Hauptschalter des Gerätes ein indem Sie den Netz Ein Aus Schalter POWER ON OFF au...

Страница 16: ...für bitte die mit dem TV Gerät mitgelieferte Bedienungsanleitung HINWEIS Sie benötigen ein Audio Kabel mit einen 4 pol 3 5 mm Klinkenstecker mit einer Stiftlänge von 17 5 mm auf Cinch LCD Monitor Bildschirmeinstellungen verändern Drücken Sie die Taste K K MODE Abb 2 8 um das Einstellungsmenü aufzurufen Wählen Sie mit den Tasten K K und Abb 2 9 die Option aus Mit den Tasten und Abb 2 7 nehmen Sie d...

Страница 17: ...oblemen die Einstellungen des DVD Brennprogrammes auf Ihrem Computer Stellen Sie insbeson dere sicher dass die DVD finalisiert wurde Weitere Informationen hierzu finden Sie in der Bedienungsanleitung Ihres Aufnahmegerätes Eingabe nicht möglich Ist eine von Ihnen gewählte Funktion oder Eingabe nicht möglich er scheint auf dem Bildschirm das nebenstehend abgebildete Zeichen Begriffe Track K K Mit Tr...

Страница 18: ...ken Sie einmal oder mehrfach auf die Taste DISPLAY Abb 3 4 der Fernbedienung um sich weitere Zeitanzeigen anzeigen zu lassen Folgende Möglichkeiten stehen zur Auswahl verbleibende Zeit bis zum Track Ende bisherige Wiedergabedauer der CD verbleibende Zeit bis zum CD Ende Bildschirmanzeige DVD Menü verstehen Verwenden Sie DVDs so können Sie sich das Bildschirmmenü mit einem Druck auf die Taste DISPL...

Страница 19: ...ntertitel anzeigen Drücken Sie mehrfach auf die Taste SUBTITLE Abb 3 20 wenn Sie die Untertitelausgabe aktivieren deaktivieren oder wenn Sie eine andere Un tertitelsprache auswählen wollen Die zur Auswahl stehenden Untertitel Sprachen sind abhängig von der DVD Wiedergabe stoppen Drücken Sie während der Wiedergabe auf die Taste K K Abb 3 7 Die Wiedergabe wird angehalten Drücken Sie noch einmal auf ...

Страница 20: ...16 bis auf dem Bild schirm die Meldung Alle erscheint Wiederholen beenden Drücken Sie so oft auf die Taste REPEAT Abb 3 16 bis auf dem Bild schirm keine Meldung mehr erscheint DVD Menü verwenden Normalerweise weist jede DVD ein eigenes Menü auf Hier können Sie Kapitel auswählen Einstellungen vornehmen etc Dieses Menü ist DVD spezifisch und kann daher hier nicht näher beschrieben werden Drücken Sie...

Страница 21: ...autstärke am DVD Monitor leise geregelt wird an der AV OUT Buchse Abb 1 14 kein Ton ausgegeben Playlist erstellen CD DVD CD Unter Umständen möchten Sie die Titel z B einer CD nicht in der vom Hersteller vorgegebenen Reihenfolge hören Mit der Funktion Playlist erstellen können Sie sich eine eigene Wiedergabereihenfolge erstellen Gehen Sie hierzu folgendermaßen vor 1 Drücken Sie auf die Taste PROGRA...

Страница 22: ... n Datei en aus und starten Sie die Wie dergabe Seite 23 Datei Verzeichnis auswählen und Wiedergabe starten Speicherkarte verwenden Folgende Speicherkarten können Sie verwenden SD Card K K Multi Media Card K K Memory Stick K K 1 Stecken Sie die Speicherkarte mit dem Label nach hinten in den Kartenleser Abb 1 1 2 Drücken Sie auf die Taste SOURCE Abb 3 2 der Fernbedienung um das Datei Auswahlmenü au...

Страница 23: ...iums Dieser Vorgang kann bei großen Speichermedien lange dauern 4 Wählen Sie die gewünschte n Datei en aus und starten Sie die Wie dergabe Seite 23 Datei Verzeichnis auswählen und Wiedergabe starten 5 Wollen Sie wieder in den DVD Modus wechseln drücken Sie erneut auf die SOURCE Taste Abb 3 2 und wählen den DVD Modus mit den Richtungstasten und ENTER aus Datei Verzeichnis auswählen und Wiedergabe s...

Страница 24: ...rmat des Wiedergabegerätes entspricht Dieses beträgt bei Fernsehern normalerweise 1024x576 Pixel Seitenverhältnis 16 9 oder 768x576 Seitenverhältnis 4 3 Bitte beachten Sie dass jegliche Konvertierung Umwandlung im K K Allgemeinen immer einen Informationsverlust im Bezug auf das ursprüngliche Format zur Folge hat Starten Sie die Bildwiedergabe indem Sie die Datei auswählen mit der die Wiedergabe be...

Страница 25: ...d hingegen dau erhaft Menü Aufbau verstehen Im Setup Menü finden Sie zwei Menü Ebenen Hauptmenü K K Die Hauptebene wird durch graphische Symbole darge stellt Untermenü K K Unter jedem Hauptmenü Eintrag finden Sie die zugehö rigen Untermenüeinträge Menü verwenden Navigation und Auswahl Im Hauptmenü bewegen Sie sich mit den K K Richtungstasten Abb 3 9 der Fernbedienung Im Untermenü hingegen bewegen ...

Страница 26: ... Film schwarze Balken erscheinen 16 9 K K Wählen Sie diese Option wenn Sie ein Wide Screen Fernseher zur Wiedergabe verwenden Beachten Sie dabei dass Filme die mit einem Seitenverhältnis von 4 3 aufgezeichnet wurden nach wie vor im Verhältnis 4 3 angezeigt werden Es wird also nicht die gesamte Fläche des Wide Screen Fernsehers zur Wiedergabe verwendet Wide Squeeze K K Wählen Sie diese Option wenn ...

Страница 27: ...akteristik der Lautsprecherausgabe L R K K Wählen Sie diese Einstellung wenn Sie die DVD im Pro Logic Dolby Stereoeffekt abspielen wollen Hierdurch entsteht ein realitäts naher 2 Kanal Wiedergabeeffekt Stereo K K Wählen Sie diese Einstellung wenn eine DVD die im 5 1 Audio Format aufgenommen wurde als 2 Kanal Stereoton ausgege ben werden soll Digital Ausgang Hier werden die Einstellungen für den di...

Страница 28: ... beider Stereo Kanäle ausgegeben Dynamik Mit dem Begriff Dynamik Dynamikumfang wird das Verhältnis vom leisesten zum lautesten Ton beschrieben Ist der Dynamikumfang sehr groß so gibt es sowohl sehr leise als auch sehr laute Töne Unter Umständen stellt dies ein Wiedergabeproblem dar Angenommen Sie sehen eine DVD in relativ lauter Umgebung Sie können die Laut stärke nun erhöhen um auch die leisen Pa...

Страница 29: ...en z B Haben Sie die Kinderschutz Option aktiviert so wird sofern vorhanden die entsprechende Information von der DVD ausgelesen und mit dem von Ihnen voreingestellten Wert verglichen Ist eine DVD für eine ältere Altersgruppe vorgesehen als es von Ihnen voreingestellt wurde so kann die DVD nicht abgespielt werden Folgende Kinderschutz Optionen können ausgewählt werden Kind sich K K Kindergeeignet ...

Страница 30: ...wortes geändert werden Passwort In diesem Menü haben Sie die Möglichkeit das Kennwort für die Jugend schutzfunktion zu ändern Um das Kennwort zu ändern müssen Sie das aktuelle Kennwort einge ben Das Master Kennwort ist 1369 HINWEIS Haben Sie Ihr Kennwort vergessen so können Sie mit diesem Master passwort den Jugendschutz deaktivieren Gehen Sie folgendermaßen vor um das Kennwort zu ändern 1 Geben S...

Страница 31: ...gen Sie eine CD DVD ein DVD CD nicht kompatibel Verwenden Sie nur kompatible Medien DVD CD liegt verkehrt herum im CD DVD Fach Drehen Sie die CD DVD herum CD DVD ist verschmutzt Reinigen Sie die CD DVD CD DVD ist beschädigt Verwenden Sie eine andere CD DVD Voreinstellungen falsch Überprüfen Sie die Voreinstellungen des DVD Players Kindersicherung ist aktiviert Deaktivieren Sie den Kinderschutz Kei...

Страница 32: ...nweis Das Gerät DVD Monitor enthält einen wiederaufladbaren Akku Verbrauchte Batterien und Akkumulatoren Akkus gehören nicht in den Hausmüll Die Batterien Akkus müssen entnommen werden bevor das Produkt K K in die Entsorgung geht Wenden Sie sich hierfür an eine qualifizierte Person oder kontaktieren unseren Service Batterien Akku Hinweise zum Umgang mit Batterien Akku Halten Sie Batterien Akku von...

Страница 33: ...ng der Garantieleis tungen zur Verfügung gestellt werden 3 Mängel müssen innerhalb von 14 Tagen nach Erkennbarkeit uns ge genüber schriftlich angezeigt werden Besteht der Garantieanspruch zu Recht entscheiden wir auf welche Art der Schaden Mangel be hoben werden soll ob durch Reparatur oder durch Austausch eines gleichwertigen Geräts 4 Garantieleistungen werden nicht für Mängel erbracht die auf de...

Страница 34: ...Prüfung Ihres Garantieanspruches erhalten Sie von uns einen fertig ausgefüllten Versandaufkleber Sie brauchen diesen Aufkleber nur noch auf die Verpackung Ihres gut verpackten Gerätes zu kleben und das Paket bei der nächsten Annahmestelle der Deutschen Post DHL abzugeben Der Versand erfolgt für Sie kostenlos an unser Servicecenter bzw Service partner Bitte fügen Sie dem Paket eine Kopie Ihres Kauf...

Страница 35: ...STELLUNGEN BILDS SCHONER EIN TV TYP PAL AUS Auto NTSC AUDIO SETUP MENÜ AUDIO DOWNMIX LT RT UNTERTIT Stereo DISK MENÜ DIGITAL AUSGANG SPDIF AUS KI SICHERUNG 1 KIND SICH SPDIF RAW 2 O ALTERSB SPDIF PCM 3 FREI AB 6 SETUP DOLBY DIGITAL DOLBY DIGITAL EINSTELLUNG 4 FREI AB 12 DOPPELTES MONO STEREO 5 FREI AB 16 L MONO 6 N FREI U 16 R MONO 7 N FREI U 18 MIX MONO 8 ERWACHSENE DYNAMIK GRUNDEINST RÜCKSTELLEN...

Страница 36: ...lecting the chapter tracks above 9 Pressing the button again increases the figure by 10 each time 4 DISPLAY Display playback mode 5 AUDIO Change audio set tings 6 MENU PBC Access DVD VCD main menu Show playback control in VCD 7 Start playback Freeze im age Press to continue Stop playback 8 MODE Show the video setup menu 9 Navigation buttons Navigate OSD menu 10 VOL VOL Increase de crease volume 11...

Страница 37: ...f CD Disc CD R RW K K Video CD of CD Disc CD R RW K K MP3 files of CD DVD Disc DVD R RW K K CD R RW Regional code 2 Europe Greenland South Africa Egypt and Middle East Japan Accessories AC DC Adapter Mains AV cable remote control incl battery 2x stereo earphones car adaptor cable 4x straps Table of Contents Location of Controls 36 Remote Control 36 Technical Specifications 37 Safety Instructions 3...

Страница 38: ... is imperative to comply with these guidelines WARNING Warns against danger to your health and illustrates possible injury risks CAUTION Outlines possible hazards for unit and other items NOTE Provides notes and information for your convenience Manufacturer s Contact Informtion ETV Elektro Technische Vertriebsgesellschaft mbH Industriering Ost 40 47906 Kempen We reserve the right to perform techni...

Страница 39: ...o K K cation Power Supply The unit is powered electrically and therefore may lead to electric shock Please pay attention to the following Do not touch the plug with wet hands K K If you remove the plug from the outlet always remove by pulling the K K plug directly To avoid possible breakage never pull the cable Ensure that the mains cable is not bent jammed run over or is sub K K jected to heat so...

Страница 40: ... K tion to avoid heat accumulation inside of the unit Ensure that ventila tion slots are not blocked Protect the unit from mechanical percussions K K Always place the unit on a sturdy lat surface K K Protect the remote control against environmental forces moisture and K K extreme temperatures i e direct sun light Do not use the unit while driving a vehicle K K Operation The unit can display a free...

Страница 41: ...n accordance with your countries regulations NOTE Damages due to transport must be reported to the supplier immedi ately Assembly 1 Fold out the stand at the rear of the DVD Monitor 2 Place the unit on a stable level and lat surface Maintain a distance of a minimum of 10 cm from walls and other objects 3 Connect the unit to an outlet installed according to regulations 4 Remove protective cover fro...

Страница 42: ...pen the battery compartment on the bottom of the remote control 2 Replace the cell with a battery of the same type CR 2025 Pay atten tion to the polarity 3 Close the battery compartment again NOTE The signals of the remote control are transmitted to the DVD Player by infrared light Ensure that the DVD Player is not exposed to direct sunlight This may render the signal transmittal from the remote c...

Страница 43: ...connector K K Fig 1 10 Using both units Connect the cigarette lighter adapter plug to the DC IN 9 12 V connector Fig 1 10 Connect the mains AV cable to DC OUT AV OUT connector from DVD MONITOR Fig 1 11 14 and DC IN AV IN connector from LCD MONITOR Fig 2 5 4 Now connect the plug to the cigarette lighter of your vehicle K K Safety Precautions Only use this unit with the genuine car adaptor other ada...

Страница 44: ...act the Service Center Do not charge the battery if not properly ventilated such as on a K K mattress sofa cushion soft surface etc Do not replace the battery with a different type do not throw into ire K K or water danger of explosion Avoid direct sunlight or high temperatures above 40 C 104 F like K K on the dashboard Avoid shocks and pressure to the battery K K Avoid overcharging deep discharge...

Страница 45: ...eadphone volume to loud This may be hazard K K ous to your hearing and you may endanger others and yourself Adjust to a low volume to avoid disrupting your surroundings K K If you suffer from tinnitus keep volume to a minimum or refrain from K K use of this unit Otologists advise a against long term use of headphones over an K K extended period of time Side Panel Inputs USB port Fig 1 12 Connect a...

Страница 46: ...he corresponding socket of your playback unit or your amplifier Connect TV Set Connect an A V cable to AV OUT Fig 1 14 and to the TV set to view images on the TV set Switch the TV set to AV IN Observe the TV s user manual NOTE You need an audio cable with a 4 pin 3 5 mm jack plug to cinch socket with a pin length of 17 5 mm LCD Monitor Change Display Settings Press the K K MODE button Fig 2 8 to d...

Страница 47: ...oduced CDs or DVDs i e vacation pictures In the event of problems examine the setting of the DVD reproduction program on your computer Ensure that the DVD was inalized Further information regarding this subject is avail able in the operation manual of your recording device Input not possible This icon will be displayed if you select or enter an invalid function Terms Track K K Track is the section...

Страница 48: ...ave the following options remaining time until the end of the track elapsed playing time CD remaining time until the end of the CD Screen Display of DVD Menu You may display the screen menu for DVD use by pressing the DISPLAY button Fig 3 4 DVD menu Current title total number of titles 1 K K Current chapter total number of chapters 2 K K Time 3 K K Here you find information about playing time and ...

Страница 49: ...VD will start from the beginning Select previous Chapter Track Press button Fig 3 9 to return to the beginning of the previous chapter or track Select next Chapter Track Press Fig 3 9 to forward to the next chapter or track Direct Track Selection Enter the number of the desired chapter track using the numeric but tons on your remote control Fig 3 22 Playback will start shortly Select a Passage usi...

Страница 50: ...d e g 2x 2 Press the or button repeatedly to change the speed The speed may be accelerated by factor 2 4 8 16 or 32 3 Press the button Fig 3 7 to continue normal play upon reach ing the desired passage Enlarge Picture Upon viewing DVDs VCDs or pictures you may modify the picture ap pearance Press ZOOM button Fig 3 14 to modify the picture segment Press the button repeatedly to select the applicabl...

Страница 51: ...DVD 1 Press the PROGRAM button A table is displayed Fig CD or Fig DVD 2 Use the navigation buttons Fig 3 9 to manoeuvre to the command Stop at the bottom of the table 3 Press ENTER Fig 3 18 on the remote control to confirm 4 Press the PROGRAM button to finish Work in Data Mode In addition to play regular movies or music with CDs DVDs with this DVD Player you have the option to display video or aud...

Страница 52: ...buttons Fig 3 9 to select MEDIA USB mode Press ENTER Fig 3 18 to confirm NOTE The DVD Player will search storage media to determine which playable data is available This may take a long time if a large storage media is searched 4 Select the desired file s and star Page 52 Select File Index and start playback 5 Press the SOURCE button Fig 3 2 again and use the navigation buttons and ENTER to return...

Страница 53: ... of the play In TVs this is normally 1024x576 Pixel size 16 9 or 768x576 Size 4 3 Please be aware that any conversion may lead to loss of information K K regarding the original format Start the photo display by selecting the file you would like to start the display with Page 52 Select File Index and start playback NOTE After a few seconds a preview appears in the menu window on the right hand side...

Страница 54: ...y you will ind the corre sponding sub menu entries Using the Menu Navigation and Selection Within the main menu you will navigate using the K K navigation buttons Fig 3 9 of remote control You can navigate the sub menu using the K K navigation buttons Select a specific menu section by pressing the K K ENTER button Fig 3 18 Select an option e g PAL in the Figure on the left also with K K ENTER The ...

Страница 55: ...6 9 K K Choose this option if you have a wide screen TV Keep in mind that movies recorded in an aspect ratio of 4 3 will display in the same 4 3 ratio Therefore it will not populate the entire screen of the wide screen TV Wide Squeeze K K Select this option if you are using a wide screen TV for playback This setting adjusts films in 4 3 format to the aspect ratio of the wide screen TV NOTE The set...

Страница 56: ...ded in 5 1 audio format in 2 channell stereo sound Digital Output The settings for the digital audio output are defined here SPDIF Off K K An analogue and not a digital audio signal is transmitted SPDIF RAW K K A digital audio signal is transmitted Use this setting if the amplifier is not a stereo two channel amplifier SPDIF PCM K K A digital audio signal is transmitted which is converted into a 2...

Страница 57: ...mpromise reduce the dynamic range and increase the output volume FULL 1 8 K K The dynamic ratio is compromised from 1 8 to maximum FULL OFF K K The dynamic ratio is not compromised default setting Video Setup Video Output Settings In this menu you can change various settings to adjust the video output signal NOTE You can also use the MODE button Fig 3 8 to open this menu Preference Page TV Type Ad...

Страница 58: ...es may be unsuit able for children PG 13 K K Parental guidance is strictly recommended Some scenes may be unsuitable for children under 12 years of age PGR K K Parental guidance is necessary R K K Parental guidance for juveniles under the age of 16 years NC17 K K Not suitable for children and juveniles under the age of 18 years Adult K K Adults only Default Select Reset to reset the unit to the de...

Страница 59: ...isplay light not on Lack of power supply WARNING Turn off the device prior to troubleshooting Check if the mains plug is connected correctly If necessary test the outlet with another device for functionality No power supply main switch turned off Turn the unit back on again with the main switch Fig 1 16 2 2 No screen display TV operation Video cable incorrectly connect ed WARNING Turn of the devic...

Страница 60: ...ctric waste may not be disposed of together with household cable For recycling instructions consult your community authorities or your dealer Battery Disposal The unit DVD Monitor features a rechargeable battery Do not dispose of exhausted batteries with the household waste Remove the batteries before disposing of the unit If necessary ask a K K qualified person or our service centre Batteries Rec...

Страница 61: ...nformity Declaration The company hereby declares ETV Elektro technische Vertriebsg sellschaft mbH that the following device DVD 4551 LCD is in compli ance with the essential requirements of European regulations for electro magnetic compatibility 2004 108 EG and low voltage regulations 2006 95 EG You may request a copy of the conformity declaration by contacting the enclosed address ...

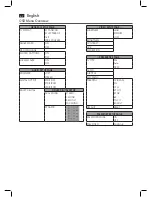
Страница 62: ...TION CLOSED CAPTIONS ON OFF PREFERENCE PAGE SCREEN SAVER ON TV TYPE PAL OFF Auto NTSC AUDIO SETUP PAGE AUDIO DOWNMIX LT RT SUBTITLE STEREO DISC MENU DIGITAL OUTPUT SPDIF OFF PARENTAL 1 KID SAFE SPDIF RAW 2 G SPDIF PCM 3 PG DOLBY DIGITAL DOLBY DIGITAL SETUP 4 PG 13 DUAL MONO STEREO 5 PGR L MONO 6 R R MONO 7 NC 17 MIX MONO 8 ADULT DYNAMIC DEFAULT RESET PASSWORT SETUP PAGE RASSWORD MODE ON OFF PASSWO...

Страница 63: ......

Страница 64: ......

Страница 65: ......

Страница 66: ...warancjinapodstawiekartygwarancyjnej Záruka24mésíců podle prohlášení o záruce A garanciát lásd a használati utasításban Гарантийные обязательства смотри руководство пользователя Kaufdatum Händlerstempel Unterschrift Koopdatum Stempel van de leverancier Handtekening Date d achat cachet du revendeur signature Fecha de compra Sello del vendedor Firma Data de compra Carimbo do vendedor Assinatura Data...

Отзывы: