background image

28

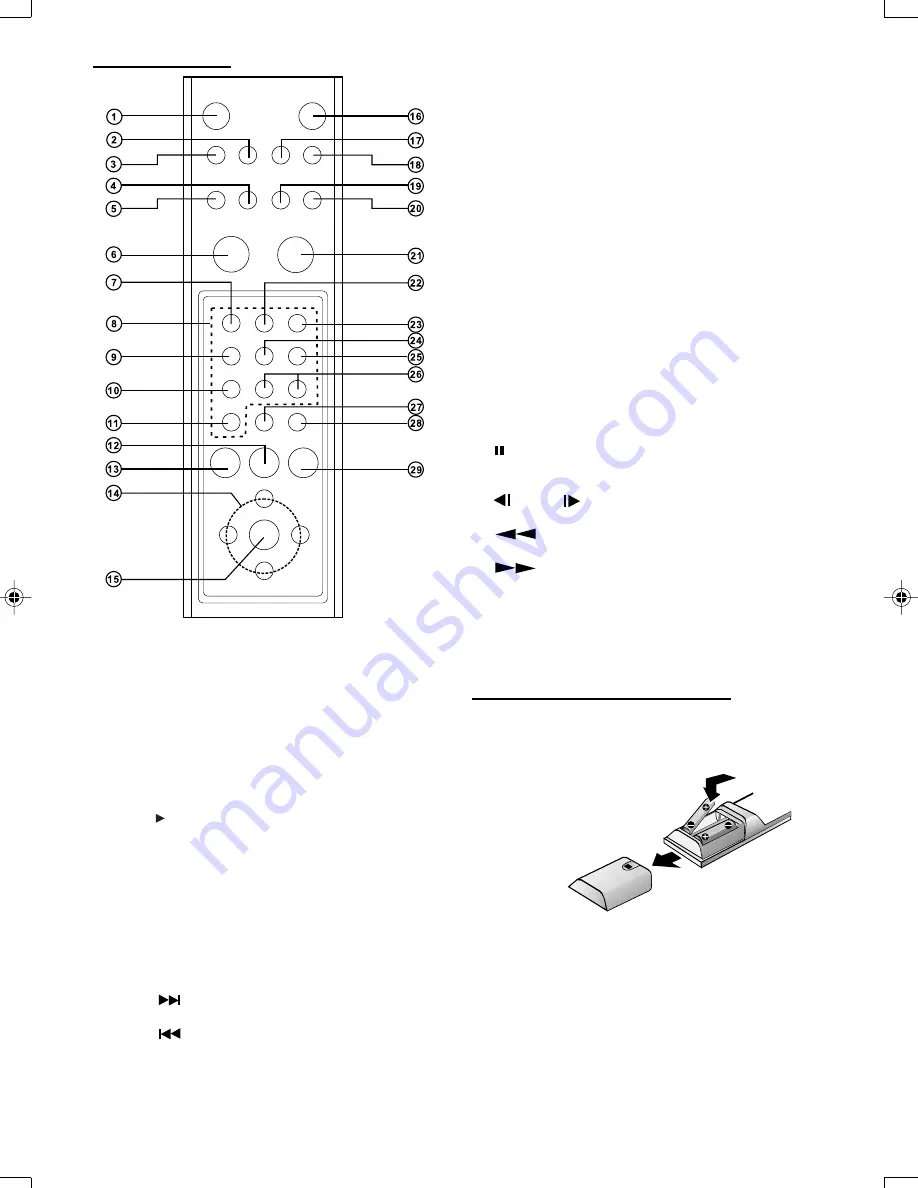
16. DISPLAY

– Press during playback to see current disc information

or the TV screen.

17. SUBTITLE

– Select a subtitle language.

18. MUTE

– Press to silence the volume, press again to restore

the volume.

19. SETUP

– Press to access or remove the setup menu of the

player.

20. GOTO

– In SHIFT ON press to search for a specific chapter

or playing time.

– In SHIFT OFF press to select DVD or MEMORY

CARD.

21. STOP 

– Press to stop playback.

22. REPEAT

– Press to play a chapter, title, track or disc repeatedly.

23. A-B

– Press to repeat a specific segment.

24. SHUFFLE

– Press to play track in random order.

25.


/ STEP

– Pause playback temporarily/frame-by-frame

playback.

26.

 SLOW 

– Press to play slow reverse/forward playback of DVD.

27.

 REV

– Press to search backward during playback.

28.

 FWD/CLEAR

– Press to search forward during playback.
– Clear input selections.

29. SHIFT

– Press to number lock on the buttons with number

printed on the surface.

Insert Batteries (Remote Control Unit)

You can control the player with the supplied remote control
unit. Insert two R6 (size AA) batteries by matching the +
and – markings inside the compartment. When using the
remote unit, point it at the remote sensor on the player.

Notes:

Do not leave the remote control unit in the extremely
hot or humid place.

Do not use a new battery with an old one.

Do not expose the remote sensor to direct light from
the sun or lighting apparatus. Doing so may cause a
malfunction in controlling the player.

If you do not use the remote control unit for an extended
period of time, remove the batteries to avoid possible
damage from battery leakage and corrosion.

Remote control Unit

1. POWER

– To switch to standby mode.

2. TITLE/PBC

– Press to access a DVD’s title menu.

3. DVD MENU/RETURN

– Press to access a DVD’s Disc menu.
– Go back to previous menu.

4. DIGEST

– Press to preview DVD track.

5. PRGM (Program)

– Press to access program mode.

6. PLAY 

– Press to start playback.

7. ZOOM

– Press to enlarge the picture.

8. NUMBER BUTTONS (0 – 9)

– Select numbered item in a menu.

9. ANGLE

– Select a DVD camera angle.

10. AUDIO

– Select an audio language.

11. BOOKMARK
12. NEXT 

– Press to go to the next chapter or track.

13. PREV 

– Press to go to the previous chapter or track.

14. (left/right/up/down) select an item in the menu.
15. ENTER

– Acknowledge menu selection.

English.p65

9/5/05, 11:10 AM

28

Содержание DVD 4511 CR

Страница 1: ...1 Bedienungsanleitung Garantie Instruction Manual Guarantee DVD Player DVD Player DVD 4511 CR ...

Страница 2: ...2 Inhalt Contents Bedienungsanleitung Seite 3 Übersicht Bedienelemente Seite 5 6 Garantie Seite 24 Instruction Manual Page 25 Control element overiew Page 27 28 Guarantee Page 45 D GB ...

Страница 3: ...ältig durch bevor Sie dieses Gerät benutzen Schutz des Netzkabels Um Fehlfunktionen des Gerätes zu vermeiden und zum Schutz vor Stromschlägen Feuer oder Verletzung von Personen beachten Sie bitte folgendes Ziehen Sie am Netzstecker und nicht am Kabel Berühren Sie den Netzstecker oder das Kabel niemals mit nassen Händen Halten Sie das Netzkabel von Heizgeräten fern Stellen Sie niemals einen schwere...

Страница 4: ...r des Fernsehers Schalten Sie das Gerät aus wenn Sie eine Fernsehsendung ansehen wollen WIEDERGABEFÄHIGE DISKS Dieser DVD Player kann folgende Diskarten mit den entsprechenden Logos wiedergeben Verwendbare Disks Bereichscode Sowohl der DVD Player als auch die Disk sind nach Bereichen codiert Diese Bereichscodes müssen in der Reihenfolge übereinstimmen damit die Disk abgespielt werden kann Passen d...

Страница 5: ...DIA SECURE DIGITAL MULTIMEDIA MEMORY Rückseite des Gerätes 1 DIGITAL OUT COAXIAL Anschluss von Audiogeräten mit Digital Coaxial Eingang 2 Analog 5 1ch Audio Ausgangsbuchsen Anschluss einen Verstärkers mit 5 1ch Analogeingangsbuchsen 3 S VIDEO Ausgang Anschluss eines TV Gerätes mit SVHS Videoeingang 4 VIDEO Ausgang Anschluss eines TV Gerätes mit Video Ausgang 5 SCART Ausgang Anschluss eines TV Gerä...

Страница 6: ... Auswahl löschen 28 SHIFT Durch Drücken wird die auf der Oberfläche aufgedruckte Funktion mit der entsprechenden Taste kombiniert Batterie einlegen Fernbedienung Sie können den Player mit der mitgelieferten Fernbedienung steuern Legen Sie zwei R6 AA Batterien entsprechend der angegebenen Polrichtung in das Batteriefach ein Wenn Sie die Fernbedienung verwenden möchten richten Sie diese auf den Remo...

Страница 7: ...er Batterien oder Korrosion zu verhindern Reichweite der Fernbedienung Die Fernbedienung kann in einer Entfernung von bis zu ca 5 Metern in gerader Richtung verwendet werden Außerdem kann sie innerhalb eines horizontalen Winkels von 30 zum Remote Sensor eingesetzt werden ANSCHLUSS EINES FERNSEHGERÄTS FÜR VIDEO Methode 1 DVD Player mit TV Gerät mit Video Eingang Methode 2 DVD Player mit TV Gerät mi...

Страница 8: ...DVD Players Sicherstellen dass vor dem Anschließen eines weiteren Gerätes alle Geräte der Anlage ausgeschaltet sind Die Bedienungsanleitung Ihres TV Gerätes Stereoanlage sowie der anderen Geräte die an den DVD Player angeschlossen werden sollen genau durchlesen Methode 1 DVD Player Stereoanlage Methode 2 DVD Player Verstärker mit 5 1 Analog Eingang Methode 3 DVD Player Verstärker mit Dolby Digital...

Страница 9: ...n des Symbols in der unteren Ecke rechts im Bildschirm Betätigen Sie die GOTO Taste zum wählen des Speicherkartenschachtes Für weitere Details lesen Sie bitte den Abschnitt MP3 Wiedergabe WICHTIGE HINWEISE Bitte beachten Sie folgende Punkte jedesmal wenn Sie eine Karte einlegen Vergewissern Sie sich dass sich keine Disc im DVD Player befindet und er sich im gestopptem Zustand befindet bevor Sie ei...

Страница 10: ...h die Stelle merken Betätigen Sie die PLAY Taste um die Wiedergabe an der letzten Stelle fortzuführen Bei zweimaliger Betätigung der STOP Taste wird die Wiederaufnahmefunktion zurückgesetzt Unterbrechen der Wiedergabe Pause Zur Unterbrechung der Wiedergabe einmal auf die Taste STEP drücken Während des Pause Modus ist der Ton stummgeschaltet Zur Wiederaufnahme der normalen Wiedergabe auf die Taste ...

Страница 11: ...e den Endtitel der CD erreicht hat startet die Wiedergabe nochmals von vorn CHAPTER laufendes Kapitel wiederholen Wenn die Wiedergabe am Ende des laufenden Kapitels angelangt ist springt die Wiedergabe zum Anfang des Kapitels zurück TRACK wiederhohlung des aktuellen Titels Wenn die Wiedergabe am Ende des aktuellen Titels angelangt ist geht die Wiedergabe am Anfang des gleichen Titels weiter Wieder...

Страница 12: ... haben Sie dann folgende Wahlmöglichkeiten Programmwiedergabe Betätigen Sie die PRGM Programm Taste und geben Sie die Titel und Kapitelnummern mit Hilfe der Zifferntasten 0 9 auf der Fernbedienung ein Auf dem Bildschirm wird folgendes Angezeigt Wählen Sie ein Programm und betätigen Sie die Richtungstasten zum Bewegen des Cursors auf START Betätigen Sie dann ENTER zur Wiedergabe des Programms Die P...

Страница 13: ...VAL Der aktuelle Kapitel wir in verschiedene Teile der gleichen Länge geschnitten Betätigen Sie die Zifferntasten zur Auswahl des gewünschten Fensters und betätigen Sie die ENTER Taste Der Player springt sofort zu der gewünschten Position Bei VCD2 0 Wiedergabe betätigen Sie bitte die GOTO Taste für den Suchmodus Disc Abspielzeit Titel Abspielzeit Titelnummer Bei CDs oder VCDs können Sie die GOTO T...

Страница 14: ...ie entsprechenden Bilder angezeigt werden Einige nützliche Funktionen hierzu werden im Folgenden beschrieben Wenn Sie eine Disc einlegen auf der sich JPEG Dateien befinden werden die Dateien oder Bilder die der Player wiedergeben kann auf dem Bildschirm angezeigt Sie können die gewünschten Ordner oder Dateien auswählen indem Sie auf die Tasten UP DOWN nach oben nach unten und dann jeweils auf die ...

Страница 15: ...enden Sie die Pfeiltasten nach LINK RECHTS OBEN UNTEN um einen Wiedergabe Modus auszuwählen 2 Wählen Sie über die Tasten den gewünschten Musikordner aus und drücken Sie dann auf die Eingabetaste ENTER 3 Mit der Taste und den Tasten wählen Sie die Lieddatei aus dann drücken Sie auf die ENTER Taste HINWEIS A FOLDER Alle Dateien im aktuellen Verzeichnis werden in Reihenfolge abgespielt B REPEAT ONE D...

Страница 16: ...nweis Die anzeigbare Bildgröße ist auf der DVD Disk voreingestellt Deshalb kann es vorkommen dass kas wiedergegebene Bild einiger DVD Disks nicht mit der von lhnen gewählten Bildgröße übereinstimmt Videoausgang Wählen Sie den Videotyp der Ihrem Anschluss entspricht SCART CVBS oder SCART RGB Winkelsymbol Manche DVDs beinhalten Szenen die aus verschiedenen Blickwinkeln aufgenommen wurden Diese Auswa...

Страница 17: ...INSTELLUNGEN Wählen Sie speaker setup im Einstellungsmenü und wählen Sie die gewünschte Option mit Hilfe der Pfeiltasten und betätigen Sie ENTER zur Bestätigung Downmix LT RT Bei einer Disc die über Mehrkanal Audio verfügt kann das Ausgangssignal in den linken und den rechten Kanal eingefügt werden STEREO Bei einer Disc die über Mehrkanal Audio verfügt kann das Ausgangssignal in das Stereosignal e...

Страница 18: ...mit einem 5 1 Home Theatre System über ein Koaxialkabel nicht im Lieferumfang verbunden ist Wählen Sie SPDIF PCM um den eingebauten Dolby Digital Dekoder des Players zu aktivieren Dynamikkompression Die Dynamikompression vermindert Lautstärken schwankungen indem es Ihnen erlaubt den Abstand zwischen lauten und leisen Geräuschen einzustellen Betätigen Sie oder um die Dynamikompression einzustellen ...

Страница 19: ...chte Audiosprache einzustellen und betätigen Sie ENTER zur Bestätigung Untertitel Wählen Sie Subtitle und betätigen Sie Betätigen Sie oder um die gewünschte Untertitelsprache einzustellen und betätigen Sie ENTER zur Bestätigung Discmenü Wählen Sie Disc menu und betätigen Sie Betätigen Sie oder um die gewünschte Discmenüsprache einzustellen und betätigen Sie ENTER zur Bestätigung Altersbeschränkung...

Страница 20: ... einstellen oder das Superuser Passwort 136900 benutzen Kindersicherungspasswort Die Kindersicherung begrenzt das Sehen von DVDs mit einer Altersbeschränkung die über der eingestellten Einstufung liegt Zum Einstellen der Altersbeschränkung sehen Sie bitte Altersbeschränkung einstellen Betätigen Sie und um ein Passwort zu wählen Gehen Sie auf CHANGE und betätigen Sie die ENTER Taste Ein Fenster ers...

Страница 21: ...der rückwärts schnelles rück Abspielen nicht zulassen wärts Abspielen Kein 4 3 16 9 Wählen Sie die korrekte Einstellung Bild die den Eigenschaften Ihres Fernsehers TV Aspects entspricht Kein Surround Wählen Sie die korrekte Einstellung Sound unter Audio Output die Ihrer Stereoanlage entspricht Keine Bedienung Prüfen Sie ob die Batterien korrekt über die Fernbe entsprechend der Polarität und dienun...

Страница 22: ... US Patente und anderer Rechte an geistigem Eigentum in Besitz der Macrovision Corporation sowie anderer Rechteinhaber geschützt sind Die Verwendung dieser Copyright Schutztechnik muss seitens der Macrovision Corporation autorisiert sein und ist ausschließlich auf die private bzw anderweitig eingeschränkte Nutzung beschränkt außer dies wurde ausdrücklich seitens der Macrovision Corporation genehmi...

Страница 23: ... kann darauf aufgenommen werden Eine DVD hat eine größere Kapazität als eine einseitige 1 2 mm dicke Diskette Dadurch dass zwei dünne Disketten zusammenhängen gibt es irgendwann in der Zukunft die Möglichkeit der doppelseitigen Wiedergabe mit noch längeren Spielzeiten PBC Playback Control Diese ist auf Video CDs Version 2 0 aufgenommen Die Szenen oder Information kann über den Fernsehbildschirm mi...

Страница 24: ...scht bei Fremdeingriff NACH DER GARANTIE Nach Ablauf der Garantiezeit können Reparaturen kostenpflichtig vom entsprechenden Fachhandel oder Reparaturservice ausgeführt werden SERVICE Sehr geehrter Kunde ca 95 aller Reklamationen sind leider auf Bedienungsfehler zurück zu führen und könnten ohne Probleme behoben werden wenn Sie sich telefonisch oder über E mail mit unserer für Sie eingerichteten Se...

Страница 25: ...ctions of the Mains Lead In order to prevent the device from malfunctioning and to protech against electric shocks fire or injury please note the following Always remove the plug by pulling the plug itself and not the lead Never touch the mains plug or lead with wet hands Keep the mains lead away from heaters Never put a heavy object on the electric lead Never try to repair or replace the mains le...

Страница 26: ...not match the disc will not be played The Region Number for this player is describer on the rear panel of the player Disc structure A DVD video disc consists of title and each title may be divided into some chapters See Example 1 For example if a DVD disc contains some movies each movie may have its own title number and it may be further divided into some chapters On the other hand Audio CD consis...

Страница 27: ...dard AC outlet CAUTION Do not touch the inner pins of the jacks or the rear panel Electrostatic discharge may cause permanent damage the unit 1 POWER To switch standby modes 2 STANDBY INDICATOR 3 DISPLAY 4 DISC TRAY 5 OPEN CLOSE To open or close the disc tray 6 SKIP Press to skip to the previous chapter track 7 SKIP Press to skip to the next chapter track 8 STOP To stop playing the disc 9 PLAY PAU...

Страница 28: ...R6 size AA batteries by matching the and markings inside the compartment When using the remote unit point it at the remote sensor on the player Notes Do not leave the remote control unit in the extremely hot or humid place Do not use a new battery with an old one Do not expose the remote sensor to direct light from the sun or lighting apparatus Doing so may cause a malfunction in controlling the p...

Страница 29: ...tely 5 meters in a straight line It can also be operated at a horizontal angle of up to 30 from the remote sensor CONNECTION TO A TV FOR VIDEO METHOD 1 DVD Player TV with Video input jack METHOD 2 DVD Player TV with S Video input jack METHOD 3 DVD Player TV with Scart input jack Audio video ...

Страница 30: ... DVD player Be sure to turn off the power to all components in the system before connecting another component Refer to the instruction Manuals for your TV stereo system and other components to be connected to the DVD player METHOD 1 DVD Player Stereo System METHOD 2 DVD Player Amplifier with 5 1ch Analog input jacks METHOD 3 DVD Player Amplifier with Dolby Digital Decoder DTS Decoder ...

Страница 31: ...ng Card Port Press the SHIFT button first the symbol appears in the right lower corner at the TV screen Press GOTO button to select the card slot For further details please see section MP3 playback IMPORTANT NOTES When insert a card please insert it into the pin awarding to the following and each time you can insert one card Make sure no disc in the tray and the DVD player in STOP mode before inse...

Страница 32: ...URE This player can playback MPEG DivX avi MPEG mpg files and compatible with DVD SVCD VCD CD MP3 JPEG CD CD R CD RW DVD R Compatible with DivX 3 11 4 XX 5 02 5 03 encoder standard Starting playback MPEG 4 DivX It is recommended you turn on you TV when playing back MPEG DivX disc 1 Press the OPEN CLOSE button to load disc The menu will show up the folders and the files in root directory 2 Use the ...

Страница 33: ... jumps back to the beginning of the track A B Repeat playback Press A B button once at the beginning of the segment point A you want to play repeatedly Press A B button again at the end of the segment point B The player automatically returns to point A and starts repeat playback of the selected segment A B Press A B button a third time to disable repeat A B playback and allow playback to continue ...

Страница 34: ...ITLE button to select different subtitle languages eg English French Spanish German depending on the number of languages recorded on a DVD disc ZOOM Press ZOOM button repeatedly during playback to select zoom 2x 3x 4x to change the size of the picture While an image is enlarged you can use UP DOWN LEFT RIGHT buttons to shift the view and display the part you wanted ANGLE Press the ANGLE button dur...

Страница 35: ...han 6 Digest play VCD During play press the DIGEST button The following menu will appear Press the UP DOWN buttons to select TRACK DIGEST DISC INTERVAL TRACK INTERVAL Then press ENTER button Press and buttons to select the window you d like to see and press the ENTER button Up to 6 windows can be displayed on the screen at a time Press the and buttons to select NEXT Then press ENTER button for the...

Страница 36: ... to select PREV or NEXT then press ENTER Choose slide show on the screen to change to slide show mode The player will start showing from the first picture Press UP DOWN LEFT RIGHT buttons to select the picture then press ENTER and it will shift to slide show mode starting with the picture selected MP3 Playback This system has a built in MP3 decoder You can playback MP3 tracks files recorded on CD ...

Страница 37: ... and press the ENTER button to select TV Display NORMAL PS Pan scan Select when the unit is connected to a conventional TV Video material formatted in the Pan Scan style is played back with the left and right edges are cut off NORMAL LB Letter Box Select when the unit is connected to a normal TV Wide screen images are shown on the screen with a black band at the top and bottom WIDE Select when the...

Страница 38: ...p menu and then select the desired option using the cursor buttons to select the desired option and press the ENTER button to select SPEAKER SETUP Select speaker setup in the setup up menu and then select the desired option using the cursor buttons to select the desired option and press the ENTER button to select Downmix LT RT A disc recorded multi channel soundtrack the output signal will be inco...

Страница 39: ...r is connected to a 5 1 home theatre system by a coaxial cable not supplied Select SPDIF PCM to enable the internal Dolby Digital decoder of this player Dynamic Range Compression Dynamic Range Compression reduces volume changes by letting you adjust the difference between soft and loud sounds Press or to set Dynamic Range higher dynamic sound will be produced if dynamic range is selected VIDEO SET...

Страница 40: ...le Choose PAL if your TV is PAL compatible Choose AUTO if you want the player to automatically select the color system of the current DVD The TV system setting must be AUTO Audio Audio will be selected Press Press or to select the desired audio language and then press ENTER Subtitle Subtitle will be selected Press Press or to select the desired subtitle language and then press ENTER Disc Menu Disc...

Страница 41: ...LT Mature material should be viewed only by adults due to graphic sexual material violence or language Notes Parental control is a relatively new feature encoded into DVD discs Currently very few DVD titles if any include parental control in the Australia and New Zealand region PASSWORD You need in PASSWORD setting to set the NEW PASSWORD or use SUPERUSER PASSWORD 136900 Parental control Password ...

Страница 42: ... Ensure that the disc has been inserted with the label facing upwards No picture Ensure that the device is properly connected Ensure that the television is turned to video Please press the VIDEO button until you have a picture again No sound Ensure that the device is properly connected Distorted sound Ensure that the television and stereo system have been adjusted correctly Adjust the main volume ...

Страница 43: ...lights up on the device Symptom Video CD Remedy There is no menu This function is only possible with video CDs with Playback Control VCD SVCD does With the disc inserted switch over the not play back PBC function using the MENU button CD RWs do not CD RWs must not be written with hard play back disc simulation tools such as Packed CD In CD or similar programmes Symptom Video CD Remedy CD Rs and Th...

Страница 44: ...VDs A title is divided up into many sections each of which has a number Specific sections of the video presentation can be quickly found using these numbers DVD This term refers to optical CDs of a high density on which high quality picture and sound recordings have been made using digital signals Through the use of a new video compression technique MPEG and a high density recording technique it i...

Страница 45: ...tice Guarantee The device supplied by our Company is covered by a 24 month guarantee starting on the date of purchase receipt During the life of the guarantee any fault of the device or its accessories ascribable to material or manufacturing defects will be eliminated free of charge by repairing or at our discretion by replacing it The guarantee services do not entail an extension of the life of t...

Страница 46: ...he potential effects of incorrect disposal on the environment and human health This will contribute to the recycling and other forms of reutillisation of electrical and electronic equipment Information concerning where the equipment can ve disposed of can be obtained from your local authority In many EU countries the disposal of electrical and electronic equipment in the domestic waste is prohibit...

Страница 47: ...47 ...

Страница 48: ...gwarancji na podstawie karty gwarancyjnej Záruka 24 mésíců podle prohlášení o záruce A garanciát lásd a használati utasításban Гарантийные обязательства смотри руководство пользователя Kaufdatum Händlerstempel Unterschrift Koopdatum Stempel van de leverancier Handtekening Dated achat cachetdurevendeur signature Fechadecompra Sellodel vendedor Firma Data de compra Carimbo do vendedor Assinatura Dat...

Отзывы: