VP-8-V2 and VP-16-V2 Series Encoder
·
User Manual
57
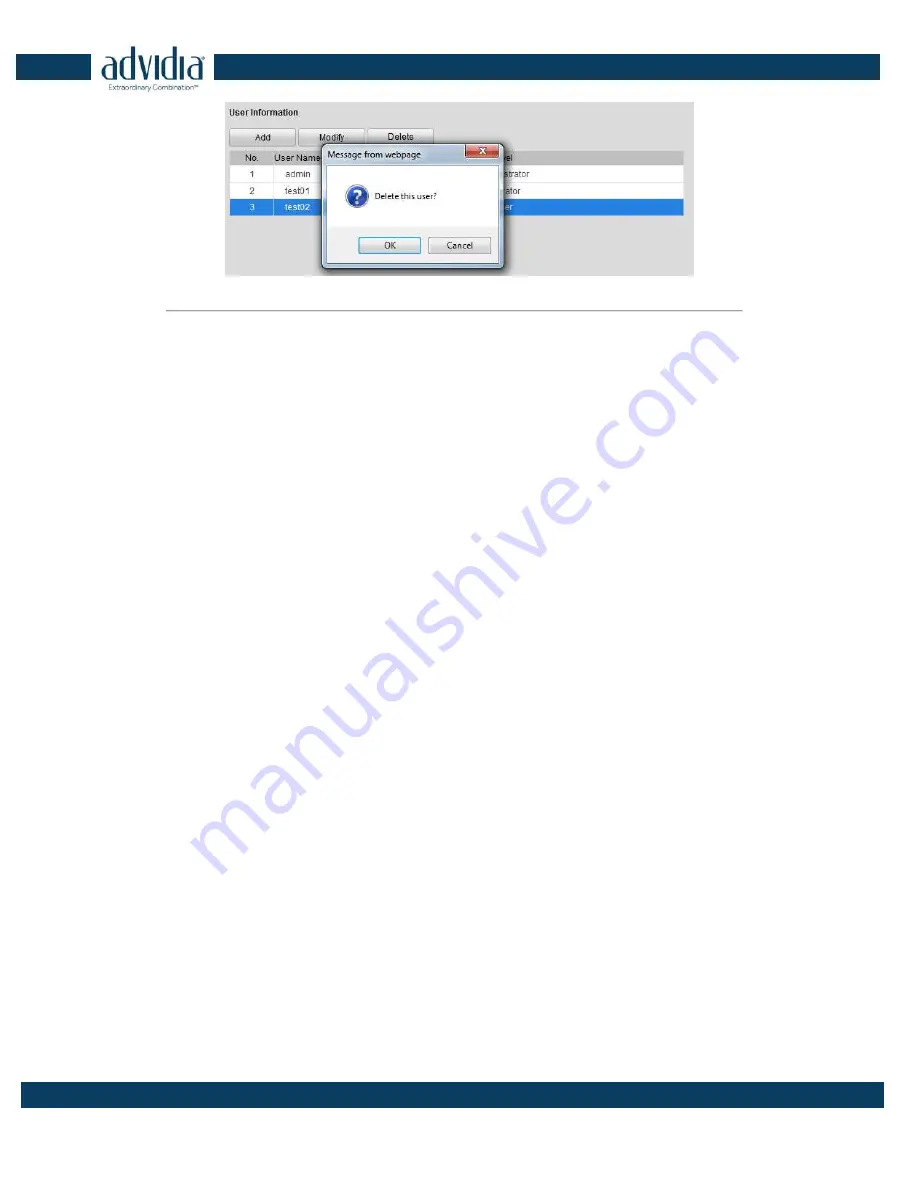
Figure 6. 6
Delete a User
1.
Click
OK
to delete the selected user account.
Страница 1: ...VP 8 V2 and VP 16 V2 Series Encoder User Manual...
Страница 2: ...Disclaimer REGARDING TO THE PRODUCT WITH INTERNET ACCESS THE USE OF PRODUCT SHALL BE WHOLLY AT YOUR OWN RISKS OUR COMPANY SHALL NOT TAKE ANY RESPONSIBILITES FOR ABNORMAL OPERATION PRIVACY LEAKAGE OR...
Страница 3: ...interference that may cause undesired operation EU Conformity Statement This product and if applicable the supplied accessories too are marked with CE and comply therefore with the applicable harmoni...
Страница 4: ...cal safety regulations of the nation and region Please refer to technical specifications for detailed information Input voltage should meet both the SELV Safety Extra Low Voltage and the Limited Power...
Страница 5: ...tory specifications Ensure unit is properly secured to a rack or shelf Major shocks or jolts to the unit as a result of dropping it may cause damage to the sensitive electronics within the unit Use th...
Страница 6: ...ting Calling a Patrol 20 3 4 Configuring Video Parameters 21 Chapter 4 Device Configuration 23 4 1 Local Configuration 23 4 2 Device Parameters 24 4 2 1 Configuring Time Settings 24 4 2 2 Configuring...
Страница 7: ...ring Alarm 50 5 3 7 Handling Exception 51 5 4 Configuring Privacy Mask 52 Chapter 6 Managing User Accounts 54 1 1 Adding a User 54 6 2 Modifying a User 55 6 3 Deleting a User 56 Chapter 7 Maintenance...
Страница 8: ...igurable arming time of alarm input output Alarm triggers audio alarm notifying surveillance center sending email and alarm output VCA detection alarm line crossing detection and intrusion detection i...
Страница 9: ...roduction 1 1 Front Panel VP 8 V2 VP 16 V2 Figure 1 1 VP 8 V2 VP 16 V2 Front Panel Table 1 1 Indicator Description Indicator Description 1 POWER Lights in green when the device is powered on 2 Not Use...
Страница 10: ...Interface 6 12 VDC Power Input 7 Power Switch 8 ALARM IN and ALARM OUT 9 GND 1 3 Alarm Connections 1 3 1 Alarm Input Connections VP 8 V2 AND VP 16 V2 supports the open close relay input as the alarm...
Страница 11: ...methods are applied to the AC or DC load Please refer to the following diagram Alarm output connections diagram Figure 1 6 Alarm Output Connections Please note the different connections of JJ1 shown...
Страница 12: ...t Explorer 6 7 8 9 Firefox 3 5 and above Chrome 8 and above Safari 5 0 2 and above Windows XP SP1 and above 32 bit Before you start Before access you need to configure the network settings of device a...
Страница 13: ...min user or 5 times for the normal user the current user account will be locked for30 seconds 2 On the main page of VP 8 V2 AND VP 16 V2 you need to download and install the plug in 1 Click on the liv...
Страница 14: ...Manual 13 Figure 2 4 Click Next 4 When the installation completes click Finish to finish the installation of Web Components Figure 2 5 Install the Web Components 2 2 Main Page After successful login y...
Страница 15: ...lit screen modes Live Video Window Display the live video of the current camera Toolbar Realize functions in live view mode e g live view capture recording audio on off two way audio etc PTZ Control R...
Страница 16: ...clicking the mouse 2 Double click a camera from the device list to start the live view Figure 3 1 Start Live View 3 You can click the button on the toolbar to start the live view of all cameras on th...
Страница 17: ...e main stream gets higher video quality while the sub stream requires lower bandwidth 3 1 2 Full screen Mode You can click the button on the toolbar or double click on the live video to switch to the...
Страница 18: ...Control Before you start 1 Make sure the encoder is connected with the camera dome which supports PTZ function Connect the R and R terminals of the pan tilt unit or speed dome to RS 485 D and RS 485 D...
Страница 19: ...ure 3 5 PTZ Control Panel Click the zoom iris focus buttons to realize lens control Refer to the following table for description of PTZ control buttons Table 3 2 Description of PTZ Control Buttons But...
Страница 20: ...ng of current preset Up to 256 presets are configurable depending on the PTZ protocol applied Calling a Preset This feature enables the camera to point to a specified preset scene when an event takes...
Страница 21: ...ol area to enter the patrol settings interface 2 Select a patrol number from the patrol list for setting Figure 3 9 Patrol Setting 3 Click the button to enter the Add Patrol Path interface Figure 3 10...
Страница 22: ...ve step 3 to 5 to add more patrol paths You can also click to edit the existing patrol path or click to delete it 7 Click to save the patrol settings Repeat the above steps to configure other patrols...
Страница 23: ...atively smoother Outdoor the image is relatively clearer and sharper The degree of contrast and saturation is high Dim Light the image is smoother than the other three modes 3 Move the slider to set t...
Страница 24: ...e Size Select the split screen view mode to 4 3 16 9 or Auto fill Record File Size Select the size of packed video files during manual recording to 256M 512M or 1G Live View Performance Set the live v...
Страница 25: ...Click Remote Configuration Device Parameters Time Settings to enter the Time Settings interface Figure 4 2 Time Settings 2 Select the Time Zone Select the Time Zone that is closest to the device s lo...
Страница 26: ...a time synchronization function such as the server at the National Time Center IP Address 210 72 145 44 If the device is set up in a more customized network NTP software can be used to establish a NT...
Страница 27: ...ameters Advanced to enter the advanced settings interface Figure 4 7 Packet Time of Recording 2 Set the packet time of the recorded file The packet time can be set from 1to 300 minutes 3 Click Save to...
Страница 28: ...should properly configure the Preferred DNS Server and Alternate DNS Sever here Figure 4 9 DNS Server Settings 5 Click the Save button to save the above settings 4 3 2 Configuring Port Settings Purpo...
Страница 29: ...he Remote Configuration Network Settings DDNS Settings to enter the DDNS Settings interface www hiddns com Figure 4 11 DDNS Settings 2 Check the Enable DDNS checkbox to enable this feature 3 Select DD...
Страница 30: ...me of the device You can register the alias of the device domain name in the HiDDNS server first and then enter the alias to the domain name in the encoder you can also enter the domain name directly...
Страница 31: ...c Before you start 1 Before configuring the Email settings the device must be connected to a local area network LAN that maintains an SMTP mail server The network must also be connected to either an i...
Страница 32: ...for SMTP is 25 Enable SSL Click the checkbox to enable SSL if required by the SMTP server When the SSL is enabled the default TCP IP port used for SMTP is 465 Interval The interval refers to the time...
Страница 33: ...ocol for managing devices on IP networks You can use SNMP to get camera status parameters and alarm related information Before you start Before setting the SNMP please download the SNMP software and m...
Страница 34: ...rameters of the device Before you start If you want to enable the UPnP function of the device you must enable the UPnP function of the router to which your device is connected When the network working...
Страница 35: ...mapping in the router 5 Click Save to save the settings After port mapping is successful you can view the status of the port mapping on the Port Status area Figure 4 20 UPnPTM Settings Manual 4 3 8 Co...
Страница 36: ...create the following dialog box Figure 4 22 Create Self signed Certificate 2 Enter the country host name IP validity and other information 3 Click OK to save the settings Task2 Create the authorized...
Страница 37: ...255 It is recommended to use the IP address ranging from 239 252 0 0 to 239 255 255 255 Steps 1 Click Remote Configuration Network Settings Advanced to enter the multicast address settings interface F...
Страница 38: ...st Port in the text fields The Alarm Host IP refers to the IP address of the remote PC on which the CMS Client Management System software e g iVMS 4200 is installed and the Alarm Host Port must be the...
Страница 39: ...to enter the Display Settings interface Figure 5 1 Display Settings 2 Select the camera from the drop down list 3 Edit the camera name in the text field of Camera Name Figure 5 2 Edit Camera Name 4 Se...
Страница 40: ...te the above settings 5 1 2 Configuring Text Overlay Steps 1 Click the Remote Configuration Camera Settings Text Overlay Settings to enter the Text Overlay Settings interface 2 Select the camera from...
Страница 41: ...ettings 6 If you want to copy the text overlay settings of the current camera to other cameras spread the Copy to Camera panel and select the camera s to copy or click Select All to select all cameras...
Страница 42: ...e view 4 You can customize the following parameters for the selected Main Stream or Sub Stream Video Type Select the video type to video stream or video audio composite stream The audio signal will be...
Страница 43: ...Figure 5 8 Copy to Camera 6 Click OK to validate the above settings 5 3 Configuring and Handling Alarms Purpose This section explains how to configure the network camera to respond to alarm events in...
Страница 44: ...When this feature is enabled the motion detection triggered frame green for the moving targets in the motion detection area will be displayed on the live video 5 Click the button Draw motion detection...
Страница 45: ...10 Motion Detection Area Settings 8 Click Save button to save the settings 2 Set the Arming Schedule for Motion Detection Steps 1 Click the Arming Time tab Figure 5 11 Motion Detection Arming Time Se...
Страница 46: ...n you have enabled holiday schedule in Holiday settings 3 Choose the day you want to set the arming schedule 4 Click the button to set the time period for the arming schedule 5 After you set the armin...
Страница 47: ...information to a user or users when an event occurs To send the Email when an event occurs you need to go to the network setting interface to set the related parameters Refer to Section Configuring Em...
Страница 48: ...utput remains in effect after alarm occurs If you choose Manual you need to manually disable the alarm output 4 Click Edit to enter the Edit Schedule Time interface The time schedule configuration is...
Страница 49: ...on Detection Alarm Linked Recording 5 Click OK to save the settings of linking method motion detection 5 3 4 Configuring External Alarm Input Steps 1 Click Remote Configuration Alarm Settings Alarm In...
Страница 50: ...t the Alarm Actions Taken for Motion Detection in Section Configuring Motion Detection Figure 5 19 Alarm Input Settings Linking Method 6 You can also choose the PTZ linking for the alarm input if your...
Страница 51: ...ng Schedule for Motion Detection in Section Configuring Motion Detection 5 Click the Linkage Method tab to set the actions taken for the video loss alarm Please refer to Step 3 Set the Alarm Actions T...
Страница 52: ...he Alarm Actions Taken for Motion Detection in Section Configuring Motion Detection 5 3 7 Handling Exception The exception type can be HDD full HDD error network disconnected IP address conflict illeg...
Страница 53: ...Mask enables you to cover certain areas on the video of the channel to prevent your privacy from live viewing and recording Steps 1 Click Configuration Remote Configuration Camera Settings Privacy Ma...
Страница 54: ...on 5 Draw the mask area by clicking and dragging the mouse in the live video image Up to four privacy mask areas can be configured 6 When finishing the area setting click the button to finish drawing...
Страница 55: ...Add user interface 2 Edit the User Name 3 Select the Level to Operator or User 4 Set the Password and confirm the same password STRONG PASSWORD RECOMMENDED We highly recommend that you create a stron...
Страница 56: ...in Camera Configuration User The Guest user has permission of Local Log Search in Local Configuration Remote Log Search in Remote Configuration and only has the local remote playback in the Camera Con...
Страница 57: ...You are highly recommended to use the strong password 4 Configure the user permission for the user including the Basic Permission and Camera Operation 5 Click OK to finish the user modification You ne...
Страница 58: ...VP 8 V2 and VP 16 V2 Series Encoder User Manual 57 Figure 6 6 Delete a User 1 Click OK to delete the selected user account...
Страница 59: ...he Device Information interface of the encoder Figure 7 1 1 Device Information You can edit the Device Name and Device No and view the device information including Model Serial No Firmware Encoding Ve...
Страница 60: ...nterface click Reboot to enter the following message box Figure 7 3 Reboot the Device Click OK to reboot the device or Cancel to cancel the operation 7 2 2 Restoring Default Settings On the Maintenanc...
Страница 61: ...d the configuration files of one device can be imported to multiple devices if they are to be configured with the same parameters On the Maintenance Import Config File interface click Browse to select...
Страница 62: ...e Video Video Audio Main Stream 1080P 720P WD1 4CIF VGA CIF Dual Stream Support sub stream WD1 4CIF 12fps CIF QVGA QCIF real time Storage Type SATA NAS ISCSI IPSAN Number 2 Capacity Up to 6 TB for eac...
Страница 63: ...encoder with software 1 Check the encoder IP 2 Make sure the cable is connected 3 User name and password of encoder are correct Why cannot control the connected PTZ camera or speed dome through the en...