Automating The System Using Schedules
16
Preliminary 8/23/00
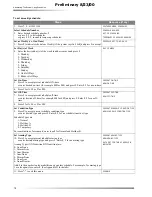
To turn the chime feature on or off:
Note
To change which doors (or other selected sensors)
chime or what text message is indicated (if any), con-
tact your security consultant.
Latchkey Feature
The latchkey feature pages you if someone, such as a
child, doesn’t arrive home and disarm the system by a des-
ignated time. If programmed to do so, the system will also
phone in a report to the monitoring service. The latchkey
time need only be set to the desired time once.
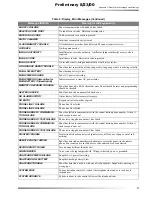
To set the latchkey time:
Arm the system to AWAY adding the LATCHKEY arming
modifier:
Note
To change the programmed pager phone number,
contact your security consultant.
Automating The System Using
Schedules
Schedules are used to automatically control the system at a
predetermined date and time. Schedules can be used for
automatically turning system controlled lights and devices
on or off. They can automatically arm or disarm the sys-
tem and also define time periods during which business
type openings, closings, and access codes are valid.
Each system partition (separate protected area) can have
up to 32 programmed (numbered) schedules. Once these
schedules are set up they can then be associated with the
desired light, device, or access code or combinations of all
three.
There are two similar, but different schedule types: one-
time and weekly.
❑
One-time schedules are those that are used only once
at a set on- and off-time and then automatically made
inactive by the system.
❑
Weekly schedules are repeatedly used on certain times
and days of the week. These schedules remain active.
Both one-time and weekly schedules can have one (or a
combination) of five partition/condition types: Inactive,
Normal, Holiday A, Holiday B, and Temporary.
❑
Inactive (type 0) means no conditions apply (essen-
tially saves the settings, but turns the schedule OFF).
❑
Normal conditions (type 1) are those where other con-
ditions (such as Holiday or Temporary) do not apply.
❑
Holiday A conditions (type 2) are those where the cur-
rent date matches a holiday date programmed in the
Holiday A list. This list is pre-programmed by the
installer.
❑
Holiday B conditions (type 4) are those where the cur-
rent date matches a holiday date programmed in the
Holiday B list. This list like the A list is pre-pro-
grammed by the installer.
❑
Temporary conditions (type 8), when enabled, are
special conditions that override all other conditions.
Both one-time and weekly schedules can also have one of
seven arming types and can also be set as an Open/Close
schedule.
❑
None/None arming selects no arming action for both
ON and OFF transitions.
❑
Disarm/Arm selects disarming for the ON transition
and arming for the OFF transition.
❑
Arm/Disarm selects arming for the ON transition and
disarming for the OFF transition.
❑
Arm/None selects arming for the ON transition and no
action for the OFF transition.
❑
Disarm/None selects disarming for the ON transition
and no action for the OFF transition.
❑
None/Arm selects no action for the ON transition and
arming for the OFF transition.
❑
None/Disarm selects no action for the ON transition
and disarming for the OFF transition.
❑
Open/Close defines the schedule as one to be used as
the start or the end of an opening and closing time
window for reporting if the partition has been armed
or disarmed within the time window. This is typically
used in businesses with normal open and closed
hours. (See Appendix D - Advanced Topics for Open-
ing and Closing Notification By Exception details.)
One-Time Schedules
One-time schedules are automatically made inactive at the
scheduled off-time setting. For setting recurring schedules,
see Setting Weekly Schedules.
Note
If an off-time is set to be earlier than the on-time, the
off-time is understood to be for the next day.
Steps
Response (if any)
Press
7, 1.
FEATURES
MENU
,
CHIME
ON
(if off)
or
CHIME
OFF
(if
on).
Steps
Response (if any)
1. Press
7, 2.
FEATURES
MENU
,
PRESENT
LATCHKEY
TIME
2. Press # to accept the indi-
cated time or enter the new
[
DESIRED
TIME
]
(for example,
440
FOR
4:40), #.
NEW
LATCHKEY
TIME
3. Press
1
for
A.M
. or
2
for
P.M.
A
.
M
.
OR
P
.
M
.
Steps
Response (if any)
Press
1, 3,
ACCESS
CODE
, 8.
SECURITY
MENU
,
AWAY
,
LATCHKEY


