background image

37

PWS-440 User Manual

Chapter 4

G

etting

Connected

4.4

Connecting GPS

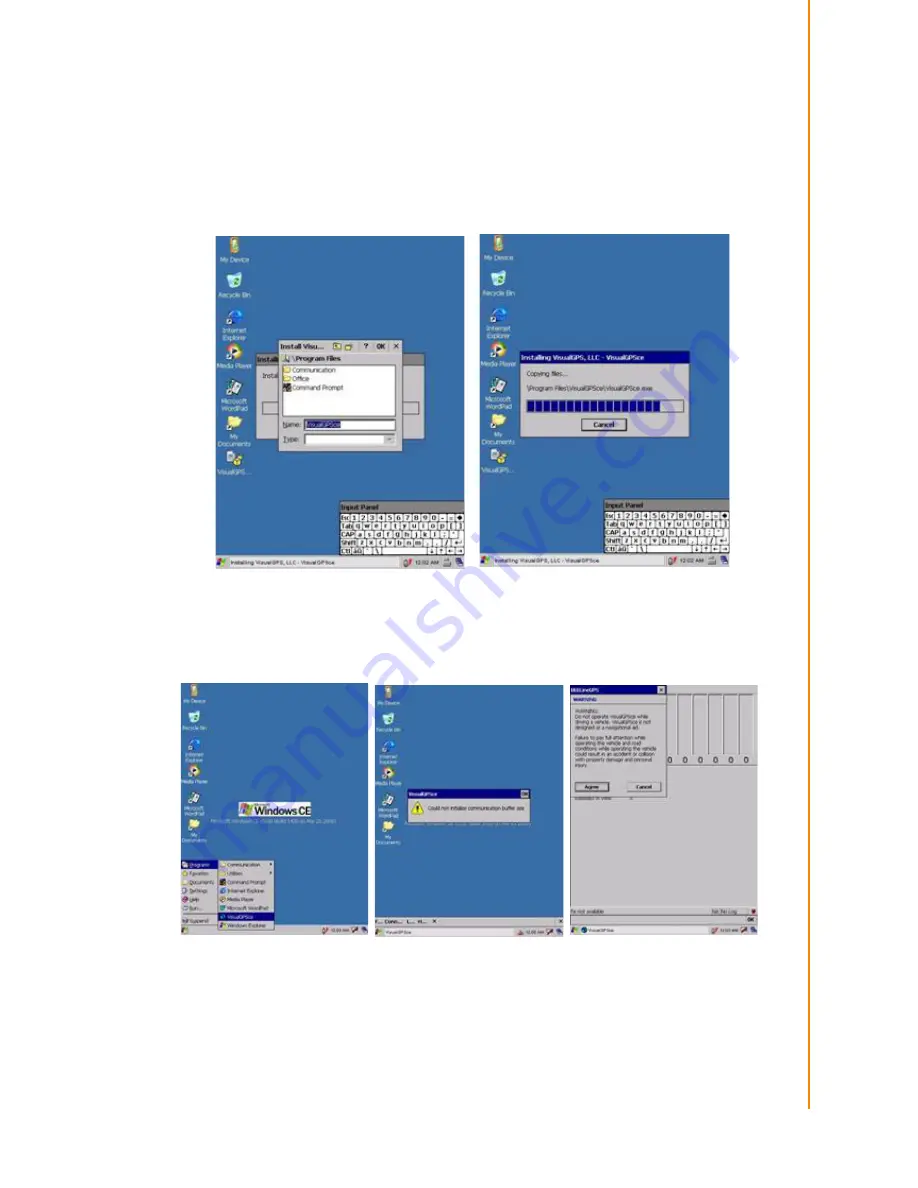
To run GPS Demo program, it need to download VisualGPS from internet. Copy this
program onto Deskonchip1 to save, and double tag to install VisualGPS as follow
instruction.

Copy “visualGPSceinstall.CAB” to PWS-440 ®C Desktop, and execute “visualGPS-
ceinstall.CAB” on desktop.

Follow these instructions to set up a GPS connection.

1.

Tap Start 

->

 Program 

->

 VisualGPS.

Содержание PWS-440

Страница 1: ...User Manual PWS 440 Rugged PDA ...

Страница 2: ...ered trademark of Bluetooth SIG Microsoft Windows and ActiveSync are either registered trademarks or trademarks of Microsoft Corporation Other product names mentioned in this manual may be trademarks or registered trademarks of their respective companies and are hereby acknowledged Regulatory Compliance Statements FCC Statement This device complies with Part 15 of the FCC Rules Operation is subjec...

Страница 3: ... from that to which the receiver is connected Consult the dealer or an experienced radio TV technician for help The maximum SAR value reported is 0 119 the SAR value to be define after SAR test Canada Industry Canada IC The wireless radio of this device complies with RSS 139 RSS 210 Industry Can ada This Class B digital apparatus complies with Canadian ICES 003 Cet appareil numérique de la classe ...

Страница 4: ...ctors are correctly oriented and aligned Battery Safety There is a risk of explosion if the battery is replaced by an incorrect type Dispose of used batteries according to the instructions Do not dispose of batteries in a fire They may explode Check with local author ities for disposal instructions Notices This unit is equipped with a battery pack and backup battery It is possible that the PDA may...

Страница 5: ... 3 Powering up for the First Time 16 2 4 Calibrating the touch screen 16 2 5 Setting the Time and Date 17 2 6 Adjusting the Screen Brightness 18 Chapter 3 Using the Hardware 19 3 1 Keypads and Function Buttons 20 3 1 1 Entering Characters with the Keypad 20 3 2 Using the Stylus 21 3 3 Inserting an Micro SD Memory Card 22 3 4 Removing a Storage Card 22 3 5 GPRS SIM Card Set Up 23 3 6 Connecting Dev...

Страница 6: ...onnecting GPRS 38 4 6 COM Port list 40 Chapter 5 Advance Settings 41 5 1 Checking the Battery Status 42 5 2 Optimizing Battery Life 42 5 2 1 Changing the Automatic Power Settings 42 5 2 2 Adjusting Backlight Settings 43 5 3 Performing a System Reset 44 ...

Страница 7: ...Chapter 1 1 Overview ...

Страница 8: ...gency services and construction PWS 440 been developed to comply with MIL STD 461E MIL STD 810G and IP67 standards the main specifications are as detailed below Table 1 1 PWS 440 Military PDA Specification Items Description OS Windows Embedded Handheld 6 5 Windows CE 6 0 CPU Marvell PXA310 806 MHz Memory 256 MB SDRAM on board 1 GB Flash ROM on board Display 3 7 transflective TFT LCD VGA resolution...

Страница 9: ... USB type One stereo headphone jack One microphone jack One DC In connector At the right side One MicroSD Slot Main Battery Rechargeable Li ion smart battery 7 4V 1880mAh 2S1P 59x38x25mm Power Adapter Universal AC 90V 265V 47 63Hz input 12V 3 5A output Physical 155 x 96 x 42mm 650g Environment Operating Temperature 20 to 50 C Storage Temperature 40 to 70 C Charging Temperature 0 to 50 C Operating ...

Страница 10: ...s to navigate in the PWS 440 interface Function Keys Programmable keypad interface for controlling the PWS 440 Power button If the device is off press this button to turn it on When the unit is on press this button for 3 seconds to turn the PWS 440 off Power LED Indicates the battery charging power status Green Battery is fully charged or the device is running on battery power When LED flashes the...

Страница 11: ...ug Enables the recording of voice using an external microphone USB mini type B port USB mini type B port client Micro SD Slot Accommodates Micro Secure Digital memory cards HW Reset Switch Press the end of the stylus into the button to reset PWS 440 DC IN Jack Connect the AC adapter to this jack to supply power to charge the PWS 440 battery RJ45 Microphone Plug Earphone Plug USB mini B Port DC IN ...

Страница 12: ...B mini B Battery Cover Latch Unlock the latch to open the battery compartment cover to place or remove battery Cradle Connector Battery Cover Latch Item Description RS 232 Serial Port Connects using a mini 9 way D type connector for this port for serial communications USB type A port Connects to USB type A port host to this port USB A Port RS 232 Serial Port RS 232 Serial Port ...

Страница 13: ...ve the sty lus from the holder and hold and use it the same way you would a pen or pencil For use with the touch screen Battery Compartment Houses the removable and rechargeable battery pack Stylus Battery Compartment Item Description SIM Card Slot Additional functionality can be provided by using SIM cards Only with WAN module included SIM Card Slot ...

Страница 14: ... the charger and charge the PWS 440 Battery Status LED Indicates that power and the PWS 440 battery is charging RED light Battery is charging No Light No battery fitted RED light Flash once Power Adaptor connected and ready for charging battery Warning Both Battery charger adaptor and PWS 440 power adaptor are the same but they can NOT be interchanged with other adaptor Battery Pack Holder Status ...

Страница 15: ...the PWS 440 to the cradle Provides connections for RS232 USB type A and mini USB type B USB mini type B port client Connects a USB mini type B client cable DC IN Jack Connects the AC adapter to provide power for the cradle Status LED Indicates that power and the PWS 440 is charged Green light PWS 440 is charging and connected No Light No PWS 440 fitted for charging Cradle Connector Status LED DC I...

Страница 16: ...PWS 440 User Manual 10 ...

Страница 17: ...Chapter 2 2 Getting Started ...

Страница 18: ...O NOT disassemble crush puncture short external contacts or dis pose the battery pack in fire or water DO NOT attempt to open or ser vice the battery pack Dispose of used batteries according to local recycling guidelines in your area A backup battery cell is embedded into your device to prevent data loss in instances when the removable battery pack is removed or com pletely discharged This backup ...

Страница 19: ... the battery in the compartment as shown below 3 Replace the battery compartment cover and lock the battery latch 2 2 2 Charging the Battery Before using the PWS 440 for the first time it will need charging for about 3 hours The PWS 440 can be charged using the power adaptor or the Cradle Note When the battery power is below 10 the PWS 440 will enter suspend mode ...

Страница 20: ...g the Battery with the Adapter Charger 1 Open the side door on the right bottom of the PWS 440 2 Plug the adapter charger B into the side door A 3 Plug the power cord into the AC adapter C 4 Plug the AC adapter D into an electrical outlet ...

Страница 21: ...g the Battery with the Cradle 1 Slide the PWS 440 into the cradle until it clicks into place 2 Plug the AC adapter cable into the power connector on the cradle A 3 Plug the power cable connector into the AC adapter B Plug the AC adapter into an electrical outlet C ...

Страница 22: ...and set the date time and zone Turn on your device by pressing the power button on the front panel 2 4 Calibrating the touch screen The calibration screen automatically appears when the unit is powered on for the first time or after the system is reset 1 Tap the center cross hair firmly and accurately with the stylus The cross hair moves to the next location 2 Follow the cross hair and continue ta...

Страница 23: ...the Time and Date 1 Tap Start Settings Control Panel 2 Double tap Date Time 3 Tap the arrows next to the month to select the correct month 4 Select a field in the time box and tap the arrows next to the time to change the value of the field Note To recalibrate the screen at any time tap Start Settings Control Panel Then double tap Stylus Tap the Calibration tab and tap Recali brate ...

Страница 24: ...tomatically update the time for daylight saving 7 Tag Apply to save the settings 2 6 Adjusting the Screen Brightness 1 Tap Start Settings Control Panel 2 Double tap OEMs Utility 3 Click the Display Manager tab 4 Under Backlight Control click the Dark arrow to make the screen darker or click the Bright arrow to make the screen brighter 5 Click OK to save and exit the utility ...

Страница 25: ...Chapter 3 3 Using the Hardware ...

Страница 26: ... Keypad The operating system has an onscreen keyboard that enables you to enter alphanu meric characters with the stylus Press the input panel icon in the system tray to view the input panel menu Tap Keyboard to view the onscreen keyboard Tap Hide Input Panel to close the keyboard The keyboard emulates a standard computer keyboard Tap the onscreen keyboard to enter edit and delete text ...

Страница 27: ...hat item Adjusting the Double Tap Rate Set the stylus double tap rate as follows 1 Tap Start Settings Control Panel 2 Double tap Stylus 3 Tap the Double Tap tab 4 Double tap on the checkerboard graphic to set your double tap rate Caution Never use anything other than the PWS 440 stylus on the screen Using another object as a stylus could cause permanent damage You can use your finger to interact w...

Страница 28: ...ards To insert a Micro SD card into the Micro SD slot 1 Open the right centre door 2 Insert the Micro SD card with the notched corner as oriented as shown below 3 Press the card into the slot The card is secure when it is flush with the slot 4 Close and lock the door 3 4 Removing a Storage Card 1 Open the right centre door 2 Press the card in and release The card pops out 3 Remove the card from th...

Страница 29: ... Using the Hardware 3 5 GPRS SIM Card Set Up 1 Remove the two hand screws on the top of the PWS 440 2 Insert the SIM Card into the SIM Card slot as shown 3 Push the card into the slot The card is secure when it is flush with the slot ...

Страница 30: ... made directly to the PWS 440 or using the cradle 3 6 1 Connecting USB The PWS 440 can accommodate both USB Type A and USB mini Type B Connecting a USB Type A The illustration below shows how to connect a USB type A device to the PWS 440 The connector can only go in one way If it does not go in smoothly check the orien tation and try again ...

Страница 31: ...shows how to connect a mini USB type B cable to the PWS 440 The connector is keyed to only go in one way If it does not go in smoothly check the orientation and try again 3 6 2 Connecting a Serial Device Connect a serial device to the PWS 440 to perform serial communications Please see below illustration ...

Страница 32: ...4 Connecting Headphones and a Microphone The PWS 440 utilizes an external microphone and speaker A headset and micro phone can be used in noisy environments See the illustration above 3 6 5 Connecting to the Cradle Optional The cradle allows for charging the batteries as well as connecting USB and serial devices ...

Страница 33: ...SB Type A connector on the back which supports both USB keyboard and mouse In addition there is one Mini Type B USB port next to the Type A USB connector See the above illustration Connecting a Serial Cable A serial cable can be connected thePWS 440 cradle See the above illustration ...

Страница 34: ...PWS 440 User Manual 28 ...

Страница 35: ...Chapter 4 4 Getting Connected ...

Страница 36: ...Your Computer 1 After ActiveSync has been installed connect the USB B cable to the USB port on your PWS 440 2 Plug the other end of the USB cable into a USB port on your computer 3 Turn the device on 4 ActiveSync starts automatically and configure the USB port to work with the PWS 440 The New Partnership setup wizard will automatically start Note If you have a previous version of the Microsoft Act...

Страница 37: ...ually configure the communication settings 1 Follow the onscreen instructions 2 When the configuration process is complete the ActiveSync window appears 3 Synchronization will be initialized and will take place if you ve chosen to syn chronize periodically or upon connection 4 ActiveSync detects the PWS 440 and establishes a connection 5 Click No and then click Next ...

Страница 38: ...nstructions to set up a Bluetooth connec tion 1 Tap Start Settings Control Panel and double tap Bluetooth Device Properties The Bluetooth Manager opens 2 Tap Scan Device Bluetooth Manager scans for local Bluetooth devices and dis plays a list of all Bluetooth enabled devices within range 3 Double tap a device in the list to display a context menu 4 Tap Trusted to add the device to the trusted Blue...

Страница 39: ...he device from the trusted device list When checked the red X on the key next to the device is removed Active Tap to make the device active or inactive Authenticate Tap to authenticate the device and add the device to the trusted devices list Encrypt Tap to enable or disable encryption of data transferred between the PWS 440 and a Bluetooth device Delete Deletes the device from the Bluetooth Manag...

Страница 40: ...ect to an existing network change the advanced wireless settings and view wireless network ing log information To establish a WiFi connection follow the steps below 1 From START PROGRAM Utility PwrCtrl and choose WLAN ON Then click on the WIFI icon 2 Select the Wireless Information tab to display the available options ...

Страница 41: ...35 PWS 440 User Manual Chapter 4 Getting Connected 4 3 1 Add a New Network 1 To add a new network double click Add New ...

Страница 42: ...screen displays input the required parameters as explained in the following table 3 Click OK to connect 4 3 2 Connect to an Existing Network 1 Select a network from the list and press Connect or right click for more options 2 Click OK to connect ...

Страница 43: ...nload VisualGPS from internet Copy this program onto Deskonchip1 to save and double tag to install VisualGPS as follow instruction Copy visualGPSceinstall CAB to PWS 440 C Desktop and execute visualGPS ceinstall CAB on desktop Follow these instructions to set up a GPS connection 1 Tap Start Program VisualGPS ...

Страница 44: ...o display the satellite status 4 Allow approximately 60 seconds very first time for GPS longitude and latitude display Note GPS display approximately time depend on the environment 4 5 Connecting GPRS 1 From START PROGRAM Utility PwrCtrl and choose GPRS ON 2 Chose Start Settings Control Panel Network and Dial up connec tions ...

Страница 45: ...g Connected 3 Tap Make New Connection Dial Up Connection Cinterion PH8 HSDPA Modem Port1 Configure 4 Set Baud Rate 115200 then choose Call Options to set up APN 5 Input AT Command cgdcont 1 ip internet and Phone Number input 99 Then click OK ...

Страница 46: ... Then place G into each blank as follow 8 Connection is successful when the Status screen displays Connected 4 6 COM Port list Below is reference for COM Port list COM No Indicate 0 Cradle 1 RS232 2 RS232 422 Optional 485 Optional 3 Virtual COM port 4 Virtual COM port 5 GPS baud 9600 6 BT baud 921600 7 ActiveSync 8 Visual COM port 9 Visual COM port ...

Страница 47: ...Chapter 5 5 Advance Settings ...

Страница 48: ... Battery Life You can extend the PWS 440 battery life by doing either of the following Change the automatic power settings Minimize the use of the backlight 5 2 1 Changing the Automatic Power Settings To change the automatic power settings 1 In the Power Properties screen tap the Schemes tab 2 Tap the arrow next to the Power Scheme and select Battery Power 3 Tap the arrows next to the following th...

Страница 49: ...s on when the LCD is touched Switch state to Suspend PWS 440 enters suspend mode when there is no user input or system activity after the selected time out Time out values range from Never and 4 5 10 30 minutes 5 2 2 Adjusting Backlight Settings The power consumption of the LCD backlight may be high turn off the backlight func tion if it is not necessary If a backlight is required set automaticall...

Страница 50: ...ows your device to get a fresh start similar to rebooting a computer This will restart your device and adjust memory allocation All records and entries are retained after a reset Unsaved data in open programs may in some cases be lost Performing a Hardware reset 1 Remove the stylus from its holder 2 Lightly press the tip of the stylus to the reset button located on the PWS 440 ...

Страница 51: ...45 PWS 440 User Manual Chapter 5 Advance Settings ...

Страница 52: ...ations are subject to change without notice No part of this publication may be reproduced in any form or by any means electronic photocopying recording or otherwise without prior written permis sion of the publisher All brand and product names are trademarks or registered trademarks of their respective companies Advantech Co Ltd 2013 ...

Отзывы: