Adobe Creative Suite 4 Printing Guide
63
the life of the image; text can be edited with the Type tool, and vector shapes can be edited with
the Pen and selection tools. Since such content has no inherent resolution, it can be scaled and
rotated within Photoshop without losing fidelity. However, some special handling is required to
ensure that such content prints as intended.
Vector Text:
The Horizontal and Vertical Type tools are used to create vector text in Photoshop.
Like text in Illustrator or InDesign, such text is fully editable—content, color, size, and spac-
ing can be changed at any time, provided that the text remains true text. If the text is rasterized
(Layer > Rasterize > Type), the text becomes pixels and such editability is lost. Note that the
Type Mask tools do not create vector text; they let you type pixel-based characters that instantly
become active selections.
The appearance of vector text in Photoshop is a bit misleading; even though the text is clearly not
pixels—it’s fully editable—it appears rasterized. If the image is printed directly from Photoshop,
the edges of text will be defined at the resolution of the underlying image, unless the image is
printed to a PostScript printer and Include Vector Data is checked in the print dialog. (Text will
be rasterized if the image is printed to a non-PostScript device, such as an inkjet printer, even if
Include Vector Data is checked.) If a Photoshop .psd file containing text is placed into Illustrator
or InDesign, the text will image at the resolution of the placed image. However, if the file is saved
as a Photoshop PDF, the text in the image will print as crisp, vector text if the Photoshop PDF is
placed in Illustrator or InDesign.
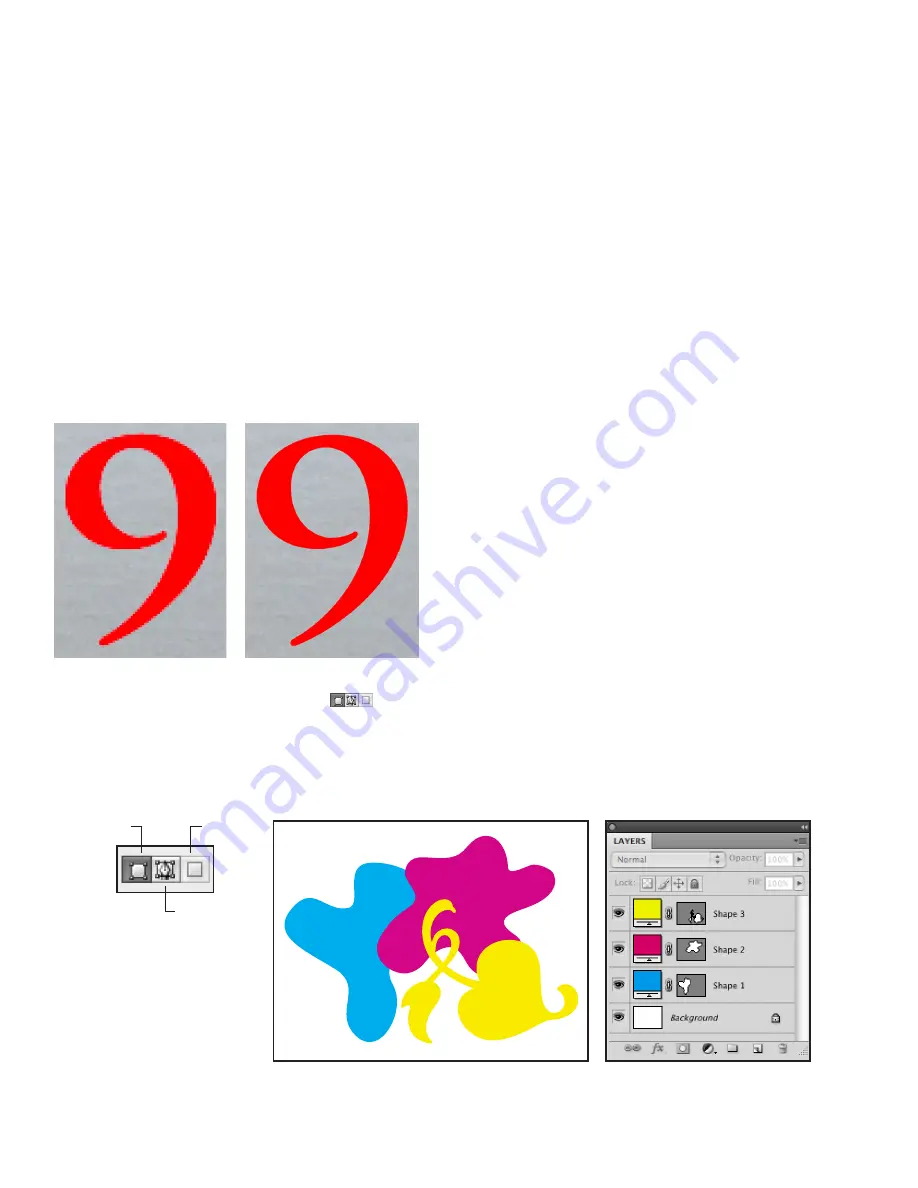
Vector Text in Photoshop
Viewed in Photoshop (left),
the text appears rasterized . It
will image as pixels if printed
directly from Photoshop, unless
Include Vector Data is checked
in the print dialog (and the
printer is a PostScript device) .
But if the file is saved as a
Photoshop PDF (right), text is
crisp when viewed in Acrobat,
and prints as vectors if placed
into an InDesign or Illustrator
document, or if printed directly
from Acrobat .
Shape Layers:
To create a Shape Layer, choose a vector drawing tool, such as the Pen tool, set the
paths behavior in the Options bar to Shape Layer (
), and select a foreground color. Use
the Pen tools and the geometric tools (Rectangle, Ellipse, Custom Shape tool, and so on) to create
what are essentially vector masks for a layer filled with color. The vector shapes can be edited
with the selection tools and modified with the Add/Delete Anchor Point tools. The rules for
imaging Shape Layers are the same as for vector text: to ensure crisp, vector edges, save the file as
a Photoshop PDF.
Shape Layers
Created with vector drawing tools such
as the Pen tool and Custom Shape tool,
Shape Layers are essentially sheets of
color with vector masks . This image has
three shape layers; note that each Shape
Layer consists of a color component and
a vector mask component, which can be
edited independently .
Shape Layer
Pixel Fill
Paths
Vector Masks:
Very similar to Layer Masks, Vector Masks are created with vector tools such as
the Pen tool. After a vector shape is created, the user chooses Layer > Vector Mask > Current


