background image

Getting Started

 19

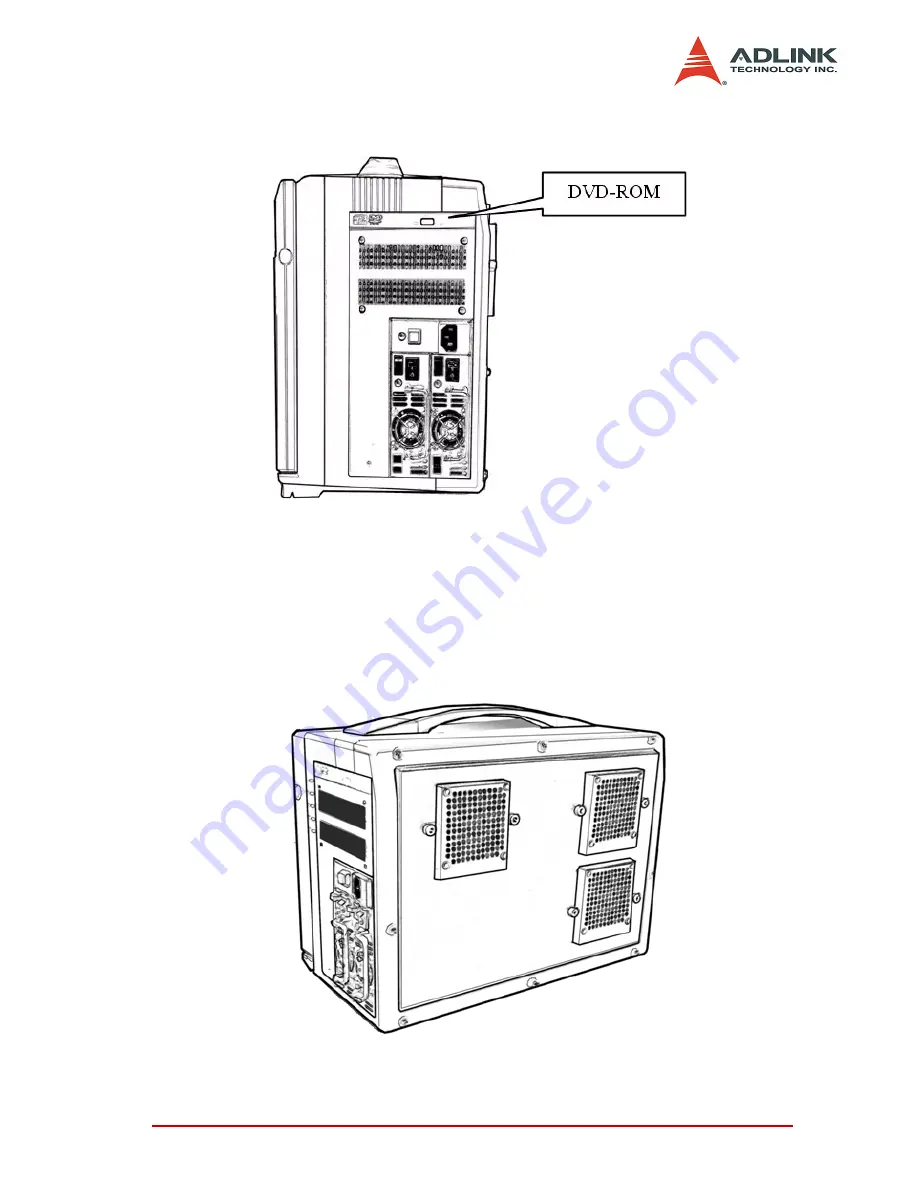
Figure 2-14: PXIS-2680P DVD-ROM

Cooling Fans

The cooling fans are located at the rear of the chassis for easy
access. There are two cooling fans running at a total of 79CFM to
ensure that the whole unit be within its working temperature. They
can be easily exchanged a newer or better one. 

Figure 2-15: PXIS-2680P Cooling Fans

Содержание PXIS-2680P

Страница 1: ...dvance Technologies Automate the World Manual Rev 2 00 Revision Date January 28 2005 Part No 50 17019 100 PXIS 2680P 8 Slot 3U PXI Portable Instrument Chassis with 300W 300W AC Power Supply User s Manual ...

Страница 2: ...ntial damages arising out of the use or inability to use the product or documentation even if advised of the possibility of such damages This document contains proprietary information protected by copy right All rights are reserved No part of this manual may be repro duced by any mechanical electronic or other means in any form without prior written permission of the manufacturer Trademarks Produc...

Страница 3: ...vice adlinktech com TEL 886 2 82265877 FAX 886 2 82265717 Address 9F No 166 Jian Yi Road Chungho City Taipei 235 Taiwan Please email or FAX this completed service form for prompt and satisfactory service Company Information Company Organization Contact Person E mail Address Address Country TEL FAX Web Site Product Information Product Model Environment OS M B CPU Chipset Bios Please give a detailed...

Страница 4: ......

Страница 5: ...ion 9 Peripheral Module Installation 12 Power Supply Unit Replacement Procedures 12 2 3 Operation Instructions 15 How to Release Keyboard and Touch Pad 15 How to Replace the Keyboard 15 How to Setup the Keyboard 16 Keyboard Positioning 17 Touchpad Operation 17 LCD Display 18 DVD ROM Drive 18 Cooling Fans 19 2 4 Software Installation 20 2 5 Powering Up the System 20 2 6 System Monitoring 20 3 Backp...

Страница 6: ... Troubleshooting and Maintenance 35 4 1 Troubleshooting 35 Installation Issues 35 BIOS Beep Code 35 System Fails to Power Up 35 No Display LCD 36 Keyboard Failure 36 Touchpad Failure 36 DVD ROM Failure 36 4 2 Maintenance 37 PXIS 2680P 37 Cables 37 LCD 37 Power 37 Keyboard 37 Cleaning the LCD 38 Cleaning the Keyboard 38 Important Safety Instructions 39 Warranty Policy 41 ...

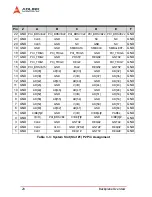
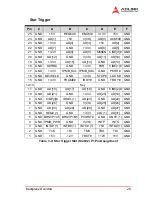
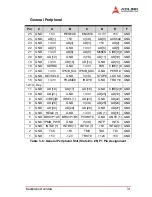
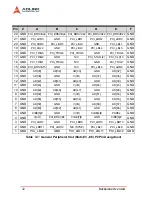
Страница 7: ...gnment 27 Table 3 3 System Slot Slot 1 P2 Pin Assignment 28 Table 3 4 Star Trigger Slot Slot 2 P1 Pin Assignment 29 Table 3 5 Star Trigger Slot Slot 2 P2 Pin Assignment 30 Table 3 6 General Peripheral Slot Slots 3 6 P1 Pin Assignment 31 Table 3 7 General Peripheral Slot Slots 3 6 P2 Pin Assignment 32 Table 3 8 Signal Routing 33 Table 3 9 PXI_STAR Routing 33 ...

Страница 8: ...Removing the Controller Card 11 Figure 2 5 Redundant Power Supply Front Rear 12 Figure 2 6 Removing the Power Supply A 13 Figure 2 7 Removing the Power Supply B 14 Figure 2 8 Replacing the Power Supply 14 Figure 2 9 Releasing the Keyboard 15 Figure 2 10 PXIS 2680P Keyboard 16 Figure 2 11 Positioning the Keyboard 17 Figure 2 12 PXIS 2680P Touchpad 17 Figure 2 13 Lift the LCD Display Upward 18 Figur...

Страница 9: ...for a system controller and seven general purpose slots for periph eral PXI and CompactPCI modules The PXIS 2680P also pro vides connectors for multiple input devices such as the integrated keyboard and touch pad and the touch panel LCD This integrated PXI portable chassis also implements complete PXI functional ities including PXI trigger bus star trigger PXI local bus and a 10MHz reference clock...

Страница 10: ...custom Test and Measurement applications directly on the PXIS 2680P of which its environment is quite the same as a standard PXI platform By combining advanced designs the PXIS 2680P is able to supply a wide range of applica tions that run in an integrated portable and dependable chassis such as power industry military and telecommunication applica tions 1 1 Features X Designed for portable instru...

Страница 11: ...V 3 3V and 12V cannot exceed 275W Both 5V and 5Vsb are not used in the system Touch LCD Panel X 15 TFT 1024 768 resolution X 250 nits contrast 350 1 long live 50 000hrs backlight at 25 C Input Devices X Keyboard Mechanical typed 108 key keyboard with touch pad X Five keyboard types Chinese France Germany Russian USA X Touch screen 15 resistive type connected to COM2 RS 232 interface MTBF is 100 00...

Страница 12: ...ment Temperature X Ambient temperature 20 to 60 C X Relative humidity 10 to 95 40 C noncondensing Backplane X Backplane bare board material UL 94V 0 rated X Peripheral slots with star signals from 3rd to the 8th slot X PXI trigger bus all X PXI local bus all X 1 system slot on the left hand side X 7 peripheral slots accept modules compliant with both PXI and CompactPCI specifications Shock and Vib...

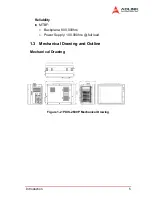
Страница 13: ...Introduction 5 Reliability X MTBF Z Backplane 800 000hrs Z Power Supply 100 000hrs full load 1 3 Mechanical Drawing and Outline Mechanical Drawing Figure 1 2 PXIS 2680P Mechanical Drawing ...

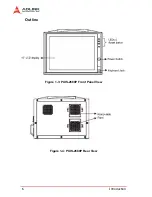
Страница 14: ...6 Introduction Outline Figure 1 3 PXIS 2680P Front Panel View Figure 1 4 PXIS 2680P Rear View ...

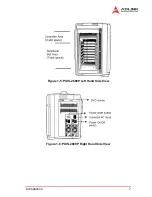
Страница 15: ...Introduction 7 Figure 1 5 PXIS 2680P Left Hand Side View Figure 1 6 PXIS 2680P Right Hand Side View ...

Страница 16: ...8 Introduction ...

Страница 17: ... Configuration Before installing the system controller and peripherals on the PXIS 2680P or doing any hardware installation please make sure that you completely understand the installation and compatibility of any upgrade Please be aware that electrostatic damage can occur during handling of sensitive electronic equipments proper precaution needs to be taken System Controller Installation The PXIS...

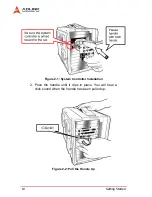
Страница 18: ...10 Getting Started Figure 2 1 System Controller Installation 2 Push the handle until it clips in place You will hear a click sound when the handle has been pulled up Figure 2 2 Pull the Handle Up ...

Страница 19: ...controller board mounting screws and screw tightly Figure 2 3 Mount the Controller Card with Screws 4 When taking out the controller card unscrew the mount ing screws and push the controller out Figure 2 4 Removing the Controller Card ...

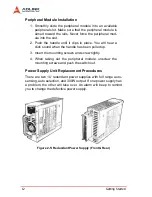
Страница 20: ...k sound when the handle has been pulled up 3 Insert the mounting screws and screw tightly 4 When taking out the peripheral module unscrew the mounting screws and push the switch out Power Supply Unit Replacement Procedures There are two 1U redundant power supplies with full range auto sensing auto selection and 300W output If one power supply has a problem the other will take over An alarm will be...

Страница 21: ...Getting Started 13 Removing and Installing a Power Supply 1 Unscrew and remove the side panel Figure 2 6 Removing the Power Supply A ...

Страница 22: ...14 Getting Started 2 Pull out the power supply while pressing Figure 2 7 Removing the Power Supply B 3 To replace push and slide in the new Figure 2 8 Replacing the Power Supply ...

Страница 23: ...rd and are inserted on the portable for stability The keyboard can now be lifted upward and freely removed for usage Figure 2 9 Releasing the Keyboard How to Replace the Keyboard To replace the keyboard back into the PXIS 2680P follow the steps above in inverse Note that the keyboard cable should be put back its proper original lodging on the keyboard Make sure that all locking mechanisms are prop...

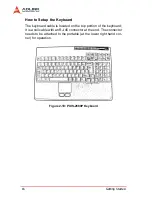
Страница 24: ...The keyboard cable is located on the top portion of the keyboard it is a coil cable with an RJ 45 connector at the end The connector needs to be attached to the portable at the lower right hand cor ner for operation Figure 2 10 PXIS 2680P Keyboard ...

Страница 25: ...ard Touchpad Operation The touch pad operates similar to a mouse and is used to move the cursor in the graphic user interface GUI environment by plac ing and moving your finger Two buttons located below the touch pad act as same as the left and right buttons of a mouse You can also tap on the touch pad to indicate a left click Figure 2 12 PXIS 2680P Touchpad ...

Страница 26: ... the touch panel driver according to your operating system Please refer to section 2 4 for details Figure 2 13 Lift the LCD Display Upward DVD ROM Drive A DVD ROM is located on the right side of the machine near the top Open the DVD ROM drive door by pushing the eject button located on the door of the drive When the door is ejected you can pull the door out completely and clip in the DVD into the ...

Страница 27: ...oling fans are located at the rear of the chassis for easy access There are two cooling fans running at a total of 79CFM to ensure that the whole unit be within its working temperature They can be easily exchanged a newer or better one Figure 2 15 PXIS 2680P Cooling Fans ...

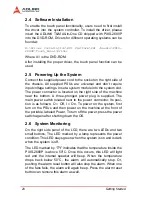
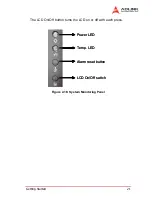
Страница 28: ...bottom A three pronged power plug is supplied The main power switch located next to the power connector Its posi tion is as follows O Off I On To power on the system first turn on the PSUs and then power on the machine at the front of the portable labeled Power To turn off the power press the power switch again after shutting down the OS 2 6 System Monitoring On the right side panel of the LCD the...

Страница 29: ...ed 21 The LCD On Off button turns the LCD on or off with each press Figure 2 16 System Monitoring Panel Power LED Temp LED Alarm reset button LCD On Off switch Power LED Temp LED Alarm reset button LCD On Off switch ...

Страница 30: ...22 Getting Started ...

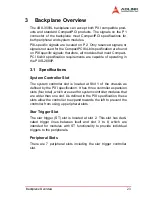
Страница 31: ... Specifications System Controller Slot The system controller slot is located at Slot 1 of the chassis as defined by the PXI specification It has three controller expansion slots four total which are used for system controller modules that are wider than one slot As defined in the PXI specification these slots allow the controller to expand towards the left to prevent the controller from using up p...

Страница 32: ...communication path that does not affect the PXI bus bandwidth In accordance with the PXI specification local bus connections are between all slots except slots 1 and 2 Trigger Bus The PXIS 2680P implements a dedicated PXI trigger bus with 8 lines Users can use these trigger lines to synchronize the opera tion of several different PXI peripheral modules or use one mod ule to control carefully timed...

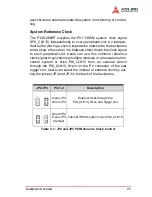
Страница 33: ...eral slot Users can use this common reference clock signal to synchronize multiple modules in a measurement or control system or drive PXI_CLK10 from an external source through the PXI_CLK10_IN pin on the P2 connector of the star trigger slot Users can select the internal or external clock by set ting the jumper JP2 and JP3 in the back of the backplane JP2 JP3 Pin 1 2 Description Open JP2 Short JP...

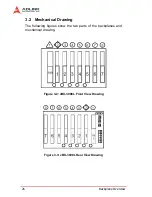
Страница 34: ... Backplane Overview 3 2 Mechanical Drawing The following figures show the two parts of the backplanes and mechanical drawing Figure 3 2 cBX 3008L Front View Drawing Figure 3 3 cBX 3008L Rear View Drawing ...

Страница 35: ...3V IPMB_SCL IPMB_SDA GND PERR GND 16 GND DEVSEL GND V I O STOP LOCK GND 15 GND 3 3V FRAME IRDY GND TRDY GND 12 14 Key 11 GND AD 18 AD 17 AD 16 GND C BE 2 GND 10 GND AD 21 GND 3 3V AD 20 AD 19 GND 9 GND C BE 3 GND AD 23 GND AD 22 GND 8 GND AD 26 GND V I O AD 25 AD 24 GND 7 GND AD 30 AD 29 AD 28 GND AD 27 GND 6 GND REQ 1 GND 3 3V CLK 1 AD 31 GND 5 GND BRSVP1A5 BRSVP1B5 PCIRST GND GNT 1 GND 4 GND IPM...

Страница 36: ...NT5 GND 14 GND AD 35 AD 34 AD 33 GND AD 32 GND 13 GND AD 38 GND V I O AD 37 AD 36 GND 12 GND AD 42 AD 41 AD 40 GND AD 39 GND 11 GND AD 45 GND V I O AD 44 AD 43 GND 10 GND AD 49 AD 48 AD 47 GND AD 46 GND 9 GND AD 52 GND V I O AD 51 AD 50 GND 8 GND AD 56 AD 55 AD 54 GND AD 53 GND 7 GND AD 59 GND V I O AD 58 AD 57 GND 6 GND AD 63 AD 62 AD 61 GND AD 60 GND 5 GND C BE 5 GND V I O C BE 4 PAR64 GND 4 GND...

Страница 37: ..._SDA GND PERR GND 16 GND DEVSEL GND V I O STOP LOCK GND 15 GND 3 3V FRAME IRDY GND TRDY GND 12 14 Key 11 GND AD 18 AD 17 AD 16 GND C BE 2 GND 10 GND AD 21 GND 3 3V AD 20 AD 19 GND 9 GND C BE 3 IDSEL 1 AD 23 GND AD 22 GND 8 GND AD 26 GND V I O AD 25 AD 24 GND 7 GND AD 30 AD 29 AD 28 GND AD 27 GND 6 GND REQ 1 GND 3 3V CLK 1 AD 31 GND 5 GND BRSVP1A5 BRSVP1B5 PCIRST GND GNT 1 GND 4 GND IPMB_PWR GND V ...

Страница 38: ...TAR6 PXI_LBR6 GND 14 GND AD 35 AD 34 AD 33 GND AD 32 GND 13 GND AD 38 GND V I O AD 37 AD 36 GND 12 GND AD 42 AD 41 AD 40 GND AD 39 GND 11 GND AD 45 GND V I O AD 44 AD 43 GND 10 GND AD 49 AD 48 AD 47 GND AD 46 GND 9 GND AD 52 GND V I O AD 51 AD 50 GND 8 GND AD 56 AD 55 AD 54 GND AD 53 GND 7 GND AD 59 GND V I O AD 58 AD 57 GND 6 GND AD 63 AD 62 AD 61 GND AD 60 GND 5 GND C BE 5 GND V I O C BE 4 PAR64...

Страница 39: ...SDA GND PERR GND 16 GND DEVSEL GND V I O STOP LOCK GND 15 GND 3 3V FRAME IRDY GND TRDY GND 12 14 Key 11 GND AD 18 AD 17 AD 16 GND C BE 2 GND 10 GND AD 21 GND 3 3V AD 20 AD 19 GND 9 GND C BE 3 IDSEL 1 AD 23 GND AD 22 GND 8 GND AD 26 GND V I O AD 25 AD 24 GND 7 GND AD 30 AD 29 AD 28 GND AD 27 GND 6 GND REQ 1 GND 3 3V CLK 1 AD 31 GND 5 GND BRSVP1A5 BRSVP1B5 PCIRST GND GNT 1 GND 4 GND IPMB_PWR GND V I...

Страница 40: ...BR6 GND 14 GND AD 35 AD 34 AD 33 GND AD 32 GND 13 GND AD 38 GND V I O AD 37 AD 36 GND 12 GND AD 42 AD 41 AD 40 GND AD 39 GND 11 GND AD 45 GND V I O AD 44 AD 43 GND 10 GND AD 49 AD 48 AD 47 GND AD 46 GND 9 GND AD 52 GND V I O AD 51 AD 50 GND 8 GND AD 56 AD 55 AD 54 GND AD 53 GND 7 GND AD 59 GND V I O AD 58 AD 57 GND 6 GND AD 63 AD 62 AD 61 GND AD 60 GND 5 GND C BE 5 GND V I O C BE 4 PAR64 GND 4 GND...

Страница 41: ... C3 PXI P1 Pin E3 Slot 1 SYS INTA INTB INTC INTD Slot 2 AD31 0 6 INTD INTA INTB INTC Slot 3 AD30 1 5 INTC INTD INTA INTB Slot 4 AD29 2 1 INTB INTC INTD INTA Slot 5 AD28 3 2 INTA INTB INTC INTD Slot 6 AD27 4 3 INTD INTA INTB INTC Slot 7 AD26 5 4 INTC INTD INTA INTB Slot 8 AD25 6 0 INTB INTC INTB INTA Table 3 8 Signal Routing Physical Slot Number PXI_STAR P2 D17 Slot 2 Star Trigger Slot PXI_STAR0 PX...

Страница 42: ...34 Backplane Overview ...

Страница 43: ...er cord 7 Check for 1 through 5 and then re power the system 8 Remove all items that were added and retry system 9 If the system starts now try inserting 1 new item at a time and try powering up 10 Repeat this step until you get the desired result BIOS Beep Code The BIOS beep code indicates error in system initialization A BIOS beep of the system controller is usually associated with video and mem...

Страница 44: ... and still no video call us for further assistance Keyboard Failure 1 Check to see if the keyboard plug is inserted completely into the portable 2 Check to see if you do not have another keyboard con nected to the side I O PS 2 port Touchpad Failure 1 Check to see if the keyboard plug is inserted completely into the portable 2 If you have an external PS 2 mouse hooked up on the side I O PS 2 port ...

Страница 45: ...cable or it could result in internal breakage It is essential that the cables and plugs be handled in a proper manner without force LCD Do not use any abrasive materials to wipe the LCD screen as they can scratch the surface Do not apply heavy pressure on the surface of the LCD screen to prevent internal damage or cracking Power Always make sure the power cord is in great condition before using wi...

Страница 46: ...ol 2 Do not use a cloth that could be abrasive to the surface of the LCD 3 Always gently wipe the LCD surface when cleaning Cleaning the Keyboard 1 Do not spill any liquid on to the keyboard 2 Do not drop particles into the spaces between keys 3 Remove dust built up with a compress air cleaner ...

Страница 47: ...a voltage selector switch make sure that the switch is set to the proper position for the area The voltage selector switch is set at the factory to the cor rect voltage X For pluggable equipment ensure they are installed near a socket outlet that is easily accessible X Secure the power cord to prevent unnecessary accidents Do not place anything over the power cord X If the equipment will not be in...

Страница 48: ...battery CAUTION Risk of explosion if battery is replaced by an incorrect type Dispose used batteries as instructed in the instructions X The equipment should be checked by service personnel if one of the following situation arises Z The power cord or plug is damaged Z Liquid has penetrated the equipment Z The equipment has been exposed to moisture Z The equipment is not functioning or does not fun...

Страница 49: ...manufactured by ADLINK will be covered by the original manufactur ers warranty X For products containing storage devices hard drives flash cards etc please back up your data before send ing them for repair ADLINK is not responsible for loss of data X Please ensure the use of properly licensed software with our systems ADLINK does not condone the use of pirated software and will not service systems...

Страница 50: ... cals X Damage caused by leakage of battery fluid during or after change of batteries by customer user X Damage from improper repair by unauthorized techni cians X Products with altered and or damaged serial numbers are not entitled to our service X Other categories not protected under our warranty 4 Customers are responsible for shipping costs to transport damaged products to our company or sales...

Отзывы: