24
Getting Started
Leading
EDGE COMPUTING
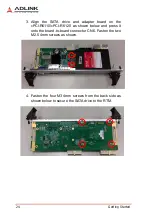
3. Align the SATA drive and adapter board on the
cPCI-R6110/cPCI-R6120 as shown below and press it
onto the board-to-board connector CN6. Fasten the two
M2.5 4mm screws as shown.
4. Fasten the four M3 4mm screws from the back side as
shown below to secure the SATA drive to the RTM.
Содержание cPCI-R6100
Страница 6: ...vi Table of Contents Leading EDGE COMPUTING This page intentionally left blank...
Страница 8: ...viii List of Figures Leading EDGE COMPUTING This page intentionally left blank...
Страница 10: ...x List of Tables Leading EDGE COMPUTING This page intentionally left blank...
Страница 18: ...8 Specifications Leading EDGE COMPUTING This page intentionally left blank...
Страница 32: ...22 Board Interfaces Leading EDGE COMPUTING This page intentionally left blank...


