background image


50 

BIOS Setup 

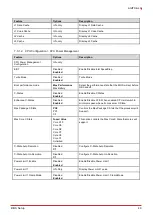
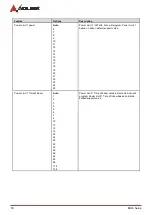
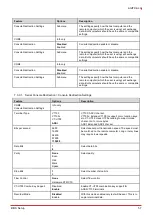
Feature  

Options  

Description  

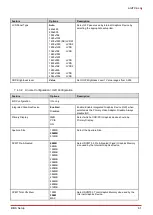
Power Limit 1 power 

Auto 


10 
11 
12 
13 
14 
15 
16 
17 
18 
19 
20 
21 
22 
23 
24 
25 

Power Limit 1 in Watts. Auto will program Power Limit 1 
based on silicon default support value. 

Power Limit 1 Time Window 

Auto 


10 
12 
14 
16 
20 
24 
28 
32 
40 
48 
56 
64 
80 
96 
112 
128 

Power Limit 1 Time Window value in Seconds. Auto will 
program Power Limit 1 Time Window based on silicon 
default support value. 


Содержание AmITX-AL-I

Страница 1: ...AmITX AL I User s Manual Thin Mini ITX Embedded Motherboard with Intel Atom Pentium and Celeron SoCs Manual Rev 1 0 Revision Date October 17 2018 Part Number 50 1J087 1000 ...

Страница 2: ... protection is a top priority for ADLINK We have enforced measures to ensure that our products manufacturing processes components and raw materials have as little impact on the environment as possible When products are at their end of life our customers are encouraged to dispose of them in accordance with the product disposal and or recovery programs prescribed by their nation or company Battery L...

Страница 3: ...8 2 12 Environmental 8 2 13 Operating Systems 8 2 14 Functional Block Diagram 9 3 Mechanical Layout 11 3 1 Connector Locations 11 3 2 Mechanical Dimensions 13 4 Connectors and Jumpers 15 4 1 Rear IO Connectors 15 4 2 Internal Connectors 18 4 3 Jumper and Switch Settings 30 4 4 Onboard Connector Information 33 5 Smart Embedded Management Agent SEMA 35 5 1 Board Specific SEMA Functions 35 6 System R...

Страница 4: ...iv Preface 7 1 Menu Structure 45 7 2 Main 46 7 3 Advanced 48 7 4 Chipset 59 7 5 Security 66 7 6 Boot 67 7 7 Save Exit 67 Safety Instructions 69 Getting Service 70 ...

Страница 5: ...f Figures Figure 1 AmITX AL I Functional Block Diagram 9 Figure 2 AmITX AL I Rear I O 11 Figure 3 AmITX AL I Component Side Connectors 11 Figure 4 AmITX AL I Solder Side Connectors 12 Figure 5 AmITX AL I Mechanical Dimensions 13 ...

Страница 6: ...oard Voltage Monitor 35 Table 4 SEMA BMC Status 36 Table 5 SEMA Exception Codes 36 Table 6 SEMA BMC Flags 37 Table 7 System Memory Map 39 Table 8 I O Map 39 Table 9 IRQ Lines PIC Mode 40 Table 10 IRQ Lines APIC Mode 41 Table 11 PCI Configuration Space Map 42 Table 12 PCI Interrupt Routing Map 43 Table 13 SMBus Slave Address 43 ...

Страница 7: ... SATA 6 Gb s ports A feature connector provides 10 GPIOs SMBus and I2C and optional SIM card slot and microSD card slot are available The AmITX AL I is equipped with SPI AMI EFI BIOS supporting embedded features such as hardware monitor and watchdog timer The Thin Mini ITX form factor is the premier standard for designing and assembling all in one PCs according to Intel Measuring 170 mm square and...

Страница 8: ...edded Board SATA dual power cable P N 30 20875 0000 SATA cable P N 30 10057 0600 Standard rear I O shield PN 34 25318 2000 1 2 Optional Accessories COM port cable 1 port P N 30 20876 0000 PS 2 KB MS cable P N 30 20873 0000 USB 2 0 cable 2 ports P N 30 20874 1000 ...

Страница 9: ...for IA 32 Intel 64 and Intel Architecture Intel VT x Intel Virtualization Technology Intel VT for Directed I O Intel VT d Notes Availability of features may vary between processor SKUs and operating systems Only Atom SKUs can support extreme temperature operating range Cache 2MB for all SKUs Memory Dual channel non ECC 1600 1333 MHz DDR3L memory up to 16GB in dual stacked SODIMM sockets Embedded B...

Страница 10: ...Slot Build option microSD Card Slot Build option Other Front Panel Header Audio Header Feature Connector Header PS 2 KB MS Connector TPM Header SPI Header ATX Power Connector 4 pin 2 4 Form Factor Mini ITX 170mm x 170mm 2 5 SEMA Board Controller ADLINK Smart Embedded Management Agent SEMA Voltage Current monitoring Power sequence debug support AT ATX mode control Logistics and Forensic information...

Страница 11: ...upport DisplayPort Supports DP1 2 maximum resolution 4096x2160 24Hz 2x DisplayPort by build option in place of HDMI HDMI Supports HDMI 1 4b maximum resolution 3840x2160 30Hz co lay with DP LVDS optional Supports single dual channel 18 24 bit up to 1920x1200 60 Hz eDP optional Supports eDP 1 3 maximum resolution 3840x2160 60Hz Note The configuration of triple display support is DP HDMI LVDS eDP 2x ...

Страница 12: ...5 CT250MX200SSD1 250GB Micron SSD 2 5 CT250MX200SSD1 250GB Micron SSD 2 5 CT250MX200SSD1 250GB OS Window 10 Enterprise 10 0 15063 64bit V1703 Window 10 Enterprise 10 0 15063 64bit V1703 Window 10 Enterprise 10 0 15063 64bit V1703 Windows Idle mode Enable EIST 3 3V A 0 0 0 5V A 0 0 0 12V A 0 33 0 33 0 33 5VSB A 0 0 0 Power consumption W 3 96 3 96 3 96 Windows Idle mode Disable EIST 3 3V A 0 0 0 5V ...

Страница 13: ...dows MAX mode Disable EIST 3 3V A 0 0 0 5V A 0 0 0 12V A 1 45 1 3 1 0 5VSB A 0 0 0 Power consumption W 17 4 15 6 12 System S1 mode 3 3V A No support No support No support 5V A No support No support No support 12V A No support No support No support Power consumption W Not Applicable Not Applicable Not Applicable System S3 mode 3 3V A 0 0 0 5V A 0 0 0 12V A 0 07 0 07 0 07 Power consumption W 0 84 0 ...

Страница 14: ...tures Standard Operating Temperature 0 C to 60 C Extreme Rugged Operating Temperature 40 C to 85 C build option supported by Atom SKUs only 2 12 Environmental Humidity 10 90 RH operating non condensing Shock and Vibration MIL STD 202G Method 214A Table 214 I Condition D MIL STD 202G Method 213B Table 213 I Condition A HALT Thermal Stress Vibration Stress Thermal Shock and Combined Test 2 13 Operat...

Страница 15: ...e x1 Port 3 RJ45 10 100 1000 HDA Codec ALC888S Line Out Mic In Audio Header COM1 COM2 COM3 COM4 2x RS 232 422 485 0 5 12V Mini PCIe full size PCIe x1 port 2 SIM card slot SATA 1 6Gb s USB 2 0 port 1 PCIe x1 port 1 PCIe x1 slot 4x RS 232 Horizontal SODIMM Channel B DDR3L at 1867 1600 MHz non ECC eDP to LVDS eDP 4 lanes LVDS eDP Single Dual Channel 18 24 bit DDC LVDS Dat Clk eDP optional LVDS AUX Co...

Страница 16: ...10 Specifications This page intentionally left blank ...

Страница 17: ...gure 3 AmITX AL I Component Side Connectors 12V DC in HDMI DP Line out rt Mic in lft 4x USB 3 0 DP optional Dual LAN PCIe x1 mSATA Slot 2 Stacked SODIMM SATA Power Mini PCIe Front Panel Audio 12V DC in 6x RS 232 ATX Power eDP SPI Socket TPM Header PS 2 KB MS Feature Connector USB LVDS System Fan CPU Fan 2x SATA 3 SPI Header Front Panel Auxiliary Battery ...

Страница 18: ...12 Mechanical Layout 3 1 3 Solder Side Connectors Figure 4 AmITX AL I Solder Side Connectors SIM Card Slot microSD Card Slot DB40 Connector ...

Страница 19: ... 92 105 37 152 75 157 48 22 86 154 94 157 48 1 73 33 26 32 29 0 47 44 91 95 91 57 53 108 53 6 35 163 83 10 16 160 02 1 60 18 30 3 2 Mechanical Dimensions Top View W O RTC battery Side View W O RTC battery Dimensions mm Figure 5 AmITX AL I Mechanical Dimensions ...

Страница 20: ...14 Mechanical Layout This page intentionally left blank ...

Страница 21: ...r connector Maximum current draw is 10A Note Either the DC Power Inlet or the internal ATX Power Connector ATX_PWR must be used to supply the motherboard with 12V 5 JACK1 PWR JACK_P1 VCC 1 GND1 2 GND2 3 Caution Hot plugging the power supply is not supported Doing so may damage the board Only connect ONE power supply to the board Connecting power to both the 12V DC inlet and the internal ATX Power ...

Страница 22: ... Ground 12 CN_DP3_N 13 DDC_AUX_SEL 14 CN_CEC 15 CN_AUX_P 16 Ground 17 CN_AUX_N 18 DDP_HPD 19 Ground 20 P3V3 4 1 3 HDMI Connector Supports HDMI 1 4b maximum resolution 3840x2160 30Hz co lay with DP Pin Signal Pin Signal 1 TMDS Data2 2 TMDS Data2 Shield 3 TMDS Data2 4 TMDS Data1 5 TMDS Data1 Shield 6 TMDS Data1 7 TMDS Data0 8 TMDS Data0 Shield 9 TMDS Data0 10 TMDS Clock 11 TMDS Clock Shield 12 TMDS ...

Страница 23: ...X LAN_MDI0 2 TX LAN_MDI0 3 RX LAN_MDI1 4 LAN_MDI1 5 LAN_MDI2 6 RX LAN_MDI2 7 LAN_MDI3 8 LAN_MDI3 LED1 Speed LED2 Link Activity Status Description Status Description Off 10 Mb connection Off No Link Green 100 Mb connection Green Linked Orange 1 Gb connection Blinking Data Activity 4 1 5 USB 3 0 Connectors USB1 4 Pin Signal 1 USB3 0_P5VA 2 USB2_CMAN 3 USB2_CMAP 4 GND 5 USB3A_CMRXN 6 USB3A_CMRXP 7 GN...

Страница 24: ...ernal Connectors 4 2 1 ATX Power Connector 4 pin ATX_PWR1 AmITX AL I supports a proprietary internal ATX Power Connector 4 pin Note Either the DC Power Inlet or the internal ATX Power Connector 4 pin must be used to supply the motherboard with 12V 5 Pin Signal 1 GND 2 GND 3 12V DC 4 12V DC CAUTION Only connect ONE power supply to the board Connecting power to both the 12V DC inlet and the internal...

Страница 25: ...3 0 1 5Gb s Note If mSATA is installed SATA1 is disabled See 4 3 3 SATA1 mSATA Select JP11 Pin Signal 1 GND 2 TXP 3 TXN 4 GND 5 RXN 6 RXP 7 GND 4 2 3 SATA Power Connector ST_PWR CN24 Pin Signal 1 12V 2 GND 3 5V 4 GND 5 3 3V SATA Power Cable ADLINK Part No 30 20875 0000 length 200 mm 5 4 3 2 1 HDD SSD Power Motherboard SATA Power Connector HDD SSD Power ...

Страница 26: ...SB2_HUB4_N 4 USB2_HUB5_N 5 USB2_HUB4_P 6 USB2_HUB5_P 7 GND 8 GND 9 KEY 10 GND USB Cable optional USB 2 0 Header to 2x Female Type A Cable length 200mm P N 30 20874 1000 4 2 5 PS 2 Keyboard and Mouse Connector CN19 6 pin 2 0 pitch standard wafer connector No support for PS 2 KB MS wake function Pin Signal 1 MSCLK 2 V5S_S3 3 MSDATA 4 GND 5 KBDATA 6 KBCLK KB MS Cable optional PS 2 KB MS Cable length ...

Страница 27: ... pin 2 0 pitch standard wafer connector Note Signals shared with Audio Connector on Rear I O Signal Pin Pin Signal LFE_R 1 2 CEN_L AGND_AU 3 4 AGND_AU LOUT_L_CN 5 6 LOUT_R_CN AGND_AU 7 8 AGND_AU SURR_LO 9 10 SURR_RO SIDE_L 11 12 SIDE_R AGND_AU 13 14 AGND_AU MICIN_L_CN 15 16 MICIN_R_CN AGND_AU 17 18 AGND_AU LIN_L 19 20 LIN_R MUTE 21 22 AGND_AU GND 23 24 NC SPDO 25 26 GND LINE1_JD 27 28 CEN_JD SURR_...

Страница 28: ...selection of COM1 default RS 232 COM2 Supports RS 232 422 485 0V 5V 12V power support by jumper selection SWS2M Switch for mode selection of COM2 default RS 232 COM3 Supports RS 232 COM4 Supports RS 232 COM5 Supports RS 232 COM6 Supports RS 232 RS 232 COM1 6 Pin Signal Pin Signal 1 DCD 2 DSR 3 RxD 4 RTS 5 TxD 6 CTS 7 DTR 8 RI 9 GND 10 NC RS 422 COM1 2 only Pin Signal Pin Signal 1 Tx 2 3 Tx 4 5 Rx ...

Страница 29: ...Power Selection JP7 JP8 JP7 COM1 PWR 1 2 12V 3 4 5V JP8 COM1 PWR 1 2 GND 3 4 RI default COM2 Power Selection JP9 JP10 JP9 COM2 PWR 1 2 12V 3 4 5V JP10 COM2 PWR 1 2 GND 3 4 RI default COM1_RI L_CN COM1_RI 12V 5V 0V P_ 5V_S0_COM P_ 12V_S_COM COM2_RI 12V 5V 0V 50 COM2_RI L_CN 50 JP8 PH_4_S2 0mm 1 3 2 4 JP8 MINI JUMP 2P 2 H3D5 JP7 PH_4_S2 0mm 1 3 2 4 C1222 0 1uF_25V JP9 PH_4_S2 0mm 1 3 2 4 C1223 0 1uF...

Страница 30: ... or 12V Maximum load is 1A total for both voltages DDC CLK DDC Channel Clock DDC DAT DDC Channel Data Note Type Signal Pin Pin Signal Type Note Max 0 5A PWR POWER GND 1 17 LVDS B1 LVDS LVDS LVDS A0 2 18 POWER GND PWR Max 0 5A LVDS LVDS A0 3 19 LVDS B2 LVDS LVDS LVDS A1 4 20 LVDS B2 LVDS LVDS LVDS A1 5 21 LVDS BCLK LVDS LVDS LVDS A2 6 22 LVDS BCLK LVDS LVDS LVDS A2 7 23 LVDS B3 LVDS Max 0 5A PWR PO...

Страница 31: ...KLT_PWR Max 0 5A 6 PWR BKLT_PWR Max 0 5A 7 PWR BKLT_PWR Max 0 5A 8 PWR GND Max 0 5A 9 PWR GND Max 0 5A 10 OT BKLT_CTL 3 3V level Signal Description BKLT_EN Backlight Enable signal active low Optional to invert this signal to active high BKLT_EN by jumper BKLT_PWR Backlight Power switchable by jumper either 5V default or 12V Maximum 1A per pin for both voltages BKLT_CTL Backlight control PWM signal...

Страница 32: ...ED O 1 15 GND PWR 16 PWRBTN_IN I 17 RSTIN I 18 GND PWR 19 SB3V3 PWR 20 LINE2 R S 21 AGND PWR 22 AGND PWR 23 MIC2 L S 24 MIC2 R S Note 1 Connect SUS_LED System Power LED to the power status indicator on the chassis front panel The LED is on when the system is operating The LED keeps blinking when the system is in S1 S3 sleep state The LED is off when the system is in S4 sleep state or powered off S...

Страница 33: ...onnect to BMC I2C Master I2C SEMA Pin Signal Pull U D IOH IOL Type Note Pin Signal Type IOH IOL Pull U D Note 1 CASE_OPEN PU 2M I 2 SMBC OT 4mA PU 10K 1 3 GND PWR 4 SMBD OT 4mA PU 10K 1 5 N A 2 6 I2CC OT PU 10K 1 7 EXT_BAT PWR 8 I2CD OT PU 10K 1 9 SB3V3 PWR 10 SB5V PWR 11 GND PWR 12 GND PWR 13 GPIO0 PU10K3V3 IOT 14 GPIO1 IOT PU10K3V3 15 GPIO2 PU10K3V3 IOT 16 GPIO3 IOT PU10K3V3 17 GPIO4 PU10K3V3 IO...

Страница 34: ... signal must be NC MOSI Master Output Slave Input ISOLATE The ISOLATE input active low is normally NC but must be connected to GND when loading SPI flash Power Supply to the Motherboard must be turned off when loading SPI flash The pull up resistor is connected via diode to 5VSB MISO Master Input Slave Output SPI_IO2_ WP SPI Data I O A bidirectional signal used to support the new Dual IO Fast Read...

Страница 35: ...3_LPC System power 3 3V provide from COM module 28 OCD0B Include a jumper to connect OCD0A via 1K0 pull up to 3 3V_BMC 9 GND 29 Test points PWRBTN 10 CB_RESET Platform Reset 30 SYS_RESET 11 RST 31 CB_RESET 12 CLK33_LPC 32 CB_PWROK 13 LPC_FRAME 33 SUS_S3 14 LPC_AD3 34 SUS_S4 15 LPC_AD2 35 SUS_S5 16 LPC_AD1 always power 3 3V provide from COM module 36 BMC Debug signals POSTWDT_DIS Connect to Jumper ...

Страница 36: ...de 1 2 ATX default 2 3 AT 4 3 2 Clear CMOS JP6 JP6 Clear CMOS 1 2 Normal default 2 3 Clear CMOS LVDS Panel Power Select JP3 JP5 Clear CMOS JP6 SATA1 m SATA Select JP11 LVDS Backlight Enable JP4 LVDS Backlight Power Select JP2 RS 232 422 485 Select SWS1M SWS2M ATX AT Mode Select JP1 COM Power JP7 JP10 BIOS Config BSW1 Load BIOS Default SW2 ...

Страница 37: ...5V default 4 3 5 LVDS Panel Power Selection JP3 JP5 JP3 JP5 Panel Power 1 2 5V 2 3 3 3V default 2 5 12V Panel Power control JP3 JP5 Jumper settings JP3 Set the LVDS panel as 3 3V Set the LVDS panel as 5V Set the LVDS panel as 12V JP5 JP3 JP5 JP3 JP5 1 4 2 5 1 4 2 5 1 4 2 5 4 3 6 LVDS Backlight Enable Jumper Selection JP4 JP4 Backlight Power 1 2 Active High Convert default 2 3 Active LowNormal ...

Страница 38: ...election JP7 JP8 JP9 JP10 COM1 Power selection JP7 JP8 JP7 COM1 PWR 1 2 12V 3 4 5V JP8 COM1 PWR 1 2 GND 3 4 RI Default COM2 Power selection JP9 JP10 JP9 COM1 PWR 1 2 12V 3 4 5V JP10 COM1 PWR 1 2 GND 3 4 RI Default COM1_RI L_CN COM1_RI 12V 5V 0V P_ 5V_S0_COM P_ 12V_S_COM COM2_RI 12V 5V 0V 50 COM2_RI L_CN 50 JP8 PH_4_S2 0mm 1 3 2 4 JP8 MINI JUMP 2P 2 H3D5 JP7 PH_4_S2 0mm 1 3 2 4 C1222 0 1uF_25V JP9 ...

Страница 39: ... I 2020 06P PH2 0 30 20873 0000 optional USB CN40 JVE 23N6850 10S10B 01G B V9 01 YOUNG YAK YY 1970H 2 5P PH2 0 30 20874 1000 optional SATA Power CN24 JVE 24W1170 05S10 01T 3 4 CS01 JWT A2501H02 5P PH2 5 YY 1970H 2 5P PH2 0 30 20875 0000 standard SATA CN22 23 WIN WIN WATM 07ABN4B3B8UW4 JWT A3811H0 5P PH3 81 30 20875 0000 standard DB 40 CN8 Molex 502790 4091 CONN TEK MLCO 5 40x172 02 30 30016 0000 o...

Страница 40: ...34 Connectors and Jumpers This page intentionally left blank ...

Страница 41: ...s tell external logic to boot from fail safe BIOS Flash area 1kB Flash area for customer data 128 Bytes Protected Flash area Keys IDs etc can be stored in a write and clear protectable region Board Identify Vendor Board Serial number Production Date Main current voltage Monitors drawn current and main voltages For a detailed description of SEMA features and functionality please refer to the SEMA T...

Страница 42: ...ced by the read access Main Current MSB_n 8 LSB_n x 8 06mA 5 1 3 BMC Status Table 4 SEMA BMC Status This register shows the status of BMC controlled signals on the AmITX AL Status Bit Signal 0 WDTOUT 1 LVDS_VDDEN 2 LVDS_BKLTEN 3 BIOS_MODE 4 POSTWDT_DISn 5 SEL_BIOS 5 1 4 Exception Codes In case of an error the BMC drives a blinking code on the blue Status LED LED1 The same error code is also report...

Страница 43: ...od 14 NO_1V24_A_PG No signal for 1V24_A Power Good 15 NO_VDDQ_PG No signal for VDDQ Power Good 16 NO_V1P05S_PG No signal for V1P05S Power Good 17 NO_SYS_GD No signal for System Good 18 NO_V12 No V12 input 19 MEMORY_ERROR SDRAM error 20 NO_P3V3_A_READY No signal for P3V3_A_READY 5 1 5 BMC Flags The BMC Flags register returns the last detected Exception Code since power up and shows the BIOS in use ...

Страница 44: ...38 Smart Embedded Management Agent SEMA This page intentionally left blank ...

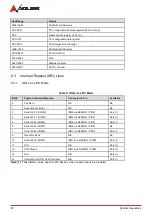
Страница 45: ...ge Device 020 02D and 030 03D Interrupt controller 1 8259 equivalent 02E 02F Motherboard resource 040 043 and 050 053 System Timer 04E 04F Motherboard resource 060 064 8742 equivalent keyboard 061 063 065 067 NMI control and status 070 077 Real Time Clock Controller bit 7 NMI mask 092 Reset Bit 0 Fast Gate A20 Bit 1 0A0 0B1 and 0B4 0BD Interrupt controller 2 8259 equivalent 0B2 and 0B3 Motherboard...

Страница 46: ...s PIC Mode IRQ Typical Interrupt Resource Connected to Pin Available 0 Counter 0 N A No 1 Keyboard controller N A No 3 Serial Port 2 COM2 IRQ3 via SERIRQ PIRQ Note 1 4 Serial Port 1 COM1 IRQ4 via SERIRQ PIRQ Note 1 5 Serial Port3 COM3 IRQ5 via SERIRQ PIRQ Note 1 6 Serial Port5 COM5 IRQ6 via SERIRQ PIRQ No 7 Serial Port4 COM4 IRQ7 via SERIRQ PIRQ Note 1 8 Real time clock N A No 10 Serial Port6 COM6...

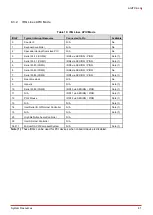
Страница 47: ...Q PIRQ Note 1 6 Serial Port5 COM5 IRQ6 via SERIRQ PIRQ No 7 Serial Port4 COM4 IRQ7 via SERIRQ PIRQ Note 1 8 Real time clock N A No 9 Generic N A Note 1 10 Serial Port6 COM6 IRQ10 via SERIRQ PIRQ Note 1 11 N A IRQ11 via SERIRQ PIRQ Note 1 12 PS 2 Mouse IRQ12 via SERIRQ PIRQ Note 1 13 N A N A Note 1 14 Intel Serial IO GPIO Host Controller N A Note 1 15 N A N A Note 1 25 High Definition Audio Control...

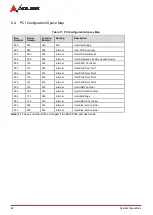
Страница 48: ... Internal Intel SATA Controller 00h 13h 00h Internal Intel PCIE Root Port 1 00h 13h 01h Internal Intel PCIE Root Port 2 00h 13h 02h Internal Intel PCIE Root Port 3 00h 13h 03h Internal Intel PCIE Root Port 4 00h 15h 00h Internal Intel USB Controller 00h 1Bh 02h Internal Intel SD Card Controller 00h 1Fh 00h Internal Intel ISA Bridge 00h 1Fh 01h Internal Intel SMBUS Controller 02h 00h 00h Internal I...

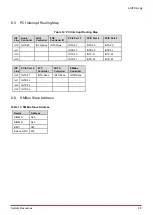
Страница 49: ...A 25 INTA None INTA None INTA 22 INTA 23 INTA 20 Int1 INTB 23 INTB 20 INTB 21 Int2 INTC 20 INTC 21 INTC 22 Int3 INTD 21 INTD 22 INTD 23 INT Line PCIE Port 6 LPC Controller SATA Controller SMBus Controller Int0 INTA 21 INTA None INTA None INTB None Int1 INTB 22 Int2 INTC 23 Int3 INTD 20 6 6 SMBus Slave Address Table 13 SMBus Slave Address Device Address DIMM A A0h DIMM B A4h BMC 58h Extend GPIO 40h...

Страница 50: ...44 System Resources This page intentionally left blank ...

Страница 51: ...e Main Advanced Chipset Security Boot Save Exit BIOS Information System Information Board Management System Date System Time CPU Configuration Graphics Configuration Power Management System Management Thermal Management Watchdog Timer CSM Configuration IT8783 Super IO Configuration Serial Console Redirection USB Network Miscellaneous Trusted Computing SDIO Configuration North Bridge South Bridge U...

Страница 52: ...rsion BIOS Boot Source Info only Display Platform Current Boot BIOS 7 2 2 System Information Feature Options Description Project Name Info only Project Name CPU Board Version Info only Project Board Version CPU Brand String Info only CPU Brand String Information CPU Frequency Info only CPU Frequency Information Total Memory Info only Total memory size Memory Frequency Info only Memory Frequency SO...

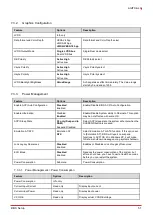
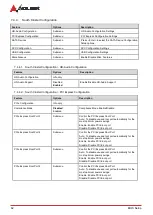
Страница 53: ... the system is removed from the external power supply Power Cycles Read only The returned value specifies the number of times the external power supply has been shut down Boot Cycles Read only The boot counter is increased after a HW or SW Reset or after a successful power up Boot Reason Read only The boot reason is the event which causes the reboot of the system 7 2 4 System Date and Time Feature...

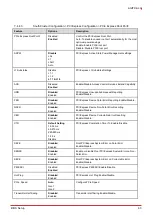
Страница 54: ...CHOT Disabled Enabled When a processor thermal sensor trips either core the PROCHOT will be driven If bi direction is enabled external agents can drive PROCHOT to throttle the processor Thermal Monitor Disabled Enabled Enable Disable Thermal Monitor Monitor Mwait Disabled Enabled Auto Enable Disable Monitor Mwait P STATE Coordination HW_ALL SW_ALL SW_ONLY Change P State Coordination type DTS Disab...

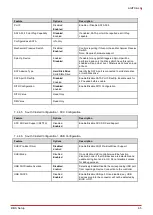
Страница 55: ... Disabled Enabled Enable Disable C States Enhanced C States Disabled Enabled Enable Disable C1E When enabled CPU will switch to minimum speed when all cores enter C State Max Package C State PC2 PC1 C0 Controls the Max Package C State that the processor will Support Max Core C State Fused Value Core C10 Core C9 Core C8 Core C7 Core C6 Core C1 Unlimited This option controls the Max Core C State tha...

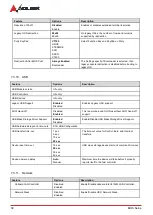
Страница 56: ... 25 Power Limit 1 in Watts Auto will program Power Limit 1 based on silicon default support value Power Limit 1 Time Window Auto 1 2 3 4 5 6 7 8 10 12 14 16 20 24 28 32 40 48 56 64 80 96 112 128 Power Limit 1 Time Window value in Seconds Auto will program Power Limit 1 Time Window based on silicon default support value ...

Страница 57: ...lity to hibernate This option may be not effective with some OS ACPI Sleep State S3 only Suspend to RAM Suspend Disabled Select ACPI sleep state the system will enter when the SUSPEND button is pressed Emulation AT ATX Emulation AT ATX Select Emulation AT or ATX function If this option set to Emulation AT BIOS will report no suspend functions to ACPI OS Win Windows XP it will make OS show shutdown...

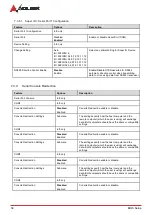
Страница 58: ... SEMA firmware build date SEMA Boot loader Read only Display SEMA boot loader Build Date Read only Display SEMA boot loader build date SEMA Features Submenu SEMA Features information Flags Submenu SEMA Flags information 7 3 4 1 System Management SEMA Features Feature Options Description SEMA Supported Features Info only Uptime Power Cycles Counter Info only System Reset Event Info only 1024 Bytes ...

Страница 59: ...ead only System exception reason 7 3 5 Thermal Management Feature Options Description Temperatures and Fan Speed Submenu Temperatures and Fan Speed Smart Fan Submenu Smart Fan Critical Trip Point Enabled Disabled This value is the temperature threshold of the critical trip point Passive Cooling Trip Point Enabled Disabled The time out value for Control Bulk and Interrupt transfers 7 3 5 1 Thermal ...

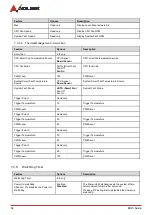
Страница 60: ... System Fan1 Mode AUTO Smart Fan Fan Off Fan On System Fan1 Mode Trigger Point 1 Read only Trigger Temperature 15 Trigger Temperature PWM Level 30 PWM level Trigger Point 2 Read only Trigger Temperature 60 Trigger Temperature PWM Level 40 PWM level Trigger Point 3 Read only Trigger Temperature 70 Trigger Temperature PWM Level 63 PWM level Trigger Point 4 Read only Trigger Temperature 80 Trigger Te...

Страница 61: ...nd Legacy PXE OpROM Storage Do not launch UEFI Legacy Controls the execution of UEFI and Legacy Storage OpROM Video Do not launch UEFI Legacy Controls the execution of UEFI and Legacy Video OpROM Other PCI device Do not launch UEFI Legacy Determines OpROM execution policy for devices other than Network Storage or Video 7 3 8 IT8783 Super IO Configuration Feature Options Description IT8783F Super I...

Страница 62: ...abled Console Redirection enable or disable Console Redirection Settings Submenu The settings specify how the host computer and the remote computer which the user is using will exchange data Both computers should have the same or compatible settings COM2 Info only Console Redirection Disabled Enabled Console Redirection enable or disable Console Redirection Settings Submenu The settings specify ho...

Страница 63: ...ange data Both computers should have the same or compatible settings 7 3 9 1 Serial Console Redirection Console Redirection Settings Feature Options Description COM0 Console Redirection Settings Info only Terminal Type VT100 VT100 VT UTF8 ANSI VT100 ASCII char set VT100 Extends VT100 to support color function keys etc VT UTF8 Uses UTF8 encoding to map Unicode chars onto 1 or more bytes ANSI Extend...

Страница 64: ...ort Enabled Disabled Enables Legacy USB support XHCI Hand off Disabled Enabled This is a workaround for OSes without XHCI hand off support USB Mass Storage Driver Support Enabled Disabled Enable Disable USB Mass Storage Driver Support USB hardware delays and time outs PCH USB Configuration USB transfer time out 1 sec 5 sec 10 sec 20 sec The time out value for Control Bulk and Interrupt transfers D...

Страница 65: ...n DMA mode PIO Option Access SD device in PIO Mode 7 4 Chipset Feature Options Description North Bridge Submenu North Bridge Parameters South Bridge Submenu South Bridge Parameters Uncore Configuration Submenu Uncore Configuration South Cluster Configuration Submenu South Cluster Configuration 7 4 1 North Bridge Feature Options Description Memory Information Info Only Total memory Read Only Displa...

Страница 66: ...locks Real Time Option RT Disabled RT Enabled Agent IDI1 RT Enabled Agent Disabled Select Real Time Enable and IDI Agent Real Time traffic Mask Bits 7 4 3 Uncore Configuration 7 4 3 1 Uncore Configuration GOP Configuration Feature Options Description Active LFP Config No LFP eDP Active Local Flat Panel Config LVDS Backlight Mode GTT Mode BMC Mode Select LVDS Backlight control function DDI Port 1 N...

Страница 67: ...ation Feature Options Description IGD Configuration Info only Integrated Graphics Device Enabled Disabled Enable Enable Integrated Graphics Device IGD when selected as the Primary Video Adaptor Disable Always disable IGD Primary Display IGD PCIE HG Select which of IGD PCI Graphics device should be Primary Display Aperture Size 128MB 256MB 512MB Select the Aperture Size DVMT Pre Allocated 64MB 96MB...

Страница 68: ...on PCIe Configuration Info only Compliance Mode Disabled Enabled Compliance Mode Enable Disable PCIe Express Root Port3 Submenu Control the PCI Express Root Port Auto To disable unused root port automatically for the most optimum power savings Enable Enable PCIE root port Disable Disable PCIE root port PCIe Express Root Port4 Submenu Control the PCI Express Root Port Auto To disable unused root po...

Страница 69: ...able FER Disabled Enabled PCI Express Device Fatal Error Reporting Enable Disable NFER Disabled Enabled PCI Express Device Non Fatal Error Reporting Enable Disable CER Disabled Enabled PCI Express Device Correctable Error Reporting Enable Disable CTO Default Setting 16 55 ms 65 210 ms 260 900 ms 1 3 5 s Disable PCI Express Completion Timer To Enable Disable SEFE Disabled Enabled Root PCI Express S...

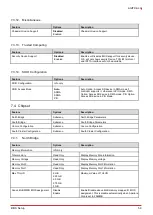
Страница 70: ...bled Enabled PCIE LTR Configuration Lock PCIe Selectable De emphasis Disabled Enabled When the Link is operating at 5 0 GT s speed this bit selects the level of de emphasis for an Upstream component 1b 3 5 dB 0b 6 dB 7 4 4 4 South Cluster Configuration SATA Devices Feature Options Description SATA Drives Info only Chipset SATA Controller Configuration Info only Chipset SATA Disabled Enabled Enable...

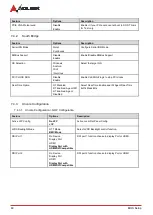
Страница 71: ...0 DevSlp Board rework for LP needed before enable DITO Configuration Disabled Enabled Enable Disable DITO Configuration DITO Value Read Only DM Value Read Only 7 4 4 5 South Cluster Configuration SCC Configuration Feature Options Description SCC SD Card Support D27 F0 Disabled Enabled Enable Disable SCC SD Card Support 7 4 4 6 South Cluster Configuration USB Configuration Feature Options Descripti...

Страница 72: ...ps in power off state until power button is pressed Wake on LAN Disabled Enabled Enable or Disable the Wake on LAN 7 5 Security 7 5 1 Password Description Feature Options Description Setup Administrator Password Enter password User Password Enter password Secure Boot menu Submenu Customizable Secure Boot settings 7 5 1 1 Secure Boot Menu Feature Options Description Secure Boot Info Only System Mod...

Страница 73: ...lacement of newly detected UEFI boot options Boot Mode select Legacy UEFI Select boot mode LEGACY UEFI Boot Option 1 8 Hard Disk CD DVD USB Hard Disk USB CD DVD USB Key USB Floppy USB LAN Network Disabled Set the system boot order 7 7 Save Exit 7 7 1 Save Options Feature Options Description Save Changes and Exit Yes No Exit system setup after saving the changes Discard Changes and Exit Yes No Exit...

Страница 74: ...ons Save as User Default Yes No Save the changes done so far as User Defaults Restore User Defaults Yes No Restore the User Defaults to all the setup options 7 7 3 Boot Override Feature Options Description UEFI Built in EFI Shell Launches built in EFI Shell Launch EFI Shell from file system device Launches EFI Shell from file system device ...

Страница 75: ...bles To avoid electrical shock and or damage to equipment Keep equipment away from water or liquid sources Keep equipment away from high heat or high humidity Keep equipment properly ventilated do not block or cover ventilation openings Make sure to use recommended voltage and power source settings Always install and operate equipment near an easily accessible electrical socket outlet Secure the p...

Страница 76: ...360 0200 Toll Free 1 800 966 5200 USA only Fax 1 408 360 0222 Email info adlinktech com ADLINK Technology China Co Ltd Address 300 Fang Chun Rd Zhangjiang Hi Tech Park Pudong New Area Shanghai 201203 China Tel 86 21 5132 8988 Fax 86 21 5132 3588 Email market adlinktech com ADLINK Technology GmbH Address Hans Thoma Strasse 11 D 68163 Mannheim Germany Tel 49 621 43214 0 Fax 49 621 43214 30 Email eme...

Отзывы: