


GB
GB
8
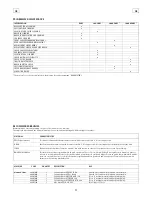
3. The batteries charge level indicator is digital and
remains fixed on the display. The battery charge level
starts from 100, which indicates the 100% of the to-
tal charge and decreases from 10 to 10. When the
charge level reaches 20%, the display starts blinking,
so you are about the end of working.
ATTENTION:
After a few seconds of the indication 10% and after
this, the blinking of the four lines, all the functions
stop automatically. With the remaining charge it is
anyhow possible to finish the drying operation be-
fore proceeding to the recharge.
HOUR METER
The machine is equipped with an hour meter located
on the same display (1) of the battery charge level
indicator. Pressing the button (2), the first data indi-
cates the working hours and after a few seconds the
working minutes are shown.
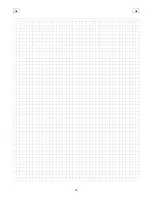
SQUEEGEE ASSEMBLY
1. Insert the two screws (3) situated on the upper
part of the squeegee (2) inside the slots present on
the support.
2. To block the squeegee tighten the stud bolts (3).
3. Insert the squeegee hose (4) into its coupling, re-
specting its position as indicated in the figure.
ADJUSTMENT OF THE SQUEEGEE
In order to have a perfect drying result through the
squeegee, the rear rubber must have the lower bend-
ing uniformly adjusted in all its length. For the ad-
justment, it is necessary to put oneself in working
condition and therefore the suction motor has to be
switched on and the brushes have to function to-
gether with the detergent solution.
The lower part of the rubber is too much bent
Take off the pressure rotating the wing nut (5) coun-
terclockwise.
The lower part of the rubber is not much bent
Increase the pressure rotating the wing nut (5)
clockwise. Check that the wheels which adjust the
height do not rest on the floor, in this case adjust
them as indicated in paragraph "Height adjustment".
The bending is not uniform
Adjust the squeegee inclination rotating counter-
clockwise the wing nut (6) to increase the bending in
the central part, or clockwise to increase the bending
on the extremities.
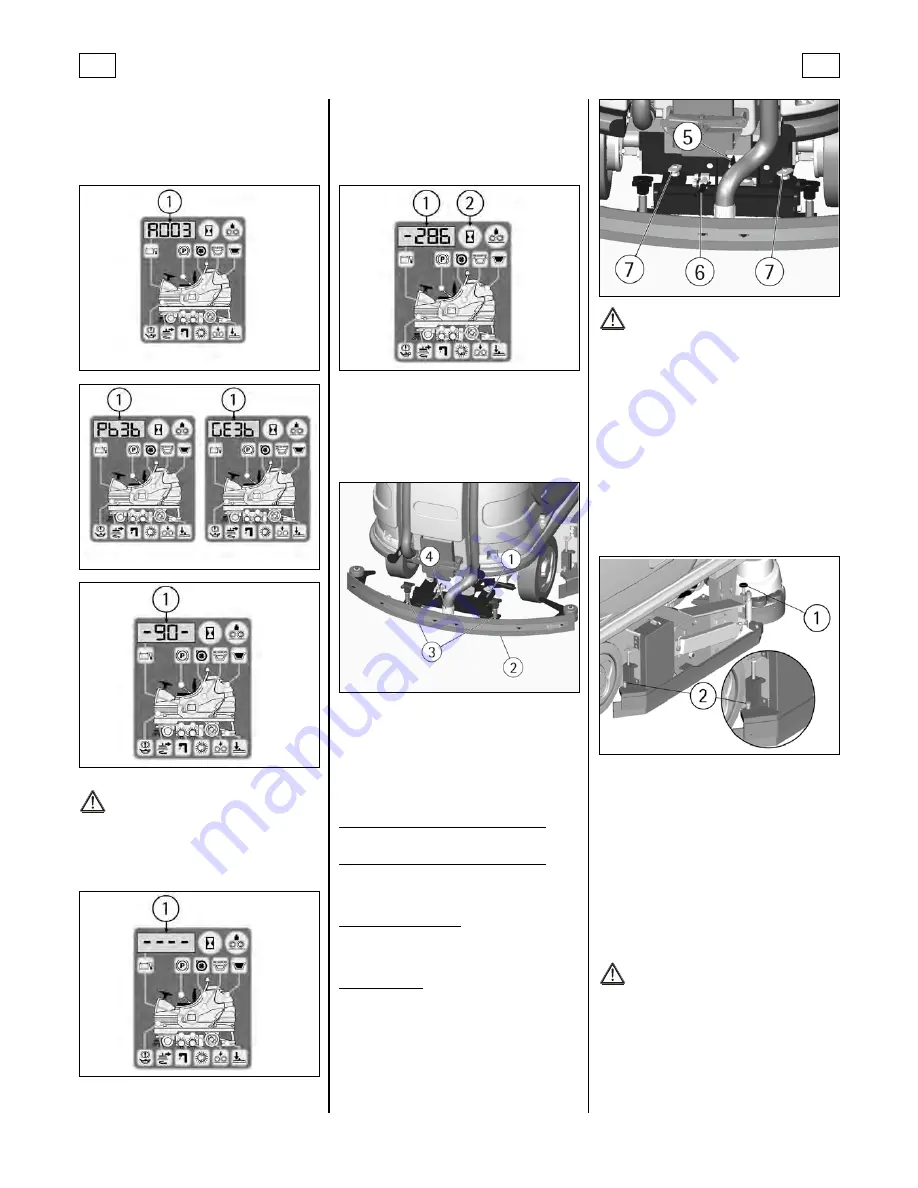
Height adjustment
Once that the pressure and inclination of the squee-
gee have been adjusted, it is necessary to fix this op-
timum condition making touch slightly the wheels
onto the floor. Rotate clockwise the registers (7) to
lower the wheels or counterclockwise to raise them.
Both wheels must be adjusted in the same measure.
To act upon the register (7) loosen at the same time
the two milled ring nuts, adjust the height acting on
the upper one and then fix the adjustment screwing
and blocking the lower one.
ATTENTION:
Every type of floor requires a specific adjustment.
For example, concrete floors (where the friction re-
sults to be high) need little pressure, while smooth
floors (ceramics) need higher pressure.
If the cleaning operations are made always on the
same type of floor, the adjustment can change only
in function of the rubber wear.
ADJUSTMENT SIDE RUBBERS
To adjust the side rubbers, it is necessary to act upon
the knob (1). Screwing down, more pressure is given
and unscrewing, pressure is being taken off. The rea-
son of the adjustment is to obtain an uniform rubber
bending.
NOTE: If the rubber should lower in the rear part, it
is necessary to restore the correct bending by acting
upon the screw (2).
BRUSHES ASSEMBLY AND DISASSEMBLY
Normally, the machine is delivered with the brushes
assembled.
To assemble and disassemble the brushes:
1. Position the selector (4) for the adjustment of
the brushes pressure on position P1.
2. Activate the machine (see under paragraph
“STARTING OF THE MACHINE”) positioning the selec-
tor (12) to the right to choose the manual mode
(MAN).
3. Activate the selector (14) of up/down of the
brushes base to lower the brushes. Once that it is
lowered, the brushes begin to turn.
4. Turn the key counterclockwise to turn off the
machine.
ATTENTION:
To carry out brushes assembly operations with the
electric supply on, may cause damages to hands.
Содержание 48907050
Страница 1: ...diamond 100s 07 2015 Use and maintenance Attention Please read the instructions before use...
Страница 2: ......
Страница 18: ...GB GB 18...


