


GB
GB
15
5. Rinse with a water jet the solution tank and the
components of the filter.
6. Reassemble all parts.
NOTE: in case of need it is possible to wash only the
components of the outer solution filter as above-
mentioned by closing the solution valve adjustment
(see under paragraph “FLOW ADJUSTMENT OF THE
DETERGENT SOLUTION”), so that the detergent solu-
tion remains in the solution tank.
TWO-MONTHLY MAINTENANCE
FRONT SQUEEGEE RUBBER CHECK
Check the wear of the squeegee rubber and eventu-
ally replace it.
For the replacement it is necessary to:
1. Take off the squeegee (see under paragraph
“SQUEEGEE CLEANING”).
2. Unscrew the wing nuts in the front part of the
squeegee.
3. Take off the rubber holder blade.
4. Replace the front rubber.
5. Reassemble all parts.
SIX-MONTHLY MAINTENANCE
SPLASH GUARD RUBBER CHECK OF THE SIDE
BRUSH
With the brush assembled, the splash guard of the
side brush must slightly touch the floor. If the rubber
is worn, it has to be replaced.
The device has to be in rest position at machine stop.
ATTENTION:
To carry out above operations with the electric sup-
ply on, may cause damages to hands.
To replace the rubber:
1. Take off the side brush (see under paragraph
“SIDE BRUSH ASSEMBLY AND DISASSEMBLY”).
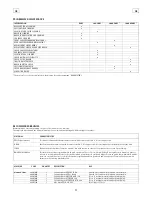
2. Take off the screws (1) that block the rubber
blade and replace the rubber.
3. Reassemble all parts.
CHECK OF THE BRAKES
Check the braking efficacy of both rear wheels.
Should the braking be insufficient, please contact
the authorized technical assistance.
TROUBLESHOOTING GUIDE
NOTE: The machine is equipped with a control sys-
tem of the main functions with indication on the
display of a probable malfunction with codified
alarms: AL 01, AL 02, etc. The alarm 20 is general and
foresees and additional check of the quantity of
blinkings to be read on the led placed on the chop-
per card.
ATTENTION:
If with the key switch positioned clockwise to switch
on the machine the display and other functions are
not activated, it is necessary to check the batteries'
connection to the machine (see under paragraph
“CONNECTION BATTERIES' CONNECTION AND
SWITCHING ON OF THE MACHINE”). If the problem
persists, please contact the authorized technical as-
sistance.
THE SUCTION MOTOR DOES NOT WORK
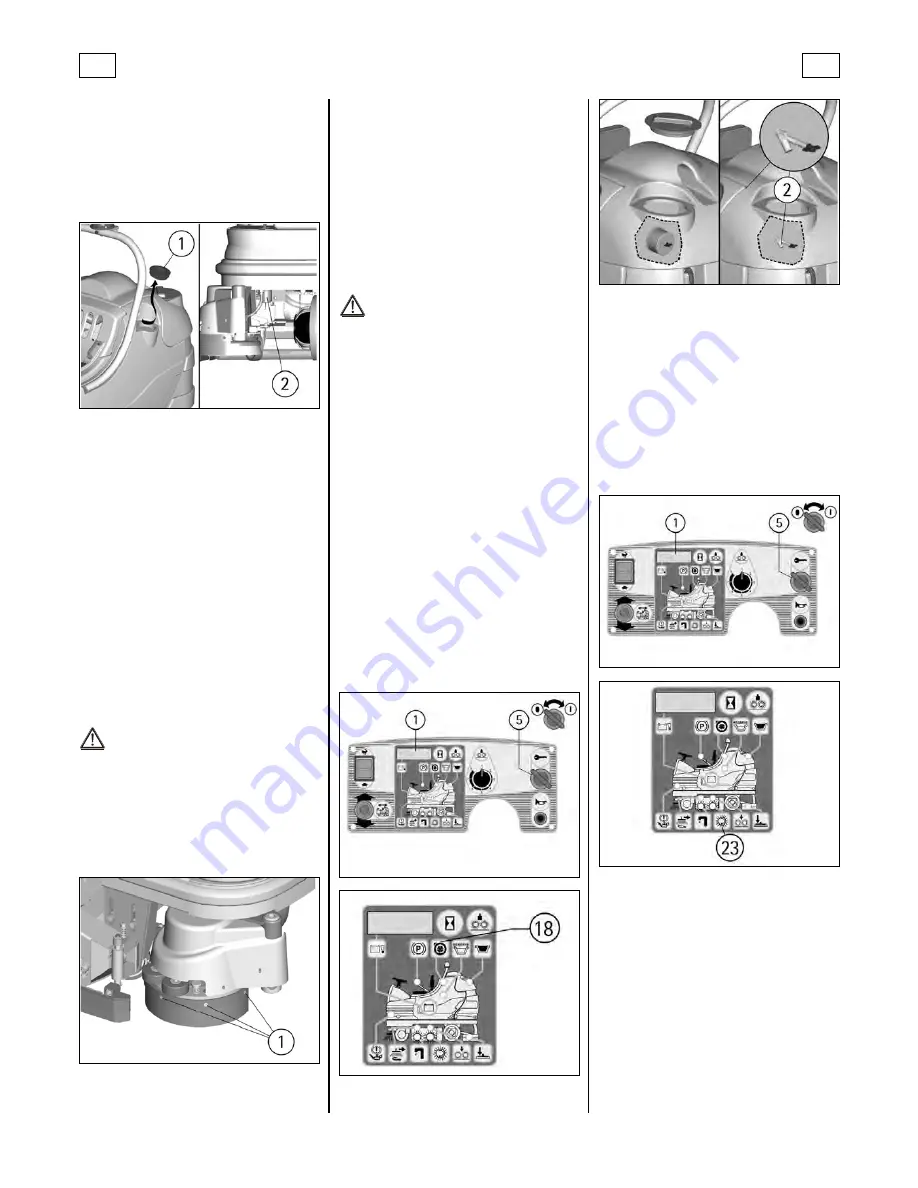
1. Verify that the key switch (5) is positioned clock-
wise to switch on the machine. In presence of alarm
signals it is necessary to switch off and on again the
machine to restore the functionality.
2. Check the charge level of the batteries on the
display (1).
3. Verify of having activated correctly the function
of drying (see under paragraph “STARTING OF THE
MACHINE”).
4. If, both in mode (MAN) as (AUTO), the signal
lamp (18) is on but the suction system does not work,
it is necessary to check the connection of the suction
motor plugs situated in the compartment behind the
seat.
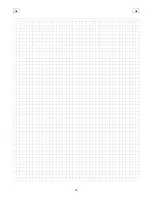
5. The that the recovery tank is not full.
6. Check that the float switch (2) in the recovery
tank is assembled correctly.
If the problem persists, please contact the authorized
technical assistance.
THE BRUSHES MOTOR DOES NOT WORK
1. Verify that the key switch (5) is positioned clock-
wise to switch on the machine. In presence of alarm
signals it is necessary to switch off and on again the
machine to restore the functionality.
2. Check the charge level of the batteries on the
display (1).
3. Verify of having activated correctly the function
of washing with the brushes (see under paragraph
“STARTING OF THE MACHINE”).
4. If, both in mode (MAN) as (AUTO), the signal
lamp (23) is on but the brushes do not turn, please
contact the authorized technical assistance.
If the problem persists, please contact the authorized
technical assistance.
THE TRACTION MOTOR DOES NOT WORK
1. Sit on the guiding place.
2. Verify that the key switch (5) is positioned clock-
wise to switch on the machine. In presence of alarm
signals it is necessary to switch off and on again the
machine to restore the functionality.
3. Check the charge level of the batteries on the
display (1).
4. Check through the signal lamp (17) that the
parking brake is not inserted and eventually release
it (see under paragraph “EMERGENCY-PARKING
BRAKE”).
5. Check that the selector (8) is in the movement
position.
6. Press the accelerator pedal placed on the right
side to start the machine.
If the problem persists, please contact the authorized
technical assistance.
Содержание 48907050
Страница 1: ...diamond 100s 07 2015 Use and maintenance Attention Please read the instructions before use...
Страница 2: ......
Страница 18: ...GB GB 18...


