background image

AVR30 (E) QR33851

3

ENGLISH

IMPORTANT SAFEGUARDS

In addition to the careful attention devoted to quality standards in the manufacture of your video product, safety is a major factor in
the design of every instrument. But, safety is your responsibility too.

These pages list important information that will help to assure your enjoyment and proper use of a Video Cassette Recorder and
accessory equipment.  Please read it carefully before operating your video product and keep it in a handy place for future reference.

INSTALLATION

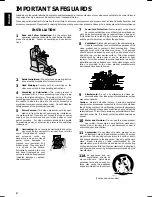
1

Read and Follow Instructions—All the safety and
operating instructions should be read before the video

product is operated.  Follow all operating and use instruc-
tions.

2

Retain Instructions—The safety and operating instruc-
tions should be retained for future reference.

3

Head Warnings—Comply with all warnings on the
video product and in the operating instructions.

4

Grounding or Polarization—This video product is
equipped with a 3-wire grounding-type plug, a plug

having a third (grounding) pin.  This plug will only fit into a
grounding-type power outlet.  This is a safety feature.  If you
are unable to insert the plug into the outlet, contact your
electrician to replace your obsolete outlet.  Do not defeat the
safety purpose of the grounding-type plug.

5

Power Sources—This video product should be oper-
ated only from the type of power source indicated on

the marking label.  If you are not sure of the type of power
supply to your home, consult your video dealer or local
power company.  For video products intended to operate
from battery power, or other sources, refer to the operating
instructions.

6

Overloading—Do not overload wall outlets and exten-
sion cords as this can result in a risk of fire or electric

shock.  Overloaded AC outlets
and extension cords are
dangerous, and so are frayed
power cords, damaged or
cracked wire insulation and
broken plugs.  They may result
in a shock or fire hazard.
Periodically examine the cord
and have it replaced by your
service technician if appearance
indicates damage or deterio-
rated insulation.

7

Power-Cord Protection—Power-supply cords should
be routed so that they are not likely to be walked on or

pinched by items placed upon or against them, paying par-
ticular attention to cords at plugs, convenience receptacles,
and the point where they exit from the appliance.

8

Ventilation—Slots and openings in the cabinet are pro-
vided for ventilation to ensure reliable operation of the

video product and to protect it from overheating.  These
openings must not be blocked or covered.  The openings
should never be blocked by placing the video product on a
bed, sofa, rug, or other similar surface.  This video product
should never be placed near or over a radiator or heat
register.  This video product should not be placed in a built-in
installation such as a bookcase or rack unless proper venti-
lation is provided or the video product manufacturer’s
instructions have been followed.

9

Attachments—Do not use attachments unless rec-
ommended by the video product manufacturer as they

may cause hazards.

Caution:  Maintain electrical safety.  Powerline operated
equipment or accessories connected to this unit should bear
the UL listing mark or CSA certification mark on the accessory
itself and should not have been modified so as to defeat the
safety features.  This will help avoid any potential hazard from
electric shock or fire.  If in doubt, contact qualified service per-
sonnel.

10

Water and Moisture—Do not use this video product
near water—for example, near a bath tub, wash bowl,

kitchen sink, or laundry tub, in a wet basement, or near a
swimming pool, and the like.

11

Accessories—Do not place this video product on an
unstable cart, stand, tripod, bracket, or table.  The video

product may fall, causing serious injury to a child or adult,
and serious damage to the appliance.  Use only with a cart,
stand, tripod, bracket, or table recommended by the
manufacturer, or sold with the video product.  Any mounting
of the product should follow the manufacturer’s instructions,
and should use a mounting accessory recommended by the
manufacturer.

11A

An appliance and cart
combination should be

moved with care.  Quick stops,
excessive force, and uneven sur-
faces may cause the appliance
and cart combination to overturn.

kawaii koneko

MOMO

key to chise

mekoalbum

cat book

mother

diet

Zoo Docter

Part 1

Zoo Docter

Part 2

sasaki akemi

hirayamo akiko

horie youji

setuko

kimio

auto moter

kabushiki

mitoniikikata

yakamashii

igarashi

Why?

kuro

abcdfevcdsz

kusano

mitono

kakurai

tadashiigenkou

tadashiigenkou

oomori

matuda

nurie

yohsinarish

yohsinarishashin

mito

namemekogaikiteita

mito

momogatoiredemizubitashi

album

mame

1

funga f

unga funga funga

funga funga funga

metsuki

123

nyanko

1

midori

3

okubyo

2

mother

Part2

tomodac

hi

3

junkaikun

2

momo

3

momo

2

momo

1

ebisu

2

ebisu

1

key
5

key
4

key
3

key
2

key
1

chise

5

chise

4

chise

3

chise

2

chise

1

(Continued on other side)

Содержание AVR30

Страница 1: ...tely Mode d emploi Des performances optimales et un fonctionnement long terme seront assur s en appliquant les pr sentes instructions apr s avoir enti rement lu ce mode d emploi Manual de instruccione...

Страница 2: ...he recorder is received the unit must be connected to power source for 48 hours to assure the battery has been ad equately charged FOR YOUR SAFETY 2 PRECAUTIONS 2 IMPORTANT SAFEGUARDS 3 CONTROLS AND F...

Страница 3: ...for a log period and it is not intended to use the unit it is rec ommended that the unit be completely switched off by removing the plug Illustrated below is molded on the back of your unit CAUTION TO...

Страница 4: ...ots and openings in the cabinet are pro vided for ventilation to ensure reliable operation of the video product and to protect it from overheating These openings must not be blocked or covered The ope...

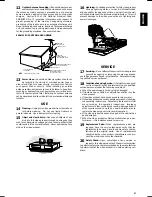
Страница 5: ...a or cable system This will prevent damage to the video product due to lightning and power line surges SERVICE 17 Servicing Do not attempt to service this video product yourself as opening or removing...

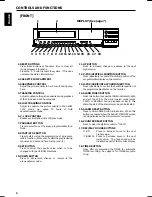
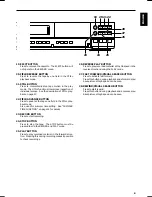
Страница 6: ...h the UP DOWN buttons 10 DOWN BUTTON Press to decrement change or reverse to the previous lower value 11 UP BUTTON Press to increase change or advance to the next higher value 12 V POS VERTICAL POSITI...

Страница 7: ...TIME FUNCTION on page 14 for details 23 RECORD BUTTON Press to start recording 24 STOP BUTTON Press to stop the tape The STOP button must be pressed to end the RECORD and PLAY mode 25 PLAY BUTTON Pre...

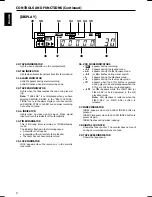
Страница 8: ...in the following cases A cassette is not loaded A cassette without its safety tab is loaded The timer has not been programmed 35 LOCK INDICATOR LOCK appears when the recorder is in the security lock...

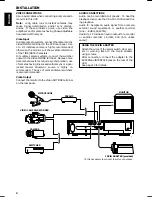
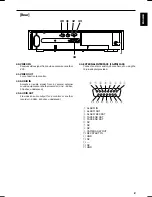
Страница 9: ...other recorder Line 8 dBm 50 Kohm unbalanced 43 AUDIO OUT Provides an audio output for a monitor or another recorder 9 dBm 600 ohm unbalanced 44 EXTERNAL INTERFACE 15 PIN JACK Connect an alarm switch...

Страница 10: ...t the switcher output to the Video IN BNC terminal Because mul tiple camera systems require synchronization use of cameras having line locked vertical sync or a gen locked master drive sync source is...

Страница 11: ...ND RE REC in the RECYCLE FUNC TIONS menu in the ALARM SET display or you have selected REWIND STOP IF ALARM and no alarm recording has been made The output impedance is approx 100 ohm TAPE END RST The...

Страница 12: ...when the safety tab is removed Notes The TAB indicator lights when a cassette without its safety tab is loaded To record again on a cassette that has its safety tab removed cover the tab hole with ta...

Страница 13: ...appears on the monitor screen when the power cord is first plugged in SELECTING A FUNCTION TO BE PROGRAMMED The program menu will always begin with the CLOCK SET function followed by the TIMER SELECTI...

Страница 14: ...12 Press the START STOP button the seconds will start counting and the clock will start CLOCK SET will flash on off again at this time 13 To display the time date you have set here on the monitor scr...

Страница 15: ...bove buttons Note Summer time cannot be set unless TIME DATE is displayed 1 Press the START STOP button twice so that OPTIONS flashes on off 2 Press the SET button so that the OSD TYPE set ting flashe...

Страница 16: ...tor 15 Press the SET button The other program event location of MON flashes on off 16 Press the UP or DOWN button until the desired program number appears on the monitor Notes If you do not need to ti...

Страница 17: ...me start time the program number with the longest stop time has priority To correct information 1 Press the START STOP button 2 Press the UP or DOWN button repeatedly until the item to be corrected Pr...

Страница 18: ...hich pulses are output to switch the camera 18 The pulses are output during recording at 18 or a longer speed ALL The pulses are output during recording in all modes 06 ONLY The pulses are output duri...

Страница 19: ...keep sounding if recording is abnormal Buzzer will not sound even if recording is abnormal ALARM OUT ON or OFF To specify whether buzzer turns on or off when alarm is output ON OFF Buzzer will keep s...

Страница 20: ...ot operate 1 Press the START STOP button The duration set ting flashes on off 2 Press the UP or DOWN button until the desired setting appears on the monitor MANUAL 5 15 30 SEC 1 3 5 10 30 60 MIN TAPE...

Страница 21: ...s press the ALARM RESET button to clear the ALARM memory Notes When the ALARM RESET button is pressed once if PL is flashing PL will disappear Press the button again to clear the ALARM memory When PL...

Страница 22: ...ures are being recorded normally or not during recording When the PLAY button is pressed during recording the recorded picture is played back for several sec onds Then recording will continue AUTO REC...

Страница 23: ...ate the ALARM recording in the stop mode follow the TAPE RECORDING procedure step 1 then select YES of the ALARM READY menu in the ALARM SET display MASTER SYSTEM RESET Press the two reset buttons sim...

Страница 24: ...button again to resume normal playback Notes The visual search speed can be changed using the SELECTION MENU screen The playback picture will have some noise in the visual search mode ALARM INDEX SEAR...

Страница 25: ...e TRACKING control may need to be returned to center position if previously adjusted The TRACKING control is only active at the 06 A18 or A30 speed Replace cassette Clean video heads Remove cassette a...

Страница 26: ...Output 1 Vp p 75 ohm unbalanced BNC S N Ratio Video More than 42 dB 06 mode S N Ratio Audio More than 40 dB 06 mode Horizontal Resolution Colour 300 lines 06 mode Monochrome 350 lines 06 mode Audio I...

Страница 27: ...26 ENGLISH...
Страница 28: ...asco Milano Italy 39 02 4571791 ADEMCO Sontrix Espana Vivero 5 28040 Madrid Spain 34 91 533 4706 Security House Amperestraat 41 1446 TR Purmerend Netherlands 31 299 419 000 Video Controls Ltd Aston Fi...

Отзывы: