background image


BetaBrite Director User Manual

Installation and setup: Assembling the Director

 5


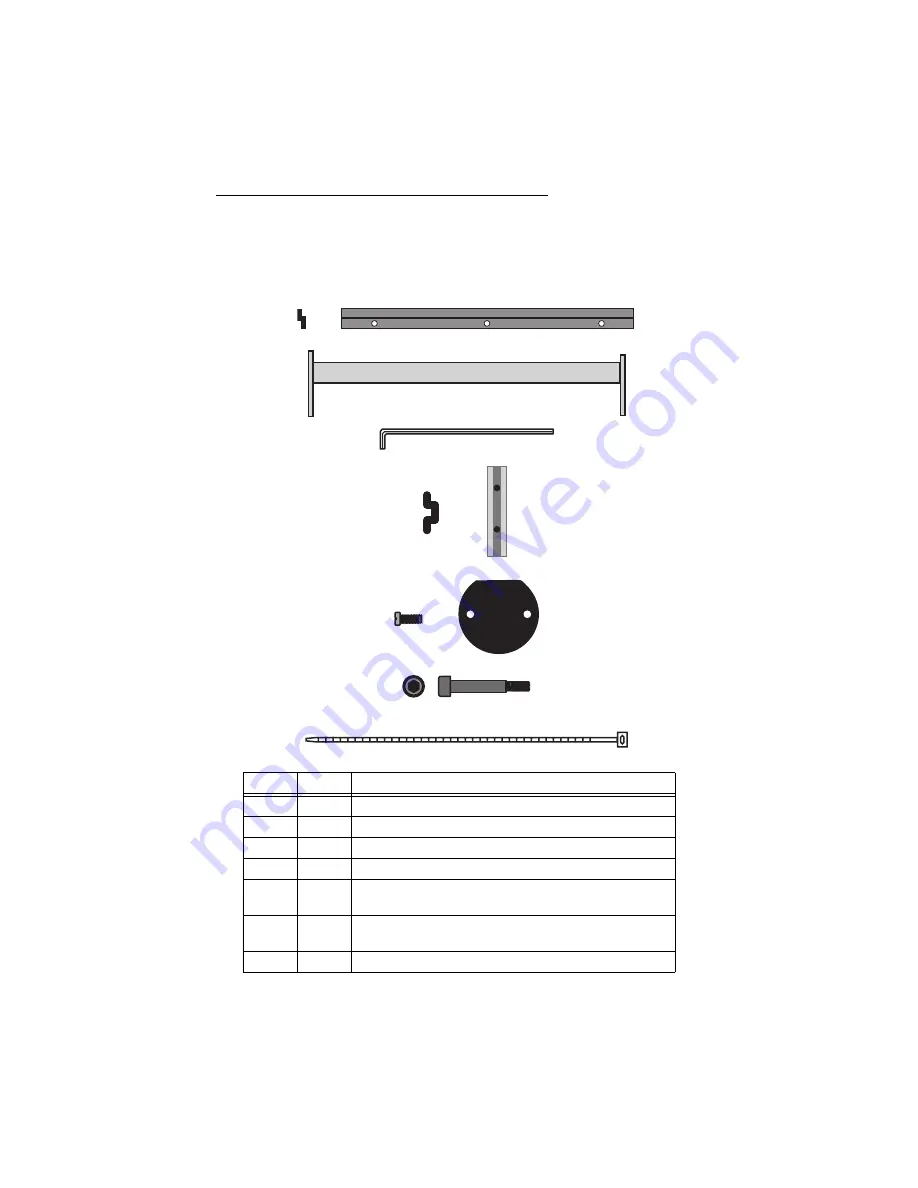
Assembly parts


These are in addition to the primary components shown on page 1. 

These are not drawn to scale. 


Part

Quantity

Component


A

1

Wall-mounting bracket, end view and face view

B

1

Crossbar

C

2

Hex (Allen) wrench: 1 smaller and 1 larger

D

2

Safety stop block, end view and face view

E

4
2

3/8” long Phillips screw and
Post cap

F

4

Shoulder bolt for optional brochure rack, end view and side view 
(3/4” shoulder, 1-5/16” total length)

G

3

Tie wrap

A

B

C

E

G

D

F

Содержание BETAbrite Director

Страница 1: ...i BETAbrite Director Programming Manual For all BetaBrite Director signs 1998 2001 Adaptive Micro Systems Form No 9702 2002B 2 9 01 Assem bly instructions inside...

Страница 2: ...ducts is a Trade Dress of Adaptive Micro Systems Inc The following are trademarks of Adaptive Micro Systems Adaptive Alpha AlphaNet plus AlphaEclipse AlphaPremiere AlphaTicker AlphaVision AlphaVision...

Страница 3: ...gn s password 23 How to delete a sign s password 23 Using the Remote Control s sound control 24 Setting a sign s serial address 24 Beginning text messaging 26 Example 1 Using upper and lowercase text...

Страница 4: ...from Adaptive Micro Systems Inc any on site support service or maintenance Local ordinances prohibiting the use of flashing signs may exist in some locations Compliance with local ordinances is the so...

Страница 5: ..._________________ _________________________________ _________________________________ Return Instructions 1 Obtain an RMA number from your distributor 2 Fill out this form and include proof of purchas...

Страница 6: ...vi...

Страница 7: ...LED sign B Mounting bracket This is a factory installed option if the sign is to be wall mounted The mating bracket for the wall must be user installed C RS232 RS485 jacks The sign s bottom panel tip...

Страница 8: ...radiate radio frequency energy and if not installed and used in accordance with the instruction manual may cause harmful interference to radio communications Operation of this equipment in a residenti...

Страница 9: ...se water and dust will damage the sign NOTE Because of its size and weight the Director should be assembled by two people WARNING Hazardous voltage Contact with high voltage may cause death or serious...

Страница 10: ...from each of the L brackets holding the sign s cap 3 Lift up and remove the cap 4 Pull up and remove the clear plastic lens on the sign s front 5 To remove the jumper grasp it with needle nosed plier...

Страница 11: ...e not drawn to scale Part Quantity Component A 1 Wall mounting bracket end view and face view B 1 Crossbar C 2 Hex Allen wrench 1 smaller and 1 larger D 2 Safety stop block end view and face view E 4...

Страница 12: ...g the sign from this bracket NOTE Only hang the Director from a wall capable of supporting 116 pounds 52 5 kg Use fasteners not supplied also capable of supporting 116 pounds 3 Plug the power cord int...

Страница 13: ...ctor 7 HowtomountaDirectoronastand 1 Lay the two mounting poles for the stand on a flat surface Slide the crossbar down the channels on the mounting poles 2 Slide a safety stop down each channel Cross...

Страница 14: ...ench to tighten each safety stop with its two set screws also pre installed in each 25 5 inches 63 5 cm Fasten with two screws on each side Fasten each safety stop with two screws Crossbar Safety stop...

Страница 15: ...ace each of the sign s mounting brackets in a channel on each mounting pole Then slide the sign down until it rests on the safety stops Finally attach the post caps onto the tops of the mounting poles...

Страница 16: ...he sign in such a way that it is not in an area where people will be walking Top view of sign Completed assembly of sign Shown without the optional brochure rack Run the power cord along one of the mo...

Страница 17: ...he brochure rack to a BetaBrite Director optional 1 Using the larger Allen hex wrench attach the four shoulder bolts to the legs of the sign 2 Slip the plastic brochure rack over the four shoulder bol...

Страница 18: ...BetaBrite Director User Manual 12 Installation and setup Assembling the Director 3 Use the supplied plastic dividers as needed in the brochure rack to adjust for different sizes of literature Dividers...

Страница 19: ...t to RS485 See Setting the RS232 RS485 jumper on page 4 Because there is such a wide variety of ways e g LAN wireless etc to connect networked signs see the Network Configurations manual PN 9708 8046...

Страница 20: ...BetaBrite Messaging Software Alpha Messaging Software AlphaNET plus Smart Alec ActiveX This user manual does not discuss usage of messaging software Please refer to the specific software manual for mo...

Страница 21: ...sign or a network of signs can also be programmed using a personal computer and special software See the document Network Configurations PN 9708 8046 and your messaging software user manual for more...

Страница 22: ...om the sign s display that is reflected back can interfere with the Remote Control If nearby fluorescent lights interfere with the Remote Control you may have to relocate either the lights or the sign...

Страница 23: ...programmed into the sign will not be lost when you turn a sign off Messages will be retained for up to 30 days if the sign is not powered When you turn a sign on information similar to the following...

Страница 24: ...and date for up to 30 days even if the sign is unplugged or interrupted by a power loss This is because it is equipped with a battery backed real time clock Step When you do this You see this 1 Press...

Страница 25: ...o 24 hour mode 0 23 5 Press BACK until SET DATE appears 6 Press ADV THEN 7 Press D to set the correct day Press M to set the month Press Y to set the year NOTE Press SELECT to display the date in diff...

Страница 26: ...d all messages that have been programmed into the sign Step When you do this You see this 1 Press PROGRAM 2 Press BACK until CLEAR MEMORY appears 3 Press ADV THEN 4 Press Y to clear the sign s memory...

Страница 27: ...others NOTE DON T FORGET YOUR PASSWORD If you do you won t be able to operate the sign However if you do forget the password see What to do when you forget a sign s password on page 23 How to set a pa...

Страница 28: ...led to type the same password ERROR will appear and you ll have to start over from Step 1 THEN THEN THEN 6 Press RUN twice 7 Press Y to password protect the sign NOTE If you select N then a password w...

Страница 29: ...want to be prompted to password protect a sign you must clear the sign s memory in order to delete the password To do this see Clearing a sign s memory on page 20 Step When you do this You see this 1...

Страница 30: ...a sign s serial address The serial address is a number that you can assign to a sign Typically this feature would be used for a sign that is connected to other signs on a network Giving a unique seria...

Страница 31: ...E A serial address is actually a number from 0 to 255 in hexadecimal 00 to FF However in typical use entering a number from 00 to 99 is fine NOTE When a sign leaves the factory its serial address is s...

Страница 32: ...s ADV Your first message will look like this THIS IS YOUR FIRST MESSAGE Your second message will look like this This is your second message The CAPS key changes between upper lower case PAGE A MODE AU...

Страница 33: ...Press RETURN to start on the next line 5 Type FIRST MESSAGE NOTE To create the period hold down SHIFT and press X 6 Press RUN to display your first message Here s how to create the second message 7 Pr...

Страница 34: ...ss CAPS to change to lowercase text Then type his is your PAGE B MODE AUT SPEED SP4 Your second message will be created in PAGE B Your first message is still in PAGE A You can create up to 26 separate...

Страница 35: ...ntil the cursor color stays amber 19 Using CAPS SHIFT and RETURN when necessary type the following The CAPS key changes between upper lower case NOTE The ampersand is made by holding down SHIFT and pr...

Страница 36: ...to create a blank line 22 Press RUN to see the message This is your second message The C PS key changes between upper lower case Use INSERT to create blank lines between text Use DELETE to remove blan...

Страница 37: ...he sequence the messages will appear in alphabetical order Step When you do this You see this This example continues where Example 1 left off This example assumes that there are two messages PAGE A an...

Страница 38: ...er of some or all of the messages you ve entered on a sign RUN BA This will be the order PAGE B then PAGE A in which messages are displayed on the sign These two messages will keep being displayed in...

Страница 39: ...Setting a sign s time and date on page 18 This example continues where Example 1 left off This example assumes that there are two messages PAGE A and B in the sign In this example we ll program the si...

Страница 40: ...ss M for minute until 13 20 appears 9 Press SELECT 10 Repeat Steps 6 7 and 8 to set an OFF time in this case 13 30 PAGE B MODE WPUP SPEED SP4 PAGE A MODE AUT SPEED SP4 TEXT A ON ALWAYS TEXT A ON MO FR...

Страница 41: ...ing messages in time order 35 11 Press RUN twice PAGE B This message should appear continuously This message should only appear between the ON and OFF times you set PAGE A This is your second message...

Страница 42: ...tinues where Example 2 left off This example assumes that there are two messages PAGE A and B in the sign In this example we ll change PAGE A to the following THIS IS YOUR VERY FIRST MESSAGE BUT NOW I...

Страница 43: ...g down SHIFT and then pressing F 8 Press DELETE until the word MESSAGE and the period is deleted 9 Hold down SHIFT and press D to move the cursor over the letter F THIS IS YOUR IRST MESSAGE SHIFT E SH...

Страница 44: ...andpressDuntilthecursor is at the start of the line 12 Type MESSAGE BUT NOW 13 Type IT S LONGER 14 Press RUN to see your message THIS IS YOUR VERY IRST THIS IS YOUR VERY FIRST THIS IS YOUR VERY FIRST...

Страница 45: ...ple 4 left off This example assumes that there are two messages PAGE A and B in the sign PAGE A THIS IS YOUR VERY FIRST MESSAGE BUT NOW IT S LONGER PAGE B This is your second message The CAPS key chan...

Страница 46: ...ssages currently stored in the sign See Clearing a sign s memory on page 20 or Example 5 Deleting messages on page 39 2 Press PROGRAM If PAGE A is not displayed just press A APR 17 2001 1 37 PM Room C...

Страница 47: ...ACE to move the cursor over two spaces Here s how to put the date in the message 5 Hold down SHIFT and press 0 6 Press RETURN to start on a new line Press COLOR until the cursor always blinks amber Th...

Страница 48: ...hen Applied Eng Repeat this process for the remaining lines of text 10 Press PROGRAM Press B to go to PAGE B Change the MODE to Wipe Left WPLF Change the SPEED to the fastest SP5 11 Press ADV 12 Using...

Страница 49: ...appears 15 Type A and then B to set the order in which the two messages will appear 16 PressRUNagaintodisplay the two messages TIM RUN RUN AB APR 17 2001 1 37 PM Room Company S200 Generic Mfg S250 Bo...

Страница 50: ...this You see this In this example we ll continue from the previous example 1 Press PROGRAM If PAGE A is not displayed then press A 2 Press ADV APR 17 2001 1 37 PM Room Company E101 Applied Eng E200 U...

Страница 51: ...n W20 5 Hold down SHIFT and press 4 for FLASH APR 17 2001 1 37 PM Room Company E101 Applied Eng E200 United Wire W20 ACME Tool W130 Adv Maint APR 17 2001 1 37 PM Room Company E101 Applied Eng E200 Uni...

Страница 52: ...e line 8 Press RUN to see the message APR 17 2001 1 37 PM Room Company E101 Applied Eng E200 United Wire W20 ACME Tool W130 Adv Maint Hold down SHIFT and press F to move the cursor APR 17 2001 1 37 PM...

Страница 53: ...pes of fonts To change from one font to the other press the FONT key The following examples demonstrate how to use fonts on a sign Step When you do this You see this 1 Press PROGRAM IfPAGECisnotdispla...

Страница 54: ...tentate Press FONT All the text after the cursor should change to the other font WELCOME Hernia Movers The potentate of totin freight WELCOME Hernia Movers T H E P O T E N T A T E of totin freight Pre...

Страница 55: ...lines and change the font of each line 7 Press RUN to see your message Here s a demonstration of what colors can be used 8 Press PROGRAM IfPAGEDisnotdisplayed just press D Using SHIFT 5 change the MO...

Страница 56: ...R five times Type COLOR 5 Then press RETURN COLOR 0 COLOR 0 should be red to start When displayed in the message it will cycle through several color schemes COLOR 0 COLOR 1 COLOR 1 should be red COLOR...

Страница 57: ...Using fonts and colors 51 16 Press COLOR six times Type COLOR 6 Then press RETURN 17 Press RUN to see what all the colors look like in a running message COLOR 0 COLOR 1 COLOR 2 COLOR 3 COLOR 4 COLOR...

Страница 58: ...nt If you try a question mark will appear in place of the letter The following table summarizes all the international characters that can be used Base Characters Use the CAPS button on the Remote Cont...

Страница 59: ...rmine if all the LEDs are working properly Step When you do this You see this 1 Press PROGRAM 2 Press BACK until SET TIME AND DAY appears 3 Press ADV 4 Type TEST The sign will go through a series a LE...

Страница 60: ...this diagram 3 Re assemble the sign being careful not to catch any wires Then re apply power to the sign WARNING Hazardous voltage Contact with high voltage may cause death or serious injury Always d...

Страница 61: ...steps NOTE To complete the transfer of memory from one sign to other signs all signs must be connected together and all must have the RS232 RS485 jumper set to RS485 For further information on connect...

Страница 62: ...and press 2 to use the Wipe mode in a message Doing this more than once cycles through all the options for direction of the wipe SCROLL Not used FLASH Hold down SHIFT and press 4 to use the Flash mode...

Отзывы: