background image


Page 33/38  

EINAR 5


USER MANUAL 

Adaptive Recognition 

America 

Adaptive Recognition 

Hungary 

Adaptive Recognition 

Nordic 

Adaptive Recognition 

Singapore 

[email protected]


WWW.ADAPTIVERECOGNITION.COM


Encoders 

If it is enabled, the following can be fine-tuned:  


Target bitrate (kbps): The bandwidth size can be adjusted. 


I-frame interval (GOP): The density of the I frames can be specified.  


Sensor 

Under Sensor tab the aspect ratio can be adjusted which can be 4:3 or 16:9. 


6.10.


MEDIA / LENS 

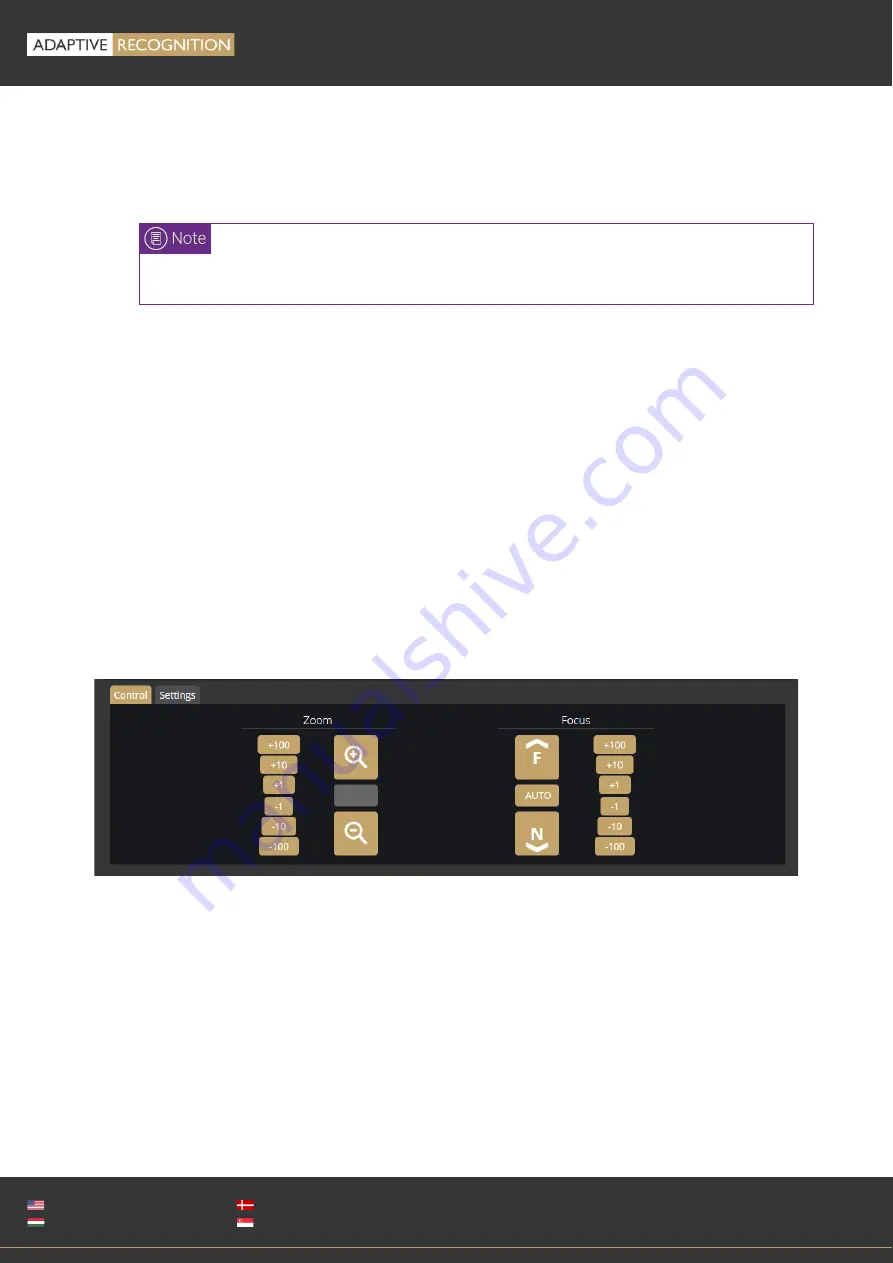
On this interface the lens of the device can be fine-tuned: the Focus and the Zoom can be customized 

by using the corresponding buttons.  


Autofocus 

The camera possesses autofocus. By default, the autofocus function is enabled, but it can be disabled 

on  the  Settings  tab  with  the  "Change  focus  when  zooming"  option.


If  the  "Change  focus  when 

zooming" option is turned on, the camera starts to look for the correct value by itself in order to achieve 

the sharpest image possible. This process starts simultaneously with the zooming.  

In manual, disabled state the autofocus can be initiated with the "AUTO" button located in the Focus 

section. 

Lens distortion correction: This setting can correct lens distortion occurring at certain zoom settings. 


The values to be set alternate stream by stream.  

Содержание Einar 5

Страница 1: ......

Страница 2: ...0 Firmware version 1 6 1 0 Table of Contents 1 Overview 4 1 1 Default IP Address 5 1 2 Finding Cameras 5 2 Overview of the Web Interface 6 3 Live 7 3 1 Full Screen Mode 7 3 2 Saving Live Stream 8 3 3 Switching Stream 8 3 4 Help 8 3 5 Overlay 9 3 6 Event Preview 9 4 Playback 10 4 1 Search among the Recordings 11 4 2 Filtering the Detectors 12 4 3 Exporting the Recordings 13 5 Events 14 6 Settings 1...

Страница 3: ...cognition Nordic Adaptive Recognition Singapore SENDINFO ADAPTIVERECOGNITION COM WWW ADAPTIVERECOGNITION COM 6 4 System Security 21 6 5 System Storage 23 6 6 System IO 27 6 7 System Service 27 6 8 Media Image 28 6 9 Media Video 32 6 10 Media Lens 33 6 11 Analytics Detectors 34 CONTACT INFORMATION 38 ...

Страница 4: ...e accessible Accessing the web interface 1 Start a browser and enter the camera IP address into the address bar of the browser 2 Type the username and the password on the displayed login interface and click on Login The default user account is the following Username admin Password admin 3 After signing in the web interface of the camera is displayed on which the required settings can be performed ...

Страница 5: ...ess Serial Number The cameras will also be accessible via their link local IP address For example if the MAC address of the camera is 00 19 B4 01 42 1A than its IP is 169 254 aa bb aa is the decimal value of the digit one before the last in the MAC address hexa 42 decimal 66 bb is the decimal value of the last digit in the MAC address hexa 1A decimal 26 so the IP is 169 254 66 26 1 3 FINDING CAMER...

Страница 6: ...VIEW OF THE WEB INTERFACE For the camera settings the following menu items are available on the web interface 1 LIVE The live stream of the camera can be seen 2 PLAYBACK The recordings stored on the SD card can be played 3 EVENTS The user can navigate between the recorded events 4 SETTINGS Under SETTINGS multiple options are accessible Status Device Network Security Storage I O Service Image Video...

Страница 7: ... 3 LIVE After logging in the live stream of the camera can be seen which can be found on the LIVE tab On this interface the current camera image can be seen 3 1 FULL SCREEN MODE The live stream of the camera can be displayed in full screen by clicking on the icon located in the bottom right corner of the image To exit from the full screen mode press the ESC keyboard key or click on the icon mentio...

Страница 8: ...cking on it an image of the current live stream with previously selected OSD information will be saved The CTRL S keyboard shortcut can be used as well 3 3 SWITCHING STREAM The Streams button is located next to the Save image icon By clicking on it the user can select which stream will be displayed as LIVE 3 4 HELP The last icon on the right in this line is the Help button clicking on which provid...

Страница 9: ...c can be viewed 3 6 EVENT PREVIEW The event preview section can be found under the live stream image where the notifications about the latest received events are displayed The SIGNAL text with brown colored background and date indicates the beginning of the event In case the event is through the RESTORE text with green colored background will appear In case of ANPR event the EVENT text with purple...

Страница 10: ...IVERECOGNITION COM 4 PLAYBACK The PLAYBACK interface is accessible if the storage is turned on By clicking on this tab the recordings stored on the SD card will be listed and can be played by clicking on the required one In case the storage is turned off but the storage device is available then the previously recorded elements can be viewed and played if the storage function is switched on ...

Страница 11: ...ed In the middle of the timeline see image above there is a purple marker which shows where you are in the playback and under this section the current time of the playback can be seen The magnifying glasses located under the timeline serve to increase magnifying glass with sign or decrease magnifying glass with sign the time interval found on the timeline On the middle of this panel there is a cal...

Страница 12: ...right of the PLAYBACK interface The display of the events can be turned on off on the timeline and in the list by clicking on the detector By clicking on an event selected from the list the playback immediately skips to the time when the event occurred If the cursor is hovered over an event located in the list the detector related to the event is highlighted in blue or gold above the list Also vic...

Страница 13: ...layed and viewed by most programs capable of playing videos The Export button is located in the bottom right corner of the PLAYBACK interface By clicking on this button a dialog box pops up and 2 gold arrows appear on the timeline With the help of the arrows the start and the end of the video clip to be saved can be set or can be entered manually by specifying the Start and the End dates The durat...

Страница 14: ... ADAPTIVERECOGNITION COM WWW ADAPTIVERECOGNITION COM 5 EVENTS The EVENTS interface is accessible if the storage is turned on By clicking on this tab all events recorded by the camera will be listed In the event browser the user can navigate between the recorded events with the scroll wheel The events appear as small images The latest events are at the top ...

Страница 15: ...ector related to the event is highlighted in blue or gold in the list on the right and after a few seconds a video clip will be played In the case of clicking on the event a window pops up where the video clip and other data belonging to the event can be viewed The interface can be redirected to the PLAYBACK menu item by clicking on the Show in playback button The data belonging to the event can b...

Страница 16: ...s related to the detector will be highlighted in the event browser By clicking on the detector the display of its events can be turned on off A calendar appears by clicking on the time located in the bottom right corner In the calendar after setting the appropriate time and clicking on the Apply button the browser skips to the specified time There is a license plate search option on the EVENTS int...

Страница 17: ... 6 1 SYSTEM STATUS On this interface a summary about the important data of the camera the installed detectors the operating time and the ANPR licenses can be found 6 2 SYSTEM DEVICE On the Device interface the following can be performed Modify the description and the location of the device Reboot the device remotely Perform factory reset after clicking on the button the original manufacturer setti...

Страница 18: ... the Device time in the following format year month day hour minute second The device time can be set manually by clicking on the calendar icon The device can be synchronized to the computer time with the Sync button next to the calendar icon It is possible to use NTP servers In order to apply NTP servers turn on the Use NTP option and add an NTP server to the field of the NTP servers In the case ...

Страница 19: ...process can be interrupted by clicking on the Cancel button located on the panel showing the status of the upload When the upload is finished in the case of uploading license before the update process the camera asks a security question whether the user is certain about the modification If you choose No the update process is interrupted and the camera operates with the previous settings In the cas...

Страница 20: ...GNITION COM 6 3 SYTEM NETWORK In the Network menu item the network settings are available The IP address assigned to the camera can be static or dynamic Default DNS 8 8 8 8 Fallback to static In the case of setting the device to DHCP the Fallback to static option will be accessible An alternative static IP address can be specified to which the camera connects if it disconnects from the DHCP range ...

Страница 21: ... can be performed like Add new users Delete users Modify the already existing user profiles The default user is admin When adding a new user three levels of permissions can be set 1 Administrator The administrator can view the live stream and the playback too as well as they can set every function 2 User The user only has access to the LIVE and PLAYBACK menu items they cannot modify the camera set...

Страница 22: ...can be adjusted After reaching the specified number the device blocks that session By default after 3 failed login attempts the camera blocks the client for 1 minute In order to enhance the network security it is possible to modify these parameters The number of the Maximum attempts may vary between 1 and 10 The duration of the block can be set between 30 seconds and 7 days Besides the list of the...

Страница 23: ...mode Under Operation mode the Storage Trigger can be selected The image sequences will be saved based on this selection The following can be selected as a Storage Trigger Event Only those image sequences will be stored which have taken place during the signaling of one of the detectors Motion When the camera detects motion the storage process starts and finishes when the motion is over Event Motio...

Страница 24: ...ord at every detector signaling thus the user can select which detector signals should trigger the recording Devices Under the Devices tab information about the data of the SD card the length of the recordings the available storage and the writing speed can be found Formatting the SD card With the Format button the immediate formatting of the storage unit can be started After clicking on the Forma...

Страница 25: ...following fields should be defined Server Address IPv4 of the GDS server Port Access port of the GDS server Path Access within the server Table name The name of the GDS table where the upload will be done Username Username required for the identification Auto obtain user The username can be queried automatically The device queries the user token which will be the user however it has to be authoriz...

Страница 26: ...cognition Hungary Adaptive Recognition Nordic Adaptive Recognition Singapore SENDINFO ADAPTIVERECOGNITION COM WWW ADAPTIVERECOGNITION COM Setting of the HTTP s upload Enable the upload to the HTTP POST at Target then enter the Host IP address to set the HTTP event receiver ...

Страница 27: ...icking on the Edit button at the Inputs tab When the Active state of a port is set to Low then signal is received from a detector if the device connected to the camera sends about 0 1 VDC When the Active state of a port is set to High then signal is received from a detector if the device connected to the camera sends about 2 24 VDC The Output ports also can be modified at the Outputs tab The follo...

Страница 28: ...lling in the field Authentication required By selecting Enabled the authentication is obligatory when connecting to the RTSP stream SNMP Service enabled The SNMP service can be enabled or disabled Read community Password required for the camera properties on SNMP MIB file can be downloaded from here UPnP Allow discovery The device discovery provided by the UPnP protocol can be enabled or disabled ...

Страница 29: ...tness difference between the brightest and darkest point of the image Gamma It increases the contrast on the darker spots of the image thereby the details are more visible even in poor lighting conditions Sharpness It makes the details sharper or more blurred Saturation It defines the saturation of colors in the image Color temperature It adjusts the reddish bluish hue of the image Exposure mode I...

Страница 30: ...ode can be chosen manually or automatically Day night preference A preferred setting of day or night mode can be defined which is applied in case of automatic shifting 2D noise filter Noisy pixels are filtered based on the environment of a pixel 3D noise filter The deviation of the same pixels of frames in sequence is used to determine if the image is noisy Iris control The iris can be kept open a...

Страница 31: ... ideal settings for all cases they are to be considered as guidelines They show generally acceptable image settings for certain scenarios These pre set values are the following Surveillance General setting for basic motion detection and surveillance Traffic General setting for traffic observation ANPR fast traffic Ideal for fast traffic license plate reading ANPR slow traffic Recommended for slow ...

Страница 32: ...e adjusted separately as well as the quality of the thumbnail images also can be defined Frame rate control It can be enabled or disabled When it is disabled the camera operates with maximum FPS regardless of the other settings located on this interface After enabling it the following functions can be set Normal frame rate The frame rate of the camera in normal state Condition of reducing the fram...

Страница 33: ...n be fine tuned the Focus and the Zoom can be customized by using the corresponding buttons Autofocus The camera possesses autofocus By default the autofocus function is enabled but it can be disabled on the Settings tab with the Change focus when zooming option If the Change focus when zooming option is turned on the camera starts to look for the correct value by itself in order to achieve the sh...

Страница 34: ...r and general use of masks The Motion detector is a fundamental detector which regulates the motion based storage It cannot be deleted If you click on the detector then on the live stream a mask can be applied which can be set to exclusive or inclusive with the Masks Type option If the mask is set to Exclude then any recording will not be taken about the motion on the highlighted area If the mask ...

Страница 35: ...d by clicking on the Delete selection button located under the live stream Sensitivity It sets the sensitivity of the motion detector Trigger threshold It can be used to define the sufficient level of motion in the image in order to trigger the event Further filtering can be done with the previously set sensitivity conditions to determine the degree of action intensity which triggers recording The...

Страница 36: ...eads to missed reading cases Therefore the values between 50 70 are recommended Ignore same plate for s A time limit can be set for previously read license plate This value determines a waiting time in seconds before the license plate is read again Country preference The selected region is prioritized and read with higher confidence value by the license reading system While the license plates from...

Страница 37: ...is responsible for transmitting the events The following can be adjusted on the ANPR detector interface Name The name of the detector can be entered Description A brief description can be added to the detector Filter The system can be set to read exclusively certain license plates The ANPR detector must be defined separately The primary functions of the detector cannot be set at ANPR detector sect...

Страница 38: ...st proficient assistance so you can quickly get back to business Information regarding hardware software manuals and FAQ are easily accessible for customers who previously registered to enter the dedicated ATSS site Besides offering assistance the site is also designed to provide maximum protection while managing your business information and technical solutions utilized New User If this is your f...

Отзывы: