background image

3

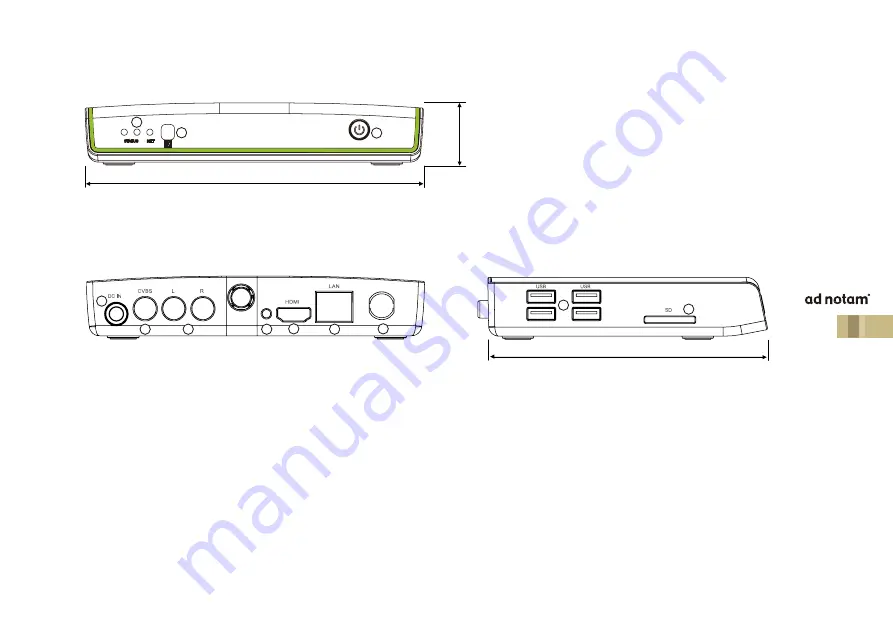
PRODUCT INFORMATION - INPUT / OUTPUT OVERVIEW

1.  Status LEDs
2.  IR receiver eye window
3.  Power button
4.  Power input, 1 x power adapter connector (12V DC / 1.5A)
5.  CVBS video output, 1 x RCA terminal, yellow
6.  Line audio output, 2 x RCA terminal, white (L), red (R)
7.  Reset button
8.  HDMI output, 1 x HDMI terminal
9.  LAN input, 1 x RJ45 terminal, RJ45 wire internet connector
10.  Wi-Fi, built in antenna
11.  USB input, 3 x external USB host, 1 x internal USB
12.  SD input, 1 x SD card slot

168mm / 6.61“

21mm / 0.83“

1

2

3

4

5

6

7

8

9

10

FRoNTVIEW

BACKVIEW

132mm / 5.20“

11

12

SIDEVIEW

Содержание DSTB-IPTV

Страница 1: ...DSTB IPTV USER MANUAL EN subject to modification errors and omissions excepted 09 2013 V1...

Страница 2: ...social media platforms It is ready to interact with all models of the ad notam Display Frame Unit DFU line and any monitor system that features an HDMI input port Before using the device please check...

Страница 3: ...x RCA terminal yellow 6 Line audio output 2 x RCA terminal white L red R 7 Reset button 8 HDMI output 1 x HDMI terminal 9 LAN input 1 x RJ45 terminal RJ45 wire internet connector 10 Wi Fi built in an...

Страница 4: ...e Use this port once you choose to connect to your network via wire Both options Wi Fi and Ethernet may be de activated independently within the Settings menu or during the Installation Wizard at init...

Страница 5: ...ation dependent Pg Pg Zoom in application dependent Pg Pg Back Pg Pg Menu mouse right click Pg Pg Home screen launcher Pg Pg Power toggle power on off Pg Pg Information notification Pg Pg Mute sound o...

Страница 6: ...or up Cursor down Cursor left Cursor right OK confirm selection Menu mouse right click Home screen launcher Back LED indicator NOTE Observe that the contact clip is connected correctly to the plus pol...

Страница 7: ...robot the Loading Screen shows the Android logo Upon your first startup of the DSTB IPTV the Installation Wizard will be displayed automatically Navigation Use the Cursor keys and Back key of your rem...

Страница 8: ...age The Installation Wizard will ask you to select your preferred language Once done execute the Next button to continue Display Position On demand you may adapt the image position and size Follow the...

Страница 9: ...rk at all you may skip this section by executing the Next button Ethernet Configuration If you choose to connect via Ethernet plug the network cable to the RJ45 port of the DSTB IPTV box and activate...

Страница 10: ...Wi Fi Configuration The DSTB IPTV has a built in wireless feature To activate it go to Wi Fi and toggle the switch in the upper right hand corner to ON The system will begin to scan for available net...

Страница 11: ...ct the ad notam Metro icon Subsequently execute Always to set the ad notam Metro launcher as your home screen Once done the ad notam home launcher will be displayed From the home screen you have sever...

Страница 12: ...Browser To navigate on the pages use the cursor keys on the remote control Press OK to click a link or to input into a field A soft keyboard will be displayed on the screen that enables you to enter...

Страница 13: ...from the All Apps list to a matching menu category In order to do so navigate to the app in question then press and hold the OK button until a pop up window appears Select the desired menu category an...

Страница 14: ...ns The most relevant settings have already been treated during the Installation Wizard The Settings menu features different quick launch icons such as links to the Network the Display Position or the...

Страница 15: ...A Standby 1W Media Player Local video playback incl MPEG 1 2 4 H 264 VC 1 WMV AVI MKV MOV etc Video Output Ratio 16 9 Video Resolution 1920 x 1080p Music Player Local music player incl MP3 WAV WMA etc...

Страница 16: ...icensing LLC ad notam MIRROR IMAGE and MAGIC MIRROR are licensed trademarks of ad notam This product parts components and the assembly are protected by or might be part of one or more of the following...

Отзывы: