background image

11

S002104 Action Row Go

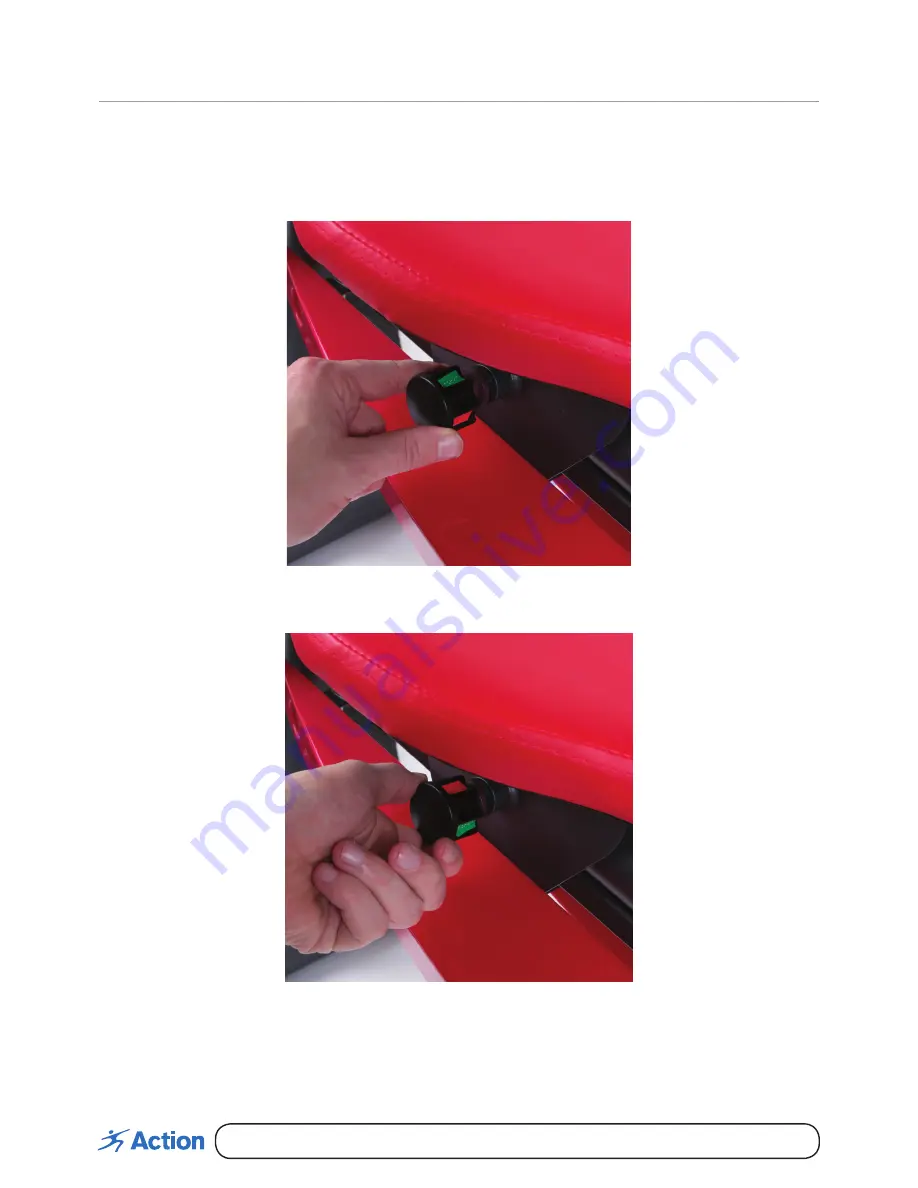
Use of the Adjustment Knob

SEAT

During your workout, if you want the seat to slide, the adjustment knob must be unlocked (green). To 
unlock the knob, simply pull the knob out towards you and turn to the unlock position.

If you would rather the seat to be fixed during your workout, simply pull the knob out towards you and 
twist until it reaches the locked (red) position. Release the knob to secure the position.

Содержание Row GO S002104

Страница 1: ... in injury or property damage Only use this product on a solid flat level surface The Action Row Go has a maximum user weight of 150kg Do now allow more than one person on the product at any time This product is designed for domestic use only it is not intended use in commercial training environments For parts and service enquiries please contact Action Spares on 1800 465 070 or e mail service act...

Страница 2: ...and Safety Instructions 5 User Safety 6 Parts List 7 Assembly Instructions 11 Use of the Adjustment Knob 13 Exercise Guidelines 14 Suggested Stretches 15 Training Zones 16 Exercise Phase 19 Different Types Of Grips 20 Digital Monitor 22 Warranty Information ...

Страница 3: ...k of serious injury read the entire manual before you assemble the Action Row Go Please keep this manual in a safe place for future reference Safe Disposal Of Product And Packaging UNPACKING Unpack the unit where it will be used Place the Action Row Go carton on a level flat surface When unpacking the unit remove any packaging materials from the interior Keep the original packaging carton and mate...

Страница 4: ...rways or corridors Do not leave in a garage outdoors on a covered patio or near water 6 Keep the Action Row Go indoors away from moisture and dust 7 Always use the Action Row Go on a flat level surface with at least 2 5m diameter of clear space surrounding the unit 8 Due to the heavy nature of the unit care must be taken when lifting and moving to another location Always use safe lifting technique...

Страница 5: ...Contagious skin diseases Recovering from an operation Neurological conditions Acute thrombosis Severe diabetes Epilepsy Pacemaker Tumours 1 This Action Row Go is not suitable for persons under the age of 15 2 Please keep children and pets away from the unit at all times 3 Do not allow more than one person on the product at any time 4 The Maximum User Weight for this product is 150kg 5 Do no place ...

Страница 6: ... Large Caps A 6 13 Wrench for nuts 1 14 Allen wrench 1 15 Screw A 1 16 Screw B 1 17 Screw C 1 18 Screw D 1 19 Nut No 1 1 20 Nut No 2 1 21 Nut No 3 1 22 Adjustment knob 2 23 Safety stopper 2 24 Seat mount 1 25 Pulley A 1 26 Pulley B 1 27 Large Caps B 2 28 Large Caps C 1 Part No Description Qty 29 Screw E 2 30 Screw F 4 31 Nut No 4 4 32 Washer 4 33 Adjustment Knob 1 34 End Caps 4 NOTE Some parts may...

Страница 7: ...rts to be sent to you NOTE Steps 1 3 and 7 parts are packed already assembled STEP 1 Place x2 Large Caps 12 to main support bar 1 Using Parts 24 25 26 and screw B 16 assemble the seat 7 to main support bar For safety purposes please ensure you lock the seat by adjusting the knob 22 STEP 2 Using screw D 18 place the front frame 2 and screw to main support Do the same for the back frame 3 and secure...

Страница 8: ...fety please ensure the piston is attached securely and placed in the correct position 21 21 10 10 11 5 5 4 1 C17 D18 D18 D18 D18 C17 STEP 4 Take screw D 18 and assemble the main handles x 2 5 and digital monitor 6 to the main support 21 21 10 10 11 5 5 4 1 C17 D18 D18 D18 D18 C17 Assembly Instructions cont ...

Страница 9: ... 15 attach handle to the main support Now using screw C 17 attach the top part of the piston to the handles 21 20 17 1 15 11 8 8 1 19 5 E29 STEP 6 Next using screw B 16 x 2 attach the back handles 8 x 2 to main support 21 20 17 1 15 11 8 8 1 19 5 E29 Assembly Instructions cont ...

Страница 10: ...0 F30 F30 STEP 8 Now place the small caps 11 x 4 and stoppers 23 onto the handles 34 23 23 34 32 32 31 34 32 31 1 1 9L 9R F30 F30 F30 Your Action Row Go should now be assembled Please ensure that all screws are tightened securely and all parts have been correctly attached before you begin your workout Assembly Instructions cont ...

Страница 11: ...djustment knob must be unlocked green To unlock the knob simply pull the knob out towards you and turn to the unlock position If you would rather the seat to be fixed during your workout simply pull the knob out towards you and twist until it reaches the locked red position Release the knob to secure the position ...

Страница 12: ...RAME To adjust the height of the Action Row Go simply turn the knob counter clockwise pull it towards you and adjust rower to desired level Release the adjustment knob so that the bolt is inserted in the hole and turn it once again clockwise to tighten the leg base ...

Страница 13: ...rcise A warm up increases your body temperature heart rate and circulation in preparation for exercise Training Zone Exercise Exercise for 20 to 30 minutes with your heart rate in your desired training zone During the first few weeks of your exercise program do not keep your heart rate in your desired training zone for longer than 20 minutes Breathe regularly and deeply as you exercise never hold ...

Страница 14: ... 3 CALF ACHILLES STRETCH With one leg in front of the other reach forward and place your hands against a wall Keep your back leg straight and your back foot flat on the floor Bend your front leg lean forward and move your hips toward the wall Hold for 15 counts then relax Repeat 3 times for each leg To cause further stretching of the achilles tendons bend your back leg as well Stretches Calves ach...

Страница 15: ... short term fatigue and increases your cardiovascular fitness quickly You will feel VERY stressed in this zone and will be sweating heavily WARNING Training in the RED ZONE is extremely difficult and should only be attempted by experienced individuals Only train in the RED ZONE for short bursts of activity 20 seconds 2 minutes ORANGE ZONE Training in the ORANGE ZONE helps improve your general card...

Страница 16: ...difficult ROWING Sit on the seat place your feet on the pedals Hold the row bar with an overhand grip Correct rowing form consists of three phases 1 The first phase is the CATCH Slide the seat forward until your knees are slightly bent Pull the row bar until your hands are above your feet 2 The second phase is the DRIVE Push backward with your legs Lean back slightly at the hips not at the waist k...

Страница 17: ...our hands are slightly wider than your shoulders lower yourself by bending your elbows until you reach chest level Push yourself back up through your hands to the start position AB CURLS Using the back handles place both hands on the bars and your knees on the seat Slide the seat up and down to complete the motion Exercise Phase cont ...

Страница 18: ...asten your feet onto the back handles Lift your torso into a sitting position to complete the abdominal crunch ARM DIPS Using the back handles place your hands on the bars and keep your legs at a 90 degree angle Slowly bend your elbows to lower body towards the floor and push yourself back up to complete the exercise ...

Страница 19: ...s whilst using the machine you could be targeting different muscle groups which will improve your workout and help build your fitness levels Please see diagram below to show what exercises can be done using the machine Main Handlebars Back and Triceps Back and Triceps Core and Arms Ab Curls Arm Dips Push Ups Ab Curls Back Handlebars Arm Dips Biceps and Laps ...

Страница 20: ...ries COUNT Displays the number of repetitions you complete during your workout NUMBERS MIN This function counts the number of repetitions per minute HOW IT WORKS 1 ON The monitor turns on when you press the red button or when you start exercising Press the red button repeatedly until you see the function you want to display on the screen or select SCAN mode so that the functions appear on the scre...

Страница 21: ...must be inserted according to the correct polarisation and If the Row Go is not going to be used for a long period of time we recommend the battery is removed WARNING To prevent battery leakage Be sure to insert the battery correctly and always follow the battery manufacture s instructions Never mix alkaline standard or rechargeable batteries Use only batteries of the same or equivalent type as re...

Страница 22: ...l purchaser from the date of purchase Please keep your receipt tax invoice or other proof of purchase This warranty does not extend to any damage to a product caused by abuse improper or abnormal usage or repairs not provided by us or our Service Centre Nor does this warranty extend to products used for commercial or rental purposes This warranty does not cover ordinary wear tear and weathering fa...

Страница 23: ...red The sending of replacements spare parts or the cost of repair carried out will be organised and covered by the Service Centre If collection of the item is required this will be organised by the Service Centre and at our expense Do not return any products without authorisation as this will be at your expense Our Service Centre has been set up to provide assembly assistance replacement parts and...

Отзывы: