background image


5

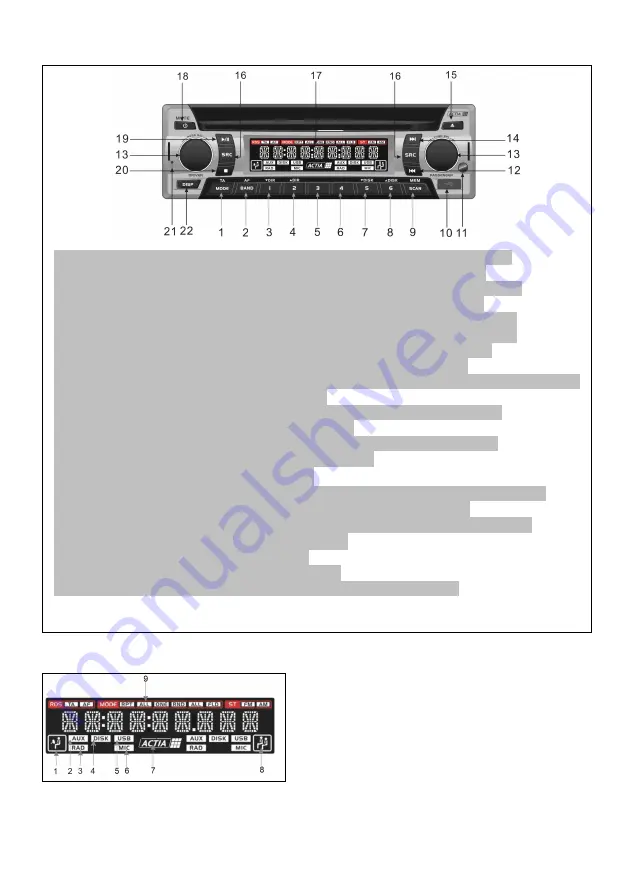
Locations of Parts (Main unit)   

 
Locations of Parts (LCD Display) 


1 Driver ICON    Indicate DRIVER as selected area                   
2 AUX ICON      Indicate the selection of AUX 
3 RAD ICON   

Indicate the selection of RADIO   

4 DISK ICON       Indicate the selection of DISK 
5 USB ICON        Indicate the selection of USB 
6 MIC ICON         Indicate the selection of Microphone 
 
7 ACTIA LOGO     

Displays 

animation 

when 

loading the disc 
8 Passenger ICON   

Indicate PASSENGER as selected area 

9 MODE ICON   

Indicate the playback selected MODE (repeat /random) 


1

 TA / MODE


Select the play MODE and Activate TA function for RDS 

2

 AF / BAND            Select the frequency band and Activate AF for RDS 

3

 1/

DIR


Memorize a new station and Select lower directory             

4

 2/

DIR


Memorize a new station and Select upper directory 

5

 3                              Memorize a new station and select the memorize station 

6

 4                                Memorize a new station and select the memorize station 

7

 5/

DISK

                Memorize a new station / Arrow Down during menu   

8

 6/

DISK

                Memorize a new station / Arrow Up during menu 

9

 SCAN /MEM       

Scan & Auto-memorization for radio station and Preview music file 

10 

USB PORT           Insert the USB pen drive 

11

 Remote Sensor    Receive the infra-red signal from the remote controller 

12


                            Fast advance/Next track/file   

13

 PUSH SEL            Adjust volume and setup audio (Passenger or Driver) 

14


                          Fast rearward/Previous track/file 

15


0


Eject/Reinsert the disk 

16

 SRC                   

Select the audio source for the respective side (PSG or DRV) 

17

 LCD Display        Display info about the current state of equipment 

18

 POWER/MUTE    Turn the power on/off when held for 2s; Mute when pushed 

19


B


Play/pause the reproduction 

20


Stop the reproduction 

21

 RESET                  Reset the unit by hardware 

22

 DISP                      Change the info that displayed on LCD/Monitor 


Содержание ACT500

Страница 1: ...1 USER MANUAL ACT500 DVD SVCD VCD CD MP3 MP4 RADIO MIC Player with USB Input ...

Страница 2: ...OL 6 3 GENERAL OPERATIONS 7 3 1 AUXILIARY SOURCE AUX 8 3 2 DISK SOURCE DISK USB SOURCE USB 8 3 2 1 LISTENING TO CD MP3 9 3 2 2 PLAYING USB MUSIC MOVIES 10 3 2 3 PLAYING DVD VIDEO 10 3 2 4 PLAYING VCD SVCD 11 3 3 RADIO SOURCE RAD 12 3 4 MICROPHONE SOURCE MIC 13 4 OSD SETUP MENU 14 5 TECHNICAL SPECIFICATIONS 16 ...

Страница 3: ...ossible to scan memorize or select Radio stations and use the RDS main functions Microphone for GUIDE or DRIVER auto selectable Two microphones can be plugged into the equipment GUIDE and DRIVER The MIC source is auto selected when the microphone switch is on Only one can be used at time having priority the DRIVER MIC over the GUIDE MIC PAL BG NTSC compatibility This unit is PAL BG NTSC system com...

Страница 4: ...the safe place as you may need it in future to remove the unit from the vehicle 2 2 ELECTRICAL CONNECTIONS The rear electrical connections are detailed in the drawing below NOTE ACC Red must be connected by car ignition key in order to avoid that car battery becomes weak when the car will be not used for long period Maintenance FUSE REPLACEMENT If the fuse blows check the power connection and repl...

Страница 5: ...rectory 5 3 Memorize a new station and select the memorize station 6 4 Memorize a new station and select the memorize station 7 5 DISK Memorize a new station Arrow Down during menu 8 6 DISK Memorize a new station Arrow Up during menu 9 SCAN MEM Scan Auto memorization for radio station and Preview music file 10 USB PORT Insert the USB pen drive 11 Remote Sensor Receive the infra red signal from the...

Страница 6: ...ntrol will only work on ACT500 player IMPORTANT The remote control is a dual frequency type which will only work with the selected product ACT501 or ACT500 by using the keys 500 or 501 2 3 REMOTE CONTROL Installing the battery Slide the tray out on the back of the remote control and insert the battery with the and minus poles pointing in the proper direction When use for the first time pull out th...

Страница 7: ... Once one area is selected the respective icon DRV or PSG will light on and from then on all the operations on the other keys will only affect this area To select permanently some area the rotary volume button should be pushed To change volume audio settings or source of any area it is just necessary to access directly the corresponding keys Once the parameters are set the previous area will be re...

Страница 8: ... AUTO system Reset Reset button is placed on the left of front panel The reset button is to be activated for the following reason Initial installation of the unit when all wiring is completed All the function buttons do not operate Error symbol on the display 3 1 AUXILIARY SOURCE AUX Source selection Push the SCR key until AUX icon is selected and the AUX input broadcast will be reproduced Audio B...

Страница 9: ...int just release holding or on the head unit or press B on remote control 2 To skip back or forward to another track press or 3 To pause playback pressB on head unit pressB button again to resume or press B to pause on remote control Press it again to resume 4 To stop playback press Note When MP3 disc is inserted all track file names will be displayed on the monitor screen with their corresponding...

Страница 10: ...pause on remote control Press it again to resume 6 To stop playback press When you stop DVD playback that location on the disc is memorized enabling playback from that point when you play the disc again To resume playback press B key Specifying Title Chapter Press NUMBER corresponding to a desired title chapter number during playback The number is displayed and playback starts from the selected ti...

Страница 11: ...rent chapter MODE RPT ALL Repeat the title in the current disk MODE RND ALL Play randomly the chapters inside the current disk MODE _________ No mode selected Zooming during playback You can zoom into the picture during playback 1 Press ZOOM on the remote control during playback 2 Every time you press this button the unit will zoom 2 3 4 1 2 1 3 1 4 times and OFF Go back to Main Menu You can go ba...

Страница 12: ...te control repeatedly Slow motion playback Step playback mode Fast rearward forward Zooming Refer to PLAYING DVD VIDEO chapter Selecting Play Mode Program Playback Refer to CD MP3 chapter 3 3 RADIO SOURCE RAD Source selection Push the SCR key until RAD icon is selected BAND sel Select the desired BAND RANGE by pressing BAND AF key Indications FM1 FM2 FM3 AM1 AM2 are successively displayed on the s...

Страница 13: ...ch for a radio station alternative frequency when the current frequency can no longer be tuned If no alternative frequency is found the radio will stop searching after a while To enable disable the TA function hold BAND AF key for 3s till you see the icon turns on off on the LCD 3 4 MICROPHONE SOURCE MIC Source selection The MIC audio source is automatically selected for both PASSENGER and DRIVER ...

Страница 14: ...FF OFF SCREEN SAVER ON OFF ON GENERAL SETUP PAGE LOGO TYPE DEFAULT CAPTURED DEF BRIGHTNESS 20 to 20 0 CONTRAST 20 to 20 0 SATURATION 20 to 20 0 VIDEO SETUP PAGE HUE 20 to 20 0 DOWNMIX LT RT STEREO STEREO DUAL MONO STEREO MONO L MONO R MIX MONO MIX MONO SPEAKER SETUP PAGE DYNAMIC RANGE OFF TV DISPLAY NORMAL PS NORMAL LB WIDE WIDE TV TYPE NTSC PAL MULTI NTSC AUDIO ENGLISH FRENCH GERMAN SPANISH ITALI...

Страница 15: ...A logo can be restored by selecting Logo Type DEFAULT on SETUP menu AUDIO ONLY function This function disables the video output allowing only the audio to be listened This function can be set by pushing AUDIO ONLY key on remote control CAN2 0B interface The product is equipped with CAN2 0B interface which allows it to be connected and commanded by external devices such as steering wheel keys dashb...

Страница 16: ...ower supply Consumption 1mA RELAY OUT Open Collector Transistor Activated when Any of the VIDEO Outputs has video signal The output is kept active during equipment STAND_BY in case Audio By Pass function page 8 is enabled Open Collector Transistor Disabled when RADIO is selected in both zones Maximum withdraw current 200mAdc DIMMING Nominal Activation Voltage 14Vdc or 28Vdc 5Vdc Maximum Withstandi...

Страница 17: ...ls o Bass freq 100Hz Gain 10dB o Treble freq 10kHz Gain 10dB o Loudness Gain 7dB RADIO PERFORMANCE Regions ASIA EUROPE FM range 87 50MHz to 108 00MHz step 0 05MHz AM range 522 KHz to 1620KHz step 9KHz AMERICAS FM range 87 50MHz to 108 00MHz step 0 10MHz AM range 520 KHz to 1710KHz step 10KHz FM TUNER Signal to Noise Ratio IEC A network 55dB Usable Sensitivity 13dBµV 4 4µV 75Ω mono S N 30dB AM TUNE...

Страница 18: ...lation Position Angle According illustrated below Installation angles allowed DVD CD PLAYER Compact Disks CD R CD RW DVD Disks DVD R R RW RW R DL USB PORT Memory read capacity there is no limit for the memory of the device the limit is the quantity of files and folders stored Number of files read capacity Max 3000 files Number of folders read capacity Max 254 folders Format FAT32 Power supply maxi...

Страница 19: ...10 beta2 Subtitles srt smi ssa sub AVI AVI DIVX XVID etc AVI v1 x ASF ASF WMA OGG ASF v1 x Plays only audio part CONTAINER Quick Time MP4 M4A Should have Full support on 1 Nero Recoder recorded mp4bitstreams Nero Digital ver1 5 1 6 2 iTune converted AAC Audio bitstreams Should have Possible support on 3 QuickTime ISO 14496 1 mpeg4 file format CD CD DA HDCD CD G AAC M4A MP3 MP3 AUDIO WMA WMA WMA7 W...

Отзывы: