


33
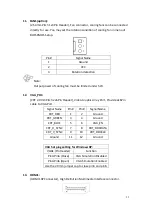
2.4 Jumpers Setting and Connectors
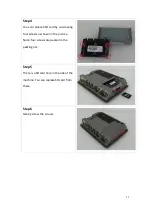
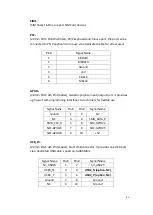
1.
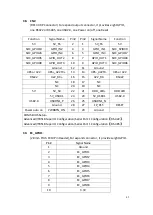
U2:
(FCBGA1170), onboard Intel Bay trail-I/M Processors.
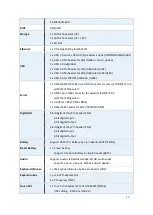
Model
Processor
Number
PBF
Cores/Threads
TDP
Remarks
SBC-7111-E3845-2G
E3845
1.91GHz
4 / 4
10W
SBC-7111-E3845-4G
E3845
1.91GHz
4 / 4
10W
Option
SBC-7111-N2930-2G
N2930
1.83 up to
2.16GHz
4 / 4
4.5 /
7.5W
Option
SBC-7111-N2930-4G
N2930
1.83 up to
2.16GHz
4 / 4
4.5 /
7.5W
Option
SBC-7111-E3815-2G
E3815
1.46GHz
1 / 1
5W
Option
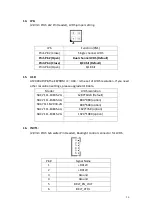
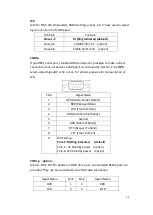
2.
H3/H4/H5/H6 (option):
U2 Heat Sink Screw holes, four screw holes for Intel Bay trail-I/M Processors
Heat Sink assemble.
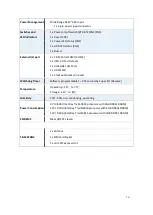
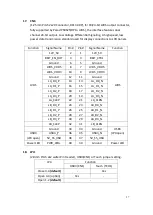
3.
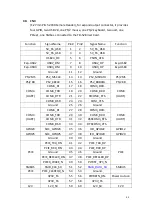
U3/U4/U5/U6:
(FBGA96), Onboard DDR3L Memory.
Model
Memory
SBC-7111-E3845-2G
2GB
SBC-7111-N2930-2G
2GB (option)
SBC-7111-E3815-2G
2GB (option)
SBC-7111-E3845-4G
4GB (option)
SBC-7111-N2930-4G
4GB (option)
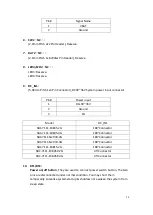
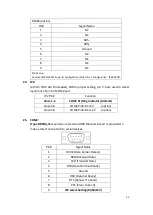
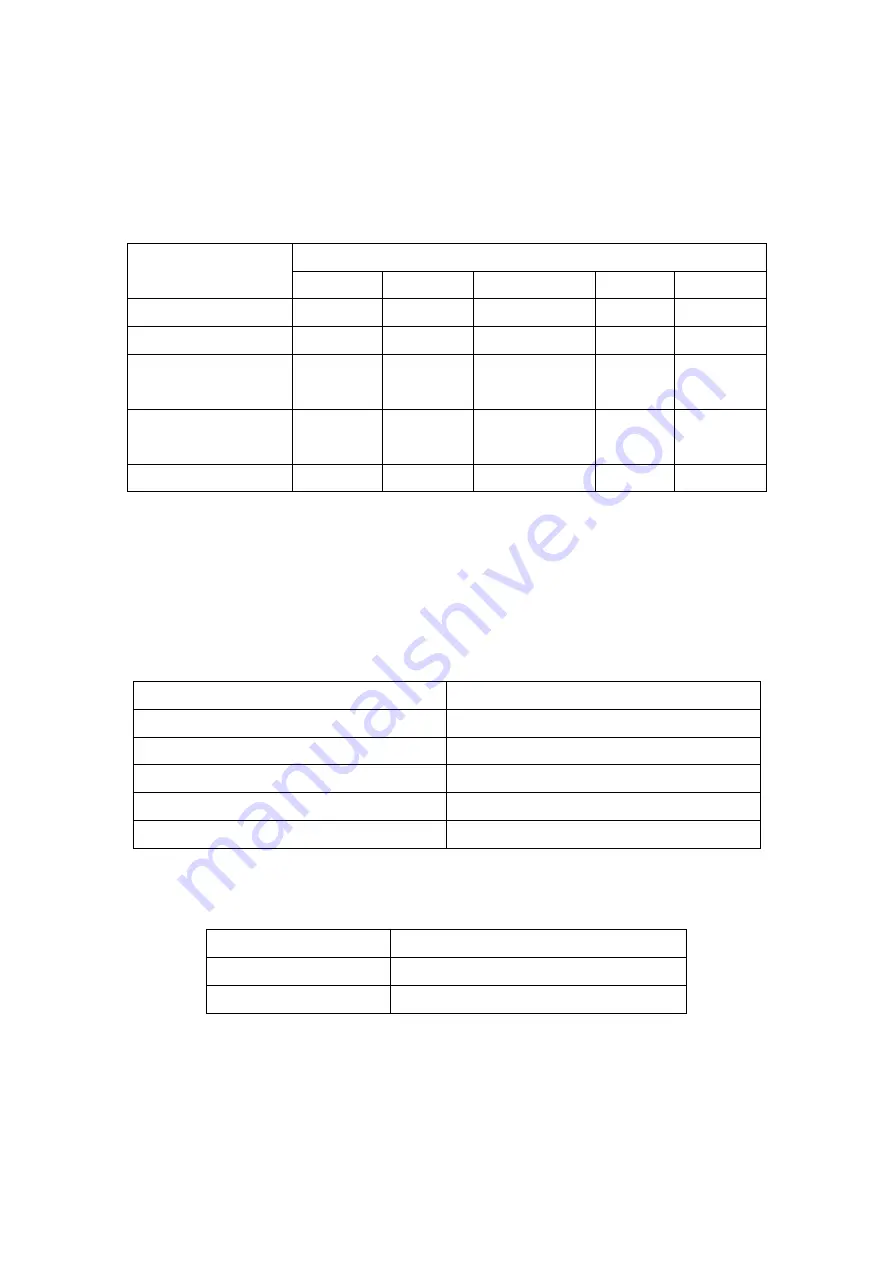
4.
S-422 (PIN6):
(Switch), ATX Power and Auto Power on jumper setting
.
S-422(Switch)
Mode
Pin6 (Off)
ATX Power
Pin6 (On)
Auto Power on (Default)
5.
BAT1:
(1.25mm Pitch 1x2 Wafer Pin Header) 3.0V Li battery is embedded to provide
power for CMOS.
Содержание PC9 A Series
Страница 12: ...11 1 3 Dimensions Figure 1 1 Dimensions of PC9070 Figure 1 2 Dimensions of PC9080...
Страница 13: ...12 Figure 1 3 Dimensions of PC9101 Figure 1 4 Dimensions of PC9120...
Страница 14: ...13 Figure 1 5 Dimensions of PC9150A Figure 1 6 Dimensions of PC9156A Resistive Touch...
Страница 15: ...14 Figure 1 7 Dimensions of PC9156A Projected Capacitive Touch Figure 1 8 Dimensions of PC9170A...
Страница 16: ...15 Figure 1 9 Dimensions of PC9185A Figure 1 10 Dimensions of PC9215A Resistive Touch...
Страница 17: ...16 Figure 1 11 Dimensions of PC8215A Projected Capacitive Touch...
Страница 19: ...18 Figure 1 13 Rear View of PC9170 9180 Figure 1 14 Rear View of PC9101...
Страница 20: ...19 Figure 1 15 Rear View of PC9120 Figure 1 16 Rear View of PC9150A...
Страница 21: ...20 Figure 1 17 Rear View of PC9156A Figure 1 18 Rear View of PC9170A...
Страница 22: ...21 Figure 1 19 Rear View of PC9185A Figure 1 20 Rear View of PC9215A...
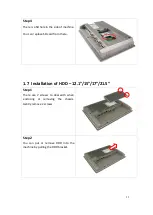
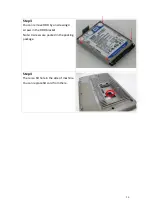
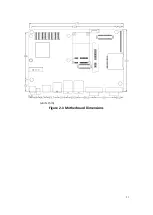
Страница 32: ...31 units mm Figure 2 1 Motherboard Dimensions...
Страница 63: ...62 3 3 Main Settings System Time Set the system time the time format is Hour 0 to 23 Minute 0 to 59...
Страница 83: ...82 Step 3 Read license agreement Click Yes Step 4 Click Next...
Страница 84: ...83 Step 5 Click Install Step 6 Click Install...
Страница 85: ...84 Step 7 Click Next Step 8 Click Yes I want to restart this computer now Then click Finish...
Страница 88: ...87 Step 5 Click Install to begin the installation Step 6 Click Finish to exit the wizard...
Страница 90: ...89 Step 3 Click Yes I want to restart my computer now Click Finish to complete the installation...
Страница 92: ...91 Step 3 Read the license agreement Then click Yes to continue Step 4 Click Next to continue...
Страница 95: ...94 Step 2 Select Resistive Touch Step 3 Click Next to continue...
Страница 97: ...96 Step 6 Wait for installation Then click Next to continue Step 7 Click Continue Anyway...
Страница 99: ...98 Step 2 Select Projected Capacitive Step 3 Click Next to continue...
Страница 100: ...99 Step 4 Select I accept the terms of the license agreement Click Next Step 5 Click Install RS232 interface driver...
Страница 101: ...100 Step 6 Select None Click Next Step 7 Click OK Step 8 Click Support Muti Monitor System Click Next...
Страница 102: ...101 Step 9 Go to C Program Files eGalaxTouch Click Next Step 10 Click Next...
Страница 109: ...108 About This panel displays information about the PenMount controller and driver version...
Страница 120: ...119 Hardware Saturn Hardware Configuration...
Страница 121: ...120 About To display information about eGalaxTouch and its version...