background image

ESP

AÑOL

- 36 -

4.

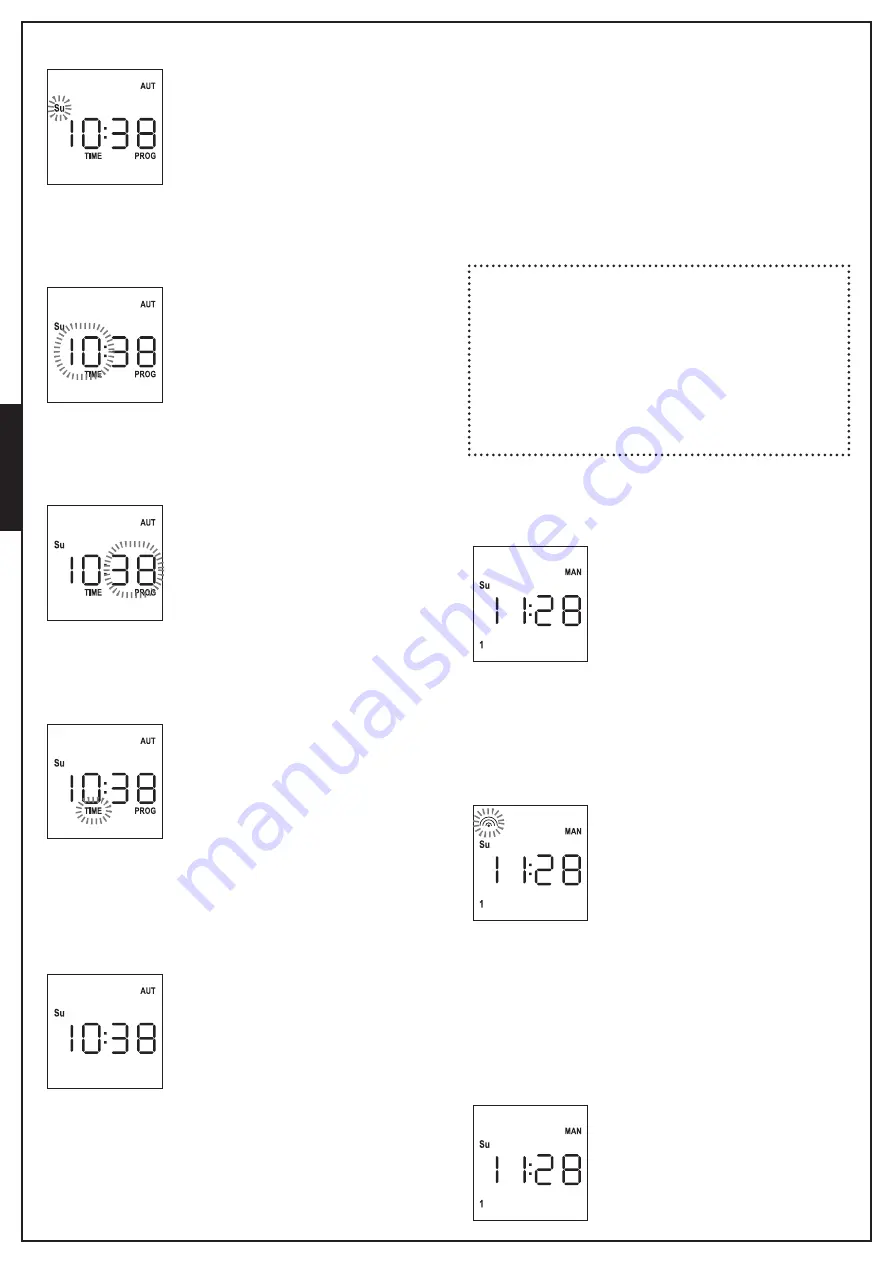
  Pulsar la tecla 

MENÚ

, el icono del día (ej. Su) parpadea

5.

  Ajustar el día correcto mediante las teclas 

UP

 y 

DOWN

 y 

pulsar la tecla MENÚ para confirmar. 
Las cifras de las horas parpadean:

6.

  Ajustar la hora mediante las teclas 

UP

 y 

DOWN

 y pulsar la 

tecla MENÚ para confirmar. 
Las cifras de los minutos parpadean:

7.

  Ajustar los minutos mediante las teclas UP y DOWN y pulsar la 

tecla MENÚ para confirmar. 
La palabra TIME parpadea durante 10 segundos.

Si se desea modificar de nuevo la hora pulsar la tecla 

MENÚ

 y

repetir el procedimiento desde el punto 4 en adelante.

Si los ajustes son correctos, esperar 10 segundos: los iconos 

TIME

PROG

 se apagan, los nuevos parámetros se memorizan y la

pantalla vuelve a la visualización normal.

LÓGICA DE FUNCIONAMIENTO 
MANUAL

La lógica de funcionamiento manual del mando a distancia TX 
PLUS 12D permite controlar directamente las automaciones 
usando los botones.

UP  

transmite vía radio un mando de apertura

STOP

   transmite vía radio un mando de parada

DOWN

  transmite vía radio un mando de cierre

SELC 

  selecciona el canal de radio deseado (de 1 a 12)

SELG  

selecciona el grupo de canales deseado (de 1 a 8)

Para controlar las diversas automaciones es necesario memorizar 
TX PLUS 12D en los diversos dispositivos.

NOTA: memorizar los canales con una cierta lógica para 
simplificar la gestión de las automaciones y la creación de 
los grupos.

Para memorizar TX PLUS 12D en las centrales de mando seguir 
el procedimiento descrito en el manual de instrucciones adjunto 
a las centrales de mando.

1.

  El mando a distancia debe estar en modalidad MANUAL. 

Si está en modalidad AUTOMÁTICA pulsar la tecla 

SELC


durante 10 segundos, la pantalla muestra (ejemplo):

2.

  Seleccionar el canal de radio mediante la tecla 

SELC

 o el 

grupo mediante la tecla 

SELG

 y transmitir el mando deseado 

mediante las teclas 

UP-STOP-DOWN

La pantalla muestra:

AJUSTE DE LOS GRUPOS

Para ajustar los grupos de automatismos a controlar en modalidad
MANUAL proceder del siguiente modo:

1.

  El mando a distancia debe estar en modalidad MANUAL. 

Si está en modalidad AUTOMÁTICA pulsar la tecla 

SELC


durante 10 segundos, la pantalla muestra (ejemplo):

Содержание TX PLUS 12D

Страница 1: ...12 CANALI 434 15 MHZ CON DISPLAY E FUNZIONE TIMER 12 CHANNELS 434 15 MHZ TRANSMITTER WITH DISPLAY AND TIMER FUNCTION TRANSMETTEUR 12 CANAUX 434 15 MHZ AVEC CRAN ET FONCTION TIMER TRANSMISOR 12 CANALE...

Страница 2: ......

Страница 3: ...attivare il sensore di sole e pu essere gestita sia in modalit automatica che in manuale SUN OFF OFF Viene disabilitato l intervento dell anemometro sui motori centrali di comando selezionati In modal...

Страница 4: ...N trasmette via radio un comando di chiusura SELC seleziona il canale radio desiderato da 1 a 12 o tutti i canali cambia la logica di funzionamento da MANUALE a AUTOMATICA pressione continua del tasto...

Страница 5: ...dalit ENERGY SAVING attiva il display si spegne per ridurre i consumi e si riaccende nelle seguenti condizioni Quando premo un pulsante qualsiasi Quando si verifica un evento modalit AUTOMATICA Il dis...

Страница 6: ...rtura STOP trasmette via radio un comando di stop DOWN trasmette via radio un comando di chiusura SELC seleziona il canale radio desiderato da 1 a 12 SELG seleziona il gruppo di canali desiderato da 1...

Страница 7: ...GRUPPI 1 Selezionare il gruppo da cancellare tramite il tasto SELG 2 Tenere premuto il tasto SELG fino a quando i canali del gruppo lampeggiano per 2 secondi e poi si spengono Il gruppo stato eliminat...

Страница 8: ...esi 10 Impostato il canale 12 premere MENU per confermare L icona relativa all evento di apertura lampeggia NOTA se per errore non ho attivato nessun canale la programmazione riparte dal punto 8 11 Se...

Страница 9: ...premere e rilasciare il tasto SELG 6 Per cambiare giorno premere e rilasciare il tasto SELC 7 Per uscire dalla modalit di visualizzazione eventi aspettare 10 secondi senza premere nessun pulsante il...

Страница 10: ...restano accesi 12 Impostato il canale 12 premere MENU per confermare L icona relativa all evento di apertura lampeggia NOTA se per errore non ho attivato nessun canale la programmazione riparte dal p...

Страница 11: ...a al punto 9 per copiare l evento in altri giorni 13 Terminata la copia degli eventi aspettare 30 secondi senza premere nessun pulsante TX PLUS 12D esce automaticamente dalla programmazione e il displ...

Страница 12: ...lare l evento tramite i tasti UP DOWN e premere MENU per confermare Il display visualizza l evento numero 1 5 Selezionare l evento da cancellare 6 Premere il tasto MENU per confermare la scritta Edit...

Страница 13: ...manage up to 8 groups SUN function ON OFF This function is used to enable or disable the sun sensor and can be managed in either automatic or manual mode SUN OFF OFF The intervention of the anemomete...

Страница 14: ...Transmits by radio a stop command DOWN Transmits by radio a closing command SELC Selects the desired radio channel 1 to 12 or all channels Changes the operating logic from MANUAL to AUTO continuous pr...

Страница 15: ...nute When the ENERGY SAVING mode is active the display turns off to save power and turns on in the following conditions When you press any key When an event occurs AUTO mode The display shows example...

Страница 16: ...ommand STOP transmits by radio a stop command DOWN transmits by radio a closing command SELC selects the desired radio channel 1 to 12 SELG selects the desired channel group 1 to 8 To control the diff...

Страница 17: ...Groups DELETING GROUPS 1 Select the group to be deleted by pressing SELG 2 Hold down the SELG key until the channels of the group blink for 2 seconds and then go off The group has been deleted AUTOMAT...

Страница 18: ...y When channels are activated they stay on 10 After setting channel 12 press MENU to confirm The opening event icon blinks NOTE If you accidentally have not activated any channel programming restarts...

Страница 19: ...n the same day press and release the SELG key 6 To change the day press and release the SELC key 7 To quit the event viewing mode wait 10 seconds without pressing any buttons the display returns to no...

Страница 20: ...annels are activated they stay on 12 IAfter setting channel 12 press MENU to confirm The opening event icon blinks NOTE If you accidentally have not activated any channel programming restarts from ste...

Страница 21: ...conds programming returns to step 9 to copy the event to other days 13 After copying the event wait for 30 seconds without pressing any keys TX PLUS 12D automatically quits programming and the display...

Страница 22: ...ou want to delete the event by using the UP DOWN keys and press MENU to confirm The display will show event number 1 5 Select the event to be deleted 1 to 5 6 Press the MENU key Edit blinks 7 Press th...

Страница 23: ...n SOLEIL ON OFF Cette fonction sert activer ou d sactiver le capteur de soleil elle peut tre g r e aussi bien en modalit automatique qu en manuel SUN OFF OFF L intervention de l an mom tre sur les mot...

Страница 24: ...smet via radio une commande de fermeture SELC s lectionne le canal radio souhait de 1 12 ou tous les canaux change la logique de fonctionnement de manuel AUTOMATIQUE pression continue de la touche pen...

Страница 25: ...la modalit ENERGY SAVING active l cran s teint afin de r duire les consommations et se rallume dans les conditions suivantes si n importe quelle touche est press e si un v nement se produit modalit A...

Страница 26: ...via radio une commande d arr t DOWN transmet via radio une commande de fermeture SELC s lectionne le canal radio souhait de 1 12 SELG s lectionne le groupe de canaux souhait de 1 8 Pour commander les...

Страница 27: ...pe supprimer au moyen de la touche SELG 2 Maintenir la touche SELG enclench e jusqu ce que les canaux du groupe clignotent pendant 2 secondes puis s teignent Le groupe a t supprim LOGIQUE DE FONCTIONN...

Страница 28: ...anal 12 configur presser MENU pour confirmer L ic ne relative l v nement d ouverture clignote NOTE si par erreur aucun canal n a t activ la programmation repart du point 8 11 S lectionner l v nement s...

Страница 29: ...jour presser et rel cher la touche SELG 6 Pour changer de jour presser et rel cher la touche SELC 7 Pour sortir de la modalit d affichage des v nements attendre 10 secondes sans toucher aucun bouton...

Страница 30: ...llum s 12 Une fois le canal 12 configur presser MENU pour confirmer L ic ne relative l v nement d ouverture clignote NOTE si par erreur aucun canal n a t activ la programmation repart du point 8 13 S...

Страница 31: ...tion revient au point 9 pour copier l v nement sur d autres jours 13 Une fois termin e la copie des v nements attendre 30 secondes sans toucher aucun bouton TX PLUS 12D sort automatiquement de la prog...

Страница 32: ...imer l v nement avec les touches UP DOWN et presser MENU pour confirmer L cran affiche l v nement num ro 5 S lectionner l v nement supprimer 1 5 6 Presser la touche MENU le message Edit clignote 7 Pre...

Страница 33: ...or de sol y puede gestionarse tanto en modalidad autom tica como manual SUN OFF OFF Se desactiva la intervenci n del anem metro en los motores centrales de mando seleccionados En modalidad autom tica...

Страница 34: ...a radio un mando de parada DOWN Transmite v a radio un mando de cierre SELC Selecciona el canal de radio deseado de 1 a 12 o todos los canales Cambia la l gica de funcionamiento de MANUAL a AUTOM TICA...

Страница 35: ...la modalidad ENERGY SAVING est activa la pantalla se apaga para reducir el consumo y se enciende de nuevo en las siguientes condiciones Al pulsar cualquier bot n Cuando se verifica un evento modalidad...

Страница 36: ...a radio un mando de parada DOWN transmite v a radio un mando de cierre SELC selecciona el canal de radio deseado de 1 a 12 SELG selecciona el grupo de canales deseado de 1 a 8 Para controlar las diver...

Страница 37: ...ea borrar mediante la tecla SELG 2 Mantener pulsada la tecla SELG hasta que los canales del grupo parpadean durante 2 segundos y luego se apagan El grupo ha sido eliminado L GICA DE FUNCIONAMIENTO AUT...

Страница 38: ...0 Una vez ajustado el canal 12 pulsar MEN para confirmar El icono relativo al evento de apertura parpadea NOTA si por error no he activado ning n canal la programaci n parte del punto 8 11 Seleccionar...

Страница 39: ...la tecla SELG 6 Para cambiar de d a pulsar y soltar la tecla SELC 7 Para salir de la modalidad de visualizaci n de eventos esperar 10 segundos sin pulsar ning n bot n la pantalla vuelve a la visualiza...

Страница 40: ...didos 12 Una vez ajustado el canal 12 pulsar MEN para confirmar El icono relativo al evento de apertura parpadea NOTA si por error no he activado ning n canal la programaci n parte del punto 8 13 Sele...

Страница 41: ...amaci n vuelve al punto 9 para copiar el evento en otros d as 13 Una vez copiados los eventos esperar 30 segundos sin pulsar ning n bot n TX PLUS 12D sale autom ticamente de la programaci n y la panta...

Страница 42: ...r el evento mediante las teclas UP DOWN y pulsar MEN para confirmar La pantalla muestra el evento n mero 1 5 Seleccionar el evento a borrar 1 5 6 Pulsar la tecla MEN la palabra Edit parpadea 7 Pulsar...

Страница 43: ......

Страница 44: ...ACM International srl Via Oros 2 g 00071 Pomezia Rm Italy Tel 39 06 91629901 info acm it www acm it...

Отзывы: