Automation Components, Inc.
2305 Pleasant View Road | Middleton, WI 53562
Phone:
1-888-967-5224 |
Website:
workaci.com
Page 3
THERMOWELL INSTALLATION
ACI’s standard Immersion sensors are made to
install into a ½” NPT female thread. Typically a
Threadolet or Tee is installed into the pipe, but a
hole can also be drilled and tapped. The
pipe/system will need to be drained, unless a Hot
Tap is being used. The recommend drill size is
23/32 in. (18 mm). Drill the hole, and tap the hole
with ½”-14NPT.
Always use proper thread sealants on tapered
pipe threads of the thermowell. Screw the
thermowell into the Threadolet, Tee, or tapped
hole, using a wrench to tighten it firmly. Refill the
system and check for leaks.
Best practice is to apply thermal grease to the end
of the probe, but not required. Insert and push
the sensor probe into the thermowell. Turn the
sensor probe assembly clockwise to tighten
down completely.
Open the cover of the enclosure. Refer to the
wiring instructions (p. 1) to make necessary
connections. After wiring, attach the cover to the
enclosure.
PROBE INSERTION
The “-INW” includes a standard ½” NPS process
thread to be used with a machined thermowell or
previously installed thermowell. Verify the existing thermowell insertion length of the pipe is suitable for
your selected Immersion.
If the length of the probe is too large, the probe may be pressed into its enclosure - up to an inch of
clearance.
Note:
*Fabricated (welded) thermowells (-I) are not intended for moving water or high pressure service.
Fluid velocity and wake frequency are primary factors in well failure. Machined thermowells (-IM) should be
used in these types of applications. Fabricated thermowells are intended for tank, or low to no flow,
applications.
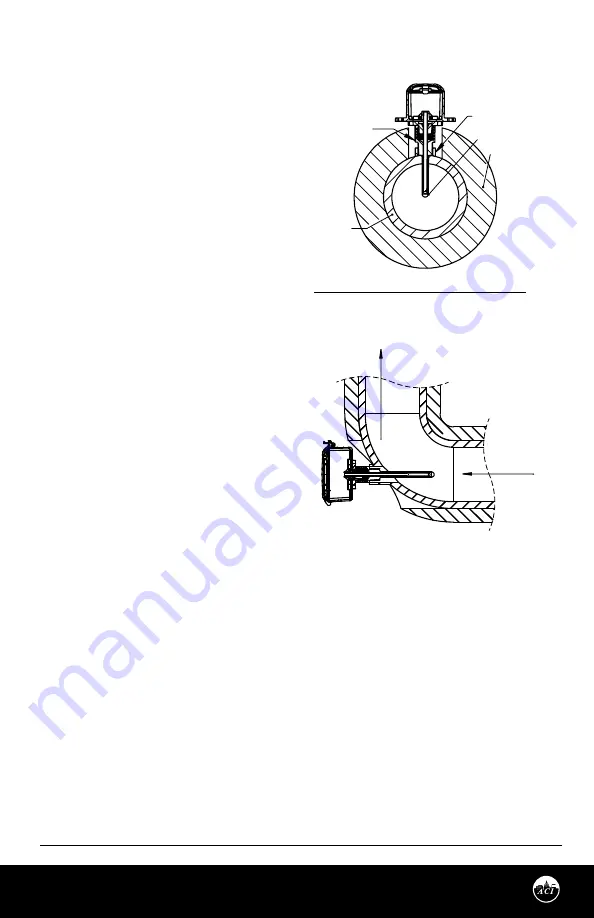
FLOW DIRECTION
PIPE INSULATION
TIP OF THERMOWELL
IN MIDDLE OF PIPE
THREADOLET
PIPE WALL
THERMOWELL
FIGURE 6:
THREADOLET ASSEMBLY
FIGURE 7:
ELBOW ASSEMBLY
BACnet MS/TP and Modbus RTU INTERFACE
The BACnet Master-Slave/Token-Passing (MS/TP) and Modbus Remote Terminal Unit (RTU) data link
protocol uses EIA-485 as a two-wire, daisy chain network. A branch is a discrete chain of devices connected
to a controller. The max number of devices per segment is 32, as per the BACnet and Modbus
specifications. 4000 ft (1219.2 m) is the maximum recommended length for a segment, which includes all
devices from the controller to the last device in the daisy chain.
BACnet MS/TP and Modbus
RTU INTERFACE
(Continued)
BACnet or Modbus RTU protocol selection is
done via SW4 switch. Place dipswitch #4 to the
OFF position for BACnet and the ON position
for Modbus. Refer to
FIGURE 8
.
ACI’s BACnet sensors are master devices. Only
master nodes are allowed to send and receive
tokens on the MSTP network.
ACI’s Modbus RTU sensors are slave devices.
Only one master is connected to the bus and
several slave nodes are connected to the same
trunk. The Master initiates communication. The
slave nodes only respond to a request from the
Master. Slave nodes do not communicate with
each other.
Each branch must have all devices connected
with (+) connected to (+) and (-) connected to
(-). If a shielded cable is used, this is not to be
connected to the devices. The shield cable
should only be connected on one end to earth
ground, usually at the controller. The start and
end of each branch should have a termination
resistor at the device level or at the controller.
Each device must be configured for the correct
baud rate and have a unique address in each
branch. The baud rate for the branch is set by
the controller. This product has auto-baud for
ease of network configuration but setting the
baud rate using the DIP switches is
recommended.
Note:
Auto-baud feature does
not function when Modbus is the selected
protocol.
Version: 2.0
I0000929


