Hardware Specifications and Configurations
1-13
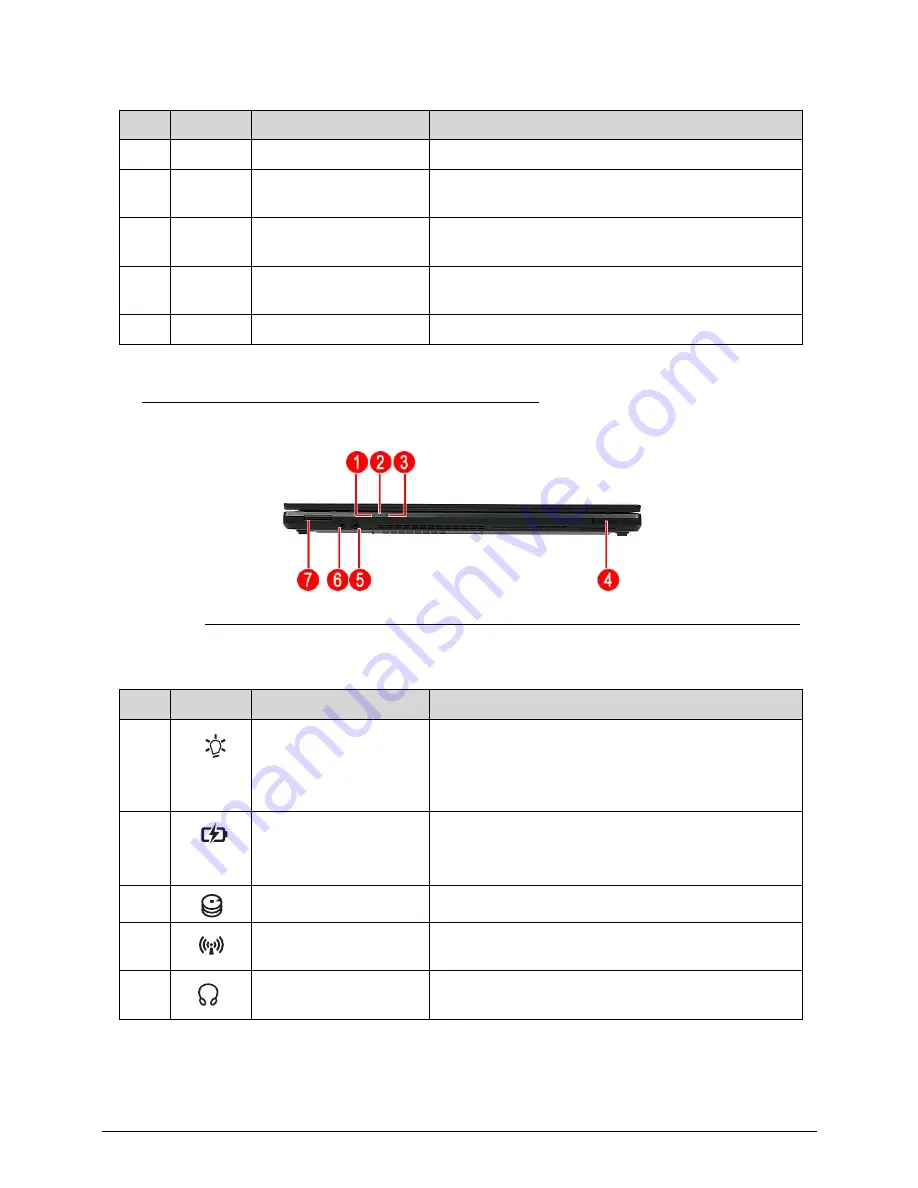
Close Front View
0
Figure 1-2.
Close Front View
7
Keyboard
For entering data into your computer.
8
Click buttons (left
and right)
The left and right buttons function like the left and
right mouse buttons.
9
Fingerprint reader
Fingerprint reader for Acer ProShield Security
Suite.
10
Touchpad
Touch-sensitive pointing device which functions like
a computer mouse.
11
Caps lock indicator
Indicates caps lock is on.
Table 1-2.
Close Front View
No.
Icon
Item
Description
1
Power indicator
Indicates the computer’s power status.
Blue: The computer is turned on.
Blinking amber: The computer is in power-saving
mode.
2
Battery indicator
Indicates the computer’s battery status.
Blue: The computer is in AC mode.
Blinking amber: The battery is charging.
3
HDD indicator
Flashes blue when there is hard drive activity.
4
RF switch
Turns on the computer’s Bluetooth or wireless
connectivity function (optional).
5
Headphones/speaker/l
ine-out jack
Connects to audio line-out devices (e.g., speakers,
headphone).
Table 1-1.
Open Front View
No.
Icon
Item
Description
Содержание TravelMate P643-V
Страница 1: ...TravelMate P643M P643V P643MG SERVICEGUIDE...
Страница 10: ...6...
Страница 11: ...CHAPTER 1 Hardware Specifications...
Страница 14: ...1 4...
Страница 53: ...CHAPTER 2 System Utilities...
Страница 70: ...2 18 System Utilities...
Страница 71: ...CHAPTER 3 Machine Maintenance...
Страница 74: ...3 4...
Страница 83: ...Machine Maintenance 3 13 5 Pull the connector adapter off the module Figure 1 10 ODD Connector Adapter...
Страница 87: ...Machine Maintenance 3 17 6 Pull the HDD from the rubber holder Figure 1 17 HDD Rubber Holder...
Страница 91: ...Machine Maintenance 3 21 6 Remove the WLAN module from the slot Figure 1 24 WLAN Module...
Страница 109: ...Machine Maintenance 3 39 9 Remove the DC input cable from the lower case Figure 1 55 DC Input Cable...
Страница 117: ...Machine Maintenance 3 47 6 Lift the LCD module from the lower cover Figure 1 69 LCD Module...
Страница 136: ...3 66 Machine Maintenance 3 Secure the bezel with the two screw covers Figure 1 100 LCD Bezel Screw Covers...
Страница 167: ...Machine Maintenance 3 97 5 Connect the HDD cable Figure 1 154 HDD Cable...
Страница 174: ...3 104 Machine Maintenance...
Страница 175: ...CHAPTER 4 Troubleshooting...
Страница 205: ...CHAPTER 5 Jumper and Connector Locations...
Страница 214: ...5 10 Jumper and Connector Locations...
Страница 215: ...CHAPTER 6 FRU List...
Страница 216: ...6 2 TravelMate P643V P643M P643MG Exploded Diagrams 6 4 Main Assembly 6 4 LCD Assembly 6 5 FRU List 6 7...
Страница 229: ...CHAPTER 7 Test Compatible Components...
Страница 230: ...7 2 Microsoft Windows 7 Environment Test 7 4...
Страница 240: ...7 12 Test Compatible Components...
Страница 241: ...CHAPTER 8 Online Support Information...
Страница 242: ...8 2...
Страница 244: ...8 4 Online Support Information...


