background image

2-20

System Utilities

8.

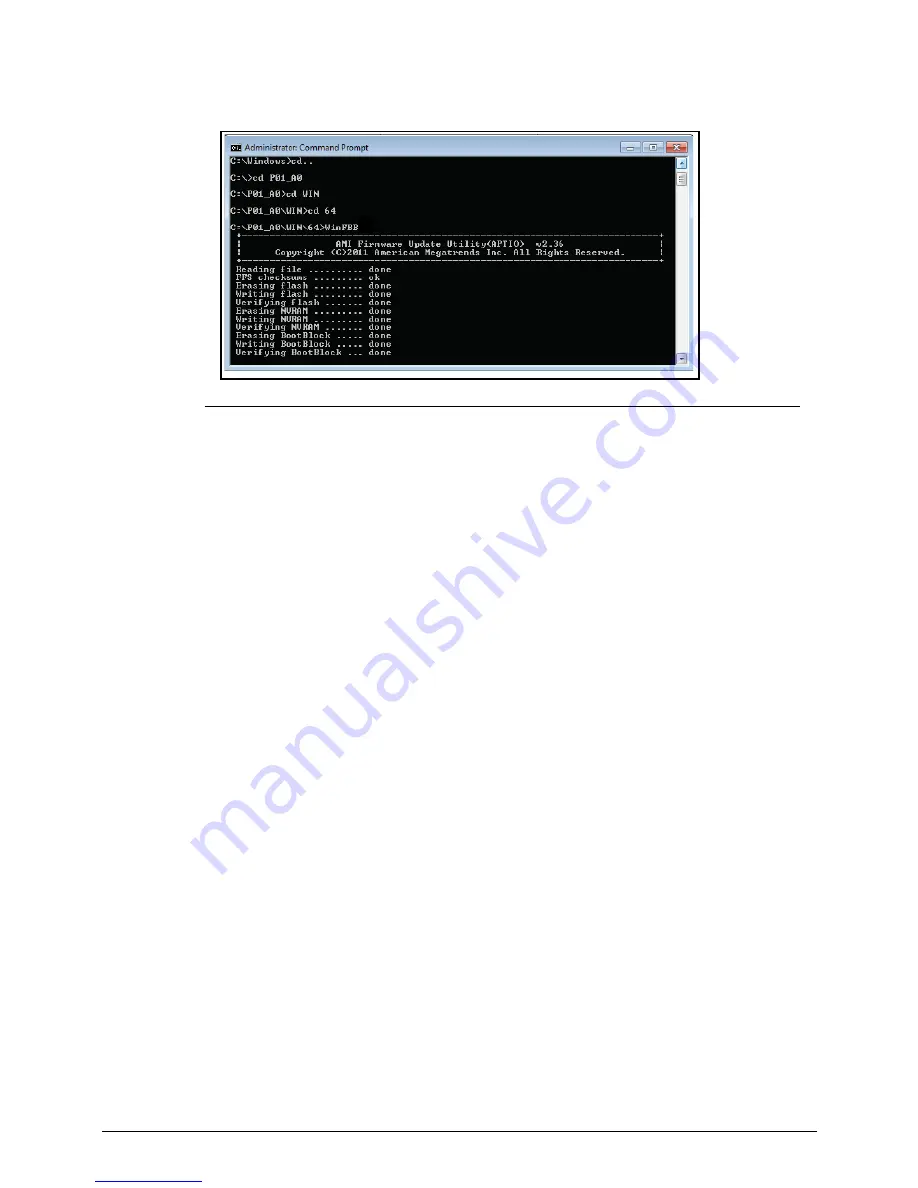
Execute 

WinFBB

 to flash BIOS. (Figure 2-23)

Figure 2-23.

Flashing BIOS

9.

Restart system after flash has completed.

10. Press DEL to enter setup when the splash screen displays.

11. Check to see if BIOS is correct.

12. Press F9 to load default settings.

13. Press F10 to save the default settings and exit BIOS setup.


Содержание Aspire Z3801

Страница 1: ...i Aspire Z3801 SERVICE GUIDE ...

Страница 2: ...nical magnetic optical chemical manual or otherwise without the prior written permission of Acer Incorporated Disclaimer The information in this guide is subject to change without notice There are no representations or warranties either expressed or implied with respect to the contents hereof and specifically disclaims any warranties of merchantability or fitness for any particular purpose The sof...

Страница 3: ... this document Book titles directory names file names path names and program process names are shown in italics Example the DRS5 User s Guide usr local bin fd the TPH15spool_M program Computer output text that represents information displayed on a computer screen such as menus prompts responses to input and error messages are shown in constant width Example 01 The server has been stopped User inpu...

Страница 4: ...eneric service guide In such cases contact your regional offices or the responsible personnel channel to provide further technical details When ordering FRU parts Check the most up to date information available on your regional Web or channel If for whatever reason a part number change is made it may not be noted in this printed service guide Acer authorized Service Providers Your Acer office may ...

Страница 5: ...9 Front View 1 9 Left View 1 10 Right View 1 11 Base View 1 12 Using the Keyboard 1 13 Windows Keys 1 14 Multimedia Keys 1 15 System Block Diagram 1 17 Specification Tables 1 18 Computer specifications 1 18 System Board Major Chips Intel H61 Express Chipset 1 19 Processor 1 20 Processor Specifications 1 20 CPU Fan True Value Table Tj 1 20 System Memory 1 21 Memory Combinations 1 21 Video Interface...

Страница 6: ... Adapter 1 32 System Power Management 1 33 Card Reader 1 33 System LED Indicator 1 34 CHAPTER 2 System Utilities BIOS Setup Utility 2 3 Navigating the BIOS Utility 2 3 BIOS 2 4 Main 2 4 Advanced 2 6 Power 2 7 Security 2 8 Boot Options 2 13 Exit 2 14 BIOS Flash Utilities 2 15 DOS Flash Utility 2 16 WinFBB Utility 2 18 Clearing BIOS Passwords 2 21 Using DMI Tools 2 23 Using the LAN MAC EEPROM Utilit...

Страница 7: ...a Module Removal 3 20 Camera Module Installation 3 21 Power Board Removal 3 22 Power Board Installation 3 22 Converter Board Removal 3 23 Converter Board Installation 3 23 LED Switch Board Removal 3 24 LED Switch Board Installation 3 24 Infrared Board Removal 3 25 Infrared Board Installation 3 25 HDD Module Removal 3 26 HDD Module Installation 3 27 HDD Carrier Removal 3 28 HDD Carrier Installation...

Страница 8: ...board Removal 3 43 Mainboard Installation 3 45 LCD Panel Removal 3 47 LCD Panel Installation 3 48 LVDS Cable Removal 3 49 LVDS Cable Installation 3 49 CHAPTER 4 Troubleshooting Introduction 4 3 General Information 4 3 Common Problems 4 4 LCD Failure 4 5 Wireless Function Failure 4 8 Component Failure 4 9 Other Functions Failure 4 11 Intermittent Problems 4 16 Undetermined Problems 4 16 BIOS Post C...

Страница 9: ...ix CHAPTER 6 FRU Field Replaceable Unit List Exploded Diagram 6 4 Main Assembly 6 4 FRU List 6 6 Screw List 6 22 CHAPTER 7 Online Support Information Support Service 7 3 ...

Страница 10: ...x ...

Страница 11: ...CHAPTER 1 Hardware Specifications ...

Страница 12: ...2 Using the Keyboard 1 13 Windows Keys 1 14 Multimedia Keys 1 15 System Block Diagram 1 17 Specification Tables 1 18 Computer specifications 1 18 System Board Major Chips Intel H61 Express Chipset 1 19 Processor 1 20 Processor Specifications 1 20 CPU Fan True Value Table Tj 1 20 System Memory 1 21 Memory Combinations 1 21 Video Interface 1 22 BIOS 1 22 LAN Interface 1 22 Keyboard 1 22 Hard Disk Dr...

Страница 13: ...1 3 Audio Codec and Amplifier 1 30 Audio Interface 1 31 Wireless Module 802 11 b g n optional 1 31 USB Port 1 32 AC Adapter 1 32 System Power Management 1 33 Card Reader 1 33 System LED Indicator 1 34 ...

Страница 14: ...1 4 ...

Страница 15: ... processor 45 W and 65 W Intel H61 Express Chipset System Memory 0 Up to 8 GB of DDR3 1333 MHz SDRAM dual channel support on two soDIMMs Display 0 21 5 1920 x 1080 pixel resolution high brightness 250 nits LED backlit TFT LCD 16 9 aspect ratio 5 ms response time Touchscreen Integrated Windows 7 compliant multi touch capable optical solution Storage Subsystem 0 Hard disk drive Serial ATA hard disk ...

Страница 16: ...lizer for Headphones Surround Virtualizer for built in speakers and Dolby Digital Output technologies High definition audio Built in microphone Integrated 5 W per channel stereo speaker system Optical Media Drive 0 BD burner BD reader SuperMulti burner SuperMulti Communication 0 WLAN Intel Centrino Wireless N 1000 802 11 b g n 802 11 b g n Wi Fi CERTIFIED LAN Gigabit Ethernet Webcam 2 MP integrate...

Страница 17: ...only TV tuner I O PAL NTSC connector for digital TV antenna cable input varies by region Rear BCAS card reader slot for Japan only I O Ports 0 Side Two USB 2 0 ports Multi in 1 card reader Headphone and microphone jacks Back Four USB 2 0 ports USB 2 0 port featuring power off USB charging Audio line out jack Ethernet RJ 45 port TV tuner Optional Items 0 Acer wireless USB keyboard and mouse Environ...

Страница 18: ...er Game Zone Acer TouchPortal Adobe Flash Player Adobe Reader Bing Bar Cyberlink YouCam McAfee Internet Security Suite 2011 Microsoft Office 2010 preloaded purchase a product key to activate Microsoft Office Starter 2010 MyWinLocker Nero 10 Essentials Netflix newsXpresso Skype Windows Live Essentials ...

Страница 19: ...igure 1 1 Front View Table 1 1 Front View Icon Item Description 1 Integrated Webcam Web camera for video communication 2 Display Screen Also called Liquid Crystal Display LCD displays computer output configure may vary by model 3 LED Light Bar Illuminates ambient LED light 1 2 3 ...

Страница 20: ...s 2 Microphone Jack Accepts inputs from external microphones 3 Headphones Speaker Jack Connects to audio devices e g speakers headphones 4 USB 2 0 Ports Connect to USB 2 0 devices e g USB mouse USB camera USB keyboard 5 Multi in 1 card reader Accepts Secure Digital SD MultiMediaCard MMC Memory Stick PRO MS PRO xD Picture Card xD NOTE Push to remove install the card Only one card can operate at any...

Страница 21: ...on or off LED light bar under LCD screen 2 Kensington lock slot Connects to a Kensington compatible computer security lock NOTE Wrap the computer security lock cable around an immovable object such as a table or handle of a locked drawer Insert the lock into the notch and turn the key to secure the lock Some keyless models are also available 1 2 ...

Страница 22: ...aster Port Connects to a set top box 2 TV Tuner Connector Connects to a TV cable 3 Audio Jack Connects to external audio source 4 Ethernet RJ 45 Port Connects to an Ethernet 10 100 1000 based network 5 USB 2 0 Ports Connect to USB 2 0 devices e g USB mouse USB camera USB keyboard 6 DC IN Jack Connects to an AC adapter 1 2 3 4 5 6 ...

Страница 23: ...ck key Description Caps Lock When Caps Lock is on all alphabetic characters typed are in uppercase Num Lock When Num Lock is on the embedded keypad is in numeric mode The keys function as a calculator complete with the arithmetic operators and Use this mode when doing a lot of numeric data entry Scroll Lock When Scroll Lock is on the screen moves one line up or down when the up or down arrow keys ...

Страница 24: ... all windows F1 Show the help window E Open Windows Explorer F Search for a file or folder D Show the desktop Ctrl F Search for computers if you are on a network L Lock your computer if you are connected to a network domain or switch users if you re not connected to a network domain Ctrl Tab Moves focus from Start menu to the Quick Launch toolbar to the system tray use or to move focus to items on...

Страница 25: ...ls Figure 1 6 Keyboard Multimedia Keys Table 1 8 shows the function of each multimedia key Table 1 8 Multimedia Keys Key Function Description Sleep Puts the computer in sleep mode Search Enables the search function Web Browser Launches the web browser Email Launches the email client Play Pause Plays or pauses media files Stop Stops media file Previous Plays the previous media file in the play sequ...

Страница 26: ...ions Next Plays the next media file in the play sequence VOL Volume decrease Decreases the volume VOL Volume increase Increases the volume Speaker toggle Turns the speakers on and off Table 1 8 Multimedia Keys Continued Key Function Description ...

Страница 27: ...Hardware Specifications and Configurations 1 17 System Block Diagram 0 Figure 1 7 System Block Diagram ...

Страница 28: ... to 140 F Relative humidity Operating 15 to 80 RH non condensing Nonoperating 10 to 90 RH non condensing at 40 C 104 F Maximum altitude unpressurized Operating N A Nonoperating N A Shock Operating Half sine 2 g 11msec Half sine 0 070 oz 11msec Nonoperating 80 g 1650mm sec 3msec 2 82 oz 1650mm sec 3msec Random vibration Operating 5 500 Hz 2 20 g RMS andom 10 minutes per axis in all 3 axes 0 071 oz ...

Страница 29: ...f fourteen USB ports Overcurrent detection on all USB ports is supported The overcurrent inputs are not 5 V tolerant and can be used as GPIs if not needed The PCH S UHCI host controllers are arbitrated differently than standard PCI devices to improve arbitration latency USB EHCI Host Controllers D29 F0 and D26 F0 The PCH contains two Enhanced Host Controller Interface EHCI host controllers which s...

Страница 30: ...ackage H61 Desktop Only Item CPU Speed GHz Cores Threads Bus Speed FSB DMI QBI Lithogr aphy nm Cache Size Package Voltage i5 2500S 2 7 GHz 4 Cores 5 GT s 32 nm 6MB LGA1155 65W i5 2400S 2 5 GHz 4 Cores 5 GT s 32 nm 6MB LGA1155 65W i3 2120 3 3 GHz 2 Cores 5 GT s 32 nm 3MB LGA1155 65W i5 2405S 2 5 GHz 2 Cores 5 GT s 32 nm 6MB LGA1155 65W i3 2100 3 1 GHz 2 Cores 5 GT s 32 nm 3MB LGA1155 65W i3 2105 3 ...

Страница 31: ...mber 2 Supports memory size per socket 4GB Supports maximum memory size 8GB Supports DIMM type SO DIMM DDR3 Supports DIMM Speed 1066 1333 MHz Support DIMM voltage 1 5 V Supports DIMM package SODIMM Slot 1 MB Slot 2 MB Total Memory MB 0 1024 1024 0 2048 2048 0 4096 4096 1024 0 1024 1024 1024 2048 1024 2048 3072 1024 4096 5120 2048 0 2048 2048 1024 3072 2048 2048 4096 2048 4096 6144 4096 0 4096 4096...

Страница 32: ...MXIC MX25L3206EM2I 12G BIOS ROM size 32Mbits Features 8 pin SOIC8 package Item Specification LAN Chipset RTL8111E VC CG LAN connector type RJ45 LAN connector location Base Features Integrated Gigabit LAN Controller Supports PCI Express1 1 Supports IEEE 802 3 10 100 1000 Mbps Ethernet Support Item Specification Type Wireless keyboard Total number of keypads 105 keys Windows logo key Yes Internal ex...

Страница 33: ... Specifications Buffer size 16MB 16 32MB 32MB 16MB Interface SATA II SATA III Fast data transfer rate Gbits sec max 3 0 6 0 Media data transfer rate Mbytes sec max 1484 1546 1546 1695 DC Power Requirements Voltage tolerance 5V 5 Item Specification Vendor Model Name SEAGATE ST3500413AS SEAGATE ST31000524AS WD WD3200AAKX 221CA0 XL500 1D WD WD5000AAKX 221CA0 XL500 1D Capacity GB 500 1000 320 500 Byte...

Страница 34: ...on Vendor Model Name WD WD10EADX 22 TDHB0 WD WD10EARS 22 Y5B1 WD WD15EARS 22 MVWB0 WD WD10EALX 22 9BA0 Capacity GB 1000 1000 1500 1000 Bytes per sector 512 4096 512 Data heads 6 6 5 4 Drive Format Disks 3 2 Spindle speed RPM 5400 7200 Performance Specifications Buffer size 32MB 64MB 64MB 32MB Interface SATAII SATA III Fast data transfer rate Gbits sec max 3 0 6 0 Media data transfer rate Mbytes se...

Страница 35: ... RW DVD RAM DVD R DVD R DL DVD RW CD CD DA Red Book Standard Audio CD CD TEXT CD ROM Yellow Book Mode1 2 Standard Data CD ROM XA Mode2 Form1 2 Photo CD Multi Session CD I Green Book Mode2 Form1 2 Ready Bridge CD Extra CD Plus Blue Book Audio Text Video Video CD White Book MPEG1 Video CD R Orange Book Part CD RW HSRW Orange Book Part Volume1 Volume 2 Super Audio CD SACD Hybrid type US US RW DVD DVD...

Страница 36: ...DVD RAM DVD R DVD R DL DVD RW CD CD DA Red Book Standard Audio CD CD TEXT CD ROM Yellow Book Mode1 2 Standard Data CD ROM XA Mode2 Form1 2 Photo CD Multi Session CD I Green Book Mode2 Form1 2 Ready Bridge CD Extra CD Plus Blue Book Audio Text Video Video CD White Book MPEG1 Video CD R Orange Book Part CD RW HSRW Orange Book Part Volume1 Volume 2 Super Audio CD SACD Hybrid type US US RW DVD DVD ROM...

Страница 37: ...ypical White Luminance cd m2 also called Brightness 250 cd m2 Contrast Ratio 1000 1 Response Time Optical Rise Time Fall Time msec 5 msec Typical Power Consumption watt 17 W Weight without inverter 1800 g Physical Size mm 495 6 x 292 2 x 10 3 Electrical Interface 2 ch LVDS Viewing Angle degree CR 10 Left L R 170 U D 160 Item Specification Vendor Model name Brightness conditions Input voltage v Inp...

Страница 38: ... X 1366x768 60Hz 16 9 V V X X X Legend V Supported X Not supported Item Specification VGA Chip Yes Supports Memory Interface Avivo Display System Motion Video Acceleration Features Power Management Features Spread Spectrum Support Internal Thermal Sensor Thermal Diode Resolution 16 bits 32 bits 36 bits 48 bits Others 800x600p 60Hz 16 9 V V X X X 1024x768p 60Hz 16 9 V V X X X 1280x600 60Hz 16 9 V V...

Страница 39: ... A Item Specifications Chipset Data throughput Protocol Interface Connector type Supported protocol Item Specifications Controller Features Item Specification Vendor and Model Foxlink FO20FF 232H 2 Chicony CNFA26621004170LH Type 2 0 Item Specification Number supported 2 Features WLAN TV Card Item Specification Features ...

Страница 40: ...atures an integrated digital BEEP generator Support two stereo digital microphone input for microphone array AEC BF application Supports legacy analog mixer architecture Supports two GPIO General Purpose Input Output pins pin sharing with digital microphone interface Supports EAPD External Amplifier Power Down control for external amplifier Supports anti pop mode when analog power AVDD is on and d...

Страница 41: ...o Mono Compatibility HD audio Interface Sampling rate Sample rate up to 192Khz resolution VSR Variable Sampling Rate Internal microphone Yes Internal speaker quantity Yes 5W x2 Item Specification Chipset Ralink RT3090 Data throughput 11 54 Mbps Protocol 802 11 b g n Interface PCIE1 Item Specification Vendor Model name Battery Type Pack capacity Number of battery cell Package configuration Item Spe...

Страница 42: ...as GPIs if not needed The PCH S UHCI host controllers are arbitrated differently than standard PCI devices to improve arbitration latency USB EHCI Host Controllers D29 F0 and D26 F0 The PCH contains two Enhanced Host Controller Interface EHCI host controllers which support up to fourteen USB 2 0 high speed root ports USB 2 0 allows data transfers up to 480 Mb s USB 2 0 based Debug Port is also imp...

Страница 43: ...is state Suspend to RAM S3 CPU set power down VGA Suspend Audio Power Down Hard Disk Power Down CD ROM Power Down Super I O Low Power mode Save to Disk S4 Also called Hibernation Mode System saves all system states and data onto the disc prior to power off the whole system Item Specification Chipset Realtek RTS5138 Package QFP 24P Maximum supported size SD 2T MMC 32G miniSD 2T MS MS PRO 32G Featur...

Страница 44: ...cification Lock N A System state White color solid on System on Amber color blinking S3 state HDD access state Reflects the activities of the HDD or Card reader access Wireless state N A Power button backlight White Power on Amber Standby S3 state Off Power off Battery state N A ...

Страница 45: ...CHAPTER 2 System Utilities ...

Страница 46: ...tility 2 3 BIOS 2 4 Main 2 4 Advanced 2 6 Power 2 7 Security 2 8 Boot Options 2 13 Exit 2 14 BIOS Flash Utilities 2 15 DOS Flash Utility 2 16 WinFBB Utility 2 18 Clearing BIOS Passwords 2 21 Using DMI Tools 2 23 Using the LAN MAC EEPROM Utility 2 25 ...

Страница 47: ...r to Enabled To change the boot device without entering the BIOS SETUP press F12 during POST to enter the multi boot menu Navigating the BIOS Utility 0 Six menu options are Main Advanced Power Security Boot Options Exit To navigate through the following Screen use the left and right arrow keys Item use the up and down arrow keys Select press Enter Change options press or Load User defined defaults...

Страница 48: ...ersion Build Date Set the Time Use Tab to switch between Time elements P01 A0 XX XX 2011 EC Firmware Version Build Date R1 01 3 15 2011 Processor Intel R Core TM i5 2500S CP 2 70GHz Core Frequency Count 2 70 GHz 4 Memory Size Product Name System Serial Number Asset Tag Number System Date System Time 2048 MB Sun XX XX 2011 XX XX XX Select Screen Select Item Enter Select 11 Change Opt F7 Load User d...

Страница 49: ... BIOS EC Firmware System EC version Processor CPU central processing unit type Core Frequency Speed of system Count Amount of cores Memory Size Memory size available Product Name Product name of the system System Serial Number Serial number of unit Asset Tag Number Asset tag number of system System Date BIOS system date System Time BIOS system time in 24 hour format ...

Страница 50: ...creen Select Item Enter Select 11 Change Opt F7 Load User defined Defaults F8 Save as User defined F9 Optimized Defaults When Access Level is Administrator F10 Save Exit Version 2 10 1208 Copyright C 2002 2011 Acer Inc Table 2 2 BIOS Advanced Parameter Description Miscellaneous Configure miscellaneous functions Advanced Chipset Configuration Configure advanced chipset settings Integrated Periphera...

Страница 51: ...te Select Screen Select Item Enter Select 11 Change Opt F7 Load User defined Defaults F8 Save as User defined F9 Optimized Defaults When Access Level is Administrator F10 Save Exit Version 2 10 1208 Copyright C 2002 2011 Acer Inc Table 2 3 BIOS Power Parameter Description Deep Power Off Mode Can enable or disable deep power off mode Power On RTC Wakeup Support Can enable or disable power on RTC wa...

Страница 52: ...9 3 11 special keys 4 key pad 0 9 support and 5 special keys User Password Not Installed Change Supervisor Password Select Screen Select Item Enter Select 11 Change Opt F7 Load User defined Defaults F8 Save as User defined F9 Optimized Defaults When Access Level is Administrator F10 Save Exit Version 2 10 1208 Copyright C 2002 2011 Acer Inc Table 2 4 BIOS Security Parameter Description Supervisor ...

Страница 53: ... press Enter The Set Supervisor Password dialog box is shown Figure 2 5 NOTE NOTE To change an existing password refer to Changing a Password Figure 2 5 Setting a Password Set Supervisor Password 2 Type a new password in the Enter New Password field and press Enter NOTE NOTE The following characters may be used in a password IMPORTANT Use care when typing a password Characters do not appear on the...

Страница 54: ... 2 7 Setting a Password Passwords Do Not Match a Press Enter to return to the BIOS Setup Utility Security menu b The Supervisor Password parameter is shown as Clear c To try to set a new password again repeat steps 1 through 3 Removing a Password 0 Perform the following 1 Use the and keys to highlight Set Supervisor Password and press Enter The Set Supervisor Password dialog box is shown Figure 2 ...

Страница 55: ...and press Enter 4 Retype new password in Confirm New Password field and press Enter 5 If new password and confirm new password strings match The Setup Notice dialog is shown Figure 2 10 If it is not shown go to step 6 Figure 2 10 Changing a Password Setup Notice a Press Enter to return to the BIOS Setup Utility Security menu b The Supervisor Password parameter is shown as Set c Press F10 to save c...

Страница 56: ...w password and confirm new password strings do not match the Setup Warning dialog is shown Figure 2 12 Figure 2 12 Changing a Password Passwords Do Not Match a Press Enter to return to the BIOS Setup Utility Security menu b The Supervisor Password parameter is shown as Clear c To try to change the password again repeat steps 1 through 4 Setup Warning Passwords do not match Re enter password Contin...

Страница 57: ...FI 2nd Boot Device Hard Disk ST31000 3rd Boot Device CD DVD HL DT ST 4th Boot Device Removable Device 5th Boot Device LAN UEFI Boot Device Priority Hard Disk Drive Priority Optical Disk Drive Priority Removal Device Priority Network Device Priority Quite Boot Press Enter Press Enter Press Enter Press Enter Press Enter Enabled Select Screen Select Item Enter Select 11 Change Opt F7 Load User define...

Страница 58: ...11 Change Opt F7 Load User defined Defaults F8 Save as User defined F9 Optimized Defaults When Access Level is Administrator F10 Save Exit Version 2 10 1208 Copyright C 2002 2011 Acer Inc Table 2 5 BIOS Exit Parameter Description Save Exit Setup Exit BIOS utility and save setup item changes to system Discard Changes and Exit Exit BIOS utility without saving setup item changes to system Save Change...

Страница 59: ...ilable create one before BIOS Flash utility is used Refer to BIOS Recovery by Crisis Disk Do not install memory related drivers XMS EMS DPMI when BIOS Flash is used Use AC adaptor power supply when running BIOS Flash utility If battery pack does not contain power to finish loading BIOS Flash do not boot system Perform the following to run BIOS Flash 1 Prepare a bootable USB HDD 2 Copy Flash utilit...

Страница 60: ... BIOS and Intel ME firmware BIOS Setup Utility Main Advanced Power Security Boot Options Exit Boot Priority Order Set Boot Priority 1st Boot Device Removable Device 2nd Boot Device Hard Disk ST31000 3rd Boot Device CD DVD HL DT ST 4th Boot Device UEFI 5th Boot Device LAN UEFI Boot Device Priority Hard Disk Drive Priority Optical Disk Drive Priority Removal Device Priority Network Device Priority Q...

Страница 61: ...OS flash process begins Figure 2 17 Figure 2 17 Flashing BIOS The EC firmware updates Figure 2 18 Figure 2 18 Updated EC Firmware 8 When flash is complete system will restart automatically when finished 9 Press DEL to enter setup when the splash screen displays Check to see if BIOS is correct 10 Press F9 to load default settings 11 Press F10 to save the default settings and exit BIOS setup ...

Страница 62: ...dates system BIOS WinFBBME BAT updates system BIOS and Intel ME firmware To use the WinFBB Utility perform the following 1 Click on the Windows Start icon 2 Click on All Programs in the Start Menu Figure 2 19 Figure 2 19 Windows Start Menu 3 Select Accessories Command Prompt Figure 2 20 Figure 2 20 Start Menu Accessories ...

Страница 63: ...rompt and select Run as administrator Figure 2 20 5 When Command Prompt opens enter the name of the BIOS file Figure 2 21 Figure 2 21 Command Prompt 6 Type Win to access the file Figure 2 22 Figure 2 22 Command Prompt 7 Type 64 to access the file ...

Страница 64: ...3 Figure 2 23 Flashing BIOS 9 Restart system after flash has completed 10 Press DEL to enter setup when the splash screen displays 11 Check to see if BIOS is correct 12 Press F9 to load default settings 13 Press F10 to save the default settings and exit BIOS setup ...

Страница 65: ...sword A hardware method and a software method Hardware Method 0 1 Remove AC adapter 2 Locate the RTC reset point and short it A Figure 2 24 Figure 2 24 CMOS Jumper Overview 3 Plug in AC adapter 4 Restart the system and press F2 to enter BIOS Utility Setup menu 5 If no password prompt is shown BIOS password is cleared 6 If password prompt is shown repeat steps 1 through 5 Table 2 6 CMOS Jumper Item...

Страница 66: ...hree times the System will halt dialog is shown Figure 2 25 Figure 2 25 Supervisor Password Error 1 At a DOS prompt enter ClearSuPw exe Figure 2 26 Figure 2 26 Clear Supervisor Password Utility 2 When message Clear the SU Pws completely is shown supervisor password has been removed ...

Страница 67: ...the bootable USB HDD 3 Restart the computer 4 Press F12 during boot to enter Setup Menu 5 Select Boot Options to modify boot priority order 6 Move USB HDD to 1st Boot Device position Refer to Boot Options menu 7 Press F10 to save changes and exit the BIOS Setup Utility 8 After system boots to DOS type cd P01_A1 to enter the BIOS flash folder Figure 2 27 Figure 2 27 DMIBatch In DOS 9 Enter DMIBatch...

Страница 68: ...e is completed the following screen will appear as shown in Figure 2 30 Figure 2 30 DMI Flash Completed 11 Restart system after flash has completed 12 Press DEL to enter setup when the splash screen displays 13 Check to see if BIOS is correct 14 Press F9 to load default settings 15 Press F10 to save the default settings and exit BIOS setup ...

Страница 69: ... Reboot the computer 4 Press F12 during boot to enter Setup Menu 5 Select USB HDD as the boot device and press Enter Figure 2 31 Figure 2 31 Boot Device Window 6 After the USB HDD has booted type cd macid Figure 2 32 Figure 2 32 MACID BAT 7 Type A MACID WRITEID BAT Please Select boot device SATA ST3250318AS SATA Slimtype BD E DS6E2SH USB HDD Enter Setup and to move selection ENTER to select boot d...

Страница 70: ...en 10 After the process is complete the screen indicates the process is successful as shown in Figure 2 34 Figure 2 34 MAC ID Success Screen 11 Enter CHECKID BAT to confirm the MAC ID is correct Figure 2 35 Mother Board Information Input Screen Mother Board Information Input Copyright Quanta Computer Corporation 2006 Please Input MACID _ _____________ PG EFuse is Successful NodeID 60 EB 69 DE C6 4...

Страница 71: ...CHAPTER 3 Machine Maintenance Procedures ...

Страница 72: ...ower Board Installation 3 22 Converter Board Removal 3 23 Converter Board Installation 3 23 LED Switch Board Removal 3 24 LED Switch Board Installation 3 24 Infrared Board Removal 3 25 Infrared Board Installation 3 25 HDD Module Removal 3 26 HDD Module Installation 3 27 HDD Carrier Removal 3 28 HDD Carrier Installation 3 28 LCD Stand Removal 3 29 LCD Stand Installation 3 29 Mainboard Cover Removal...

Страница 73: ...lation 3 40 Light Bar Cover Removal 3 41 Light Bar Cover Installation 3 41 Light Bar Module Removal 3 42 Light Bar Module Installation 3 42 Mainboard Removal 3 43 Mainboard Installation 3 45 LCD Panel Removal 3 47 LCD Panel Installation 3 48 LVDS Cable Removal 3 49 LVDS Cable Installation 3 49 ...

Страница 74: ...3 4 ...

Страница 75: ...owing procedures may not represent the final product color or configuration Cable paths and positioning may also differ from the actual model During the removal and installation of components make sure all available cable channels and clips are used and that the cables are installed in the same position All prerequisites must be performed prior to performing maintenance Recommended Equipment 0 The...

Страница 76: ...when performing any maintenance on the computer Table 3 1 Main Screw List Screw Quantity Acer Part Number M2 0x3 0 4 86 SG407 004 M3 0x4 0 31 86 SG407 002 M3 0x0 5P x L 5 4 0 1 0 1 L1 3 5 0 2 0 2 4 86 SG407 007 M3 0x6 0 13 86 SG407 003 M2 0x6 0 2 86 SG407 006 M3 0x10 0 4 86 SG407 005 M4 0x7 0 6 86 SG407 001 M3 5x8 9 4 86 SG407 008 ...

Страница 77: ...Flowchart 0 The flowchart in Figure 3 1 provides a graphic representation of the module removal and installation sequences It provides information on what components need to be removed and installed during servicing Figure 3 1 Maintenance Flowchart ...

Страница 78: ...nd install sequence Observe the order of the sequence to avoid damage to any of the hardware components Perform the following prior to performing any maintenance procedures 1 Remove power A from the system and peripherals Figure 3 2 2 Remove all cables from system Figure 3 2 AC Adapter Outlet 3 Place system on a stable work surface A ...

Страница 79: ...Card Removal 0 1 Open door A on side panel Figure 3 3 Figure 3 3 Door on Side Panel 2 Push in dummy card B to release Figure 3 4 Figure 3 4 Dummy Card 3 Remove dummy card B Dummy Card Installation 0 1 Insert dummy card B 2 Push in to lock A B ...

Страница 80: ...ar Door Removal 0 1 Locate rear door A Figure 3 5 Figure 3 5 Rear Door Slot 2 Lift rear door from slot B to unlock and separate from rear cover 3 Lift rear door in an angle as shown in Figure 3 6 Figure 3 6 Rear Door 4 Remove rear door B A ...

Страница 81: ...nges C on rear door Figure 3 7 Figure 3 7 Rear Door Flanges 2 Install rear door flanges into slots D on rear cover Figure 3 8 Figure 3 8 Rear Cover Slots 3 Install rear door to rear cover Figure 3 6 4 Press along edges until rear door is locked and secured to rear cover C D ...

Страница 82: ...edures DIMM Removal 0 Prerequisite Rear Door Removal 1 Locate DIMM Dual In Line Memory Module door A on mainboard cover B Figure 3 9 Figure 3 9 DIMM Door 2 Remove screw C from DIMM door 3 Remove DIMM door from mainboard cover A C B ...

Страница 83: ...t steps 4 and 5 for remaining DIMM G DIMM Installation 0 1 Connect DIMM G into mainboard connector D Figure 3 10 2 Press on DIMM until clips F lock in place 3 Repeat steps 4 and 5 for DIMM E 4 Install DIMM door A to mainboard cover B Figure 3 9 5 Install and secure screw C to DIMM door 6 Install rear cover ID Size Quantity Screw Type C M3 0x4 0 1 F F E D G ...

Страница 84: ...move screws A from rear stand B Figure 3 11 Figure 3 11 Rear Stand 2 Remove rear stand from front cover Rear Stand Installation 0 1 Install rear stand A to front cover Figure 3 11 2 Install and secure screws B to rear cover 3 Install rear cover ID Size Quantity Screw Type B M4 0x7 0 6 A B B B ...

Страница 85: ...r Removal 1 Locate ODD module A Figure 3 12 Figure 3 12 ODD Module 2 Remove screw B from front cover 3 Slide and remove ODD module through ODD slot C on rear cover 4 Press ODD tray release button D on bezel to eject ODD tray Figure 3 13 Figure 3 13 ODD Tray Release Button A B C D ...

Страница 86: ... from ODD module Figure 3 14 Figure 3 14 ODD Latch and Bezel 6 Unlock latch G to separate ODD bezel H from tray 7 Remove ODD bezel 8 Remove screws J from ODD bracket K and ODD module Figure 3 15 Figure 3 15 ODD Module Bracket 9 Remove ODD bracket F G H J K ...

Страница 87: ...ws J from ODD bracket to ODD module 3 Install ODD bezel H to ODD tray F Figure 3 14 4 Install and secure latch G to tray 5 Install ODD tray F into ODD module 6 Install ODD module A in ODD slot C on rear cover Figure 3 12 7 Install and secure screw B to lower cover 8 Install rear cover ID Size Quantity Screw Type B M3 0x4 0 1 J M2 0x3 0 2 ...

Страница 88: ...dures Rear Cover Removal 0 Prerequisite Rear Stand Removal ODD Module Removal 1 Remove screws A from rear cover B Figure 3 11 Figure 3 16 Rear Cover 2 Separate rear cover from bottom side C Figure 3 17 Figure 3 17 Rear Cover A A B C ...

Страница 89: ...nt cover 4 Remove rear cover Rear Cover Installation 0 1 Align and install rear cover B with front cover Figure 3 11 2 Press along edges until rear cover is secure to front cover 3 Install and secure screws A to rear cover 4 Install rear stand 5 Install ODD module ID Size Quantity Screw Type A M3 0x6 0 5 ...

Страница 90: ... 1 Remove screws A from brackets B and C Figure 3 18 Figure 3 18 Camera Module Brackets 2 Remove brackets B and C CAUTION Camera cable is connected to mainboard Use caution when lifting or removing camera 3 Remove camera module D from front cover Figure 3 19 Figure 3 19 Camera Module A B C D ...

Страница 91: ...connector F Camera Module Installation 0 1 Connect camera module cable E to module connector F Figure 3 20 2 Turn camera module over 3 Install camera module D to front cover Figure 3 19 4 Install camera brackets B and C to front cover Figure 3 18 5 Install and secure screws A to brackets 6 Install rear cover ID Size Quantity Screw Type A M3 0x4 0 2 F E ...

Страница 92: ... A from power board connector B 3 Remove screw D from front cover 4 Remove power board from guide pin E on front cover Power Board Installation 0 1 Align and install power board C with guide pin E on front cover Figure 3 21 2 Install and secure screw D to front cover 3 Connect power board cable A to power board connector B 4 Install rear cover ID Size Quantity Screw Type D M3 0x4 0 1 A B C D E ...

Страница 93: ...Converter to panel cable F from converter board connector E 3 Remove screws D from front cover 4 Remove converter board Converter Board Installation 0 1 Install converter board A to front cover Figure 3 22 2 Install and secure screws D to front cover 3 Connect the following cable Converter to panel cable F to converter board connector E Converter to mainboard cable B to inverter board connector C ...

Страница 94: ...switch board cable B from connector C 3 Remove screw E from board 4 Remove LED switch board from guide pin D on front cover LED Switch Board Installation 0 1 Align and install LED switch board A with guide pin D on front cover Figure 3 23 2 Install and secure screw E to board 3 Connect LED switch board cable B to connector C 4 Install rear cover ID Size Quantity Screw Type E M3 0x4 0 1 A B C D E ...

Страница 95: ...cable C from board connector D 3 Remove screw B from infrared board 4 Remove infrared board from guide pin E on front cover Infrared Board Installation 0 1 Align and install infrared board A with guidepin E on front cover Figure 3 24 2 Install and secure screw B to front cover 3 Connect infrared board cable C to board connector D 4 Install rear cover ID Size Quantity Screw Type B M2 0x3 0 1 A B C ...

Страница 96: ...dule A on front cover Figure 3 25 Figure 3 25 HDD Module 2 Disconnect the following cables HDD cable D from mainboard connector E HDD cable G from mainboard connector F 3 Remove HDD cables D and G from guide H 4 Remove screw B from ground cable C on HDD module 5 Slide and remove HDD module A B C D E G F H ...

Страница 97: ...Cover 2 Align ground cable C to screw hole on HDD module Figure 3 25 3 Install and secure screw B to ground cable and HDD module 4 Secure HDD cables D and G to guides H on front cover 5 Connect the following cables HDD cable D to mainboard connector E HDD cable G to mainboard connector F 6 Install rear cover ID Size Quantity Screw Type B M3 0x4 0 1 J ...

Страница 98: ... 3 27 HDD Module 2 Remove screws A from HDD carrier 3 Remove HDD carrier B from HDD module HDD Carrier Installation 0 1 Install HDD carrier B to HDD module Figure 3 27 2 Install and secure screws A to HDD module 3 Connect HDD cable C to HDD module connector D 4 Install HDD module ID Size Quantity Screw Type A M3 0x0 5P x L 5 4 0 1 0 1 L1 3 5 0 2 0 2 4 A A B C D ...

Страница 99: ...3 28 Figure 3 28 LCD Stand 2 Remove screws B from LCD stand 3 Remove LCD stand from front cover LCD Stand Installation 0 1 Install LCD stand A to slots C on front cover Figure 3 29 Figure 3 29 LCD Stand Slots 2 Install and secure screws B to LCD stand Figure 3 28 3 Install rear cover ID Size Quantity Screw Type B M3 5x8 9 4 A B B C ...

Страница 100: ...ard connector C HDD cable E from mainboard connector F 3 Remove screws B from mainboard cover 4 Remove mainboard cover Mainboard Cover Installation 0 1 Install mainboard cover A to front cover Figure 3 30 2 Install and secure screws B to mainboard cover 3 Connect the following cables HDD cable D to mainboard connector C HDD cable E to mainboard connector F 4 Install rear cover ID Size Quantity Scr...

Страница 101: ...uxiliary D antenna cables from WLAN module 3 Remove screw E from module 4 Disconnect WLAN module A from mainboard connector B WLAN Module Installation 0 1 Connect WLAN module A into mainboard connector B Figure 3 31 2 Install and secure screw E to module 3 Connect WLAN main C and auxiliary D antenna cables to WLAN module 4 Install mainboard cover ID Size Quantity Screw Type E M2 0x3 0 1 A B C D E ...

Страница 102: ... Removal 1 Locate RTC battery mylar A Figure 3 32 Figure 3 32 RTC Mylar 2 Remove mylar 3 Lift battery B from opening C on mainboard connector D Figure 3 33 Figure 3 33 RTC Battery 4 Remove battery from mainboard connector IMPORTANT Follow local regulations for battery disposal E A C D B ...

Страница 103: ... Maintenance Procedures 3 33 RTC Battery Installation 0 1 Install battery B into mainboard connector D Figure 3 33 2 Press down to secure 3 Install mylar A on RTC battery Figure 3 32 4 Install mainboard cover ...

Страница 104: ...nector C 3 Remove cable from guide D on front cover 4 Remove screws E from fan module 5 Remove fan module Fan Module Installation 0 1 Install fan module A to front cover Figure 3 34 2 Install and secure screws E to front cover 3 Secure fan cable B to guide D on front cover 4 Connect fan cable to mainboard connector C 5 Install mainboard cover ID Size Quantity Screw Type E M3 0x6 0 3 E A B C D ...

Страница 105: ... from guides on front cover 6 Remove ODD cable from guides 7 Remove screws B from front cover 8 Remove ODD connector ODD Connector Installation 0 1 Install ODD connector A to front cover Figure 3 35 2 Install and secure screws B to front cover 3 Secure ODD cable G to guides on front cover 4 Secure WLAN main E and auxiliary F cables to guide 5 Connect ODD cable G to mainboard connector H 6 Install ...

Страница 106: ...l 0 Prerequisite Mainboard Cover Removal 1 Locate thermal module A on mainboard Figure 3 36 Figure 3 36 Thermal Module 2 Loosen the following captive screws from mainboard Screws B 1 B 4 Screw C 3 Remove thermal module A from mainboard B 1 B 1 B 2 B 4 B 3 A C ...

Страница 107: ... cloth or cotton swab and Isopropyl Alcohol Acetone or other approved cleaning agent 2 Apply small amount of thermal grease to center of CPU D Figure 3 37 NOTE NOTE Force used during installation of thermal module is sufficient to spread grease over CPU top Figure 3 37 CPU Grease 3 Align and install thermal module A to mainboard screw holes Figure 3 36 4 Secure the following captive screws to main...

Страница 108: ... Thermal Module Removal 1 Locate CPU module A on mainboard Figure 3 38 Figure 3 38 CPU in Socket 2 Release lever B from latch C 3 Move lever until CPU holder D clears guide E and lifts open Figure 3 39 Figure 3 39 CPU Holder 4 Remove CPU from socket A C B D F E G ...

Страница 109: ... 0 1 Align CPU marker F with socket marker G and install CPU to socket Figure 3 39 2 Install CPU holder D until covering CPU 3 Move lever B until CPU holder is inserted to guide E 4 Install and secure lever to latch C Figure 3 38 5 Install thermal module ...

Страница 110: ...Remove speaker cable from guides 4 Remove screws E from speakers 5 Remove speakers A and B from guide pins F Speaker Module Installation 0 1 Align and install right A and left B speakers with guide pins F on front cover Figure 3 40 2 Install and secure screws E to speakers 3 Install speaker cable C to guides 4 Install speaker cable to mainboard connector D 5 Install mainboard cover ID Size Quantit...

Страница 111: ...ure 3 41 Front Cover Screws 2 Turn front cover over 3 Remove light bar cover B Figure 3 42 Figure 3 42 Light Bar Cover Light Bar Cover Installation 0 1 Install light bar cover B to front cover Figure 3 42 2 Turn front cover over Figure 3 41 3 Install and secure screws A to front cover 4 Install LCD panel ID Size Quantity Screw Type C M3 0x6 0 5 A B ...

Страница 112: ...e and hold latch C on light bar cover 3 Remove left light bar module from guides 4 Repeat steps 2 and 3 to remove right light bar module D Light Bar Module Installation 0 1 Align and install left light bar module A with guides on light bar cover Figure 3 43 2 Press on left light bar module until secure under latch C 3 Repeat steps 1 and 2 to install right light bar module D 4 Install light bar cov...

Страница 113: ...bles Figure 3 44 Left light bar cable A from mainboard connector a Speaker cable B from mainboard connector b Infrared board cable C from mainboard connector c Power board cable D from mainboard connector d Right light bar cable E from mainboard connector e Converter board cable F from mainboard connector f Figure 3 44 Mainboard Connectors D e A a b B C c E d F f ...

Страница 114: ...ble H from mainboard connector h ODD cable J from mainboard connector j LVDS cable K from mainboard connector k Camera cable M from mainboard connector m Figure 3 45 Mainboard Connectors 3 Remove screws N from mainboard P Figure 3 46 Figure 3 46 Mainboard Screws 4 Remove mainboard from guide pins Q on front cover G g h H J j K k m M N N N P Q Q ...

Страница 115: ...ble H to mainboard connector h ODD cable J to mainboard connector j LVDS cable K to mainboard connector k Camera cable M to mainboard connector m 4 Connect the following cables Figure 3 44 Left light bar cable A to mainboard connector a Speaker cable B to mainboard connector b Infrared board cable C to mainboard connector c Power board cable D to mainboard connector d Right light bar cable E to ma...

Страница 116: ...3 46 Machine Maintenance Procedures Figure 3 47 Mainboard Recycling IMPORTANT Follow local regulations for circuit board disposal ...

Страница 117: ...requisite Camera Module Removal Mainboard Removal Converter Board Removal Speaker Module Removal 1 Disconnect converter to panel cable A from LCD panel connector B Figure 3 48 Figure 3 48 Screws on Front Cover 2 Remove eleven 11 screws C from front cover A B C ...

Страница 118: ... LCD Panel Installation 0 1 Align and install front cover with LCD panel Figure 3 48 2 Install and secure eleven 11 screws C to front cover 3 Connect converter to panel cable A to LCD panel connector B 4 Install mainboard speaker module converter board and camera module ID Size Quantity Screw Type C M3 0x4 0 11 ...

Страница 119: ...ing cable 2 Remove LVDS cable from adhesive on LCD panel 3 Peel tape B covering LVDS cable to LCD panel connector Figure 3 51 Figure 3 51 LVDS Tape 4 Disconnect LVDS cable from LCD panel connector C LVDS Cable Installation 0 1 Connect LVDS cable A to LCD panel connector C Figure 3 51 2 Secure tape B to cover LVDS cable and LCD panel connector 3 Secure LVDS cable to adhesive on LCD panel Figure 3 5...

Страница 120: ...3 50 Machine Maintenance Procedures ...

Страница 121: ...CHAPTER 4 Troubleshooting ...

Страница 122: ...4 3 General Information 4 3 Common Problems 4 4 LCD Failure 4 5 Wireless Function Failure 4 8 Component Failure 4 9 Other Functions Failure 4 11 Intermittent Problems 4 16 Undetermined Problems 4 16 BIOS Post Codes 4 17 ...

Страница 123: ...type cards or modified options can give false errors and invalid system responses 1 Obtain as much detailed information as possible about the problem 2 If possible verify the symptoms by re creating the failure through diagnostic tests or repeating the operation that led to the problem 3 Use Table 4 1 with the verified symptom to determine the solution 4 If the Issue is still not resolved Refer to...

Страница 124: ...ible 2 Verify the symptoms by attempting to re create the failure by running the diagnostic test or by repeating the same operation 3 Use the troubleshooting sections to try and resolve the issue Figure 4 1 Common Problems 4 If the issue is still not resolved refer to Online Support Information Start Hardware or Software Failure Hardware Failure Determine HW failure type Component Failure LCD Fail...

Страница 125: ...nal by pressing Fn F5 Reference Product pages for specific model procedures LCD Failure Is the LVDS cable properly connected Test the LVDS Cable Is the inverter properly connected Test the inverter Test the inverter cables Re insert the cable Re insert the cable Test the LCD Module Replace the cable Replace the cable Replace the inverter Replace the LCD Module F Fail F Fail Fail Fail Fail F F F F ...

Страница 126: ...ermanent vertical horizontal lines or dark spots appear in the same location the LCD is faulty and should be replaced Refer to Maintenance Flowchart If extensive pixel damage is present different colored spots in the same locations on the screen the LCD is faulty and should be replaced Refer to Maintenance Flowchart NOTE NOTE Make sure that the computer is not running on battery alone as this may ...

Страница 127: ...clamation marks There are no device conflicts No hardware is listed under Other Devices 7 If the Issue is still not resolved refer to Online Support Information 8 Run the Windows Memory Diagnostic from the operating system DVD and follow the on screen prompts 9 If the Issue is still not resolved refer to Online Support Information ...

Страница 128: ... WLAN fails perform the following Figure 4 3 Wireless Function Failure START Check WLAN cable connection Wirelss function failure Reconnect cable correctly Check WLAN module Replace WLAN module Close Close Close OK NG OK OK NG NG Replace Mainboard OK NG OK ...

Страница 129: ...ver to the previous version 4 Remove and reinstall the audio driver 5 Make sure that all volume controls are set mid range Click the volume icon on the taskbar Drag the slider to 50 Confirm that the volume is not muted Click Mixer to verify that other audio applications are set to 50 and not muted 6 Navigate to Start Control Panel Hardware and Sound Sound Confirm that Speakers are selected as the ...

Страница 130: ...e Failure 0 If internal or external Microphones fail perform the following 1 Check that the microphone is enabled Navigate to Start Control Panel Hardware and Sound Sound and select the Recording tab 2 Right click on the Recording tab and select Show Disabled Devices clear by default The microphone appears on the Recording tab 3 Right click on the microphone and select Enable 4 Select the micropho...

Страница 131: ...l external devices 2 Run a complete virus scan using up to date software to confirm the computer is virus free 3 Run the Windows Vista Startup Repair Utility a Insert the Windows Vista Operating System DVD in the ODD and restart the computer b When prompted press any key to start to the operating system DVD c When the Install Windows screen appears click Next d Select Repair your computer e When t...

Страница 132: ... The tray does not eject Access failure screen is shown The ODD is noisy Perform the following one at a time 1 Boot the computer and retry the operation 2 Use an different disc 3 Navigate to Start Computer Check that the ODD device is shown in the Devices with Removable Storage panel 4 Navigate to Start Control Panel System and Maintenance System Device Manager 5 Double click lDE ATA ATAPI control...

Страница 133: ...mes After Changes remaining reaches zero the region cannot be changed even when Windows is reinstalled or the drive is moved to another computer Navigate to Start Control Panel System and Maintenance System Device Manager Double click DVD CD ROM drives Right click DVD drive and click Properties then click the DVD Region tab Select the region suitable for the media inserted in the drive Discs Do No...

Страница 134: ...the ODDs specified in Hardware Specifications and Configurations Remove power and remove the cover to inspect the connections to the ODD Refer to Maintenance Flowchart Check for broken connectors on the drive motherboard and cables Check for bent or broken pins on the drive motherboard and cable connections Try an alternate cable if available If the drive works with the new cable the original cabl...

Страница 135: ...nal Mouse fails perform the following 1 Use a different mouse 2 If the mouse uses a wireless connection insert new batteries and confirm there is a good connection Refer to the mouse user manual 3 If the mouse uses a USB connection use a different USB port 4 Use a different program to verify mouse operation Reinstall the program experiencing mouse failure 5 Restart the computer 6 Remove recently a...

Страница 136: ... a short circuit is suspected or whether the system is inoperative Perform the following procedures to isolate the failing FRU do not isolate non defective FRU NOTE NOTE Verify that all attached devices are supported by the computer NOTE NOTE Verify that the power supply being used at the time of the failure is operating correctly Refer to Power On Issues 1 Remove power from the computer 2 Visuall...

Страница 137: ...E0 0xE5 0xF8 Table 4 3 SEC Phase POST Code Table Functionality Name Include PostCode h Phase Post Code Description SEC_SYSTEM_POWER_ON SEC 1 CPU power on and switch to Protected mode SEC_BEFORE_MICROCODE_PATCH SEC 2 Patching CPU microcode SEC_AFTER_MICROCODE_PATCH SEC 3 Setup Cache as RAM SEC_SETUP_CAR_OK SEC 7 Cache as RAM test SEC_GO_TO_SECSTARTUP SEC 9 Setup BIOS ROM cache SEC_GO_TO_PEICORE SEC...

Страница 138: ...FOR_CRISIS PEI 7F Memory Initial for Crisis Recovery PEI_MEMORY_INSTALL PEI 80 Simple Memory test PEI_SWITCH_STACK PEI 82 Start to use Memory PEI_MEMORY_CALLBACK PEI 83 Set cache for physical memory PEI_ENTER_RECOVERY_MODE PEI 84 Recovery device Initialization PEI_RECOVERY_MEDIA_FOUND PEI 85 Found Recovery image PEI_RECOVERY_MEDIA_NOT_FOUND PEI 86 Recovery image not found PEI_RECOVERY_LOAD_FILE_DO...

Страница 139: ...DXE 50 SMBUS Driver Initialization DXE_SMART_TIMER_INIT DXE 51 8259 Initialization DXE_PCRTC_INIT DXE 52 RTC Initialization DXE_RELOCATE_SMBASE DXE 56 Relocate SMM BASE DXE_FIRST_SMI DXE 57 SMI test DXE_BEFORE_CSM16_INIT DXE 59 Legacy BIOS Initialization DXE_AFTER_CSM16_INIT DXE 5A Legacy interrupt function Initialization DXE_LOAD_ACPI_TABLE DXE 5B ACPI Table Initialization Table 4 6 BDS Phase POS...

Страница 140: ...zation BDS_START_ISA_SEIRAL BDS 23 Serial device initialization BDS_START_IDE_BUS BDS 24 IDE device initialization BDS_START_AHCI_BUS BDS 25 AHCI device initialization BDS_CONNECT_LEGACY_ROM BDS 26 Dispatch option ROMs BDS_ENUMERATE_ALL_BOOT_OPTION BDS 27 Get boot device information BDS_END_OF_BOOT_SELECTION BDS 28 End of boot selection BDS_ENTER_SETUP BDS 29 Enter Setup Menu BDS_ENTER_BOOT_MANAGE...

Страница 141: ...ty Name Include PostCode h Phase Post Code Description POST_BDS_NO_BOOT_DEVICE POST_BDS F9 No Boot Device POST_BDS_START_IMAGE POST_BDS FB UEFI Boot Start Image POST_BDS_ENTER_INTI9 POST_BDS FD Legacy 16 boot entry POST_BDS_BOOT_SECTOR POST_BDS FE Try to Boot with INT 19 Table 4 9 ACPI Functions POST Code Table Functionality Name Include PostCode h Phase Post Code Description ASL_ENTER_S1 ASL 51 P...

Страница 142: ...call ACPI disable function SMM_ACPI_DISABLE_END SMM 0xA9 ACPI disable function complete Table 4 11 InsydeH2ODDT Debugger POST Code Table Functionality Name Include PostCode h Post Code Description Used by Insyde debugger 0x0D Waiting for device connect Used by Insyde debugger 0xD0 Waiting for device connect Used by Insyde debugger 0xD1 InsydeH2ODDT Ready Used by Insyde debugger 0xD2 EHCI not found...

Страница 143: ...CHAPTER 5 Jumper and Connector Locations ...

Страница 144: ...5 2 Mainboard 5 3 Clearing Password and BIOS Recovery 5 5 Clearing Password 5 5 BIOS Recovery by Crisis Disk 5 6 ...

Страница 145: ...rd Top Table 5 1 Mainboard Top Item Description Item Description 1 Camera Connector 2 TV Mini PCIE 3 Light Bar Right 4 Speaker Connector 5 IR Connector 6 Light Bar Left 7 Power Button Connector 8 HDD Power Connector 9 SATA HDD Connector 10 Converter Connector 1 2 3 4 5 6 7 8 9 10 11 12 13 14 15 16 ...

Страница 146: ...nd Connector Locations 11 Touch Panel Connector 12 WLAN Mini PCIE 13 LED Switch Connector 14 Fan Connector 15 SATA ODD Connector 16 LVDS Connector Table 5 1 Mainboard Top Continued Item Description Item Description ...

Страница 147: ...sword Supervisor Password and or User Password is set the BIOS will prompt for the password at system POST or upon entering the BIOS setup menu Clear the password check with the following procedure 1 Remove AC adapter 2 Locate the RTC reset point and short it A Figure 5 2 Figure 5 2 CMOS Jumper Overview 3 Plug in AC adapter 4 Restart the system and press F2 to enter BIOS Utility Setup menu 5 If no...

Страница 148: ...y 0 To enable the BIOS Recovery process use the function hotkey Fn Esc during BIOS POST The AC adapter and battery are required to be installed during this process Steps for BIOS Recovery using USB HDD 0 NOTE NOTE Prior to performing the recovery prepare a Crisis USB key The Crisis USB key is created by executing the Crisis Disk program in another system with Windows 7 OS To Create a Crisis USB ke...

Страница 149: ...ll appear as shown in Figure 5 4 Figure 5 4 BIOS Recovery Screen 7 Select Proceed with flash update 8 Press Enter button to initiate BIOS Recovery mode Flash will begin Figure 5 5 Figure 5 5 Flash Update Progress 9 When BIOS Recovery is complete press F10 to save and exit 10 Press Del to return to BIOS setup menu Update the latest BIOS version for this machine by the regular BIOS flashing process ...

Страница 150: ...5 8 Jumper and Connector Locations ...

Страница 151: ...CHAPTER 6 FRU Field Replaceable Unit List ...

Страница 152: ...6 2 Exploded Diagram 6 4 Main Assembly 6 4 FRU List 6 6 Screw List 6 7 ...

Страница 153: ...eb or channel Part number changes will not be noted on the printed Service Guide For Acer Authorized Service Providers the Acer office may have a different part number code from those given in the FRU list of this printed Service Guide Users MUST use the local FRU list provided by the regional Acer office to order FRU parts for repair and service of customer machines NOTE NOTE To scrap or to retur...

Страница 154: ...d Diagram 0 Main Assembly 0 Figure 6 1 Main Assembly Exploded Diagram Table 6 1 Main Assembly Exploded Diagram No Description P N 1 Touch Board 55 SG407 006 2 LCD Panel 6M SG407 001 1 2 3 4 5 6 7 8 9 10 11 12 13 14 15 16 17 18 19 20 21 22 23 24 ...

Страница 155: ... Mainboard Cover 33 SG407 003 13 ODD Module KU 0080D 057 14 Infrared Board 55 SG407 005 15 ODD Bracket 33 SG407 008 16 HDD Bracket 33 SG407 007 17 HDD Module KH 32007 011 18 LED Switch Board 55 SG407 004 19 Power Button Board 55 SG407 001 20 Right Camera Bracket 33 SG407 002 21 Light Bar Cover 42 SG407 001 22 Hinge Assembly 60 SG407 005 23 Right Light Bar Module 55 SG407 002 24 Left Light Bar Modu...

Страница 156: ...F AP 13503 010 Adapter DELTA 135W DE 19V 2 5x5 5x11 Orange ADP 135FB BFA LV5 OBL LED LF AP 13501 015 MAINBOARD Mainboard Intel Cougar Point H61 Intel H61 LF MB SG406 001 BOARD POWER BUTTON BOARD 55 SG407 001 LED BOARD R 55 SG407 002 LED BOARD L 55 SG407 003 LED SWITCH BOARD 55 SG407 004 IR BOARD 55 SG407 005 TOUCH CONTROL BOARD 55 SG407 006 B CAS BOARD 55 SG407 007 ...

Страница 157: ...Kits TV Tuner Card TU 10500 051 internal TV cable for Quanta AIO TU 10500 093 AverMedia A336 D TV Tuner Card Kits TU 10500 052 ODM internal TV cable for AIO TU 10500 096 CABLE POWER CORD 3PIN UK 27 GCA07 002 POWER CORD US 110V 3P 27 G8507 001 POWER CORD 1 8M BLACK IT 3P 27 G8507 008 POWER CORD 1 8M BLACK EU 3P 27 SCY07 001 POWER CORD 1 8M BLACK ARGENTINA 27 GCA07 003 POWER CORD 1 8M BLACK BRAZIL 2...

Страница 158: ... 008 CABLE B CAS B TO MB 50 SG407 009 CAMERA CABLE 50 SG407 010 IR CABLE 50 SG407 011 CASE COVER BRACKET ASSEMBLY FRONT BEZEL ASSY W SPEAKER ANTENNA ODD CABLE LIGHT BAR CABLE POWER CABLE LED B CABLE R CONVERTER CABLE 60 SG407 002 LIGHT BAR COVER ASSY 42 SG407 001 REAR COVER ASSY 60 SG407 003 Table 6 2 FRU List Continued Category Description P N ...

Страница 159: ...IDDLE FRAME ASSY 33 SG407 006 HINGE ASSY 60 SG407 005 ODD BEZEL ASSY 42 SG407 002 HDD BRACKET ASSY 33 SG407 007 ODD BRACKET 33 SG407 008 SPEAKER ASSY 23 SG407 001 Remote Controller Philips Remote Controller ECO KB remote RT 11300 031 internal IR module RT 11300 032 SMK Remote Controller JA RRS9003 3409EC SMK Quatro Pulse code support I O data mAgicTV application with Battery pack RT 11300 033 IR B...

Страница 160: ... 4 104KS Silver Thailand KB RF40B 006 Keyboard LITE ON SK 9660 RF2 4 105KS Silver Spanish KB RF40B 007 Keyboard LITE ON SK 9660 RF2 4 105KS Silver Portuguese KB RF40B 008 Keyboard LITE ON SK 9660 RF2 4 105KS Silver Canadian French KB RF40B 009 Keyboard LITE ON SK 9660 RF2 4 107KS Silver Brazilian Portuguese KB RF40B 010 Keyboard LITE ON SK 9660 RF2 4 109KS Silver Japanese KB RF40B 011 Keyboard LIT...

Страница 161: ... LITE ON SK 9660 RF2 4 105KS Silver Slovak KB RF40B 025 Keyboard LITE ON SK 9660 RF2 4 104KS Silver Russian KB RF40B 026 Keyboard LITE ON SK 9660 RF2 4 105KS Silver Hungarian KB RF40B 027 Keyboard LITE ON SK 9660 RF2 4 104KS Silver Greek KB RF40B 028 Keyboard LITE ON SK 9660 RF2 4 105KS Silver Danish KB RF40B 029 Keyboard LITE ON SK 9660 RF2 4 104KS Silver Czech KB RF40B 030 Keyboard LITE ON SK 96...

Страница 162: ... Chinese KB RF40P 043 Keyboard PRIMAX KBRF36211 RF2 4 104KS Silver Simplified Chinese KB RF40P 044 Keyboard PRIMAX KBRF36211 RF2 4 104KS Silver US International KB RF40P 045 Keyboard PRIMAX KBRF36211 RF2 4 104KS Silver Arabic English KB RF40P 046 Keyboard PRIMAX KBRF36211 RF2 4 104KS Silver Thailand KB RF40P 047 Keyboard PRIMAX KBRF36211 RF2 4 105KS Silver Spanish KB RF40P 048 Keyboard PRIMAX KBRF...

Страница 163: ...ver Hebrew KB RF40P 063 Keyboard PRIMAX KBRF36211 RF2 4 105KS Silver Polish KB RF40P 064 Keyboard PRIMAX KBRF36211 RF2 4 105KS Silver Slovenian KB RF40P 065 Keyboard PRIMAX KBRF36211 RF2 4 105KS Silver Slovak KB RF40P 066 Keyboard PRIMAX KBRF36211 RF2 4 104KS Silver Russian KB RF40P 067 Keyboard PRIMAX KBRF36211 RF2 4 105KS Silver Hungarian KB RF40P 068 Keyboard PRIMAX KBRF36211 RF2 4 104KS Silver...

Страница 164: ... KBRF36211 RF2 4 Silver Spanish Latin without battery KB RF40P 086 Keyboard PRIMAX KBRF33711 RF2 4 Standard Silver US with touch pad KB RF40P 087 Keyboard PRIMAX KBRF33711 RF2 4 Standard Silver English Canadian French with touch pad KB RF40P 088 Keyboard PRIMAX KBRF33711 RF2 4 Standard Silver Italian with touch pad KB RF40P 089 Keyboard PRIMAX KBRF33711 RF2 4 Standard Silver Russian with touch pad...

Страница 165: ...0B 294 Keyboard LITE ON SK 9621 USB 105KS Silver Spanish KB USB0B 295 Keyboard LITE ON SK 9621 USB 105KS Silver Portuguese KB USB0B 296 Keyboard LITE ON SK 9621 USB 105KS Silver Canadian French KB USB0B 297 Keyboard LITE ON SK 9621 USB 107KS Silver Brazilian Portuguese KB USB0B 298 Keyboard LITE ON SK 9621 USB 109KS Silver Japanese KB USB0B 299 Keyboard LITE ON SK 9621 USB 105KS Silver German KB U...

Страница 166: ... ON SK 9621 USB 105KS Silver Danish KB USB0B 317 Keyboard LITE ON SK 9621 USB 104KS Silver Czech KB USB0B 318 Keyboard LITE ON SK 9621 USB 105KS Silver Romanian KB USB0B 319 Keyboard LITE ON SK 9621 USB 105KS Silver Turkish KB USB0B 320 Keyboard LITE ON SK 9621 USB 105KS Silver Turkish Q KB USB0B 321 Keyboard LITE ON SK 9621 USB 105KS Silver Arabic French KB USB0B 322 Keyboard LITE ON SK 9621 USB ...

Страница 167: ...B36211 USB 105KS Silver Canadian French KB USB0P 050 Keyboard PRIMAX KB36211 USB 107KS Silver Brazilian Portuguese KB USB0P 051 Keyboard PRIMAX KB36211 USB 109KS Silver Japanese KB USB0P 052 Keyboard PRIMAX KB36211 USB 105KS Silver German KB USB0P 053 Keyboard PRIMAX KB36211 USB 105KS Silver Italian KB USB0P 054 Keyboard PRIMAX KB36211 USB 105KS Silver French KB USB0P 055 Keyboard PRIMAX KB36211 U...

Страница 168: ...PRIMAX KB36211 USB 105KS Silver Turkish KB USB0P 073 Keyboard PRIMAX KB36211 USB 105KS Silver Turkish Q KB USB0P 074 Keyboard PRIMAX KB36211 USB 105KS Silver Arabic French KB USB0P 075 Keyboard PRIMAX KB36211 USB 104KS Silver Kazakh KB USB0P 076 Keyboard PRIMAX KB36211 USB 104KS Silver Turkmen KB USB0P 077 Keyboard PRIMAX KB36211 USB 105KS Silver Nordic KB USB0P 078 Keyboard PRIMAX KB36211 USB 105...

Страница 169: ... KC 40501 SI5 Core i3 2105 LGA 3 1G 3M 1155 65W Dual Core KC 10501 CI3 Pentium Dual Core G850 2 9G 3M 1066FSB KC 85001 DEG Pentium Dual Core G840 2 8G 3M 1066FSB KC 84001 DEG Pentium Dual Core G620 2 6G 3M 1066FSB KC 62001 DEG HDD HARD DISK DRIVE HDD HGST 3 5 7200rpm 320GB HDS721032CLA362 Jupiter SATA II 16MB LF F W 3EA KH 32007 011 HDD HGST 3 5 7200rpm 500GB HDS721050CLA362 Jupiter SATA II 16MB L...

Страница 170: ...B03 034 Memory KINGSTON SO DIMM DDRIII 1333 1GB ACR128X64D3S1333C9 LF 128 8 0 065um KN 1GB07 004 Memory UNIFOSA SO DIMM DDRIII 1333 1GB GU672203EP0200 LF 128 8 0 065um KN 1GB0H 017 Memory NANYA SO DIMM DDRIII 1333 2GB NT2GC64B88B0NS CG LF 256 8 0 055um KN 2GB03 021 Memory KINGSTON SO DIMM DDRIII 1333 2GB ACR256X64D3S1333C9 LF 128 8 0 065um KN 2GB07 004 Memory ELPIDA SO DIMM DDRIII 1333 2GB EBJ20UF...

Страница 171: ...s 7 KU 0080D 057 ODD PLDS Super Multi DRIVE 12 7mm Tray DL 8X DS 8A5SH LF HF W O bezel SATA With TI Rohm Solution HF Windows 7 KU 0080F 014 ODD HLDS BD COMBO 12 7mm Tray DL 4X CT30N LF W O bezel 1 00 SATA KO 0040D 005 ODD PLDS BD COMBO 12 7mm Tray DL 4X DS 6E2SH LF W O bezel SATA HF Win7 3D KO 0040F 006 Table 6 2 FRU List Continued Category Description P N ...

Страница 172: ...NYLOK IRON 86 SG407 001 SCREW M3 0 4 0 I BNI NYLOK IRON 86 SG407 002 SCREW M3 6 I BNI NYLOK IRON 86 SG407 003 SCREW M2 0 3 0 I BNI NYLOK 86 SG407 004 SCREW M3 0 10 I NI NYLOK IRON 86 SG407 005 SCREW M2 0 6 I BNI NYLOK D4 0 T0 7 86 SG407 006 SCREW M2 5 4 0 I BNI NYLOK IRON 86 SG407 007 SCREW M3 5 8 9 I NI IRON 86 SG407 008 ...

Страница 173: ...CHAPTER 7 Online Support Information ...

Страница 174: ...7 2 Support Service 7 3 ...

Страница 175: ...nformation section users can download information on all of Acer s Notebook Desktop and Server models including Service guides for all models BIOS updates Software utilities Spare parts lists TABs Technical Announcement Bulletin For these purposes we have included an Acrobat File to facilitate the problem free downloading of our technical material Also contained on this website are Detailed inform...

Страница 176: ...7 4 Online Support Information ...

Отзывы: