Chapter 1
5
Your Acer Notebook tour
After knowing your computer features, let us show you around your new computer.
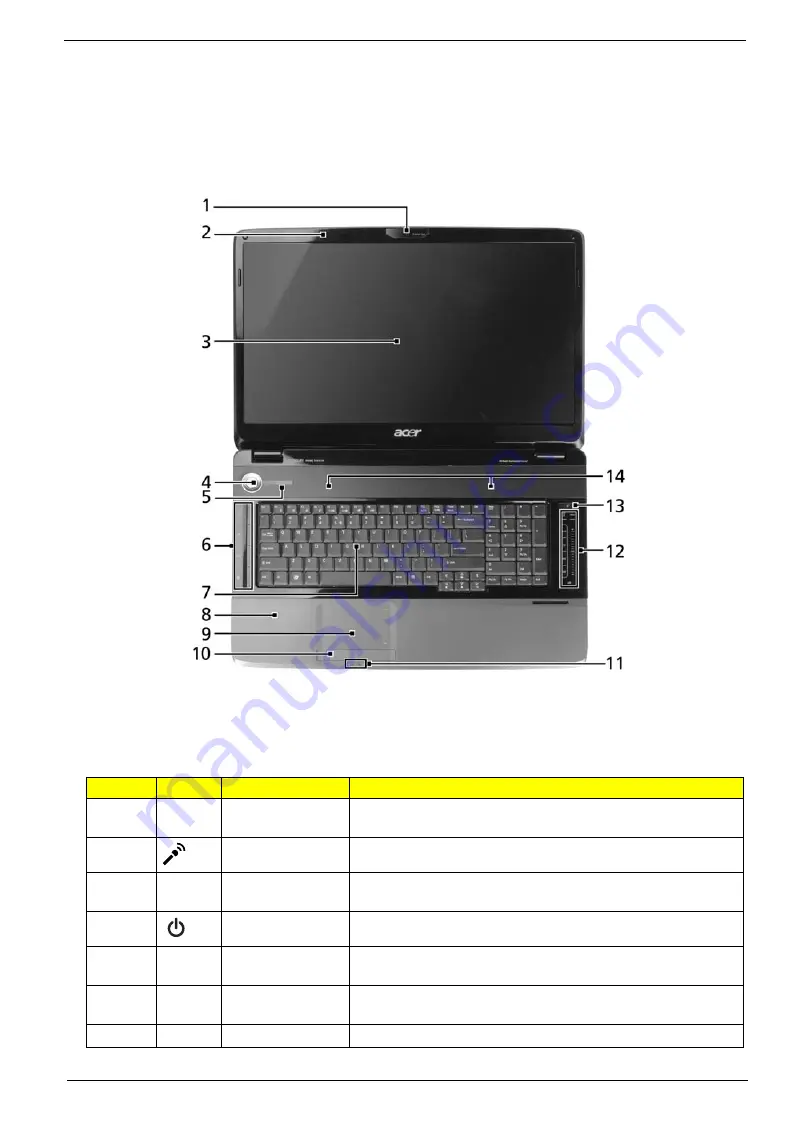
Front View
Icon
Item
Description
1
Acer Crystal Eye
webcam
Web camera for video communication.
2
Microphone
Internal microphone for sound recording.
3
Display screen
Also called Liquid-Crystal Display (LCD), displays computer
output (Configuration may vary by models).
4
Power button
Turns the computer on and off.
5/11
Status indicators
Light-Emitting Diodes (LEDs) that light up to show the status of
the computer's functions and components.
6
Easy-launch
buttons
Buttons for launching frequently used programs.
7
Keyboard
For entering data into your computer.
Содержание Aspire 8735
Страница 6: ...VI ...
Страница 10: ...4 Chapter 1 System Block Diagram ...
Страница 54: ...50 Chapter 2 ...
Страница 71: ...Chapter 3 67 2 Remove the two captive screws securing the hard disk drive cover ...
Страница 81: ...Chapter 3 77 5 Disconnect the power board cable from PWCN1 connector on the system to remove it ...
Страница 94: ...90 Chapter 3 19 Disconnect the Media console cable from LEDB1 on the main board ...
Страница 112: ...108 Chapter 3 21 Remove the USB board module from the lower case ...
Страница 118: ...114 Chapter 3 13 Detach any adhesive tapes and any cable that is glued to the LCD panel ...
Страница 119: ...Chapter 3 115 14 Disconnect the FPC cable from the LCD panel ...
Страница 136: ...132 Chapter 4 F5h Boot to Mini DOS F6h Clear Huge Segment F7h Boot to Full DOS Code Beeps ...
Страница 143: ...Chapter 4 139 ...
Страница 144: ...140 Chapter 4 ...
Страница 145: ...Chapter 5 139 Motherboard Jumper and Connector Locations Chapter 5 ...
Страница 146: ...140 Chapter 5 ...
Страница 148: ...142 Chapter 5 try again NOTE The steps are only for clearing BIOS Password Supervisor Password and User Password ...
Страница 150: ...144 Chapter 5 ...
Страница 152: ...146 Chapter 6 Aspire 8735 8735G 8735ZG Series Exploded Diagram ...
Страница 170: ...158 Appendix B ...
Страница 172: ...160 Appendix C ...


