


160
Chapter 4
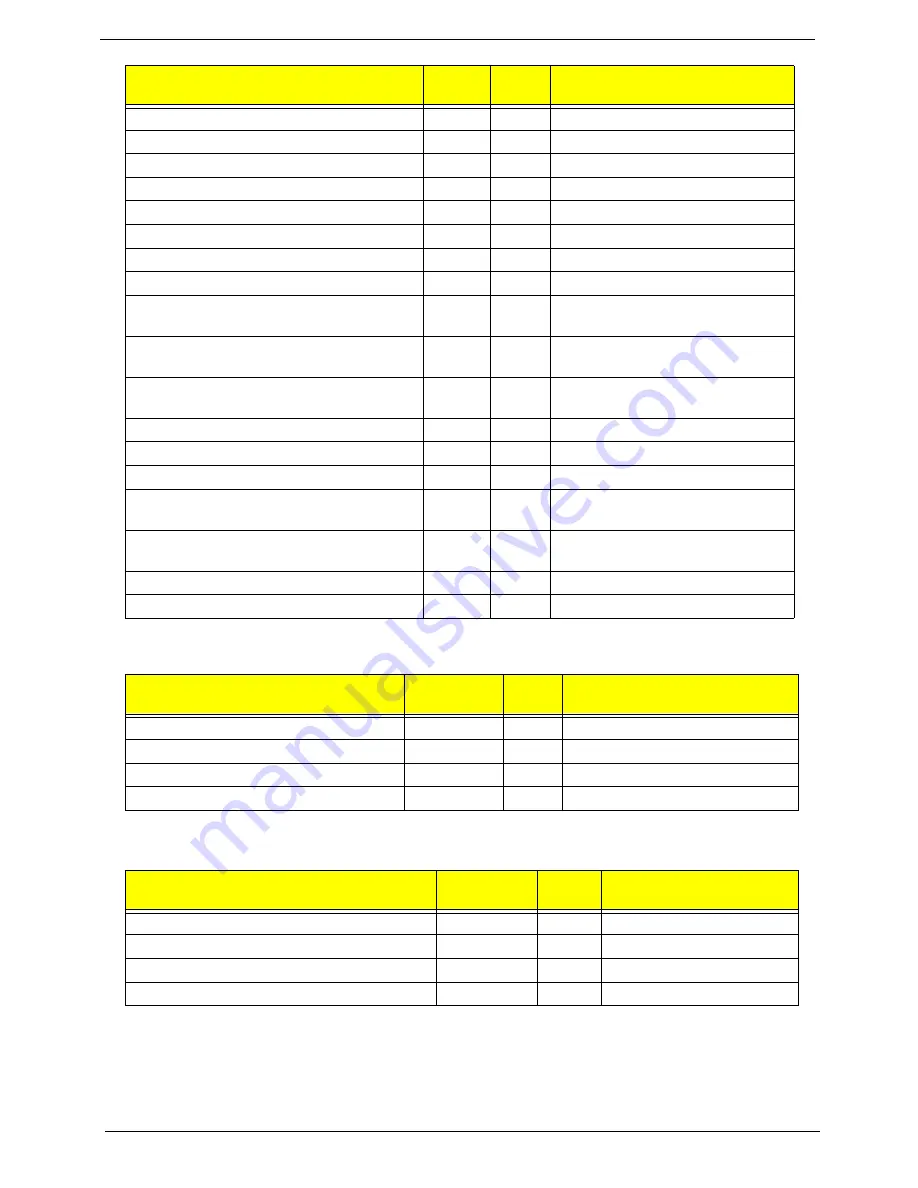
PostBDS POST Code Table
S3 Functions POST Code Table
BDS_START_IDE_BUS
BDS
24
IDE device initialization
BDS_START_AHCI_BUS
BDS
25
AHCI device initialization
BDS_CONNECT_LEGACY_ROM
BDS
26
Dispatch option ROMs
BDS_ENUMERATE_ALL_BOOT_OPTION
BDS
27
Get boot device information
BDS_END_OF_BOOT_SELECTION
BDS
28
End of boot selection
BDS_ENTER_SETUP
BDS
29
Enter Setup Menu
BDS_ENTER_BOOT_MANAGER
BDS
2A
Enter Boot manager
BDS_BOOT_DEVICE_SELECT
BDS
2B
Try to boot system to OS
BDS_EFI64_SHADOW_ALL_LEGACY_RO
M
BDS
2C
Shadow Misc Option ROM
BDS_ACPI_S3SAVE
BDS
2D
Save S3 resume required data in
RAM
BDS_READY_TO_BOOT_EVENT
BDS
2E
Last Chipset initial before boot to
OS
BDS_GO_LEGACY_BOOT
BDS
2F
Start to boot Legacy OS
BDS_GO_UEFI_BOOT
BDS
30
Start to boot UEFI OS
BDS_LEGACY16_PREPARE_TO_BOOT
BDS
31
Prepare to Boot to Legacy OS
BDS_EXIT_BOOT_SERVICES
BDS
32
Send END of POST Message to
ME via HECI
BDS_LEGACY_BOOT_EVENT
BDS
33
Last Chipset initial before boot to
Legacy OS.
BDS_ENTER_LEGACY_16_BOOT
BDS
34
Ready to Boot Legacy OS.
BDS_RECOVERY_START_FLASH
BDS
35
Fast Recovery Start Flash.
Functionality Name (Include\
PostCode.h)
Phase
Post
Code
Description
POST_BDS_NO_BOOT_DEVICE
POST_BDS
F9
No Boot Device
POST_BDS_START_IMAGE
POST_BDS
FB
UEFI Boot Start Image
POST_BDS_ENTER_INT19
POST_BDS
FD
Legacy 16 boot entry
POST_BDS_JUMP_BOOT_SECTOR
POST_BDS
FE
Try to Boot with INT 19
Functionality Name (Include\ PostCode.h)
Phase
Post
Code
Description
POST_BDS_NO_BOOT_DEVICE
POST_BDS
F9
No Boot Device
POST_BDS_START_IMAGE
POST_BDS
FB
UEFI Boot Start Image
POST_BDS_ENTER_INT19
POST_BDS
FD
Legacy 16 boot entry
POST_BDS_JUMP_BOOT_SECTOR
POST_BDS
FE
Try to Boot with INT 19
Functionality Name (Include\
PostCode.h)
Phase
Post
Code
Description
Содержание Aspire 5820T Series
Страница 6: ...VI ...
Страница 10: ...X Table of Contents ...
Страница 48: ...38 Chapter 2 ...
Страница 57: ...Chapter 3 47 4 Lift the base door out and away ...
Страница 62: ...52 Chapter 3 5 Pull the WLAN module out and away ...
Страница 64: ...54 Chapter 3 5 Pull the 3G module out and away ...
Страница 72: ...62 Chapter 3 9 Flip the keyboard over 10 Detach the keyboard FPC a Unlock the FPC b Pull the keyboard away a b ...
Страница 78: ...68 Chapter 3 4 Unlock and disconnect the switch board FFC ...
Страница 80: ...70 Chapter 3 4 Lift the power board away ...
Страница 85: ...Chapter 3 75 14 Lift the LCD module out of the assembly ...
Страница 87: ...Chapter 3 77 4 Lift away the I O board 5 Unlock and remove the I O board FFC from the mainboard ...
Страница 98: ...88 Chapter 3 Right Hinge Disassembly M2 5 3 2 86 PTN07 003 Step Screw Quantity Part No ...
Страница 100: ...90 Chapter 3 4 Pry open the bottom corners and along the bottom edge 5 Lift the bezel off the module ...
Страница 104: ...94 Chapter 3 7 Disconnect the FPC cable ...
Страница 107: ...Chapter 3 97 8 Remove the cable from the retention guides 9 Pry the antenna off the casing ...
Страница 112: ...102 Chapter 3 7 Lay the cables along the retention guides ...
Страница 118: ...108 Chapter 3 3 Press down on the bezel edge working simultaneously around the edges to the bottom ...
Страница 123: ...Chapter 3 113 2 Using a flat bladed screw driver rotate the CPU locking screw 180 clockwise to secure the CPU in place ...
Страница 127: ...Chapter 3 117 4 Connect and lock the I O card FFC to the mainboard ...
Страница 129: ...Chapter 3 119 4 Connect the Bluetooth module cable to the main board ...
Страница 133: ...Chapter 3 123 10 Press the LVDS connector left and right adhesive tabs down onto the mainboard ...
Страница 139: ...Chapter 3 129 7 Connect and lock the button board FFC ...
Страница 147: ...Chapter 3 137 4 Grasp the tab and slide the HDD firmly into the docking connector ...
Страница 150: ...140 Chapter 3 4 Push the ODD completely into the bay until flush with the lower cover ...
Страница 153: ...Chapter 3 143 Replace the Dummy Card Push the dummy card into the slot until it clicks into place ...
Страница 154: ...144 Chapter 3 ...
Страница 172: ...162 Chapter 4 ...
Страница 176: ...166 Chapter 5 ...
Страница 190: ...180 Chapter 6 ...
Страница 260: ...250 Appendix A ...
Страница 266: ...256 ...


