


103
Equipment and parts necessary for upgrade
The following is a list of the equipment and parts required for the
upgrade from JBOD to RAID:
•
Anti-static wrist strap and properly earthed grounding wire.
•
Phillips head screw driver.
•
Altos S700 RAID Controller (2 controllers if dual controller operation is
required)
•
FC host cables to connect RAID controller to host/hub/switch
Contact Acer Technical Support to ensure that the correct LS
Module Firmware is installed.
Upgrading from JBOD to RAID
Before beginning the upgrade, ensure that anti-static precautions
are taken. The minimum requirement is an anti-static wrist strap
and grounding wire.
1
Shut down the system and remove the power cables from the rear
of the enclosure.
2
Using the Phillips head screwdriver, loosen the screws securing the
I/O Module in the enclosure.
3
Using the handle on the module remove the I/O Module from the
enclosure.
4
Into the I/O Module slot install the RAID controller and secure in
place by tightening the screws using the Phillips head screwdriver.
1
2
1
2
0
I
0
I
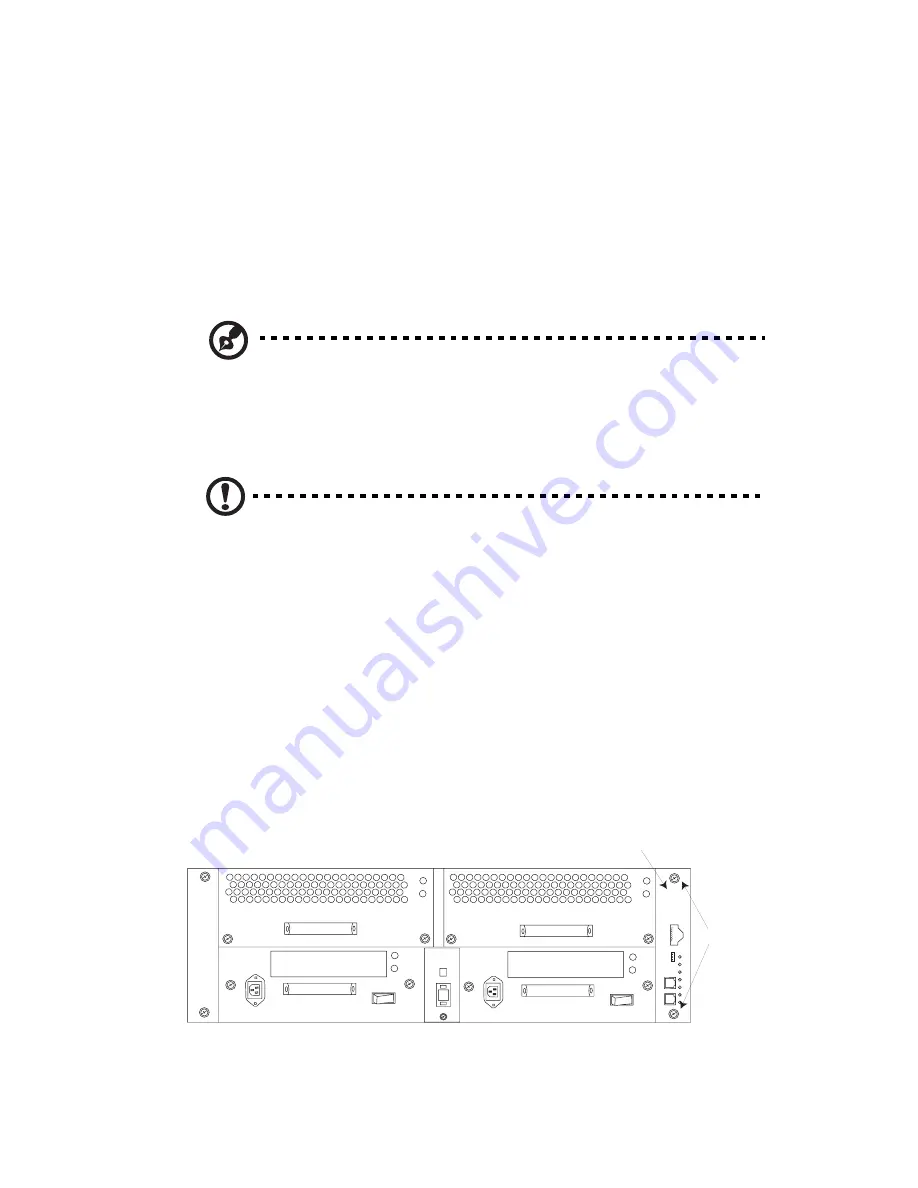
RAID Controller Installed
RAID
Controller
Screws
1
2
3
4
5
6
7
Содержание Altos S700 Series
Страница 1: ...Altos S700 Series User s Guide ...
Страница 6: ...Contents vi ...
Страница 16: ...xvi ...
Страница 17: ...Chapter 1 Introduction ...
Страница 24: ...Chapter 1 Introduction 8 Figure 1 1 Altos S700 Series Tower Model ...
Страница 25: ...9 Figure 1 2 Altos S700 Series Rack Model ...
Страница 26: ...Chapter 1 Introduction 10 ...
Страница 27: ...Chapter 2 Installation and Setup ...
Страница 36: ...Chapter 2 Installation and Setup 20 Figure 2 1 Location of Jumpers on LS Module ...
Страница 38: ...Chapter 2 Installation and Setup 22 3 Replace the LS module ...
Страница 43: ...Chapter 3 JBOD Configurations ...
Страница 55: ...Chapter 4 RAID Configurations ...
Страница 66: ...Chapter 4 RAID Configurations 50 Slot 13 16 31 46 61 76 91 106 121 Enclosure ID Drive Slot 0 1 2 3 4 5 6 7 ...
Страница 75: ...Chapter 5 System Monitoring ...
Страница 86: ...Chapter 5 System Monitoring 70 ...
Страница 87: ...Chapter 6 Installing and Removing Components ...
Страница 91: ...75 Figure 6 1 Disk Drive Carrier 18F Cam Lever Push locking tab in this direction to open ...
Страница 93: ...77 Figure 6 2 LS Module 0 1 2 3 4 5 Cam Lever Push locking tab in this direction to open ...
Страница 97: ...Appendix A Safety Statement Translations ...
Страница 105: ...Appendix B Technical Specifications ...
Страница 111: ...Appendix C Configuration Loop Diagram ...
Страница 116: ...Appendix C Configuration Loop Diagram 100 ...
Страница 117: ...Appendix D Upgrading an Altos S700 JBOD Array to a RAID Array ...
Страница 122: ...Appendix D Upgrading an Altos S700 JBOD Array to a RAID Array 106 ...


