16
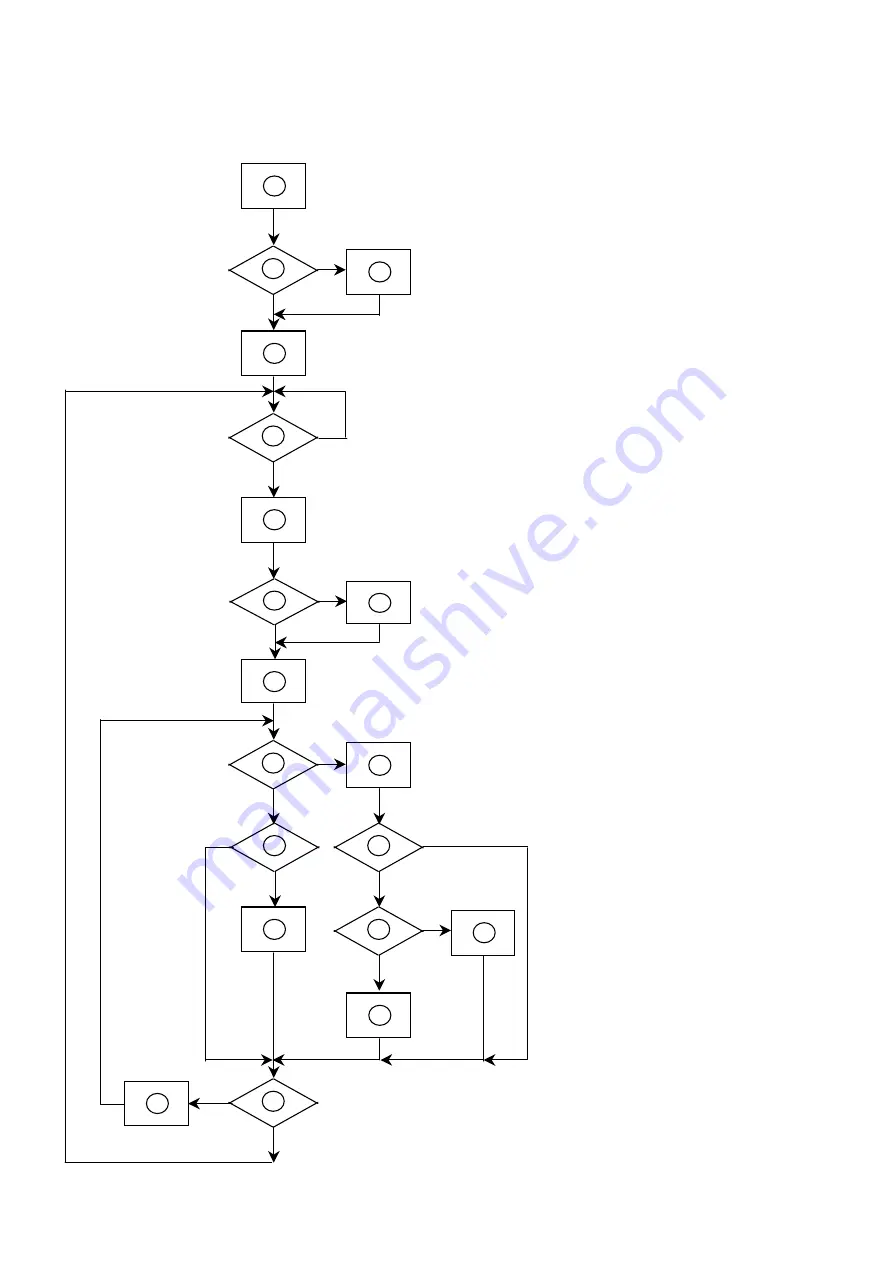
Software Flow Chart
1)
MCU initialize.
2) Is the eeprom blank?
3) Program the eeprom by default values.
4) Get the PWM value of brightness from
eeprom. Check the pin PANEL1 and PANEL2
to tell which panel to get with it.
5) Is the power key pressed?
6) Clear all global flags.
7) Are the AUTO and SELECT keys pressed?
8) Enter factory mode.
9) Saving the power key status into eeprom.
Turn on the LED and set it to green color.
Scalar initializes.
10) In standby mode?
11) Update the lifetime of back light.
12) Check the analog and digital port, are there
any signals coming?
13) Does the scalar send out a interrupt request?
14) Wake up the scalar.
15) Are there any signals coming from analog or
digital port?
16) Display "
No Input Signal " message. And go
into standby mode after the message disappear.
17) Program the scalar to be able to show the coming
mode.
18) Process the OSD display.
19)
Read the keyboard. Is the power key pressed?
1
2
N
Y
5
Y
N
10
Y
N
12
Y
N
7
Y
N
6
4
3
8
9
14
11
13
Y
N
15
Y
N
16
17
19
Y
N
18
Содержание AL1922
Страница 1: ...0 Acer AL1922 Service Guide ...
Страница 22: ...21 Front Bezel Item Description 1 Volume 2 Volume 3 POWER KEY 4 MENU ENTER 5 Auto Adjust Key Exit ...
Страница 23: ...22 Rear Bezel Item Description 1 D SUB CABLE 2 DVI CABLE 3 AUDIO CABLE 4 AC POWER CORD ...
Страница 27: ...26 II Dual Input Model Analog Signal Input III Dual Input Model Digital Signal Input ...
Страница 34: ...33 Fig 4 Fig 5 ...
Страница 35: ...34 Fig6 Fig 7 ...
Страница 39: ...38 Fig13 ...
Страница 41: ...40 Disassemble the panel 1 Remove four screws right and left to release metal frame Fig 16 Fig16 ...
Страница 51: ...50 Exploded Diagram Model AL1922 ...


