background image

1

A SPECIAL NOTE FOR PARENTS

It is a tragic fact that most bicycle accidents involve children. As a

parent or guardian, you bear the responsibility for the activities and
safety of your minor child. Among these responsibilities are to make
sure that the bicycle which your child is riding is properly fitted to
the child: that it is in good repair and safe operating condition; that
the play of young children is supervised by an adult; that you and
your child have learned, understand and obey not only the
applicable local motor vehicle, bicycle and traffic laws, but also the
common sense rules of safe and responsible bicycling.

As a parent,you should read this manual before letting your child

ride the bicycle. Please make sure that your child always wears an
approved bicycle helmet when riding.

To avoid an accident, teach children good riding skills with an

emphasis on safety from an early age.
1. Always wear a properly fitted helmet.
2. Do not play in driveways or the road.
3. Do not ride on busy streets.
4. Do not ride at night.
5.Keep away from the wet, uneven road during the use of the bike.
6. Obey all traffic laws, especially stop signs and red lights.
7.Be aware of other road vehicles behind and nearby.
8. Before entering a street: Stop, look left, right, and left again for
traffic.
9. If riding downhill, be extra careful. Slow down using
the brakes and maintain control of steering.
10. Never take your hands off the handlebars, or your

feet off the pedals when riding downhill.
11. Always wear shoes when riding a bicycle and avoid loose fiting
clothes. Wear a cuff band or trouser clip to keep pants from getting
caught in the chain wheel.

Important

Children should be made aware of all possible riding hazards and
correct riding behavior before they take to the streets.
DO NOT LEAVE IT UP TO TRIAL AND ERROR

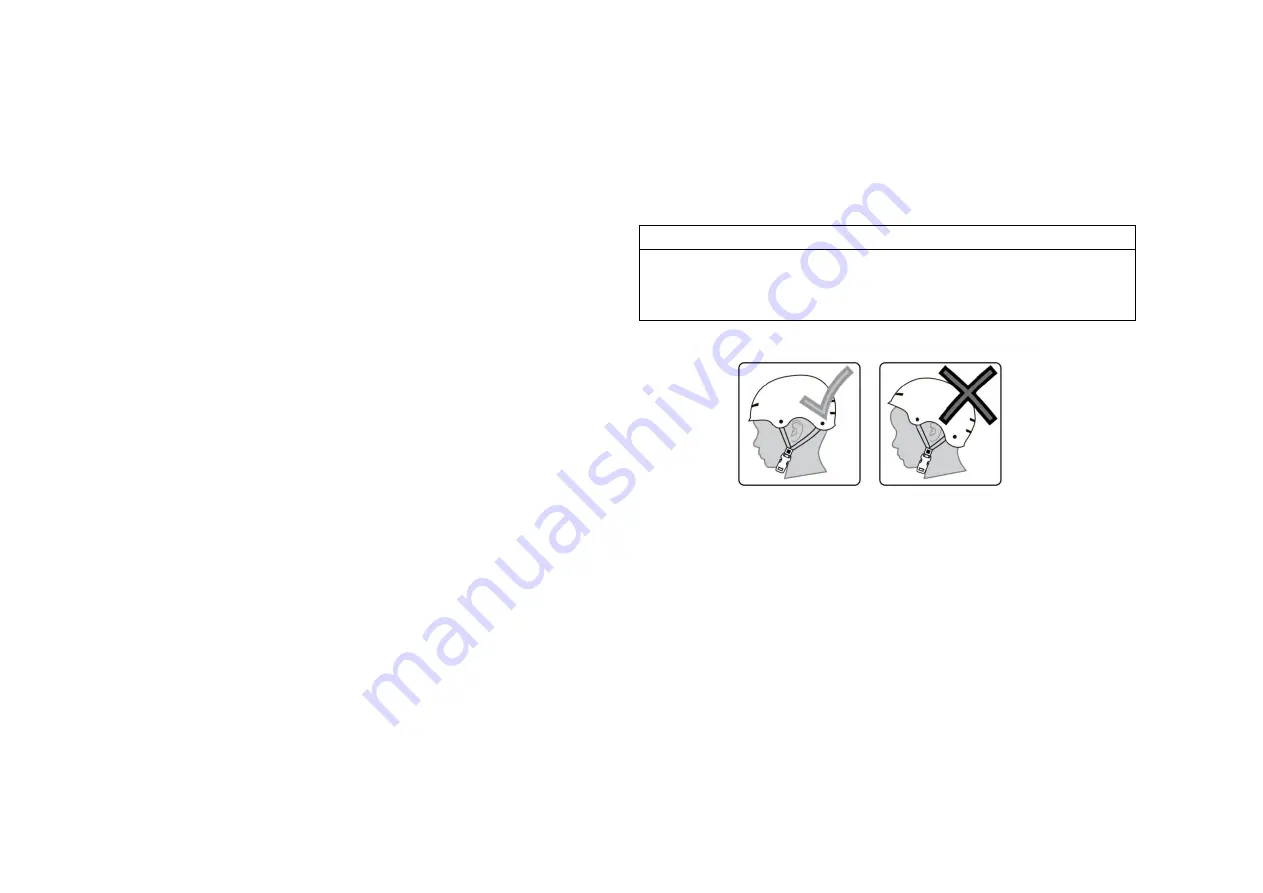
●Helmet should sit level on your head and low on your forehead.
●Adjust the strap sliders below the ear on both sides.
●Buckle the chin strap. Adjust strap until it is snug.
●No more than two fingers should fit between the strap and your
chin.
●A proper fitting helmet should be comfortable and not rock
forward/back-ward or side to side.
● Always read the user manual that comes with your helmet to
make sure it is fitted and attached properly to the wearer's head
according to the fitting instructions described in the user manual.

Содержание Cruiser Bike

Страница 1: ...Owner s Manual CRUISER...

Страница 2: ......

Страница 3: ...o you can get the most out of every ride Please pay attention to the safety information it s there to help you avoid serious injury SPECIAL STATEMENT 1 The illustrations used in this manual just descr...

Страница 4: ...e 6 Install Front Fender and Front Reflector 6 Install Handlebar 8 Adjust V Style Brake 9 Install Pedals 11 Install Seat and Rear Reflector 11 Install Bell 13 BEFORE EVERY RIDE 14 BASIC MAINTENANCE 15...

Страница 5: ...d during the use of the bike 6 Obey all traffic laws especially stop signs and red lights 7 Be aware of other road vehicles behind and nearby 8 Before entering a street Stop look left right and left a...

Страница 6: ...he rider is the highest part of the top tube plus one inch The chart should help you narrow your search but it is not a substitute for an expert helping you find a bike that is most suitable Your new...

Страница 7: ...kings and train tracks all become more hazardous when wet NIGHT RIDING Important Riding a bicycle at night is not recommended Children should never ride at dawn at dusk or at night Riding at dawn at d...

Страница 8: ...T Follow the traffic flow in a straight line and stay close to the curb Watch for cars moving in and out of traffic 8 OBEY ALL TRAFFIC LAWS REGULATIONS Most traffic regulations apply to bike riders as...

Страница 9: ...e comes with some plastic pieces to protect the bike 1 Install Training Wheels Remove the adjustment nuts of training wheel Attach the training wheel and match bolts with fender holder Then reinstall...

Страница 10: ...p outs Set the retaining washer into the hole on the fork drop out and tighten the nuts on both sides 3 Install Front Fender and Front Reflector Remove the nut and bolt on the fork first then attach t...

Страница 11: ...n the QR code or browse the link below to fix https www youtube com watch v T0kq_lhZxks Use the screwdriver and 8mm wrench to loosen the two bolts on the curved strut plate Push the fender to the corr...

Страница 12: ...ndlebar Rotate the handlebar towards the upright position and retighten the bolt Insert the handlebar into the head tube and tighten the expansion bolt with the allen wrench The stem height should be...

Страница 13: ...bicycle movement and cause serious injury or death Be sure the brakes are functioning properly before using the bicycle NOTICE The 26 inch bike of this model has both V brake and coaster brake The 16...

Страница 14: ...cable fixing bolt While holding the brake arm closed use your other hand to pull the brake cable tight through the cable fixing bolt tighten the cable fixing bolt fully with a M5 allen wrench Hold the...

Страница 15: ...e clockwise direction as the inllustration shows 7 Install Seat and Rear Reflector Loosen the nuts on both sides of seat with 14mm wrench Then pull the seat post into a vertical position and retighten...

Страница 16: ...reflector attach the reflector to the seat post then retighten the screw Insert the seat into the seat tube and tighten seat clamp bolt Be sure the minimum insertion marks do not go past the top of th...

Страница 17: ...n and the hips should not rock from side to side when pedaling While sitting on the bicycle with one pedal at it s lowest point place the ball of your foot on that pedal The correct saddle height will...

Страница 18: ...s Try to lift push down on and twist the seat to confirm that it is tight Look at the connection of the pedals to the crank arm You should see no pedal screw threads and the pedal should feel firm and...

Страница 19: ...ed in water they should be taken out and re greased This will prevent accelerated bearing deterioration If paint has become scratched or chipped to the metal use touch up paint to prevent rust Clear n...

Страница 20: ...E CABLE If the brake cable are not attached follow these steps Rotate the cable adjustment barrel and cable nut until the slots are aligned with the slot on the brake lever body Press the brake lever...

Страница 21: ...ds if damaged 8 Remount one side of the tire onto the rim 9 Using a hand pump inflate the tube just enough to give it some shape 10 Place the valve stem through the hole in the rim and work the tube i...

Страница 22: ...n this position and tighten the axle nuts 4 TIRE INSPECTION Tires must be maintained properly to ensure road holding and stability Check the following areas Inflation Ensure tires are inflated to the...

Страница 23: ...izontal position with the front pedal in about the 4 o clock position and apply downward foot pressure on the pedal that is to the rear About 1 8 turn rotation will activate the brake The more downwar...

Страница 24: ...e information of assembly and adjustment please scan the QR code or browse the link below to check our Youtube channel https www youtube com channel UClEWwGhf8z_7u6mjWiONom Q videos You can also follo...

Страница 25: ...Retrue if possible or replace Tighten mounting bolts Repair or replace chaining set Constant clicking noises when pedaling Stiff chain link Loose pedal axle or bearing Loose bottom bracket axle or be...

Страница 26: ...n incorrect Brake blocks rim dirty or wet Brake arms loose Replace blocks Correct block toe in Clean blocks and rim Tighten mounting bolts Knocking or shuddering when applying brakes Bulge in the rim...

Страница 27: ...ealignment Tighten stem bolt until stem and fork are unified Use the between legs test til it passes the test Frequent punctures Inner tube old or faulty Tire tread casing worn Tire unsuited to rim Ti...

Страница 28: ...Follow us Quick Assembly Guide Aceger kid s bike Acegerbike...

Отзывы: