background image


T-ABVA Manual |Rev.C, JULY 2017                                                                                                Page 2 

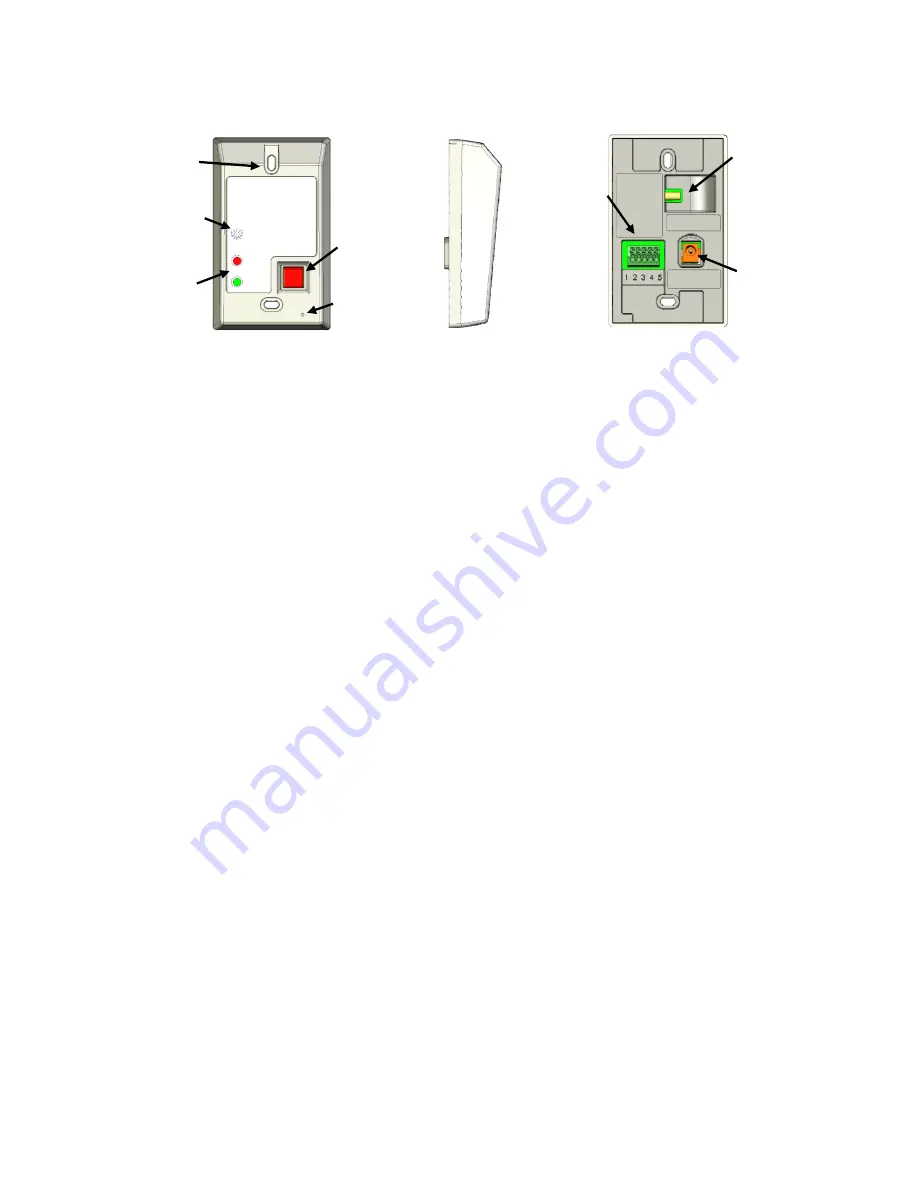
General Description 


1.  Mounting Holes:  

Both mounting holes are elongated to provide horizontal and vertical adjustment so 

the alarm can be perfectly aligned with the mounting surface. 

2.  Inlet Port:

  Air is drawn in from the room through the inlet port where it is measured by the internal 

mass flow sensor and then exits into the negatively pressurized fume hood or BSC exhaust duct. 

3.  Visual Status Indicators:

  There are two visual status indicators; one Red LED and one Green LED.  

During normal operation, the Green LED is ON and the RED LED is OFF.  During an alarm condition, 
the Green LED is OFF and the RED LED Flashes.  When the Mute Button is pressed and held for 3-
seconds, the two LEDs are also used to indicate which calibration mode is presently active. 

4.  Mute Button:  

Highly visible and easy to access for quick actuation. 

Pressing the Mute Button momentarily

 during an alarm condition will silence the horn.  Pressing 

Mute again, will reactivate the horn.  If the horn is muted and the alarm has not cleared, the horn will 
chirp (re-beep) every five minutes as a reminder that the horn is muted. 

Pressing and holding the Mute Button for 3-seconds

, will provide a visual indication of the present 

calibration mode.  If one LED turns ON, then the unit is operating in Mode 1.  If both LEDs turn ON, 
then the unit is operating in Mode 2. 

Pressing and holding the Mute Button for 15-seconds,

 will disable the horn with no re-beep.  The 

horn will remain OFF until the Mute Button is pressed again or the alarm condition clears. 

5.  Calibration Button:  

The calibration button is recessed to prevent accidental triggering.  To press the 

calibration button, use the end of a paper clip. 

Pressing the Calibration Button momentarily

 will toggle the alarm calibration mode. 

Pressing and holding the Calibration Button for 5-seconds

, will initiate the Alarm Calibration. 

Pressing and holding the Calibration Button for 10-seconds

, will re-zero the sensor.  The sensor 

should not need to be re-zeroed unless directed to do so by the factory.  Re-zero should only be 
performed with the airflow sensor blocked. 

6.  Tilted Surface:  

Because the alarm is normally installed above eye level, the front surface is angled 

downward for easy viewing. 

7.  I/O Terminal Block:

  Use stranded wire between 16 and 20 AWG only, stripped back ¼ - ½ inch. 

Remote Mute:

  Sending a contact closure to the Remote Mute input will mute the horn same as 

pressing the Mute Button.  Remote Mute is normally used during unoccupied hours. 

Alarm Output:

  Alarms can be communicated to other devices and the building automation system 

using the relay output at terminals 3, 4 and 5.  The relay changes state during alarm condition, and 
returns to normal when the alarm condition has been cleared. 

8.  Hood Probe Port: 

 This is the exit side of the mass airflow sensor.  Tubing from the hood probe or 

BSC exhaust duct is connected here. 

9.  Input Power Plug:  

The DC Power Module provided connects directly to plug on the back of the unit.  


1. Mounting 

Holes 

6. Tilted 

Surface 

2. Inlet Port 

3. Visual 

Status 

Indicators 

4. Mute 

Button 

5. Calibration 

Button 

8. Hood 

Probe 

7. I/O 

Term. 

9. Power 

Term. 

Front View 

Side View 

Back View 

Содержание T-ABVA

Страница 1: ...i Installation Operation Maintenance Manual Apex Basic Velocity Alarm Model T ABVA Manual 0133MAN00018 Accutrol LLC 21 Commerce Dr Danbury CT 06810 Tel 203 445 9991 www accutrolllc com ...

Страница 2: ...ginal warranty period has expired Unless specifically authorized by Accutrol LLC in writing no warranty is made with respect to and no liability is assumed in connection with any goods which are incorporated into other products or equipment by the Buyer The foregoing is in lieu of all other warranties and is subject to the conditions and limitations stated herein No other expressed or implied warr...

Страница 3: ...f Contents WARRANTY II TABLE OF CONTENTS III INTRODUCTION 1 GENERAL DESCRIPTION 2 SPECIFICATIONS 3 MODEL CODE DESCRIPTION 4 GETTING STARTED UNPACKING 4 INSTALLATION 5 PRE CALIBRATION 7 CALIBRATION 8 MAINTENANCE 9 ...

Страница 4: ...T ABVA Manual Rev C JULY 2017 Page iv This Page Intentionally Blank ...

Страница 5: ...tory fume hoods The following items are identified by ASHRAE as being important factors contributing to the safe operation of laboratory fume hoods 1 Cross drafts Air currents may by creating turbulent air pockets draw contaminants from the hood Such cross drafts could be caused by air supply diffusers or grilles open windows or doors or rapid movements of people in front of the hood 2 Work proced...

Страница 6: ...FF until the Mute Button is pressed again or the alarm condition clears 5 Calibration Button The calibration button is recessed to prevent accidental triggering To press the calibration button use the end of a paper clip Pressing the Calibration Button momentarily will toggle the alarm calibration mode Pressing and holding the Calibration Button for 5 seconds will initiate the Alarm Calibration Pr...

Страница 7: ... Mute is activated Re Beep Mode single fast tone every 5 minutes when horn muted and alarm not cleared ALARM DELAY 7 seconds to reduce false alarms ALARM RELAY OUTPUT I O Terminal Positions 3 4 and 5 Type SPDT relay Specifications 1A 30 VDC 0 5A 125 VAC resistive load Operation NORMAL Power ON ALARM Fault or Power Loss Relay Contact Term 3 4 OPEN CLOSED Relay Contact Term 5 4 CLOSED OPEN REMOTE MU...

Страница 8: ... wide FH2P Dual Hood Probe Kit for fume hoods 8 feet wide and greater BS1P Probe Kit for BSC Duct Optional Items Sold Separately 1025CAB00066 6 Foot Extension Cable for Power Supply T ABVA SMKIT Side Mount Kit Getting Started Unpacking Before proceeding unpack box and verify all components arrived safely through shipping Item Qty Description 1 1 Velocity Alarm Main Unit 2 1 Wall Pluggable Power Mo...

Страница 9: ...y a Using the hardware and instruction sheet provided with the side mount kit Accutrol LLC PN T ABVA SMKIT install the bracket to the side panel of the device being monitored b Install the plastic electrical box provided to the side mount bracket using the hardware provided c Install the ABVA to the plastic electrical box however do not secure until Steps 3 through 7 have been completed With the f...

Страница 10: ...he back side of the ABVA Step 8 Secure the ABVA Secure the ABVA to the mounting surface using the appropriate two screws provided Drilled Hole Inside of Fume Hood Step 3 Locate the Hood Probe Due to the wide variety of fume hoods and configurations available there is no single hood probe location that will work for all fume hoods Contact the fume hood manufacturer to obtain the optimum side wall p...

Страница 11: ...which Mode is suited best for your application Example 1 Desired Alarm Set Point 80 FPM Fume Hood Type Constant Exhaust Volume Face Velocity Range When Sash is 100 Open the Face Velocity is measured at 80 FP Calibration Mode Select Mode 1 because the desired alarm set point can be achieved by opening the sash 100 Example 2 Desired Alarm Set Point 80 FPM Fume Hood Type Variable Exhaust Volume Face ...

Страница 12: ...h to provide the desired velocity for the alarm set point c Using a calibrated velocity meter measure the average airflow velocity using appropriate ANSI ASHRAE method If the measured velocity is within the desired alarm set point then proceed to Step d If not then adjust exhaust flow or fume hood sash and repeat Step c until the desired velocity is achieved d To calibrate the alarm set point pres...

Страница 13: ...ll now hear a series of short fast beeps while the microprocessor is acquiring data from the sensor After about 5 seconds the buzzer will provide one longer beep to signify calibration set point has been stored e Verify the alarm set point is calibrated properly by modulating the exhaust volume or moving the fume hood sash to achieve the desired alarm set point After calibration is verified you ma...

Страница 14: ...T ABVA Manual Rev C JULY 2017 Page 10 Notes ...

Страница 15: ...Revision History ECN New Rev New File Name 2260 C T ABVA Rev C February 2017 TOC Updated company physical address to the front and back cover pages ...

Страница 16: ...Proudly made in the USA 21 Commerce Dr Danbury CT 06810 Tel 203 445 9991 www accutrolllc com ...

Отзывы: