background image

31

Operating

- The availability of display mode format features depends on the resolution select and current broadcasting 

   signal format.

- You may press the “ASPECT” button on the remote to toggle through available display mode options.

Display Modes

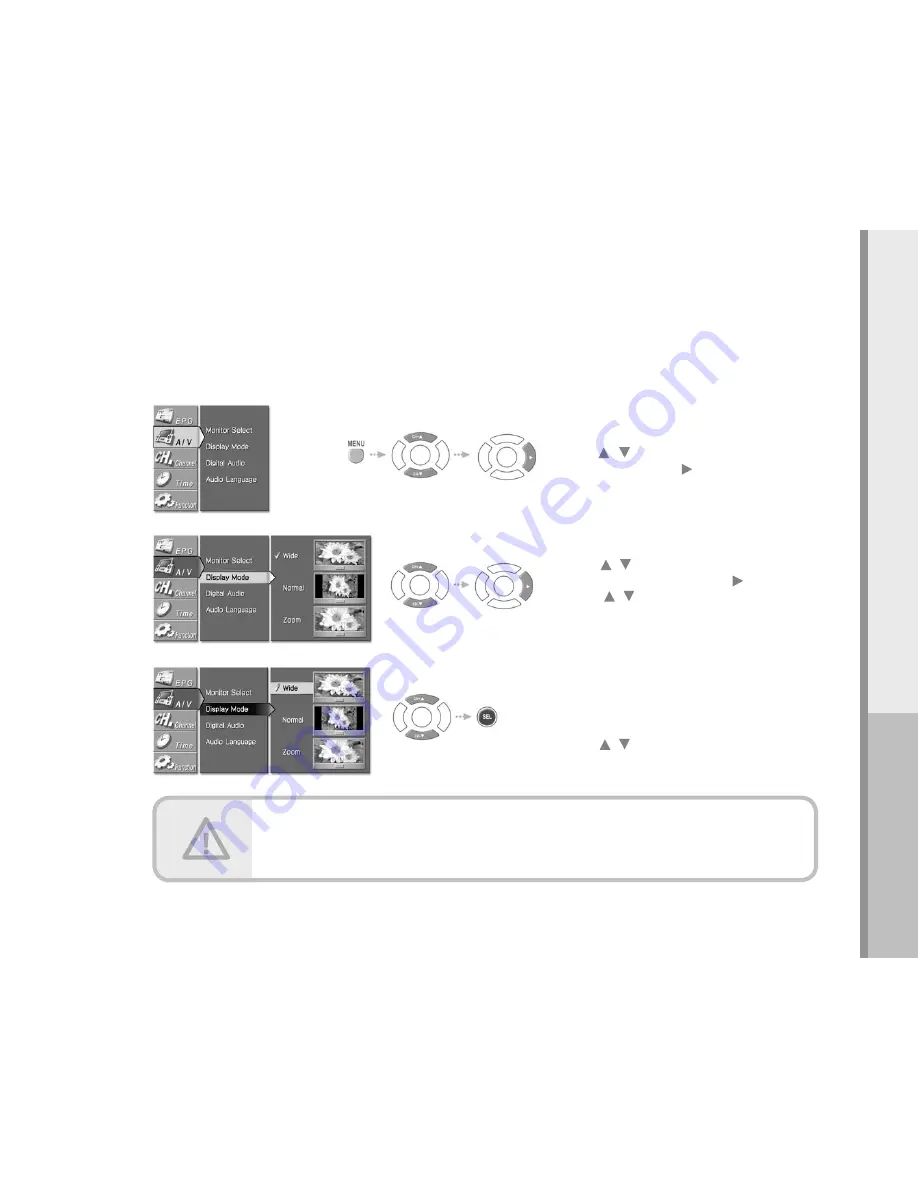
How to select available display modes.

1.

2.

3.

Select “A/V” in the menu

Press the Menu button.

Press the       /       on the remote control to highlight 

the “A/V” icon and press the       or SEL button.

Select “Display Mode”

Press the       /       button on the remote control to highlight 

the “Display Mode”  icon and press  the      or SEL button. 

Press the        /        button on the remote control to select 

a “Display Mode” among ʻNormalʼ, ʻWideʼ or ʻZoomʼ.

Normal/Wide/Zoom

Available display modes will be highlighted. 

Press the       /       buttons to choose desired mode and 

press the SEL button to select.

Содержание 16-3499

Страница 1: ......

Страница 2: ......

Страница 3: ...es with one wider than the other A grounding type plug has two blades and a third grounding prong The wide blade or the third prong is provided for your safety When the provided plug does not fit into your outlet consult an electrician for replacement of the obsolete outlet 10 Protect the power cord from being walked on or pinched particularly at plugs convenience receptacles and the point where t...

Страница 4: ...tric light or power circuits or where it can fall into such power lines or circuits When installing an outside antenna system extreme care should be taken to keep from touching such power lines or circuits as contact with them might be fatal 17 Overloading Do not overload wall outlets extension cords or integral convenience receptacles as this can result in a risk of fire or electrical shock 18 Ob...

Страница 5: ...uired be sure the service technician has used replacement parts specified by the manufacturer or have the same characteristics as the original part Unauthorized substitutions may result in fire electric shock or other hazards 22 Safety Check Upon completion of any service or repairs to this product ask the service technician to perform safety checks to determine that the product is in proper opera...

Страница 6: ......

Страница 7: ...ltiple Audio Language Tracks Setting The Time Zone Setting The Time And Date Using Auto Power On Using Auto Power Off Using The Sleep Timer Setting Daylight Savings Viewing Current Channel Information Using The EPG Electronic Program Guide Changing The MENU Language Adjusting The MENUʼs Opacity Setting Up The DTV CC Display V chip Lock Additional Remote Control Functions Troubleshooting and Warran...

Страница 8: ...DTV and 65 73 percent are in markets with 8 or more transmitting DTV signal All broadcasters have been currently mandated by the FCC to transmit DTV ATSC signal as opposed to the previously common analog NTSC signal by the end of 2006 or when 85 percent of U S TV households have DTV signal penetration How can you find out which stations in your area are broadcasting in DTV and what kind of antenna...

Страница 9: ...e g on a chimney and clear of obstructions An attic installation may be satisfactory If available DTV transmissions are from different directions then either a motorized antenna with a rotator or an area special antenna system is required You can purchase antenna rotators from your local RadioShack store or a professional antenna installer Area special antennas are best handled by professional ant...

Страница 10: ......

Страница 11: ...11 Before Operating Before Operating Digital HDTV Receiver Features Remote Control Battery Installation Front Panel Rear Panel Remote Control ...

Страница 12: ...g TV signals If provided by the broadcaster closed caption service can be viewed in multiple languages Supports a RF 75ohm coaxial input with various outputs such as composite component S video and digital audio coaxial optical Broadcast time and contents of program can be viewed in the user friendly Electronic Program Guide if information is transmitted by broadcasters Supports programs broadcast...

Страница 13: ...13 Before Operating 1 2 3 Remote Control Battery Installation Press and detach battery cover on the back of the remote control Install 2 AAA batteries and aligned correctly Replace the battery cover ...

Страница 14: ...en display SEL Press to make a selection when using the on screen menu EXIT Press to exit from any on screen display Standby on Press to turn power on or off Left Right Up Down Use to change channels or to move cursor about the on screen menus 12345678910112131415 12345678910112131415 12345678910112131415 12345678910112131415 12345678910112131415 12345678910112131415 12345678910112131415 123456789...

Страница 15: ... audio inputs of a TV set i e to a TV that has jacks for L R inputs Or connect these terminals to the L R inputs of a separate audio component SPDIF Output Fiber optic connector Connect to digital optical input of TV or audio equipment HDMI out Connect to TV or Receiverʼs input that support HDMI Resolution Format Selector Switches between 1080i interlaced scanning 720p progressive scanning and 480...

Страница 16: ...the sound Press again to restore the sound AUDIO Multitrack Sound Press to select available multitracks or audio languages Depending on the particular broadcast one or more foreign language translations may be available FREEZE Press to freeze the current picture Press again to resume motion FAV CH Favorite Channel Press to switch to your favorite channel s Program Guide Press to display the on scr...

Страница 17: ...trialAntenna Connecting The Set Top Box ToADigital HDTV Monitor YPbPr inputs Connecting The Set Top Box ToAHDMI Equipment Connecting The Set Top Box ToADVI Equipment Connecting The Set Top Box ToAnAnalog TV Set Connecting The Set Top Box ToAudio Equipment ...

Страница 18: ... bend crease the coaxial cable Bending of cable will hamper signal transfer Use a HDTV amplifier to boost signal strength Use a 2 way splitter to feed both the HDTV receiver and your TV VCR This will allow your TV to continue to receive analog NTSC or non digital signals channels Spanish Quick Start Guide is being created on www radioshack com ...

Страница 19: ...ut jacks of your HDTV monitor set projector 2 Connect an audio cable from the audio output jacks of the HDTV set top box to the audio input jacks of your HDTV monitor set projector Use digital audio input output for better audio quality 3 Select resolution output format of the HDTV set top box to correspond to the resolution of your HDTV monitor set projector ...

Страница 20: ... input jack of the your HDTV monitor sets projector If a standard definition digital TV 480p resolution is connected to the HDMI port the output will automatically be set to standard definition 480p resolution not high definition If the Accurian is connected to HDMI TV the aspect ratio shall be automatically adjusted to those of the screen 16 9 or 4 3 ...

Страница 21: ...cable from the audio output jacks of the HDTV set top box to the audio input jacks of your HDTV monitor set projector Use digital audio input output for better audio quality 3 Select resolution output format of the HDTV set top box to correspond to the resolution of your HDTV monitor set projector For the screen which HDCP High Definition Copy Protection is not supportive thereʼs a chance for Vide...

Страница 22: ... ANALOG TV OUT video outputs of the HDTV set top box to the video input of your analog TV Use S video for higher quality video 2 Connect an audio cable from the audio output of the HDTV set top box to the audio input of your analog TV The ANALOG TV OUT video feed is in 480i display format ...

Страница 23: ...GITALAUDIO OUT of the HDTV set top box and the input coaxial or optical of your digital audio amplifier 2 When connecting to an amplifier equipped with two channel analog stereo or Dolby sound connect the left and right audio out jacks from the HDTV set top box to the left and right audio in jacks of your amplifier receiver or stereo system Connecting The Set Top Box ToAudio Equipment ...

Страница 24: ...Modes ChoosingADigital Sound Format Dolby Digital Or PCM MultipleAudio Language Tracks Setting The Time Zone Setting The TimeAnd Date UsingAuto Power On UsingAuto Power Off Using The Sleep Timer Setting Daylight Savings Viewing Current Channel Information Using The EPG Electronic Program Guide Changing The MENU Language Adjusting The MENUʼs Opacity Setting Up The DTV CC Display V chip Lock Additio...

Страница 25: ... to display the menu Press the MENU button again or EXIT button to close the menu Navigating through menu Move to desired content using the button of remote control Press the SEL or corresponding arrow buttons to move through tiers or to select a function You may use the BACK button on remote control to return to previous menu tier Menu ...

Страница 26: ...ity Select Channel in the Menu Press the MENU button Press the on the remote control to highlight the Channel icon and press the or SEL button 3 1 2 How to select source input Set UpAntenna Input Select input type Press the button on the remote control to select either Air for over the air DTV broadcasts or Cable 8VSB to receive DTV broadcast through cable Select Input Select Press the button on t...

Страница 27: ...in the menu Press the MENU button Press the on the remote control to highlight the Channel icon and press the or SEL button Select Auto Scan Press the button on the remote control to highlight the Auto Scan icon and press the or SEL button 3 1 2 How to scan and store channels Start auto scan Channel Scanning Select either Rescan To delete all previously stored channels and to store all channels fo...

Страница 28: ...or SEL button 3 1 2 Select Channel Edit Press the button on the remote control to highlight the Channel Edit icon and press the or SEL button Editing Memorized Channels Channel edit Press the arrow button on the remote control to move to desired channel and press the SEL button to activate or deactivate the channel on your channel list or add or delete from your favorite list Press the button to m...

Страница 29: ...the remote Digital channels will either have exellent reception or none at all It is quite unlike analog reception which can vary in reception quality from snowy to clear Select Channel in the menu Press the MENU button Press the on the remote control to highlight the Channel icon and press the or SEL button Select Signal Strength Press the button on the remote control to highlight the Signal stre...

Страница 30: ...nitor projectorʼs aspect ratio Select A V in the menu Press the MENU button Press the on the remote control to highlight the A V icon and press the or SEL button Select Monitor Select Press the button on the remote control to highlight the Monitor Select icon and press the or SEL button Aspect ratio Press the button on the remote control to select your monitor type either 4 3 conventional or 16 9 ...

Страница 31: ...3 Select A V in the menu Press the Menu button Press the on the remote control to highlight the A V icon and press the or SEL button Select Display Mode Press the button on the remote control to highlight the Display Mode icon and press the or SEL button Press the button on the remote control to select a Display Mode among ʻNormalʼ ʻWideʼ or ʻZoomʼ Normal Wide Zoom Available display modes will be ...

Страница 32: ...een Normal Choose this when you want the television to adjust the 16 9 image vertically so it fills your 4 3 screen No blank panels will be added and the image is vertically stretched Zoom Choose this when receiving a 16 9 image and you want the wide movie format to fill the entire screen Outer portions of image are cropped or cut wide normal zoom Somtimes broadcasters fill a 16 9 aspect ratio fee...

Страница 33: ...d right side in the screen so user can see 4 3 ratio image without distortion Zoom If zoom mode is selected user can see zoomed image correspond with 16 9 screen Outer portions of image are cropped When the broadcaster is transmitting a 16 9 feed Wide and Normal display modes are available Wide If wide mode is selected user can watch optimal ratio image without distortion Normal If this mode is se...

Страница 34: ... icon and press the or SEL button ChoosingADigital Sound Format Dolby Digital Or PCM How to select your digital audio format Digitalaudiooutputmodesetup Press the button on the remote control to select your digital audio transmission format Dolby or PCM as appropriate to your particular equipment Select DigitalAudio Press the button on the remote control to highlight the Digital Audio icon and pre...

Страница 35: ... on the remote to toggle through available audio language options 3 1 2 Select A V inthemenu Press the MENU button Press the on the remote control to highlight the A V icon and press the or SEL button MultipleAudio Language Tracks How to select available audio languages Select Audio Language Press the button on the remote control to highlight the Audio Language icon and press the or SEL button Sel...

Страница 36: ...Zone Press the button on the remote control to highlight the Time Zone icon and press the or SEL button Time zone set Press the button on the remote control to highlight the Time Zone you are in and press the SEL button to save the setting 3 1 2 Setting The Time Zone Important Time zone must be correctly set for all auto time functions to work properly Time ...

Страница 37: ... Automatic date time set up Select AUTO by pressing the button and press the SEL Both date and time will be set up automatically if the broadcaster is transmitting the information How to set the current time and date via automatic or manual options Time Select Date Time Set Press the button on the remote control to highlight the Date Time Set icon and press the or SEL button ...

Страница 38: ...formation If auto function dose not work try other channels or use manual time set Correct time zone must be set for auto time set function to work properly Time Manual date time set up Press the button on the remote control to select ʻMANUALʼ and press the or SEL button Use the arrows to set the year month date and time When the set up is finished press the SEL button to save the setting ...

Страница 39: ...he on the remote control to highlight the Time icon and press the or SEL button 3 1 2 UsingAuto Power On Time Auto power on set up Select ʻEverydayʼ or ʻOnceʼ by pressing the button and press the or SEL button to set up the time by pressing the NUMBER buttons You must press the SEL before exiting to save the setting Be sure to select Off if youʼd like to disable the Auto Power On function ...

Страница 40: ...e MENU button Press the on the remote control to highlight the Time icon and press the or SEL button then move to second stage Time Auto power off set up Select ʻEverydayʼ or ʻOnceʼ by pressing the button and press the button to set up the time by pressing the NUMBER buttons You must press the SEL before exiting to save the setting Be sure to select Offʼ if youʼd like to disable the Auto function ...

Страница 41: ...n the remote control to move to desired time and press the SEL button If Off is selected the sleep timer will be canceled 3 1 2 Using The Sleep Timer The sleep timer may also be set by pressing the SLEEP button on the remote and toggling through the various times Time Select Sleep Timer Press the button on the remote control to highlight the Sleep Timer icon and press the or SEL button ...

Страница 42: ...ht savings set Press the button on the remote control to select Auto On or Off and press the SEL button to save the settings 3 1 2 Setting Daylight Savings Select Daylight Savings Press the button on the remote control to highlight the Daylight Savings icon and press the or SEL button Auto means daylight savings is dependent on Broadcasterʼs feed Time ...

Страница 43: ...he Info banner Press the SEL BACK EXIT MENU or wait 10 seconds and the display will disappear is highlighted when broadcast feed is 720p or 1080i resolution is highlighted when stereo is available is highlighted when multilanguage audio tracks are available is highlighted when digital close caption service is available is highlighted when multi channel Dolby Digital surround sound is available Ch ...

Страница 44: ... broadcastʼs feed EPG Press the Arrow buttons on the remote control to navigate through the EPG You may press the EPG button on the remote to view the EPG To receive the EPG information from a broadcaster you must flip to the specific channel to receive the broadcasterʼs PSIP Program and System Information Protocol to update the EPG if available Time must be set correctly for EPG to function prope...

Страница 45: ...ing The MENU Language How to change MENU language to either English or Spanish Select Function in the menu Press the MENU button Press the on the remote control to highlight the Function icon and press the or SEL button Function Select Menu Language Press the buttons on the remote control to highlight the Menu Language icon and press the or SEL button ...

Страница 46: ...Select Opacity Press the button on the remote control to highlight the Opacity icon and press the or SEL button Select Function in the menu Press the MENU button Press the on the remote control to highlight the Function icon and press the or SEL button 1 2 3 Adjusting The MENUʼs Opacity Function How to change the OSD MENUʼs transparency ...

Страница 47: ...e remote control to highlight the Function icon and press the or SEL button Pen Style Press the button on remote control to highlight Pen Style and press the SEL button Then use the arrows to highlight selection and press the SEL button to store settings 3 1 2 Setting Up The DTV CC Display Function 47 Operating How to manipulate text background border and position of closed captions ...

Страница 48: ... button Then use the arrows to highlight selection and press the SEL button to store settings 4 5 Character Edge Press the button on remote control to highlight Character Edge and press the SEL button Then use the button to highlight selection and press the SEL button to store settings 6 Caption Location Press the button on remote control to highlight Caption Location and press the SEL button Then...

Страница 49: ...r Select Function inthemenu Press the MENU button Press the on the remote control to highlight the Function icon and press the or SEL button Enter the PIN Enter your PIN number by pressing the NUMBER buttons on the remote control The default code is 0000 3 1 2 V chip Lock Function How to control access to program via a 4 digit code and ratings ...

Страница 50: ...d press the SEL button to save or cancel 5 6 Function Select Rating Control While in the V Chip menu press the button on the remote control to highlight the Rating Control icon and press the SEL button The Rating Control Settings window will appear V Chip Lock Press the button on the remote control to highlight selection and press the SEL button to store setting If you want to use the rating contr...

Страница 51: ... re enter your new PIN by pressing the NUMBER buttons on the remote control 7 8 Function Change PIN selection Press the button on the remote control to highlight the Change PIN icon and press the SEL button Change PIN menu will appear ...

Страница 52: ...lence no strong language and little or no sexual dialogue or situations TV Y7 Directed to older children Themes and elements in this program may include mild physical or comedic violence or may frighten children under the age of seven TV Y All children The themes and elements in this program are specifically designed for a very young audience including children from ages 2 6 TV FCC Content Categor...

Страница 53: ...ntrol once more to release frozen frame and resume with live broadcast feed Help Button Press the HELP button on remote while in the OSD MENU to view help information in regards to specific function in MENU Remote Programming a Universal Remote Your HDTV receiver can be controlled by most Universal Remote Controls by programming your universal remote with a Pioneer Cable Box code ...

Страница 54: ...54 Troubleshooting andWarranty Troubleshooting andWarranty Troubleshooting Guide Specifications Warranty ...

Страница 55: ...powered antenna make sure the power boost is on Make sure the correct resolution format compatible with your monitor is selected Poor or no sound Check to make sure the audio cables are connected properly and without damage Make sure the MUTE function is Not ʻOnʼ on your TV HDTV Receiver or audio receiver Picture is distorted Make sure the correct aspect ratio is selected Make sure the correct for...

Страница 56: ... 1 CVBS Composite 1 S Video 2 x Lt Rt Component Y Pb Pr Lt Rt HDMI Fiber Optic Coaxial Others Specifications Coding Algorithm Decoding Algorithm Display Format Dolby Digital Antenna Input Video Output Audio Out DTV Output Digital Audio Output Band Corverage Broadcasting standard On Screen Display EPG Display Format Selection Remote Controller Unit Power Requirement Power Consumption Dimensions W x...

Страница 57: ...rmal use for 90 ninety days from the date of purchase from RadioShack company owned stores and authorized RadioShack franchisees and dealers For complete warranty details and exclusions check with your local RadioShack store RadioShack Customer Relations 200 Taylor Street 6th Floor Fort Worth TX 76102 04 04 WARRANTY 08A04 PrintedinKorea ...

Страница 58: ...Memo ...

Отзывы: