background image

AXIOM

 / AXIOM-X

 Product Line Manual

 Mechanical 

Installation 

29 


03-AXIOM-AXIOM-X_Mechanical_Installation_R10.doc 

Accu-Sort Systems, Inc. 

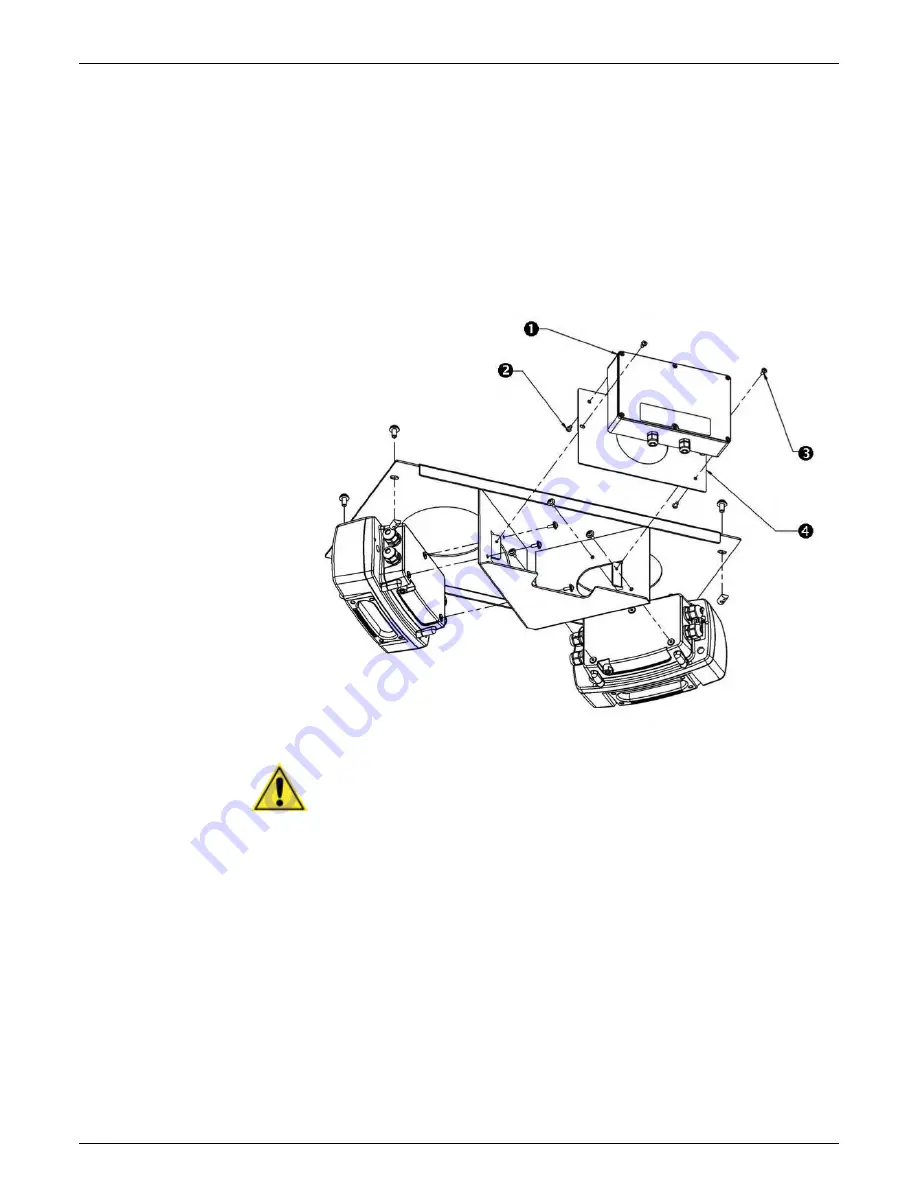
Mount Power Supply to XMB: 

1.  Mount the power supply (1) to the power supply adapter mounting plate 

(4) (included with the XMB kit). The XMB kit provides the necessary 
hardware (2).  

2.  Attach the power supply/mounting plate assembly directly to the XMB 

using the provided hardware (3). Fasten to the two tabs on the XMB as 
shown

DO NOT over-tighten the screws. 

3.  Continue with the electrical installation. 

(See Chapter 4.)


IMPORTANT:


Do not install scan heads to wiring bases until all wiring is 

completed.


Содержание AXIOM

Страница 1: ...AXIOM AXIOM X Laser Bar Code Scanning Solutions Product Line Manual ...

Страница 2: ...AXIOM AXIOM X AXCESS and 1 800 BAR CODE are trademarks of Accu Sort Systems Inc All other company or product names are mentioned for purposes of identification only and may be trademarks of their respective owners Disclaimer Information The information contained in this manual is subject to change without notice Supplemental information or documentation may be required for certain applications or ...

Страница 3: ...ion to Scanning Area AXIOM 20 Bar Code Orientation to Scanning Area AXIOM X 21 General Mounting Guidelines 22 Reader Positioning 22 Dimensions and Clearances 23 Attaching the Wiring Base 23 Attaching the Universal Mounting Bracket UMB 24 Attaching the Power Supply to UMB 25 Attaching the X Pattern Mounting Bracket XMB AXIOM 27 Mounting the Trigger Photoeye 30 Mounting the Height Tracking Photoeyes...

Страница 4: ... 77 Network Access Options 78 Bar Code Setup 79 Adding Editing Moving and Removing a Bar Code 80 Bar Code Groups 81 Defining a Bar Code Group 81 User Defined Mod Checks 82 Bar Code Padding and Stripping 83 Match Codes Setup 84 Serial Communications Port 85 Message Format 86 Network Settings Net 87 Advanced Network Settings 89 Ethernet IP Settings 90 Message Definitions user defined messages 92 Mes...

Страница 5: ...gger Photoeye Operation 135 Cleaning Tachometer 136 Verify Tachometer Operation 136 Tighten Mounting Hardware 137 Checking Wiring Base Connections 137 Verify Reader Operations 137 8 Troubleshooting Test Mode 139 Control Panel Status Indicators 140 Wiring Base Status Indicators 143 Diagnostics 144 AXIOM Monitor 144 Status LEDs 145 Read Quality and Box Information 146 Messages and Message Monitor 14...

Страница 6: ...onal Scanning Applications using XMB 179 AXIOM X Omnidirectional Scanning Applications 182 C Networking Guide Ethernet Hardware Configuration 185 Network Software Configuration 185 Controller Client Communications 186 Setting up AXIOMs for a Multi reader Network 186 Network Host Communications 188 EtherNet IP 190 Remote Setup and Diagnostics 196 EtherNet IP Object Models 198 D FAST Monitor How to ...

Страница 7: ...ironment you should know how to use a mouse choose commands and work with windows and dialog boxes This manual contains some terms that may be unfamiliar Use the glossary at the back of this manual for assistance Thank You Thank you for using an AXIOM bar code scanning solution and this manual We value your comments and feedback Feel free to let us know what you like or dislike about the product o...

Страница 8: ...ferences in inches Metric references are provided in millimeters and enclosed in brackets For example 10 inches 254 mm Customer Service Training Accu Sort Systems offers a complete set of training courses to help you and your staff get the most out of your investment We can help you develop a training plan that provides thorough training for both your project team and your end users We will work w...

Страница 9: ...canner Though technologically advanced the AXIOM product line is designed for easy setup using AXCESS Setup software AXCESS provides a familiar Windows based user interface Using the AXCESS Wizard or the AXCESS Explorer you can configure your readers without the need for onsite service Simply connect to your reader via setup cable or on board Ethernet Specify valid bar code types groups match patt...

Страница 10: ...ng multiple access points for all setup parameters With the AXCESS Setup Software you can Integrate AXIOM to your system and application without custom software Modify the AXIOM output messages to accommodate your system needs Add or modify the bar code symbologies to be read by AXIOM Define up to four 4 relay input outputs Monitor AXIOM performance using various diagnostic tools You can easily co...

Страница 11: ...DE if you need more information Symbols Throughout this manual special safety alerts are indicated by the following symbols WARNINGS or CAUTIONS This symbol identifies a hazard or procedure that if incorrectly performed could cause personal injury or result in equipment damage HIGH VOLTAGE CAUTION This symbol alerts the user they are about to perform an action involving either a dangerous level of...

Страница 12: ...asten mounting structures in place before installing the equipment to any mounting structure Avoid using freestanding mounting structures If your application requires a freestanding mounting structure avoid making the structure top heavy Follow all procedures regarding electrical safety laser safety and electrostatic discharge safety ESD as outlined in this manual Save all packing material in case...

Страница 13: ... cables shall have the shield terminated to the chassis NOTE DRAIN WIRE SHIELDING IS NOT ADEQUATE Do not remove the shielding covers Refer to the details on making custom cables as provided in the specific technical manual for the component Electrical Safety AXIOM products must be installed in accordance with Canadian Electrical Code Part I CSA C22 1 CSA C22 2 No 0 and the National Electrical Code...

Страница 14: ...integrated circuits are particularly sensitive to ESD damage Product failures may not occur until days or weeks after the component was damaged Static damage to units can take the form of upset failures or catastrophic failures direct and latent An upset failure occurs when an electrostatic discharge is not significant enough to cause total failure but may result in intermittent gate leakage causi...

Страница 15: ...AXIOM X Laser Exit Window to Avoid Exposure WARNING Use of controls adjustments or procedures other than those specified in this document may result in hazardous laser light exposure The AXIOM Line Scanning Bar Code Reader is rated as a Class 3R Laser Product by the International Electrotechnical Commission Compliances are as follows Class 3R Laser Product IEC 60825 1 1993 A1 1997 A2 2001 Class II...

Страница 16: ...erating repairing or replacing an AXIOM AXIOM X note all label content on the unit These labels provide special precautions for operation usage specifications product identification and service information WARNING The following is molded into the reader s exit window frame AVOID EXPOSURE LASER LIGHT EMITTED FROM THIS APERTURE Label Placement AXIOM Scan Head Label Placement AXIOM X Scan Head Top an...

Страница 17: ... Failure to do so may void your warranty Preparing to Install Before mounting any components please do the following Read all instructions before beginning your installation Define and confirm the accuracy of your application s requirements Review all installation specific drawings Review and plan the mechanical installation of all devices used in your application Be sure to allow adequate clearan...

Страница 18: ...ount the Accu Sort power supply to the UMB optional Mount Trigger Photoeye optional Mount Height Tracking Photoeyes optional Mount tachometer optional Mount I O modules optional Complete electrical installation See Chapter 4 NOTE To reduce the possibility of damage to the scan head install it after the wiring base is mounted wired and all wiring is checked for accuracy Be sure to perform the polar...

Страница 19: ...uding the near far distances and overall depth of field Bar Code Orientation on products ladder or picket fence as well as the angle in which codes will appear skew pitch and tilt Reader Positioning for type of scanning required to accommodate picket fence or ladder bar code orientation yaw pitch and roll angles Read Range The AXIOM AXIOM X must be positioned in the scanning area to accommodate re...

Страница 20: ...sually determines the AXIOM s positioning The AXIOM can be mounted to read codes in either a ladder or picket fence orientation Picket Fence Orientation Ladder Orientation Bar Code Skew Pitch and Tilt These angles affect bar code readability Bar codes pitched or skewed up to 45 degrees are still readable Although some skew may occur it should not exceed 45 degrees Bar Code Tilt Pitch and Skew Illu...

Страница 21: ... containing bar codes should be positioned to face the reader Bar codes should be of good quality Partially damaged codes can still be decoded as long as all the bars and spaces are visible to the reader If more than one product surface contains bar codes to be read multiple readers are needed Depending on package spacing i e distance between packages as they travel through the scanning area Heigh...

Страница 22: ...d equipment See Chapter 2 Safety Reader Positioning IMPORTANT The AXIOM readers are able to decode bar codes at a variety of angles however significant angular distortion may degrade reading performance When positioning a reader be aware of how the scanning beam exits the scan window in relation to the wiring base When mounting the AXIOM readers take into consideration The bar code orientation The...

Страница 23: ...should be considered when locating the mounting position NOTE For installation maintenance and service approximately 8 12 inches 203 305 mm of clearance is recommended Attaching the Wiring Base The wiring base and universal mounting bracket may ship pre assembled If your application is not using the UMB mount the wiring base to any flat surface with three mounting screws The mounting holes in the ...

Страница 24: ...ing base are pre assembled If assembly is required follow the instructions provided with the UMB 2 Mount the wiring base 1 to the UMB 3 Use the three screws 4 provided with the wiring base 3 Insert the screws through the UMB into the threaded holes on bottom of wiring base Leave the three screws slightly loose This allows for final adjustment of the reader in relation to the scanning area after wi...

Страница 25: ...power cord into the power supply s IEC connector 2 Insert the power supply 2 into the mounting bracket 1 3 Make sure the wires are guided through the wiring notch in the bracket 4 Use an Allen wrench to attach the power supply mounting bracket 1 to the power supply mounting plate 3 using the four 10 32 hex socket head cap screws 4 DO NOT over tighten screws 5 Attach the power supply mounting plate...

Страница 26: ... plate 3 Attach the wiring base UMB assembly to the mounting structure 4 Attach the power supply mounting plate assembly from step 2 directly to the UMB 4 Insert the two tabs on the edge of the mounting plate into their corresponding locations on the UMB 5 If the power supply mounting plate assembly is properly positioned to the UMB use the screw located on the opposite edge of the mounting plate ...

Страница 27: ... Pattern Mounting Bracket XMB part number 0106226002 is an optional accessory that simplifies dual AXIOM mounting where it is necessary to create an x scanning pattern IMPORTANT The correct read distance reference plane is from the mounting edge of the XMB and not the AXIOM exit window In most instances the XMB is shipped from the factory pre assembled Correct Read Distance Reference Plane 0 ...

Страница 28: ...ructure with the provided hardware 2 2 Mount both wiring bases 3 to the XMB Use the three screws 4 provided with each wiring base 3 Insert the screws through the XMB into the threaded holes on bottom of wiring base DO NOT over tighten screws 4 Continue with mounting the power supply to the XMB See page 29 IMPORTANT Do not install scan heads to wiring bases until all wiring is completed ...

Страница 29: ...apter mounting plate 4 included with the XMB kit The XMB kit provides the necessary hardware 2 2 Attach the power supply mounting plate assembly directly to the XMB using the provided hardware 3 Fasten to the two tabs on the XMB as shown DO NOT over tighten the screws 3 Continue with the electrical installation See Chapter 4 IMPORTANT Do not install scan heads to wiring bases until all wiring is c...

Страница 30: ...reflector within the operating range of the trigger photoeye The photoeye must be mounted so the light exit window is perpendicular to the conveyor facing the reflector The reflector must be mounted perpendicular to the conveyor facing the photoeye When mounting the photoeye to an Accu Sort structure see drawing 41222 in Appendix E IMPORTANT The trigger photoeye s beam between photoeye and reflect...

Страница 31: ...package spacing requirement in half down to a minimum of 2 inches 50 8 mm Up to three photoeyes can be used to divide the DOF into four zones The following figures illustrate how to divide a 40 inch DOF into four zones to reduce the package spacing requirement to 3 5 inches 88 9 mm Height Tracking Photoeyes Side View For example An application with a 30 inch 762 mm DOF requires minimum package spa...

Страница 32: ...package spacing less than two inches 50 8 mm Height Tracking Photoeyes Front View NOTE The Height Tracking Photoeye kit includes a DC Input Module that must be installed in the wiring base See Mounting the I O Modules A Height Photoeye Mounting Adapter is also available See drawing 112697 in Appendix E After electrical installation settings must also be made in AXCESS Set the near far distances in...

Страница 33: ... below as closely as possible when mounting Mount the tach on the conveyor section where scanning is performed Mount the tach on the underside of the conveyor away from areas where the conveyor bows downward A good place to mount the tach is underneath the drive shaft Make sure the tach assembly angles in the same direction that the underside of the conveyor travels The tach must make good contact...

Страница 34: ...utput Modules Activate diverter sorter for no read multi read match or no match conditions Activate device e g beacon light to indicate any of the above conditions Activate device for use as a life condition indicator Activate device to follow the trigger condition Activate alarm Input Modules Additional photoeye input for Start End Trigger Additional photoeye input s for Height Tracking Photoeyes...

Страница 35: ...the insulating cover to gain access to the wiring base 2 The I O modules may be plugged into locations I O 1 through I O 4 These locations run right to left as shown on the insulating cover label 3 Plug the appropriate I O module directly into the wiring base circuit board 4 Secure the I O module by tightening the captive screw into the circuit board DO NOT over tighten screw ...

Страница 36: ...nstalled at product scan points To check the shock indicator before installation 1 Locate the shock indicator AXIOM Scan Head Shock Indicator Location AXIOM X Scan Head Shock Indicator Location 2 Confirm if there has been any excessive shock GOOD Indicator no shock good to install BAD Indicator excessive shock DO NOT install 3 If the indicator is GOOD the scan head can be installed 4 If the indica...

Страница 37: ...install the scan head to the wiring base The scan head can be installed with or without the power disconnected from the wiring base To install a scan head 1 Make sure the insulating cover is in position so the flap covers the field wiring connections inside the wiring base 2 Carefully align the 3 scan head alignment pins with the 3 holes in the wiring base This automatically assures the correct sc...

Страница 38: ...M X_Mechanical_Installation_R10 doc 3 Gently press the scan head down until it firmly connects with the wiring base 4 Secure the scan head to the wiring base with the four captive screws 5 Alternately tighten screws DO NOT over tighten screws Alignment Pin Scan Head Connector Wiring Base Connector ...

Страница 39: ...ad to the wiring base You can install the scan head with or without the power disconnected from the wiring base To install a scan head 1 Make sure the insulating cover is in position so the flap covers the field wiring connections inside the wiring base 2 Use the Safety during AXIOM X Scan Head Installation procedures 3 Carefully align the scan head alignment pins with the 3 holes in the wiring ba...

Страница 40: ...M X_Mechanical_Installation_R10 doc 4 Gently press the scan head down until it firmly connects with the wiring base 5 Secure the scan head to the wiring base with the four captive screws 6 Alternately tighten screws DO NOT over tighten screws Alignment Pin Scan Head Connector Wiring Base Connector ...

Страница 41: ...wiring base with the mounting bracket adjusted as shown 2 Tighten the four screws that hold the scan head to the wiring base 3 Adjust mounting bracket angle downward to meet the required application setup Direction of Conveyor Travel Top Read Top Read Installation with Limited Overhead Space 1 Install scan head onto wiring base with the mounting bracket adjusted as shown 2 Use upper body to stabil...

Страница 42: ..._R10 doc Side Read Installation 1 Install scan head onto wiring base with the mounting bracket adjusted as shown 2 Use upper body or torso to stabilize scan head as you tighten the four screws that hold it to the wiring base 3 Adjust mounting bracket angle to required application setup Direction of Conveyor Travel Side Read ...

Страница 43: ...charge ESD To prevent personal injury or damage to the unit please follow the safety precautions and warnings found in Chapter 2 Failure to follow these precautions may void your warranty Preparing for Electrical Installation Before mounting any components please do the following Read all instructions before beginning your installation Define and confirm the accuracy of your application s requirem...

Страница 44: ...trigger to wiring base Connect tachometer to wiring base Connect communications to wiring base Connect wiring for I O module s to wiring base Attach scan head to wiring base NOTE To reduce the possibility of damage to the scan head install it after the wiring base is mounted wired and all wiring is checked for accuracy Be sure to perform the polarity check before attaching the scan head Setup your...

Страница 45: ...ntional exposure to laser light whenever possible As you plan and install your AXIOM bar code solution application be sure to keep the following guidelines in mind Determine the reader is in the proper orientation and position as outlined in Chapter 3 Allow approximately 8 12 inches 203 305 mm of clearance for wiring The wiring base has four conduit openings Seal unused openings Use cord grips wit...

Страница 46: ... connections are made via the wiring base Use the four conduit openings for running wires into the base Route your cabling for input output power tachometer trigger communications and I O through the recommended conduit openings Wiring tables printed on the wiring base insulation cover help simplify installation Remember Wire to the terminal blocks left to right coordinating your wiring with the t...

Страница 47: ...PORTANT Ground the wiring base to safety ground protective earth ground PE See wiring recommendations for safety ground Example of Proper Wiring Only use connectors designed for connecting to aluminum See also UL 486B Wire Connectors for use with Aluminum Conductors UL 486C Splicing Wire Connectors and UL 486E Equipment Wiring Terminals for use with Aluminum and or Copper Conductors Protective Ear...

Страница 48: ...ger 24 AWG minimum I O Modules Depends upon module rating See Appendix A NOTE ALL external wiring must be UL listed or recognized rated VW 1 or FT 1 and conforming to NEC ANSI NFPA 70 Cord Grips Recommended Wiring Diameters Small Diameter Accommodates 0 191 to 0 354 inches 4 9 to 9 0 mm Large Diameter Accommodates 0 236 to 0 472 inches 6 0 to 12 0 mm Cable Connections to Wiring Base Where the cabl...

Страница 49: ...on adjustments especially when the UMB is used Once all conduit connections are completed plug all unused wiring base openings Plug Unused Wiring Base Openings Three 3 wiring base hole plugs are supplied Use these plugs on unused openings All unused openings MUST be plugged to maintain IP54 rating Use Teflon tape or other thread sealant when inserting the hole plug in the conduit opening Conduit o...

Страница 50: ... AXIOM X wiring base to assure the unit maintains its IP65 rating 1 Wrap the cord grips with Teflon tape 2 Install the cord grips into the wiring base openings 3 Assure that the Teflon tape is threaded through the opening 4 After wiring to the terminal blocks secure the cables by tightening the cord grip Cables should be tight with no slipping when pulled 5 Wrap hole plugs with Teflon tape Seal an...

Страница 51: ...plies Single Reader The AXIOM readers require 30 watts maximum of power Accu Sort power supply options are available for either domestic or international installations and are rated for IP40 and IP65 environments 1 Connect the power supply to the wiring base s INPUT POWER terminal blocks The arrow on the figure below indicates the location of the TBs 2 Make sure wiring cannot come loose 3 DO NOT o...

Страница 52: ...y with multiple readers 1 Follow the INPUT POWER wiring table to assure proper wiring to the first reader in the wiring daisy chain 2 By using the OUTPUT POWER terminal block a total of three readers may share a power source NO MORE than three readers may be daisy chained to one power source 3 Wire a cable from the OUTPUT POWER of the first reader to the INPUT POWER of the second reader 4 Wire a c...

Страница 53: ...ion of Polarity LED in Wiring Base 1 Apply power 2 Check that all Polarity LEDs are GREEN If multiple AXIOM X are daisy chained together check the polarity of the first unit in the chain i e unit wired directly to power source then the second then the third If all Polarity LEDs are GREEN polarity is correct 3 If any Polarity LEDs are RED polarity is reversed and must be corrected 4 Disconnect from...

Страница 54: ...able below Wire colors indicated for standard NPN Output shown in shaded areas WIRE COLOR TERM NPN OUTPUT PNP OUTPUT 24V RED V Supply Voltage Supply Voltage Jumper to V TRIG Jumper to V Photoeye Output Output WHITE TRIG Photoeye output Jumper to GND Output BLACK GND Common Common If your application uses a photoeye other than the one available from Accu Sort follow the TRIGGER wiring table to assu...

Страница 55: ...lors indicated for standard NPN Output shown in shaded areas Tachometer Wiring TACH WIRE COLOR TERM NPN OUTPUT PNP OUTPUT 24V WHT ORG V Supply Voltage Supply Voltage Jumper to V TACH Jumper to V Tach Output Output WHT BLU TACH Tach Output Jumper to GND Output BLU WHT ORG WHT GND Common Common WARNING The maximum tachometer current should not be more than 0 3 amps 24 volts The shielding for the tac...

Страница 56: ...roller See drawings 107480 and 107481 in Appendix E Using Ferrite Clamps when Wiring Tachometer In order to absorb transient currents generated by motors and belts two ferrite clamps should be added to the TACH cable as shown below Doing this prevents external noises from damaging the wiring base and scan head Close up of Ferrite Clamp in the open position included with the wiring base Proper posi...

Страница 57: ...terminal block Follow the SERIAL COM RS232 wiring table to assure proper wiring IMPORTANT Before attempting to use RS232 communications with RTS CTS contact Accu Sort Customer Service for additional information RS422 Connections Use RS422 for a direct connection to a controller personal computer or other device RS422 provides point to point communications at distances up to 1000 feet 300 meters RS...

Страница 58: ...e Ethernet terminal block For additional details on Ethernet and EtherNet IP communications go to Appendix C AXIOM Networking Guide Another useful source of information is the ODVA official web site www odva org NOTE To simplify your network installation Accu Sort offers the following options RJ45 Adapter Kit RJ45 adapter cables 10 and 20 ft lengths a 5 port Ethernet switch Linksys and an 8 port d...

Страница 59: ...ing DC modules observe the polarity of the connections illustrated on insulating cover label Part Number Description Color Rating Current Range 1000056135 DC Input Module white 3 3 to 32 VDC 32 mA 1000056136 DC Output Module red 3 to 60 VDC 3 A max 1000056137 AC Output Module black 12 to 42 VAC 3 A max NOTE Relay modules are only for connection to SELV LPS power source Derate 33mA deg above 25C Pr...

Страница 60: ... Back EMF may damage the output module A diode in parallel with the inductive device dissipates the back EMF DC Source Optional Diode Fuse Recommended Inductive Load Optional Diode to Dissipate Back EMF An example output module application is the use of a Stack Light with three output modules Each module will send a signal to the stack light to visually indicate specific conditions e g green read ...

Страница 61: ...the power disconnected from the wiring base Check Installation After completing the installation of your AXIOM AXIOM X Confirm that the reader has been properly installed mechanically and electrically Use the Installation Sequence at the beginning of this chapter and your application specifications to check your installation Configure the reader s parameters to meet the needs of your application S...

Страница 62: ...62 Electrical Installation AXIOM AXIOM X Product Line Manual Accu Sort Systems Inc 04 AXIOM AXIOM X_Electrical_Installation_R10 doc Notes ...

Страница 63: ...c setup procedures for a standard configuration More experienced operators may use the advanced setup features that allow access to more complex options In either case the user friendly AXCESS Wizard efficiently guides you through a sequence of screens until the AXIOM is configured to fit your application To download the latest version of AXCESS for AXIOM 1 Go to the Accu Sort website www accusort...

Страница 64: ...ard disk Recommended C Program Files Accu Sort AXIOM AXCESS 4 Double click the Setup exe icon 5 Follow the AXCESS Setup Wizard prompts to install the AXCESS Setup Software on your computer 6 After the AXIOM AXCESS setup was completed successfully message is displayed click OK To start the AXCESS for AXIOM software AXCESS 1 Locate the AXCESS program icon on your computer 2 Double click the icon to ...

Страница 65: ...SS Specifically this chapter describes how to Use AXCESS Wizard s step by step approach to configuring a reader Navigate around the application using AXCESS Explorer window functions To use AXCESS effectively you need to understand its user interface The figures in this chapter show AXCESS running in a Window environment displaying windows typically seen when using Windows 98 2000 AXCESS Main Wind...

Страница 66: ...OM X Product Line Manual Accu Sort Systems Inc 05 AXIOM AXIOM X_Setup_R10 doc AXCESS User Interface Toolbar Drop down Menus AXCESS Explorer AXCESS Wizard Modal Window Option Group Status Line Drop down List Button Region ...

Страница 67: ...a horizontal or vertical scroll bar so that you can scroll horizontally or vertically to view additional fields hidden in the region In addition if a field is partially hidden you can scroll the region to fully display the field by clicking on the partially hidden field Field Each block contains fields you use to enter view update or delete information A field prompt describes each field by tellin...

Страница 68: ...on the left side of every window allows easy navigation through the setup windows This frame is a dynamic interface Depending on the selection of certain options and the configuration of your reader access to specific windows becomes available AXCESS Modify Window You can navigate through the AXCESS software using any of three methods Menu Bar AXCESS Explorer AXCESS Wizard Menu Bar The main menu b...

Страница 69: ... sign The AXCESS Explorer list appears with no items expanded Click the folders to display the active window for the setup function and or expand the folders to view any additional setup features AXCESS Wizard Buttons The reset previous and next buttons are part of the AXCESS Wizard The wizard allows you to proceed easily through a predefined sequence of screens in the reader setup Each screen mus...

Страница 70: ...hoose Help Index from the Help drop down menu or press the F1 key A help window appears providing you with information and an index of topics associated with the current application window 2 Click on a topic of interest to display more detailed information 3 You can use the menus or buttons in the help window to navigate to other topics of interest or from the File menu in the help window you can ...

Страница 71: ... AXIOM readers use the same type of wiring base and programming cable 2 Connect the other end of the programming cable to your computer Be sure to note which COM port you are connected to on your computer 3 Click the AXCESS Wizard s Next button You can also use AXCESS Explorer s Connect function the Connect button on the button menu or Connect to AXIOM from the Configuration drop down menu 4 The n...

Страница 72: ...made No reply received from AXIOM message is displayed 5 Check the cable connection between the reader and computer to assure proper connection and then click Open Port Reader s Information Buttons Button Definition Save Saves the reader information to scan head Retrieve Retrieves the reader information from scan head Default Returns the reader configuration to the default settings NOTE Selecting ...

Страница 73: ...ss to the Reader s IP Address list 5 To verify the AXIOM can be accessed on the network click Ping The status will be returned in the Reader s Status column on the Connection window 6 To connect to the AXIOM over the network click Connect NOTE If you have enabled the use of a password for all network access you will be prompted for a password after this step AXCESS Connection Window with Network S...

Страница 74: ... IP Address popup window appears 2 Enter the IP address and reader name in the fields 3 Click Add The IP address and reader name will appear in the TCP IP connection fields of the Connection Mode screen 4 Repeat steps 2 and 3 in the Add Edit IP Address popup window to enter as many AXIOM readers as necessary for your application 5 Click Exit to return to the Connection Mode screen ...

Страница 75: ...IOM Configuration Bar Code Setup Bar Code Padding and Stripping Match Codes Setup Serial Communications Port 1 Network Settings Trigger and Relay Settings Tracking The following Modify menu items only appear if another function is enabled Bar Code Groups Multiple Codes enabled FAST Monitor Configuration Collect FAST Monitor Statistics selected User Defined Mod Checks Advanced Setup selected Messag...

Страница 76: ...ent software revisions being used by the AXIOM scan head Modify AXIOM Configuration Reader Information Field Definition Reader Name User defined reader name up to 15 characters Useful when it is necessary to identify multiple AXIOM readers within the same building or application Reader Model Identifies the type of reader to which AXCESS is connected e g AXIOM 1L 2L 4L or AXIOM X 2L AXIOM X 4L AXIO...

Страница 77: ... whenever the belt speed is zero or a package has not been detected for two minutes Collect FAST Monitor Statistics checkbox Enabling this function results in the following FAST Monitor Configuration selection becomes available in the menu tree under Modify See Appendix D CAUTION Changing the scan rate and or laser configuration can adversely affect reader performance Do not change the scan rate o...

Страница 78: ...n selected FTP access to an AXIOM reader is enabled when the correct password is entered Use FTP to update and extract the AXIOM firmware and parameter settings The username for FTP access is always axiom Password for All Net Access In addition to FTP connections a password is also required for network connections from AXCESS and Telnet connections Host communications are not affected NOTE If a pa...

Страница 79: ...m and maximum number of codes These parameters control what is reported as a no read or a multiple code For example if a Code128 is specified with a minimum quantity of 1 and a maximum quantity of 2 the reader can read one or two Code128 codes during a trigger cycle without reporting a problem However if no codes were read one no read message would be sent If three codes were read a multiple codes...

Страница 80: ... Code Setup window without saving any changes or additions NOTE The Data Filter allows a match pattern to be specified for a bar code definition This restricts this code definition to only bar codes that match this pattern Example Setting 9 as a data filter defines that only bar codes that start with a nine will be accepted Only one may be entered in the Data Filter field Adding a Bar Code Click A...

Страница 81: ... code Group 2 Defining a Bar Code Group NOTE By default all codes are placed into the same group To add a code into a group double click the empty field in the corresponding group number and code number column The symbology name would appear from the field For example To add Interleaved 2 of 5 to Group 3 in our window shown above you would double click the Group 3 Code 2 field The symbology name w...

Страница 82: ...ue Example Enter 31 for a 3 to 1 weight Divisor 1 255 Number that is divided into the mod check sum Remain Defines whether check digit is a remainder of the divided amount or the number that must be added to the remainder to get the divisor Right Defines where weight string begins i e from right if selected Wrap If the remainder of the check digit is calculated to be 0 accept 0 as check character ...

Страница 83: ...character of a code such as for Codabar without start and end specify F1 L1 for the character stripping NOTE Stripping is applied before padding Character Padding Option Group Definition No Padding No effect on bar code Add Padding This will add a fixed string of characters to the beginning and or end of the bar code The character s to be added as padding must be entered in the field next to the A...

Страница 84: ...ou to configure an AXIOM to match specific characters within a bar code All bar codes are compared to the complete list of Match Codes If a bar code matches ANY of the codes defined in Match Code Setup it is considered a MATCH When a match code is read you can also setup your AXIOM to Fire a relay e g Activate a diverter Send a user defined message e g Acknowledge match code The following wildcard...

Страница 85: ...dow to set the serial port connection parameters e g baud rate data bits stop bits parity and flow control and the message format to the host computer Set or modify the communications parameters for Serial Port 1 using the Mode drop list to select RS232 or RS422 Click the appropriate option group buttons to define the baud rate data bits stop bits parity and flow control ...

Страница 86: ...ine specific message formats The Modify Message Definitions Port 1 window is available when you select this message format See also Creating User Defined Messages MUX ADP Message Message format for communicating with an Accu Sort MUX When ACK NAK Flow Control is selected the Retry Count drop down list and Timeout in ms options become available Modify Serial Communications Port 1 ACK NAK enabled Re...

Страница 87: ... specify network settings including the IP address for the reader Currently the reader can only be configured to use a Static IP address Net Host Port1 and Net Host Port2 define two network connections for sending bar code messages The Connection Type and Message Format for each port can be set independently Message formatting is the same as for the serial port ...

Страница 88: ...pts to establish a connection UDP Messaging In some instances it may be desirable to use a connectionless UDP message to send bar code data In this case only the Port and Remote IP Address of the receiver need to be specified EtherNet IP Net Host Port1 only This enables use of the EtherNet IP protocol on the AXIOM Message Format There are four message format options Custom Message Standard Message...

Страница 89: ...ircumstances these should never need to change Selection Definition Controller Multicast IP address During Controller Client operations the controller uses TCP IP multicasting to communicate with the clients The group number represents the low byte of the Multicast IP Address that is used Setup Port TCP IP port number used for setup Changing this can cause problems with AXCESS which always uses po...

Страница 90: ...to communicate bar code and I O data to other EtherNet IP EIP enabled devices on your network The Modify EtherNet IP Settings are only available if EtherNet IP has been enabled from the Network Settings window Once enabled EtherNet IP Explicit and I O messaging are enabled The EtherNet IP Objects supported by the AXIOM are described in Appendix C ...

Страница 91: ...n enabled you must provide the Controller IP Address the Slot number of the processor in the Controller and a Tag Name To use On Demand messaging a tag of the same name is then defined on the ControlLogix Controller and every time a bar code is read the Bar Code object is transferred to the ControlLogix Tag AXIOM Inputs When Enable Trigger Inputs is selected the AXIOM Trigger settings are ignored ...

Страница 92: ...ader Character string specified for the header Sent at beginning of every message Trailer Character string specified for the trailer Use to terminate every message Seq When enabled a sequence number consisting of the specified number of digits is inserted just after the header Check When enabled a two character hexadecimal check character is inserted just prior to the trailer Include Multi Bar cod...

Страница 93: ... multiple bar code condition will be reported as a Read of the first bar code reported Otherwise the specified repeated character or the user specified message is sent Category 2 The next three conditions are IN ADDITION to the conditions specified above If a condition in both categories is met these messages will be appended If you desire to only generate a message based on these conditions all m...

Страница 94: ...vides configurations for the optional input output relay modules Example IO Configuration when Height Tracking Photoeyes are used Trigger Source The trigger source options are Hardware Trigger Hardware Start End Trigger Software Trigger Continuous Trigger Since the trigger parameters vary based on trigger type selected the trigger parameter options are defined within the context of the specific tr...

Страница 95: ...case this needs to be specified for BOTH the hardware trigger input which is used for start trigger and for IO 1 which is used for the end trigger input NOTE Typically these parameters are set to OPPOSITE values as the end trigger signal IO 1 indicates the state at which trigger should be stopped Transmit Delay This defines how long after the end of trigger this code will be sent If Transmit Delay...

Страница 96: ...pth of field into up to four zones The Distance from scanner in inches must also be set See Chapter 3 See Mounting the Height Tracking Photoeyes CAUTION If you get this message when saving parameters they should be corrected before saving them CAUTION If you get this message when retrieving parameters you should correct and save them before use Output Definition Custom Output Used for applications...

Страница 97: ... tracking parameters are only available if tracking is enabled otherwise they are not shown in this window Click the Tracking Enabled checkbox When tracking is enabled a checkmark appears in the checkbox and the tracking parameter settings are visible in the window The tracking options for the tachometer are Hardware External Tach Constant Internal Tach Computed Tach NOTE Details on tracking appli...

Страница 98: ...e number of inches after the specified edge of the package passes the trigger before data transmission occurs AXIOM Mounting Settings Selection Definition Closest Read Point in Specify in inches the nearest distance from the reader where the reader is expected to read a bar code Farthest Read Point in Defines the furthest distance from the reader where the reader is expected to read a bar code Tri...

Страница 99: ...speed from the package length or spacing In all instances the tachometer configuration can be verified by monitoring belt speed on the AXIOM Monitor The belt speed is displayed in ft min Specify Transmit Point All tracking systems require the transmit point for the bar code to be specified This is a point located a fixed number of inches from the trigger source such as a photoeye at which the bar ...

Страница 100: ...XIOM at which a bar code is to be read The distance from the trigger source i e Photoeye to the center point of the AXIOM scan line Trigger Reference Point Orientation of the reader with respect to the motion of the belt This is a rotation value from 0 to 360 degrees When an AXIOM reader s scan line or AXIOM X reader s X pattern is perpendicular to conveyor travel it has a rotation angle of zero d...

Страница 101: ...Inc AXIOMs 2 in X pattern configuration When two AXIOM readers are mounted to create an X pattern they have rotation angles of 45 and 135 degrees or 45 and 135 degrees respectively NOTE This only applies to the use of two AXIOM line scanners it does not apply to AXIOM X omnidirectional scanners ...

Страница 102: ...his number NOTE Make sure that the package position intersects the scan lines so that the bar code will be read as close to the center of the X as possible 4 Select the AXCESS Monitor screen 5 Run the package through the scanning area 6 Observe the reported tracking position in the Messages window For example The display Box Zone Code 42 1 3 is reporting a bar code position of 3 inches from the fr...

Страница 103: ...he guidance of Accu Sort Selection Definition Data Filtering The data filtering parameters specify the minimum and maximum pulse width in counts for the bar code data This important data filter setting assures optimal reader performance The Sampling Frequency default of 100 Mhz assures better decoder resolution for poorly printed bar codes Scan Filtering Skip Scans is disabled for AXIOM X DRX Sett...

Страница 104: ...o save parameters from AXCESS to the scan head Parameters saved on the AXIOM scan head s parameters storage module are the set of parameters that will be used during normal operations Retrieve from AXIOM Retrieves the current parameters from the AXIOM scan head s parameters storage module to the AXCESS setup software Save to Disk Use to save a copy of the parameters from AXCESS to disk Retrieve fr...

Страница 105: ...use the file later 4 Click Save or press the Alt S keys When this operation is successfully completed the following message appears in the AXCESS status line Parameters saved to disk If you get a warning message regarding Height Tracking Photoeye parameters reference Modify Tracking If you have not already done so be sure to update the wiring base with the file you have saved using the Backup AXIO...

Страница 106: ...default to the AXCESS folder 3 Click the appropriate pam file name 4 Click Open or press the Alt O key Once parameters are retrieved AXCESS is automatically updated to match the retrieved settings To update the reader with the file you have retrieved use the Save to AXIOM button NOTE If you get a warning message regarding Height Tracking Photoeye parameters reference Modify Tracking and Modify Tri...

Страница 107: ...base after modifying the scan head s parameters only to find that the previous parameters performed better If you used the Backup AXIOM Parameters to Base earlier you will be able to recover those parameters from the base using the Restore AXIOM Parameters from Base command Exiting AXCESS When you complete your work you can choose to save or discard any unsaved parameter change s before exiting AX...

Страница 108: ...ng options File Menu Descriptions Selection Definition Retrieve Parameters from Disk Retrieves a file of parameters stored on your computer Save Parameters to Disk Saves a file of parameters to your computer s hard disk Exit Use this option to exit AXCESS Whether or not there are changes to save AXCESS asks you to confirm your exit The message Any unsaved changes will be lost Do you still want to ...

Страница 109: ...AXIOM Saves a set of parameters to the scan head Standard Enables the standard setup features Setup Advanced Enables various advanced setup features available in AXCESS Advanced Setup The advanced setup functions do not appear in AXCESS Explorer unless Setup Advanced is selected from the Configuration drop down menu When selected a checkmark appears next to Advanced in the menu The following table...

Страница 110: ...o which it is connected Restore AXIOM Parameters from Base Send the parameters stored in the wiring base to the AXIOM scan head to which it is connected Visual Keyboard Use the visual keyboard to save keystrokes while creating messages that use non printable ASCII characters e g STX CR LF Reboot AXIOM Use to reboot restart the AXIOM reader Test Mode On Enables the reader s test mode AXIOM Commands...

Страница 111: ...ter selection To compare two sets of parameters 1 Select the option button in the Compare options group for either a Configuration File from disk or the Current AXIOM Configuration 2 If looking for a Configuration File use the Browse button locate the pam files saved on your computer If you re comparing current settings go to step 3 3 In the To field use the Browse button to find the configuration...

Страница 112: ...mpare only the parameters that are different between the two sets put a checkmark in the Remove identical parameters from list checkbox Click Compare Only the parameters that are different will be compared Compared Parameters identical parameters removed Use the Save to notepad button if you wish to save a comparison as a text file for future reference ...

Страница 113: ...AXIOM AXIOM X Product Line Manual Setup 113 05 AXIOM AXIOM X_Setup_R10 doc Accu Sort Systems Inc Compared Parameters Saved to Notepad Use the Exit button to leave the Compare Parameters functional tool ...

Страница 114: ...er just use visual keyboard to create your message then copy and paste it into the appropriate text box To create a message with the Visual Keyboard tool 1 Go to Tools Visual Keyboard 2 The ASCII Chart pop up window appears 3 Click on the keys you want to use for your message Example Clicking the STX CR LF buttons of the visual keyboard causes 02 0D 0A to appear in the text field 4 Click on the Co...

Страница 115: ...M and AXIOM failed to echo REBOOT command are displayed Test Mode On Enables the test mode For details on how to use the test mode reference the start up and operations checklist procedures in Chapter 6 Test Mode Off Disables the test mode Save LogView to File Enables you to store a copy of the LogView to a file on your computer See Chapter 8 for details on the Diagnostics Log Viewer Help Help Men...

Страница 116: ...ing operations Retrieve Parameters from AXIOM Use to retrieve the reader s current parameters to AXCESS Save Parameters to Disk Use to save a copy of the parameters from AXCESS to disk Retrieve Parameters from Disk Retrieves a set of parameters from disk Backup AXIOM Parameters to Base Use to save the scan head parameters to the wiring base This enables you to keep a parameters backup in the wirin...

Страница 117: ...wer up the AXIOM performs a series of self diagnostic and LED tests The complete power up sequence takes about 30 seconds When the STATUS LED flashes and turns a steady green the power up sequence is complete The AXIOM is now operational NOTE When an application uses multiple AXIOM readers you can provide each reader with a unique reader name using the AXCESS setup software This makes it easier to...

Страница 118: ...cable to the reader s setup port 3 Connect the programming setup cable to your computer 4 Apply power to the reader 5 Set configuration parameters using AXCESS for bar code symbologies trigger tracking and communications serial Ethernet and I O See Chapter 5 6 Check operations using the Test Mode Check Operations using Test Mode NOTE Perform the following test using a bar code that matches the def...

Страница 119: ...ages via the on screen indicators See Chapter 8 Diagnostics 10 Close the connection to the reader 11 Disconnect setup cable Operations Checklist Check trigger photoeye LED for proper operation Test parameters to assure optimal operation Observe the reader s Status Indicator LEDs during power up What to watch for is outlined later in this chapter Using AXCESS Explorer select Diagnostics AXIOM Monit...

Страница 120: ...ine Manual Accu Sort Systems Inc 06 AXIOM AXIOM X_Operations_R10 doc Control Panel Status Indicators There are several control panel status indicators on the AXIOM AXIOM X AXIOM Control Panel on scan head AXIOM X Control Panel on scan head ...

Страница 121: ...rt 1 GREEN Transmitting data RED Receiving data NETWORK Flashes red or green to indicate connection status For a Single TCP IP connection it indicates that a host connection has been made to the reader For EtherNet IP connection it indicates network connection status This LED is software controlled For a Controller Client multi reader connection it indicates that all inter reader communications co...

Страница 122: ...ler with the same group number Off Not connected to a controller with the same group number NOTE The mode indicated by the Network LED is dependent on the configuration you are using Ethernet IP is the highest priority Single TCP IP mode operation is the lowest Using Control Panel Buttons to Check Normal Operations Ref Button Description A Restore to AXIOM Restores parameters from Wiring Base to S...

Страница 123: ... strobe from 5 to 1 indicating parameters are being backed up from scan head to wiring base 5 When the LEDs stop strobing the backup is complete To restore parameters from wiring base to scan head 1 Press the restore button for about 1 second 2 Release button The bar graph LEDs continuously flash to indicate the button has been pressed long enough If the LEDs flash only once the button was not pre...

Страница 124: ..._R10 doc Checking Operations with AXCESS The AXCESS Diagnostics AXIOM Monitor enables you to evaluate the operational performance of your reader by providing vital statistics via status indicators real time read quality monitoring and box information Outgoing and incoming messages are also monitored ...

Страница 125: ...Multi Reader Network with AXCESS From the AXIOM Controller check Diagnostics Log Viewer Read Rate This simple diagnostic allows you to check bar codes read by laser for each Client in the network Each client is identified in the Read Rate Log by the unique name and IP address assigned to it using AXCESS See Chapter 5 ...

Страница 126: ... one side of packages as they move down a conveyor A photoeye is used to trigger the reader to begin searching for valid bar codes Bar code data is transmitted to a host device A simplified schematic diagram of the required items is shown below 2 4 3 1 AXIOM Wiring Base AXIOM AXIOM X Scan Head Photoeye Network Host Communications PC Universal Mounting Bracket Programming Cable Power Supply AC Powe...

Страница 127: ...ial Communications Tachometer HOST Network Communications Setup AXCESS Setup Functions for AXIOM AXIOM X Tracking Operation Modify Tracking Tachometer define tach type Modify Tracking AXIOM Mounting Modify Tracking Transmit Modify Tracking Track Config Basic Tracking Setup Procedure To assure tracking accuracy the distance from the Trigger Photoeye to the X scanning pattern must be measured and en...

Страница 128: ...r AXIOM A simplified schematic diagram of the required items for an X scanning configuration is shown below AXIOM X Controller PC Photoeye HOST Serial Communications Tachometer Wiring Base AXIOM X Client HOST Network Communications Ethernet Setup Functions for Controller Modify AXIOM Configuration Reader Name Controller Network Settings of Client Readers IP address and Group Setup Functions for Cl...

Страница 129: ...ollected data over a serial communications or network link to the host A simplified schematic diagram of the required items for a multiple reader configuration is shown below AXIOM Controller PC Photoeye HOST Serial Communications Tachometer AXIOM Client Wiring Base AXIOM Client AXIOM Client HOST Network Communications Ethernet Switch Setup Functions for Controller Modify AXIOM Configuration Reade...

Страница 130: ...ation is called a scanning array or tunnel NOTE Due to the complexity of these applications tunnel arrays are typically custom engineered to your specifications Setup Functions for Controller Modify AXIOM Configuration Reader Name Controller Network Settings of Client Readers IP address and Group Setup Functions for Clients Modify AXIOM Configuration Reader Name Client 1 2 3 4 5 Network Settings I...

Страница 131: ...intenance Procedures Exterior Cleaning Mounting Hardware Checks Wiring Connection Checks Tools and Materials Required Item Description Soft bristle brush For cleaning the reader s exterior Clean soft cloths For cleaning the reader s exterior Mild detergent solution for cleaning the reader s exterior Cleaning solutions 70 denatured alcohol 30 de ionized water solution for cleaning exit window Soft ...

Страница 132: ...hutoff the lasers 1 Press the Test Diagnostics button for five 5 seconds 2 The bar graph LEDs will light red for the five 5 second duration and then go out 3 The lasers will then shut off 4 After maintenance or service is complete repeat the process to turn the lasers back on Test Diagnostics button used for Laser Shutoff AXIOM Button and LEDs involved with Laser Shutoff AXIOM X Button and LEDs in...

Страница 133: ... laser light for prolonged periods could result in eye damage CAUTION Do not use any chemical on the reader that is unsafe for plastics such as benzene acetone or similar products Before performing this maintenance task be sure to shutdown the reader The exterior cleaning procedure may be performed without removing the reader from the mounting structure 1 Turn off the reader s lasers See Laser Shu...

Страница 134: ... benzene acetone or similar products The exit window cleaning procedure may be performed without removing the reader from the mounting structure if it is possible to do so 1 Turn off the reader s lasers See Laser Shutoff 2 Follow the exterior cleaning procedure before cleaning the exit window 3 Check the exit window surface for any dust dirt or smudges If the window needs to be cleaned proceed to ...

Страница 135: ...e side of the transport Clean as necessary 5 Verify photoeye operation Verify Trigger Photoeye Operation 1 Block the photoeye to confirm it is aligned properly with the reflector 2 If the LED on the photoeye changes status the photoeye is functioning properly 3 Verify that the Trigger LED on reader is green when photoeye is blocked 4 If the photoeye s LED does not change status adjust the photoeye...

Страница 136: ...eter clean using a mild detergent solution 4 Before restarting the system be sure the tachometer is making good contact with the product transport 5 Verify tachometer operation Verify Tachometer Operation There are two ways to verify tachometer operations Use AXCESS Setup Software 1 Connect reader to a computer 1 Start the AXCESS setup software 2 Go to Diagnostics AXIOM Monitor 3 Verify the Belt S...

Страница 137: ...e wiring base Specific wiring instructions are located on the insulation flap inside the wiring base See Chapter 4 1 Check all wiring connections to the wiring base terminal blocks 2 Tighten as necessary Do not over tighten 3 Check all cabling conduit for signs of wear damage 4 Repair replace any damaged cable connections as necessary Verify Reader Operation 1 Follow the Operations Checklist proce...

Страница 138: ...138 Maintenance AXIOM AXIOM X Product Line Manual Accu Sort Systems Inc 07 AXIOM AXIOM X_Maintenance_R10 doc Notes ...

Страница 139: ...l s bargraph LEDs The AXCESS Diagnostics AXIOM Monitor window also provides a read quality bargraph that enables you to monitor the test mode remotely from a PC connected to your network Additional details can be obtained by monitoring from this diagnostic window while the reader is in test mode When test mode is selected either by using the control panel button or AXCESS software it will time out...

Страница 140: ...ubleshooting AXIOM AXIOM X Product Line Manual Accu Sort Systems Inc 08 AXIOM AXIOM X_Troubleshooting_R10 doc Control Panel Status Indicators There are several control panel status indicators on the scan heads ...

Страница 141: ... RED identifies a No Read condition Check bar code print quality trigger configuration and bar code parameters RX TX If bar codes are being read but the LED is NOT illuminated data is not being transmitted on serial port 1 NETWORK See Network LED Fault Detection LINK If the LED is not flashing there is no network connection Bar Graph LED 1 5 Laser Shutoff Read quality indicator 5 Good 1 Poor 5 81 ...

Страница 142: ...mode operation is the lowest NOTE See Network LED during Normal Operations in Chapter 6 Control Panel Buttons Uses during Troubleshooting Ref Button Description A Restore to AXIOM Use to restore a set of parameters from the wiring base to a replacement scan head NOTE This only works if the Backup to Base button has been used earlier to assure the correct parameters are stored in the wiring base Se...

Страница 143: ...ersed GREEN if power polarity is correct OFF indicates no power DO NOT install the scan head if this LED is RED Tach On outside edge of circuit board behind scan head connector If tachometer wheel is slowly rotated the Tach LED will flash GREEN See Verify Tachometer Operation page 136 Trigger On outside edge of circuit board behind scan head connector When the trigger photoeye is blocked the Trigg...

Страница 144: ...r window is the primary tool used to monitor the reader s operation and bar code readability in real time The Diagnostics Log Viewer lets you review the performance logs saved by the AXIOM The log view field remains empty until you select one of the three buttons Read Rate System Counters or Message Log Update Firmware is used to reload the reader firmware AXIOM Monitor Status indicators and vital...

Страница 145: ...to the reader For EtherNet IP connection it indicates network connection status This LED is software controlled For Controller Client multi reader connections it indicates all inter reader communications i e connections between readers are correctly functioning I O 1 through I O 4 Green Indicates the status of the programmable I O lines Network LED during Normal Operations Mode Description Single ...

Страница 146: ...elt speed more accurately it can also be viewed as part of the System Counters in the log viewer Box Information Definition Belt Speed FPM Belt conveyance speed in feet per minute Box Length inch Box package length in inches Code Position inch Bar code position on the box in inches Scans Trigger Number of scans per trigger cycle Messages Diagnostic messages from the reader are displayed here This ...

Страница 147: ...ion Commands can be sent from the Command field on the log viewer Commands may also be sent from a terminal interface such as a TELNET connection to the AXIOM Display Commands Description DISP COUNTERS Display the System Counter log view DISP ENET Display the Ethernet interface status including MAC address DISP LASERS Display ALL Lasers log view DISP LASERx Display one Laser log view where X is 1 ...

Страница 148: ...es information on the overall read rate Overall Read Rate Counters Read Rate Description Total Boxes Total number of triggers Good Boxes A good box is a box with all required codes This counter is the number of good boxes along with the percentage of the total boxes that were good Partial Boxes A partial box is a box were some but not all required codes were read This obviously only applies when t...

Страница 149: ...T the percentage of the total packages read by that laser Read Rate Counters per Laser Read Rate Description Total Codes Total number of bar codes read Laser x Total number of bar codes read by the particular laser For an AXIOM configured as a Controller in a multi reader network this command also provides counters for the number of bar codes read by laser for each AXIOM client The clients are ide...

Страница 150: ... the System Counters button You can also enter DISPCOUNTERS in the command field and click Send Scan Rate and Belt Speed System Counters Description Scan Rate This is the total number of scans second that the AXIOM is reading Note the this number does NOT take into account laser toggling if it is enabled If laser toggling is enabled the effective scan rate for any laser is half of this value Belt ...

Страница 151: ...hat the AXIOM had not completed processing all of the scan data at the user specified transmit time This will only happen if the transmit time parameter is set to a value other than zero This does not necessarily indicate an error but does indicate that either the transmit time is too short or the AXIOM is seeing a lot of data which may be the result of too much background noise QData Trig Queue D...

Страница 152: ...the transfer of scan data from the scan data buffer Full Scans Number of times a scan could not be added to the scan data buffer because the maximum number of scans was exceeded Mem Full Number of times a scan could not be added to the scan data buffer because the memory was full ScanTooLong Number of times a scan was skipped because it contained too many transitions Max Clusters Number of times t...

Страница 153: ... Inc Message Log View The Message Log contains various text messages that have been logged by the AXIOM software You can view these messages by clicking the Message Log button You can also enter DISPMSGLOG in the command field and click Send The messages contained in this log typically reflect significant events ...

Страница 154: ...anual Accu Sort Systems Inc 08 AXIOM AXIOM X_Troubleshooting_R10 doc Display Lasers Log View The Display Lasers command provides a summary of the scan data being detected by each laser You can also enter DISPLASERS in the command field and click Send ...

Страница 155: ...f each laser can be seen with the DISP LASERx command where x is the laser number For each transition the raw position and bar width is shown first After that with brackets the computed bar and space values are displayed A zero is used if the bar or space exceeds the minimum or maximum bar space width threshold for that laser ...

Страница 156: ...IOM reader firmware This function should only be performed under the guidance of Accu Sort Technical Support Extracting an Image 1 Click the Extract Image button 2 The Save As window enables you to save image img files Burning an Image to Flash 1 Click the Burn Flash button 2 The Open window enables you to open an image file im 3 Burn the image file to flash ...

Страница 157: ...vided to the AXIOM Solution s 1 Check to ensure power is properly connected 2 Check to see if AXIOM Status LED turns ON 3 Confirm power supply functioning 4 Remove AXIOM X scan head from wiring base 5 Verify Power LED in wiring base is GREEN 6 If Power LED is RED polarity is swapped 7 If Power LED is OFF check wiring at the INPUT POWER terminal block 8 Replace the power supply if wiring was correc...

Страница 158: ... 2 Adjust the photoeye as necessary See Verify Photoeye Operation page 135 NOTE For non tracking applications only Problem HOST is not receiving serial host message Cause s Improper wiring between host and reader Incorrect configuration settings Solution s 1 Is the RX TX LED flashing GREEN 2 If yes check the serial cable wiring at the wiring base s SERIAL COM terminal block and at the HOST 3 If no...

Страница 159: ...e follow necessary procedures as outlined in Chapter 2 Safety ESD CAUTION This symbol identifies a procedure that requires you take measures to prevent Electrostatic Discharge ESD e g use an ESD wrist strap Circuit boards are most at risk Please follow ESD procedures as outlined in Chapter 2 Safety External Devices To replace any external devices reference the installation procedures provided in C...

Страница 160: ...000059582 Enhanced 2 Laser 2 Module Airport 1000052800 4 Laser Standard Density N A AXIOM Scan Head 1000052801 4 Laser High Density 1000062887 2 Laser Standard Density 1000063502 2 Laser Medium Density 1000062888 2 Laser High Density 1000062889 4 Laser Standard Density 1000063503 4 Laser Medium Density N A AXIOM X Scan Head 1000062890 4 Laser High Density N A Wiring Base 0104636001 Universal Wirin...

Страница 161: ...pply 0105914002 110 watt IP65 rated International 1000020569 Kit flying leads includes reflector hardware N A Photoeye 1000063534 Height Tracking Eye Kit 1 photoeye 1 input module N A Tachometer 1000019875 Programmable 8 30VDC with 20 ft cable 1000056135 DC Input Module White 3 3 32VDC 1000056136 DC Output Module Red 3 60VDC N A I O Modules 1000056137 AC Output Module Black 12 42VAC NOTE The illus...

Страница 162: ...n head with the connector on the wiring base and pressing the scan head down firmly In applications that are using more than one scan head option be sure to install the correct scan head by confirming the part number See Installing a Scan Head pages 36 40 5 Tighten the four screws that secure the scan head to the wiring base 6 Set a unique IP address for the reader using the AXCESS configuration s...

Страница 163: ...6 Install wiring base replacement to UMB mounting structure 7 Re connect all wiring to terminal blocks in replacement wiring base 8 Check power polarity LED in wiring base 9 Optional if used Check photoeye operation LED in wiring base 10 Optional if used Check tachometer operation LED in wiring base 11 Install the scan head to wiring base 12 Follow procedure in Chapter 5 to confirm operation 13 Op...

Страница 164: ...er 2 Disconnect any other power sources connected to the I O terminal blocks 3 Remove the scan head from wiring base 4 Remove I O module from wiring base 5 Install replacement I O module to correct location on wiring base 6 Secure I O module to wiring base 7 Install the scan head to wiring base 8 Test operation of device connected to the I O module ...

Страница 165: ...emove the scan head from wiring base 4 Disconnect power supply wiring from INPUT POWER terminal blocks See pages 25 and 51 5 Mount replacement power supply in same location as faulty unit 6 Install replacement power supply wiring through correct conduit opening 7 Connect wiring to INPUT POWER terminal blocks 8 Confirm power polarity LED in wiring base 9 Install the scan head to wiring base ...

Страница 166: ...Remove the scan head from wiring base 3 Disconnect photoeye wiring from Trigger terminal blocks 4 Mount replacement photoeye in same location as faulty photoeye 5 Install replacement photoeye wiring through correct conduit opening 6 Connect wiring to Trigger terminal blocks 7 Confirm photoeye operation LED in wiring base 8 Install the scan head to wiring base ...

Страница 167: ...g base 3 Disconnect tachometer wiring from TACH terminal blocks 4 Mount replacement tachometer in same location as faulty tachometer 5 Install replacement tachometer wiring through correct conduit opening 6 Connect wiring to TACH terminal blocks 7 Install the two ferrite clamps on the TACH cable 8 Confirm tachometer operation LED in wiring base 9 Install the scan head to wiring base ...

Страница 168: ...168 Service AXIOM AXIOM X Product Line Manual Accu Sort Systems Inc 09 AXIOM AXIOM X_Service_R10 doc Notes ...

Страница 169: ...XIOM AXIOM X Out to 80 inches 2032 max See read charts Appendix B 700 1400 SPS Scan Rate AXIOM AXIOM X 620 1120 SPS Bar Code Types All standard 1D symbologies including I 2 of 5 Code 128 Code 39 Code 93 Codabar Codabar NSS UPC EAN Visual Indicators LEDs Status Trigger Read RX TX Network Link and Read Quality LEDs 1 5 Connections Dedicated Setup Port requires AXCESS Setup Programming Cable Terminal...

Страница 170: ...0 C 32 F to 122 F Storage 20 to 70 C 4 to 158 F Relative Humidity 10 90 non condensing Enclosure Powdered Coated Cast Aluminum Rated for IP65 Power Requirements Input 90 264 VAC 0 2A typical 1 0A max 120 VAC Output Max 250mA Load Power Consumption 40 W Connections Male IEC available with either domestic or international power cord Compliance UL cUL CE FCC Class A See Compliance table Dual AXIOM Po...

Страница 171: ... 0 mA 2 5 mA RMS Static off state dv dt 200 V usec Maximum On State Current 0 5 A DC 0 5 A RMS Minimum On State Current 10 mA DC 50mA RMS Maximum 1 Cycle Surge 4 A peak Maximum 1 Second Surge 1 5 A DC Peak On State Voltage 1 5 V DC 1 6 V peak Input Module Part Number 1000056135 Maximum Input Voltage 32 VDC Minimum Input Voltage 3 3 VDC Input Resistance 1 k ohm Maximum Input Current 32mA DC 32 VDC ...

Страница 172: ...d Emissions Class A 2 Immunity EN 61000 6 2 2001 Electromagnetic Compatibility Generic Standards Immunity for industrial environments EN 61000 4 2 1995 Electromagnetic compatibility EMC Electrostatic discharge immunity test EN 61000 4 3 2001 EMC Part 4 Section 3 Radiated radio frequency electromagnetic field test EN 61000 4 4 2004 EMC Electrical fast transient burst immunity test EN 61000 4 5 1995...

Страница 173: ... module is 1 120 SPS The standard scan rate is 1 000 SPS AXIOM 2L Enhanced When one laser is installed in each module that laser has exclusive use of the mirror wheel and receiving sensor The one laser is on all the time and uses every facet of the mirror wheel The AXIOM maximum scan rate when one laser is installed per module is 1 400 SPS The standard scan rate is 1 100 SPS The scan rate is not a...

Страница 174: ...rd 1000052807 High Density 1000052809 10 mil code 1000052809 12 mil code 1000052809 Not available at time of publication 15 mil code 1000052807 20 mil code 1000052807 1 100 scans per second standard throughout DOF ANSI Contrast Grade 84 or greater ANSI Grade A Print Quality Pitch not greater than 15 Skew not greater than 15 Tilt not greater than 45 ...

Страница 175: ...h Density 1000052803 10 mil code 1000052803 12 mil code 1000052803 15 mil code 1000052802 20 mil code 1000052802 550 scans per second standard throughout DOF Using one receiving sensor Laser pairs alternate on off every other scan ANSI Contrast Grade 84 or greater Pitch not greater than 15 Skew not greater than 15 Tilt not greater than 45 ANSI Grade A Print Quality ...

Страница 176: ...04 High Density 1000052805 10 mil code 1000052805 12 mil code 1000052805 15 mil code 1000052804 20 mil code 1000052804 1 100 scans per second standard throughout DOF Using two receiving sensors one per module Each laser always on ANSI Contrast Grade 84 or greater Pitch not greater than 15 Skew not greater than 15 Tilt not greater than 45 ANSI Grade A Print Quality ...

Страница 177: ... time of publication 12 mil code 1000052805 Not available at time of publication 15 mil code 1000052804 Not available at time of publication 20 mil code 1000052804 Not available at time of publication 1 100 scans per second standard throughout DOF Using two receiving sensors one per module Each laser always on ANSI Contrast Grade 84 or greater Pitch not greater than 15 Skew 45 Tilt not greater tha...

Страница 178: ...y 1000052801 10 mil code 1000052801 12 mil code 1000052801 15 mil code 1000052800 20 mil code 1000052800 550 scans per second standard throughout DOF Using two receiving sensors one per module Laser pairs alternate on off every other scan ANSI Contrast Grade 84 or greater Pitch not greater than 15 Skew not greater than 15 Tilt not greater than 45 ANSI Grade A Print Quality ...

Страница 179: ...ng Bracket XMB Std 1000052802 High Density 1000052803 10 mil code 1000052803 12 mil code 1000052803 15 mil code 1000052802 20 mil code 1000052802 550 scans per second standard throughout DOF Using one receiving sensor Laser pairs alternate on off every other scan ANSI Contrast Grade 84 or greater Pitch not greater than 15 Skew not greater than 15 ANSI Grade A Print Quality See page 27 ...

Страница 180: ...and X Pattern Mounting Bracket XMB Std 1000052804 High Density 1000052805 10 mil code 1000052805 12 mil code 1000052805 15 mil code 1000052804 20 mil code 1000052804 1 100 scans per second standard throughout DOF Using two receiving sensors Each laser always on ANSI Contrast Grade 84 or greater Pitch not greater than 15 Skew not greater than 15 ANSI Grade A Print Quality See page 27 ...

Страница 181: ...ting Bracket XMB 1000052800 and 1000052801 10 mil code 1000052801 12 mil code 1000052801 15 mil code 1000052800 20 mil code 1000052800 550 scans per second standard throughout DOF Using two receiving sensors one per module Laser pairs alternate on off every other scan ANSI Contrast Grade 84 or greater Pitch not greater than 15 Skew not greater than 15 ANSI Grade A Print Quality See page 27 ...

Страница 182: ...cations Standard Density 2L 1000062887 and 4L 1000062889 Pitch skew not greater than 15 ANSI Contrast Grade 84 or greater ANSI Grade A Print Quality AXIOM X 2L 1000 SPS standard throughout the DOF AXIOM X 4L 500 SPS standard throughout the DOF Height Tracking Photoeyes are required when package spacing is under 1 3 of the total DOF See Chapter 3 ...

Страница 183: ... 2L 1000063502 and 4L 1000063503 High Density 2L 1000062888 and 4L 1000062890 Pitch skew not greater than 15 ANSI Contrast Grade 84 or greater ANSI Grade A Print Quality AXIOM X 2L 1000 SPS standard throughout the DOF AXIOM X 4L 500 SPS standard throughout the DOF Height Tracking Photoeyes are required when package spacing is under 1 3 of the total DOF See Chapter 3 ...

Страница 184: ...184 Appendices AXIOM AXIOM X Product Line Manual Accu Sort Systems Inc A1 AXIOM AXIOM X_Appendices_R10 doc Notes ...

Страница 185: ...l noise sources Use the AXCESS Log Viewer s DISP ENET command to monitor for Ethernet errors The AXIOM hardware will detect the swapping of the Transmit and Receive lines and configure appropriately This allows a straight cable to be used to connect two AXIOMs AXIOM Network Software Configuration Before an AXIOM will communicate on your Ethernet network a few parameters must be set Initially this ...

Страница 186: ... connecting them directly with a single cable the Ethernet Link must be configured for 10mbps Full Duplex which is the default If more than two readers are to be networked or the network needs to be accessible for other reasons an EtherNet switch is needed Only provide the trigger signal to the Controller If a tachometer is in use it is recommended that it be wired to all readers However an option...

Страница 187: ...bleshooting NOTE The following LED functions are overridden if EtherNet IP communications are used See Chapter 4 The main AXIOM diagnosis tool is the Network LED An AXIOM controller will FLASH the LED red once a second if it cannot locate the specified number of Clients When all connects are made the Network LED becomes a solid green For a client the Network LED remains off until a Controller init...

Страница 188: ...an be left open For example if a host computer has initiated a connection to an AXIOM and the host computer crashes the connection on the AXIOM will remain open until the AXIOM attempts to send the next message normally the next bar code At this point the AXIOM will detect the connection from the host computer has been terminated and clear the connection allowing the host computer to reconnect How...

Страница 189: ...tion cannot be established the AXIOM will reattempt the connection after the specified number of seconds default is 5 seconds Similar issues exist regarding improper closing of connections as described in the TCP IP Server section As a result it is also recommended that a heartbeat message be enabled for TCP IP Client connections UDP Messaging For UDP messaging only the destination IP address and ...

Страница 190: ...bled devices This can be done using Explicit Messaging I O Messaging On Demand Messaging a special AXIOM protocol for ControlLogix Controllers only All of the EtherNet IP Object definitions are given later in this appendix Refer to this appendix when setting up the interface to your device Use I O messaging to monitor and set AXIOM I O bits as well as to obtain bar code data from the AXIOM The dis...

Страница 191: ... bar codes to a numeric value instead of transmitting them as ASCII text Additionally you can enable the On Demand Messaging Option for ControlLogix Processors This is described in more detail later in this document If the EtherNet IP Trigger Input is enabled the AXIOM Trigger settings are ignored and the AXIOM is triggered solely by manipulating the Trigger Bit in the Output Word contained in the...

Страница 192: ...erNet IP I O message transfer between an AXIOM and a ControlLogix processor you need to configure your AXIOM as a Generic Ethernet Module in the ControlLogix I O tree To add a module 1 Under the I O Configuration Tree right click on the entry for your Ethernet module e g 1756 ENET A and select New Module 2 You will be presented with a list of options similar to what is shown below From this list s...

Страница 193: ... intervals down to 10 milliseconds However intervals this small may affect the overall AXIOM performance After this module definition for the AXIOM has been completed tags will be created in the controller based on the name you specified for this AXIOM on the properties page for the module These tags will consist of the name followed either by the letter C Configuration the letter O Outputs or the...

Страница 194: ... 4 67 Bar Code Data Discrete Input Word Bit 0 AXIOM Programmable Output 1 1 AXIOM Programmable Output 2 2 AXIOM Programmable Output 3 3 AXIOM Programmable Output 4 4 AXIOM Programmable Output 5 5 AXIOM Programmable Output 6 6 AXIOM Programmable Output 7 7 AXIOM Programmable Output 8 8 15 Unused AXIOM O Output Data Tag Name Value Description AXIOM O Data 0 Discrete Output Word See bit definitions A...

Страница 195: ...of bar code data using On Demand Messaging allows the I O packet interval to be increased just to provide a heartbeat with the AXIOM reducing overall network utilization On Demand messaging can be enabled on the AXIOM from the EtherNet IP window within AXCESS When enabled you need to specify the IP address and slot for the ControlLogix processor along with the name of the Tag to contain the bar co...

Страница 196: ...ble to connect from another If a diagnostic network connection to an AXIOM is terminated ungracefully PC crash network cable disconnect etc the AXIOM does poll the status of the connection by periodically sending a single STX character and will time out the connection Web Status Interface The AXIOM supports a simple web interface that provides an overview of the AXIOM health and status FTP Interfa...

Страница 197: ... a parameter is not contained in a file that parameter will be untouched when a new file is transferred to the AXIOM This allows the creation of files that just contain specific parameters match code values for example that can be transferred to a number of AXIOMs for quick reconfiguration Network Administrator Information All setup and diagnostic communications by the AXCESS application are sent ...

Страница 198: ...therNet IP Specification available from the Open DeviceNet Vendors Association ODVA Identity Object 01HEX Message Router Object 02HEX Assembly Object 04HEX Connection Manager Object 06 HEX TCP Object F5HEX Ethernet Link Object F6 HEX The following Vendor Specific Objects have been defined to support the AXIOM Bar Code Reader Bar code Data Object 70 HEX Discrete Input Data Object 71 HEX Discrete Ou...

Страница 199: ... USINT 03 01 Get 5 Status Word see below for definition WORD See Below Get 6 Product Serial Number UDINT Unique 32 Bit Value Get 7 Product Name Structure of Product Name Size Product Name String UINT USINT 0 32 15 Bar Code Reader Get Status Word Bit Bit 0 Bit 1 0 No I O Connection I O Connection Allocated 1 15 Unused Unused Common Services Implemented for Service Code Class Level Instance Level Se...

Страница 200: ...7 7 AXIOM Programmable Output 8 8 15 Unused Instance 0x70 Attributes Output Instance 1 Attribute ID Name Data Type Default Data Value Access Rule 3 Output Data Structure of Discrete Output Word see below Last Bar code Seq Num Received UINT UINT 0 0 Get Set Discrete Output Word Bit Bit 0 Bit 1 0 Trigger Off Trigger On 1 7 Unused Unused 8 AXIOM Relay 1 Off AXIOM Relay 1 On 9 AXIOM Relay 2 Off AXIOM ...

Страница 201: ...ucture of IP Address Network Mask Gateway Address Name Server Name Server 2 Domain Name Size Domain Name UDINT UDINT UDINT UDINT UDINT UINT STRING 0 0 0 0 0 0 0 Get 6 Host Name Structure of Host Name Size Host Name UINT STRING 0 0 Get Common Services Implemented for Service Code Class Level Instance Level Service Name 0EHEX Yes Yes Get_Attribute_Single Ethernet Link Object F6 HEX 1 Instance Class ...

Страница 202: ...for Service Code Class Level Instance Level Service Name 0EHEX Yes Yes Get Attribute Single 10HEX No Yes Set Attribute Single Discrete Input Data Object 71 HEX 1 Instance Class Attributes Attribute ID Name Data Type Default Data Value Access Rule 1 Revision UINT 1 Get Instance Attributes Attribute ID Name Data Type Default Data Value Access Rule 3 Discrete Input Word UINT 0 Get Discrete Input Word...

Страница 203: ...Default Data Value Access Rule 3 Discrete Output Data UINT 0 Get Set Discrete Output Word Bit Bit 0 Bit 1 0 Trigger Off Trigger On 1 7 Unused Unused 8 AXIOM Relay 1 Off AXIOM Relay 1 On 9 AXIOM Relay 2 Off AXIOM Relay 2 On 10 AXIOM Relay 3 Off AXIOM Relay 3 On 11 AXIOM Relay 4 Off AXIOM Relay 4 On 12 15 Unused Unused If enabled on AXIOM Common Services Implemented for Service Code Class Level Inst...

Страница 204: ...204 Appendices AXIOM AXIOM X Product Line Manual Accu Sort Systems Inc A1 AXIOM AXIOM X_Appendices_R10 doc Notes ...

Страница 205: ...to use browser interface as well as automatic status and error condition reporting of all Accu Sort products and systems to which it is connected Use the FAST Monitor Configuration screen in AXCESS to setup an AXIOM reader for FAST Monitor message format compatibility How to Configure an AXIOM for FAST Monitor compatibility 1 Modify Configuration Options a Select Collect FAST Monitor Statistics ch...

Страница 206: ...er or stand alone unit client units must still have this option selected in order to set unit position which is only accessible from the FAST Monitor Configuration menu screen The Reader Name set in the AXIOM Configuration menu is used in all FAST Monitor messaging Enter a unique alphanumeric name of up to 15 characters in the Reader Name field for all AXIOMs in the tunnel controller and all clien...

Страница 207: ...troller or a client Controller Client Configuration Settings Standalone Controller Client Number of Client Readers 0 0 0 Group Number 0 0 0 Example Since the Collect FAST Monitor Statistics option was checked the Net Host Port2 panel is masked out Parameters for Net Host Port2 used for FAST Monitor communications are set on the FAST Monitor Configuration screen NOTE Group number must be the same f...

Страница 208: ...by MsgSource name MsgSource Set Unit Position by clicking on the appropriate AXIOM unit in the tunnel picture and setting a number The numeric display is for informational purposes only Each unit in the tunnel must have a unique position which is used in all FAST Monitor messaging The following Net Host Port2 settings are programmable Port Number Reconnect Time Remote IP Address of FAST Monitor se...

Страница 209: ...X Installation Drawing 109259 Photoeye Mounting for Accu Sort Structures 41222 Photoeye Mounting 24130 Height Tracking Photoeye Mounting Adapter 112697 Universal Mounting Plate AXIOM and IP65 Power Supplies 112465 Interconnect Drawings The interconnect drawings provided in this appendix are useful when wiring your AXIOM AXIOM X for the following applications Controller Client with Tachometer 10748...

Страница 210: ...210 Appendices AXIOM AXIOM X Product Line Manual Accu Sort Systems Inc A1 AXIOM AXIOM X_Appendices_R10 doc Notes ...

Страница 211: ... CAGE CODE 1 OF 1 SOLIDWORKS NONE CAD SYS DATE C SIZE DATE DATE MECH ENG 03 24 03 10 18 02 10 18 02 DRAWN CHKD ENGR DEPT CUSTOMER ANGULAR X 1 0 XX 01 X 10 JJB TJB TJB E SCALE CONTRACT TOLERANCES ALL BEND RELIEFS TO SUIT ALL C SINKS ARE 82 ALL ANGLES ARE 90 ALL DIMENSIONS ARE IN INCHES UNLESS OTHERWISE SPECIFIED XXXX 0005 XXX 005 LINEAR X 100 XX 020 FT IN 1 FRACTIONS 1 4 TELFORD PA 18969 USA ACCU S...

Страница 212: ...0200 XXX 0050 XXXX 0005 UNLESS OTHERWISE SPECIFIED DIMENSIONS ARE IN INCHES MILLIMETERS ALL ANGLES ARE 90 ALL C CINKS ARE 82 INCLUDED ANGLE ALL BEND RELIEFS TO SUIT TOLERANCES FRACTIONS 1 4 FT IN 1 THIS DOCUMENT IS PROVIDED FOR A SPECIFIC PURPOSE AND THE DISCLOSED INFORMATION REMAINS OUR PROPERTY IT MAY NOT BE DISCLOSED COPIED OR REPRODUCED EXCEPT FOR THE SPECIFIC PURPOSE WITHOUT ACCU SORT S PRIOR...

Страница 213: ...ORT SYSTEMS inc 1 2 3 4 H G F E 5 6 7 D C B 8 A H G F E D C B A 1 2 3 4 5 6 7 8 0105534001 2 OF 3 ANGULAR X 1 00 X 0 10 XX 0 01 METRIC X 2 500 X 0 500 XX 0 130 XXX 0 013 INCH X 1000 XX 0200 XXX 0050 XXXX 0005 UNLESS OTHERWISE SPECIFIED DIMENSIONS ARE IN INCHES MILLIMETERS ALL ANGLES ARE 90 ALL C CINKS ARE 82 INCLUDED ANGLE ALL BEND RELIEFS TO SUIT TOLERANCES PART NO FRACTIONS 1 4 FT IN 1 THIS DOCU...

Страница 214: ...RT SYSTEMS inc 1 2 3 4 H G F E 5 6 7 D C B 8 A H G F E D C B A 1 2 3 4 5 6 7 8 0105534001 3 OF 3 ANGULAR X 1 00 X 0 10 XX 0 01 METRIC X 2 500 X 0 500 XX 0 130 XXX 0 013 INCH X 1000 XX 0200 XXX 0050 XXXX 0005 UNLESS OTHERWISE SPECIFIED DIMENSIONS ARE IN INCHES MILLIMETERS ALL ANGLES ARE 90 ALL C CINKS ARE 82 INCLUDED ANGLE ALL BEND RELIEFS TO SUIT TOLERANCES PART NO FRACTIONS 1 4 FT IN 1 THIS DOCUM...

Страница 215: ...ARE IN INCHES MILLIMETERS ALL ANGLES ARE 90 ALL C CINKS ARE 82 INCLUDED ANGLE ALL BEND RELIEFS TO SUIT TOLERANCES INCH X 1000 XX 0200 XXX 0050 XXXX 0005 METRIC X 2 500 X 0 500 XX 0 130 XXX 0 013 ANGLULAR X 1 00 X 0 10 XX 0 01 PART NO C STAMPED CONTROLLED COPY IN RED THIS IS NOT A CONTROLLED COPY UNLESS 2001 ACCU SORT SYSTEMS INC OF THIS DOCUMENT APPEAR ON ANY COPY OR REPRODUCTION PRIOR APPROVAL TH...

Страница 216: ... C 2 B A 1 2 3 4 D C 3 B 4 A SHEET REMOVE SHARP EDGES AND BURRS FT IN 1 FRACTIONS 1 4 UNLESS OTHERWISE SPECIFIED DIMENSIONS ARE IN INCHES MILLIMETERS ALL ANGLES ARE 90 ALL C CINKS ARE 82 INCLUDED ANGLE ALL BEND RELIEFS TO SUIT TOLERANCES INCH X 1000 XX 0200 XXX 0050 XXXX 0005 METRIC X 2 500 X 0 500 XX 0 130 XXX 0 013 ANGLULAR X 1 00 X 0 10 XX 0 01 PART NO C STAMPED CONTROLLED COPY IN RED THIS IS N...

Страница 217: ... 6 7 8 1 OF 1 REVISION BY TJB XX 0 01 X 0 10 X 1 00 ANGULAR ECO XXX 0 013 XX 0 130 X 0 500 X 2 500 METRIC XXXX 0005 XXX 0050 XX 0200 X 1000 INCH DATE TOLERANCES PART NO FRACTIONS 1 4 FT IN 1 ALL BEND RELIEFS TO SUIT ALL C CINKS ARE 82 INCLUDED ANGLE ALL ANGLES ARE 90 DIMENSIONS ARE IN INCHES MILLIMETERS UNLESS OTHERWISE SPECIFIED 12 22 05 RELEASED REMOVE SHARP EDGES AND BURRS STAMPED CONTROLLED CO...

Страница 218: ...LL BEND RELIEFS TO SUIT T O L E R A N C E S PART NO FRACTIONS 1 4 FT IN 1 T H I S D O C U M E N T I S P R O V I D E D F O R A S P E C I F I C P U R P O S E A N D T H E D I S C L O S E D I N F O R M A T I O N R E M A I N S O U R P R O P E R T Y I T M A Y N O T B E D I S C L O S E D C O P I E D OR REPRODUCED EXCEPT FOR THE SPECIFIC PURPOSE WITHOUT ACCU SORT S P R I O R A P P R O V A L T H I S N O T ...

Страница 219: ...CTIONS 1 4 FT IN 1 T H I S D O C U M E N T I S P R O V I D E D F O R A S P E C I F I C P U R P O S E A N D T H E D I S C L O S E D I N F O R M A T I O N R E M A I N S O U R P R O P E R T Y I T M A Y N O T B E D I S C L O S E D C O P I E D OR REPRODUCED EXCEPT FOR THE SPECIFIC PURPOSE WITHOUT ACCU SORT S P R I O R A P P R O V A L T H I S N O T I C E M U S T A P P E A R O N A N Y C O P Y O R R E P R...

Страница 220: ... O S E D C O P I E D OR REPRODUCED EXCEPT FOR THE SPECIFIC PURPOSE WITHOUT ACCU SORT S P R I O R A P P R O V A L T H I S N O T I C E M U S T A P P E A R O N A N Y C O P Y O R R E P R O D U C T I O N OF THIS DOCUMENT 2 0 0 4 A C C U S O R T S Y S T E M S I N C C T H I S I S N O T A C O N T R O L L E D C O P Y U N L E S S S T A M P E D C O N T R O L L E D C O P Y I N R E D REMOVE SHARP EDGES AND BUR...

Страница 221: ... D E D F O R A S P E C I F I C P U R P O S E A N D T H E D I S C L O S E D I N F O R M A T I O N R E M A I N S O U R P R O P E R T Y I T M A Y N O T B E D I S C L O S E D C O P I E D OR REPRODUCED EXCEPT FOR THE SPECIFIC PURPOSE WITHOUT ACCU SORT S P R I O R A P P R O V A L T H I S N O T I C E M U S T A P P E A R O N A N Y C O P Y O R R E P R O D U C T I O N OF THIS DOCUMENT 2 0 0 4 A C C U S O R ...

Страница 222: ...TAMPED CONTROLLED COPY IN RED THIS DOCUMENT IS PROVIDED FOR A SPECIFIC PURPOSE AND THE DISCLOSED INFORMATION REMAINS OUR PROPERTY IT MAY NOT BE DISCLOSED COPIED OR REPRODUCED EXCEPT FOR THE SPECIFIC PURPOSE WITHOUT ACCU SORT S PRIOR APPROVAL THIS NOTICE MUST APPEAR ON ANY COPY OR REPRODUCTION OF THIS DOCUMENT 2007 ACCU SORT SYSTEMS INC FT IN 1 FRACTIONS 1 4 UNLESS OTHERWISE SPECIFIED DIMENSIONS AR...

Страница 223: ......

Страница 224: ......

Страница 225: ......

Страница 226: ...HEET REMOVE SHARP EDGES AND BURRS THIS IS NOT A CONTROLLED COPY UNLESS STAMPED CONTROLLED COPY IN RED THIS DOCUMENT IS PROVIDED FOR A SPECIFIC PURPOSE AND THE DISCLOSED INFORMATION REMAINS OUR PROPERTY IT MAY NOT BE DISCLOSED COPIED OR REPRODUCED EXCEPT FOR THE SPECIFIC PURPOSE WITHOUT ACCU SORT S PRIOR APPROVAL THIS NOTICE MUST APPEAR ON ANY COPY OR REPRODUCTION OF THIS DOCUMENT 2004 ACCU SORT SY...

Страница 227: ... ENGR DEPT CUSTOMER TCS RAD RAD E SCALE CONTRACT TELFORD PA 18969 USA ACCU SORT SYSTEMS inc D C A 1 2 3 PART NO 0107481000 SHEET REMOVE SHARP EDGES AND BURRS THIS IS NOT A CONTROLLED COPY UNLESS STAMPED CONTROLLED COPY IN RED THIS DOCUMENT IS PROVIDED FOR A SPECIFIC PURPOSE AND THE DISCLOSED INFORMATION REMAINS OUR PROPERTY IT MAY NOT BE DISCLOSED COPIED OR REPRODUCED EXCEPT FOR THE SPECIFIC PURPO...

Страница 228: ...LED COPY UNLESS STAMPED CONTROLLED COPY IN RED THIS DOCUMENT IS PROVIDED FOR A SPECIFIC PURPOSE AND THE DISCLOSED INFORMATION REMAINS OUR PROPERTY IT MAY NOT BE DISCLOSED COPIED OR REPRODUCED EXCEPT FOR THE SPECIFIC PURPOSE WITHOUT ACCU SORT S PRIOR APPROVAL THIS NOTICE MUST APPEAR ON ANY COPY OR REPRODUCTION OF THIS DOCUMENT 2004 ACCU SORT SYSTEMS INC FT IN 1 FRACTIONS 1 4 UNLESS OTHERWISE SPECIF...

Страница 229: ...ISCLOSED INFORMATION REMAINS OUR PROPERTY IT MAY NOT BE DISCLOSED COPIED OR REPRODUCED EXCEPT FOR THE SPECIFIC PURPOSE WITHOUT ACCU SORT S PRIOR APPROVAL THIS NOTICE MUST APPEAR ON ANY COPY OR REPRODUCTION OF THIS DOCUMENT 2004 ACCU SORT SYSTEMS INC FT IN 1 FRACTIONS 1 4 UNLESS OTHERWISE SPECIFIED DIMENSIONS ARE IN INCHES MILLIMETERS ALL ANGLES ARE 90 ALL C CINKS ARE 82 INCLUDED ANGLE ALL BEND REL...

Страница 230: ...E WIRES AS GREEN IN COLOR GREEN N A N A N A A B C D B 4 3 1 2 4 C HEIGHT TRACKING PHOTOEYES AXIOM X INTERCONNECT DRAWING R 109364 DWG NO 53830 CAGE CODE 1 OF 1 SOLIDWORKS NONE CAD SYS DATE B SIZE DATE DATE MECH ENG 16 FEB 2006 16 FEB 2006 16 FEB 2006 DRAWN CHKD ENGR DEPT CUSTOMER CDG LSM JJY E SCALE CONTRACT TELFORD PA 18969 USA ACCU SORT SYSTEMS inc D C A 1 2 3 PART NO 0109364000 SHEET REMOVE SHA...

Отзывы: