background image


50 

English 


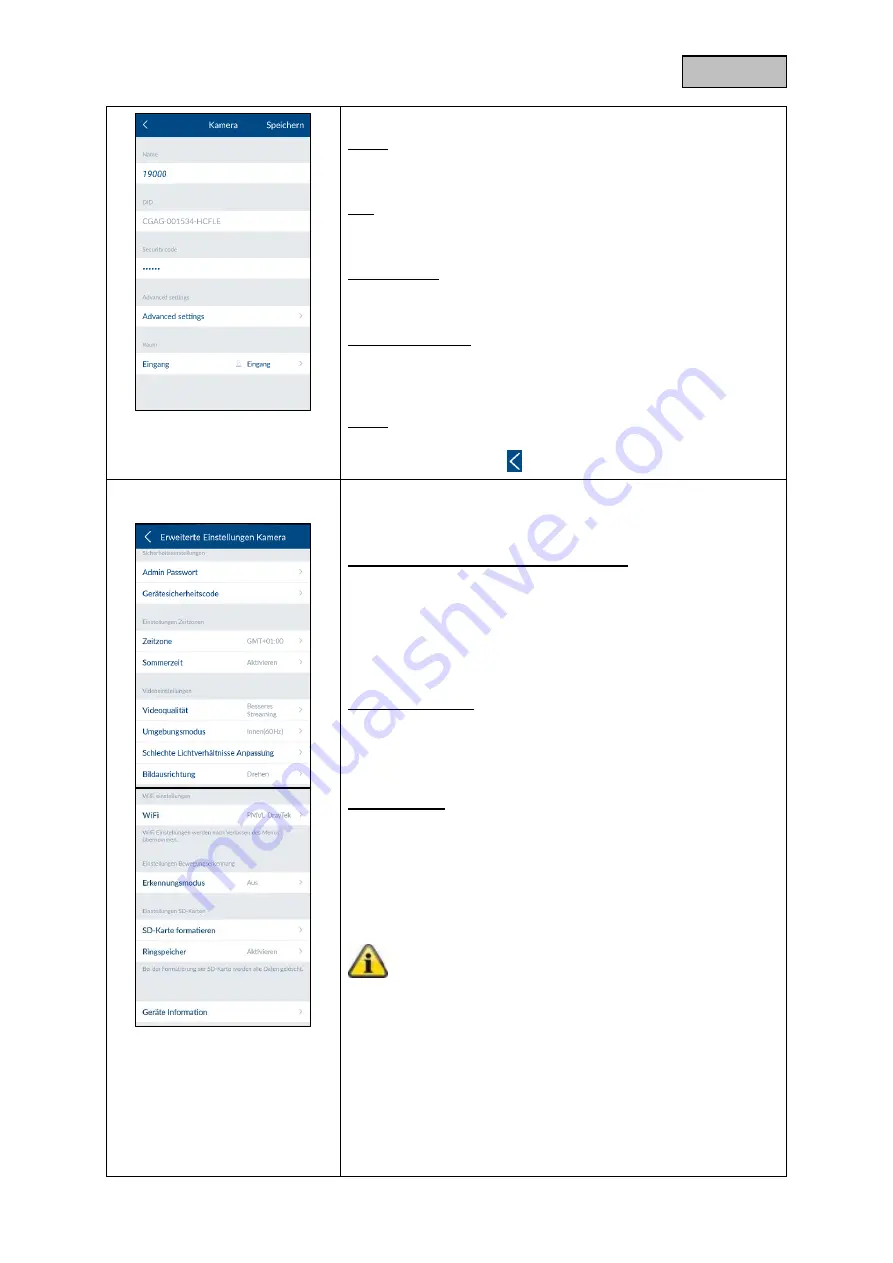
Camera 

Name 

Enter a name for the component. 


DID 

Read the camera's DID number here. 


Security code 

Entering the camera's security code 


Advanced settings 

Open the advanced settings by entering the camera's admin code 
(default setting: 123456). 


Room 

Open  the  room  list  and  select  the  room  where  the  camera  is 

installed. Tap the arrow 

 to return to the settings. 


Advanced camera settings 

(not available for TVAC16000 cameras) 


Admin password and device security code 

Change  the  device  security  code  and  password  for  the  camera 
here 

The device security code provides you with access to the camera 
image 

The admin password opens the advanced settings. 


Time zone settings 

Here you can select the time zone in which the camera is installed. 
If the  world time zone  uses summer time, activate the summer-
time setting. 


Video Settings 

Video Quality 

Select the quality for the video streaming here. 


Improved streaming

the video display is smoother. 


Improved image, the video image has a higher resolution. 


HD video, the video image is shown in HD. However, due 
to the large volume of data, the image may be delayed. 

Note: 

Only  use  the  improved  image/HD  video  settings  if  you 
have  sufficient  bandwidth  (1 Mbps)  and  the  correct 
system  requirements.  Note  that  differing  transmission 
technologies  for  audio  and  video  may  result  in 
asynchronous  transmission  as  a  result  of  different 
network traffic. 

 
Environment mode 


Here,  you  have  the  option  to  choose  between  the  interior 
(50 Hz), interior (60 Hz) and exterior network frequency. 


Standard value, Germany: 50 Hz 

Содержание Smartvest FUMK35000

Страница 1: ...sanleitung Wichtige Hinweise und FAQs zu diesem Produkt und weiteren Produkten finden Sie auf der Internetseite www abus com Version 1 2 Originalbedienungsanleitung in deutscher Sprache F r k nftige V...

Страница 2: ...en der jeweiligen Inhaber Alle Rechte vorbehalten Bei Fragen wenden Sie sich an ihren Facherrichter oder Fachhandelspartner Haftungsausschluss Diese Bedienungsanleitung wurde mit gr ter Sorgfalt erste...

Страница 3: ...bis zu 4 IP Kameras mit der kostenlosen App Die kostenlose App erm glicht den weltweiten Zugriff auf die Zentrale Im Falle eines Alarms verf gt die Zentrale ber eine integrierte lautstarke 90dB Siren...

Страница 4: ...inen Kurzschluss oder elektrischen Schlag verursachen kann Stellen Sie weder das Ger t M belst cke oder andere schwere Gegenst nde auf die Kabel und achten Sie darauf dass diese nicht geknickt werden...

Страница 5: ...nst Luftfeuchtigkeit kondensieren und zu elektrischen Kurzschl ssen f hren kann Achten Sie bei allen Komponenten die f r den Innenbereich und Au enbereich geeignet sind darauf dass die Komponenten kei...

Страница 6: ...werden k nnen Wartung und Pflege Wartungsarbeiten sind erforderlich wenn das Ger t besch digt wurde z B wenn Netzstecker Netzkabel oder Geh use besch digt sind Fl ssigkeit oder Gegenst nde ins Innere...

Страница 7: ...omponenten 19 Allgemeine Einstellungen 21 3 Montage 23 FUAA35000 Smartvest 23 FUHA35000 Funk Steckdose 24 FUMK35000 ffnungsmelder 24 FUBW35000 Bewegungsmelder 26 FURM35000 Rauch Hitze Warnmelder 27 FU...

Страница 8: ...atus LED Aus System ist deaktiv Gelb An System ist deaktiv und es liegt eine St rung vor z B Batterie leer oder ffnungsmelder ist offen Blau An System ist aktiv Rot An System ist aktiv und im Alarmzus...

Страница 9: ...ngen d h alle Einstellungen werden zur ckgesetzt und das Pairing der Komponenten gel scht Dr cken Sie den Reset Knopf im spannungslosen Zustand der Zentrale und halten diesen 10 Sekunden gedr ckt w hr...

Страница 10: ...e Richtung Schlie en Sie anschlie end das Batteriefach mit der Abdeckung Aufh ngung Aufh ngung f r Wandmontage Bohrlochabstand 10 cm Bohrschablone liegt bei Lautsprecher Lautsprecher der Smartvest mit...

Страница 11: ...rn Deutschland sterreich Schweden Niederlande Repeater Modus Die Funk Steckdose kann neben dem Schalten eines Verbrauchers zus tzlich als Funk Repeater f r eine andere Komponente dienen Hierzu folgen...

Страница 12: ...ersorgung bis zu 1 Jahr Batterielebensdauer Die Smartvest App warnt Sie bei niedriger Batterie Folgen Sie den Anweisungen in der App Batteriewechsel Schieben Sie die Abdeckung des Batteriefachs nach u...

Страница 13: ...gsmelders ein und entfernen Sie die R ckseite des Bewegungsmelders Entfernen Sie die leeren 3 AA 1 5 V Batterien aus der Kammer und legen Sie neue 3 AA 1 5 V Batterien ein Achten Sie dabei auf die im...

Страница 14: ...beiden Schrauben der Abdeckung Sie m ssen die Schrauben nicht komplett entfernen Klappen Sie die Abdeckung auf der unteren Seite nach oben und f hren Sie die Abdeckung anschlie end heraus Sie k nnen f...

Страница 15: ...gung bis zu 2 Jahre Batterielebensdauer Die Smartvest App warnt Sie bei niedriger Batterie Folgen Sie den Anweisungen in der App Batteriewechsel Ziehen Sie das Batteriefach an der Seite der Fernbedien...

Страница 16: ...rtvest Installieren Sie die Smartvest App Hinweis Bitte beachten Sie dass die Smartvest App folgende Betriebssysteme als Mindestvoraussetzung voraussetzt Apple iOS 7 Android 4 0 Einrichtung der Smartv...

Страница 17: ...anuell ein Alle kommenden Eingaben m ssen dann ebenso manuell durchgef hrt werden Ger tesicherheitscode Der Standard Ger tesicherheitscode 123456 ist bereits hinterlegt Bei der Ersteinrichtung dr cken...

Страница 18: ...auf Speichern Sie haben nun Ihre Smartvest in die App eingebunden Ger tesicherheitscode bei erster Inbetriebnahme ndern Bei der ersten Inbetriebnahme oder nach R cksetzung der Zentrale auf Werkseinste...

Страница 19: ...rtvest zu gelangen Geben Sie das Passwort f r die Einstellung Standard 123456 ein um alle Einstellungsm glichkeiten zu ffnen Standard Passwort f r Einstellungen 123456 Sie k nnen dies in den erweitert...

Страница 20: ...n finden Sie unter dem Kapitel 5 1 Komponenten Die Einstellungen Ihrer Komponenten finden Sie ebenso in dem Kapitel 5 1 Komponenten Wiederholen Sie diese Schritte f r all Ihre Komponenten Hinweis Grun...

Страница 21: ...Sie der App eine neue Smartvest hinzu oder w hlen Sie Ihre Smartvest aus um die allgemeinen Einstellungen der Smartvest zu ffnen Smartvest Details Falls der Ger tesicherheitscode ge ndert oder falsch...

Страница 22: ...er t abgefragt Sollten Sie Ihren App PIN vergessen haben deinstallieren Sie Ihre Smartvest App und installieren Sie diese neu Standard App PIN 123456 Deaktivieren Sie das automatische Einloggen f r de...

Страница 23: ...ignet FUAA35000 Smartvest Die Smartvest ist nur f r den Innenbereich geeignet Beachten Sie hierzu die Hinweise bez glich Aufstellort und Betriebsumgebung bei den Sicherheitshinweisen Allgemeine Montag...

Страница 24: ...re Sender Komponente auf den Fenster oder T rrahmen Montieren Sie den ffnungsmelder so dass die zwei Komponenten horizontal maximal 0 5 cm und vertikal maximal 1 5 cm voneinander entfernt sind Testen...

Страница 25: ...die kleinere Magnet Komponente des ffnungsmelders mit einem d nnen Schlitz Schraubendreher 2 Entfernen Sie die Abdeckung des Batteriefachs der gr eren Sender Komponente des ffnungsmelders 3 Schrauben...

Страница 26: ...n gro en Metallstrukturen nahe an Netzleitungen oder Gasleitungen nahe elektronischer Ger te oder Funkger ten oder n her als 30mm von der Decke entfernt montieren Der Erfassungsbereich des Melders ist...

Страница 27: ...eder auf die Halterung Bohrmontage ohne Halterung 1 Dr cken Sie den Knopf an der Unterseite des Bewegungsmelders ein und entfernen Sie die R ckseite des Bewegungsmelders 2 Verwenden Sie die vorgesehen...

Страница 28: ...3 m ein um k rperliche Sch den z B Geh r zu vermeiden Die Sirene ist nur f r den gesch tzten Au enbereich geeignet IP44 Achten Sie darauf dass die Sirene au erhalb des Handbereichs mindestens 3m Mont...

Страница 29: ...ernbedienung ist nur f r den Innenbereich geeignet Beachten Sie hierzu die Hinweise Betriebsumgebung in den Sicherheitshinweisen Montage Verwenden Sie den Schl sselring um die Fernbedienung an Ihren S...

Страница 30: ...n bersicht und Aktivierung Ihrer Hotkeys bersicht Ihrer R ume und des Status der Raum Melder bersicht und Liveansicht Ihrer Kameras bersicht und anrufen Ihrer Kontakte bersicht der vorgefallenen Ereig...

Страница 31: ...n der Navigationsleiste farblich angezeigt Grau System ist deaktiv Gelb System ist deaktiv und es liegt eine St rung vor z B Batterie leer Blau System ist aktiv Rot System ist aktiv und im Alarmzustan...

Страница 32: ...s Bett gehen Smartvest ist deaktiviert bereit zum aktivieren In diesem Status ist das System nicht scharf geschalten Die Meldungen der meisten Sensoren l sen keinen Alarm aus Die einzige Ausnahme ist...

Страница 33: ...r die vorkonfigurierten Hotkeys Standard Werte gesetzt Falls Sie die Einstellungen f r den jeweiligen Hotkey ndern m chten finden Sie die Einstellungen unter dem Punkt 5 3 Hotkeys St rung Falls St ru...

Страница 34: ...e Hotkeys Panik und Kamera sind bereits bei Erstinstallation hinterlegt Sie k nnen in den Einstellungen siehe Kapitel 5 3 Hotkeys 9 weitere Hotkeys der bersicht hinzuf gen oder die bereits vorhandenen...

Страница 35: ...Hotkey R ume Raum bersicht In der Raum bersicht befinden sich alle R ume denen mindestens eine Komponente hinzugef gt worden ist Unter dem Raumnamen werden jeweils maximal 2 Komponenten aufgelistet Ra...

Страница 36: ...36 Deutsch Farbcode Falls eine St rung einer einzelnen Komponente vorliegt wird der entsprechende Raum in der Raum bersicht und die Komponente gelb markiert...

Страница 37: ...men Sie das Kamerabild indem Sie mit zwei Fingern auseinanderziehen Aktionen Push to Talk Halten Sie die Schaltfl che gedr ckt um durch den Kamera Lautsprecher mit Personen vor Ort zu sprechen Mikrofo...

Страница 38: ...ichnungen sind nur m glich wenn sich eine Micro SD Karte in der Kamera befindet Ansonsten erscheint der Rec Button nicht TVAC16000 Liveansicht Zoomen Sie das Kamerabild in dem Sie mit zwei Fingern aus...

Страница 39: ...Kontakte 2 weitere Kontakte f r die Kontakt bersicht hinzuf gen oder die bereits vorhanden Kontakte bearbeiten Anrufen Durch einen Druck auf die Nummer des Kontakts ffnet sich automatisch die Telefon...

Страница 40: ...1 4 Bewegungsmelder Farbcode Falls Komponenten einen Alarmzustand ausgel st haben werden diese in der Ereignis bersicht rot markiert Falls Komponenten kein Signal an die Smartvest senden oder die Bat...

Страница 41: ...hme Standard Alle Aktoren l sen aus z B Sirene und alle Kameras zeichnen auf Standard Alle Kameras zeichnen auf Kamera bersicht Durch einen Druck auf die jeweilige Kamera gelangen Sie in die Liveansic...

Страница 42: ...Ihrer Zeitpl ne Einstellungen der Netzwerk und Sicherheitsparameter Einstellungen der Scharf Teilscharf Unscharf Modi Einstellungen zur Zeit und Firmware Aktivierung des Test Wartungs oder Fernbedienu...

Страница 43: ...pp selbst gespeichert werden Dr cken Sie auf den gew nschten Kontakt den Sie ndern m chten oder auf das Plussymbol um einen neuen Kontakt hinzuzuf gen Name Legen Sie den Namen f r den Kontakt fest Num...

Страница 44: ...r Smartvest App einlernen konfigurieren und danach auf WLAN Betrieb umstellen F r die direkte WLAN Einbindung folgen Sie zuerst der Anleitung der Kamera zur Inbetriebnahme der Kamera in Ihrem Heimnetz...

Страница 45: ...aumliste und w hlen Sie einen Raum aus in dem die Komponente montiert wird Dr cken Sie auf den Pfeil um in die Einstellungen zur ckzukehren Dr cken Sie anschlie end auf Weiter Folgen Sie den Anweisung...

Страница 46: ...den Anweisungen in der App und schlie en Sie den Vorgang ab Hinweis Falls der Einlern Prozess nicht erfolgreich war dr cken Sie auf Einlernen l sen Sie den Rauch Hitze Warnmelder von der Bodenplatte...

Страница 47: ...Sie einstellen wollen Alarmzentrale Name Legen Sie einen Namen f r die Smartvest fest Hintergrund LED Stellen Sie die Leuchtst rke der Hintergrund LED s auf Aus Niedrig oder Hoch Lautst rke Stellen S...

Страница 48: ...iert wird Dr cken Sie auf den Pfeil um in die Einstellungen zur ckzukehren ffnungsmelder Name Legen Sie einen Namen f r die Komponente fest Raum ffnen Sie die Raumliste und w hlen Sie einen Raum aus i...

Страница 49: ...n Sirene Sirene wird aktiviert LED und Sirene LED s blinken und Sirene wird aktiviert Dauer Stellen Sie die Dauer der Sirene wie lange die Sirene bei Aktivierung l uten bzw die LED s blinken sollen La...

Страница 50: ...um Mobile Ger te verf gbar Kamera Name Legen Sie einen Namen f r die Komponente fest DID Lesen Sie hier die DID Nummer der Kamera ab Security Code Eintrag des Security Codes der Kamera Erweiterte Eins...

Страница 51: ...h herer Aufl sung dargestellt HD Video Das Videobild wird in HD Aufl sung bertragen Das Bild kann aufgrund der gro en Datenmenge jedoch verz gert dargestellt werden Hinweis Verwenden Sie die Einstell...

Страница 52: ...ewegungsgesteuerte Aufzeichnung Sie haben die Auswahl zwischen Aus oder Software Aus Es erfolgt keine Benachrichtigung Aufnahme bei Bewegung Software Die Bewegungserkennung erfolgt ber die Software de...

Страница 53: ...eys werden durch eine Leerzeile getrennt dargestellt Hotkey Einstellungen W hlen Sie aus der Liste der Aktoren die gew nschten Komponenten aus die bei Bet tigung des Hotkeys aktiviert werden sollen Dr...

Страница 54: ...der Komponenten auch manuell deaktivieren bis Sie diese wieder aktivieren wollen Szenario Einstellungen Dr cken Sie auf das Plussymbol um die Liste der Aktoren zu ffnen W hlen Sie einen oder mehrere...

Страница 55: ...achtsbeleuchtung an einer Funk Steckdose anschlie en und diese ber die Zeitpl ne nur in der Nacht aktivieren Zeitpl ne W hlen Sie in der Liste der Funk Steckdosen die gew nschte Funk Steckdose aus bei...

Страница 56: ...unktion auf An zu belassen IP Adresse Die verf gbaren IP Adressen f r die IP Adresse der Smartvest sind aus Ihren Router Einstellungen zu entnehmen Subnetzmaske Die Subnetzmaske ist abh ngig von dem N...

Страница 57: ...ie end das neue Passwort f r die Einstellungen Best tigen Sie dieses erneut und dr cken auf Speichern Hinweis Sollten Sie Ihren Ger tesicherheitscode oder Ihr Passwort f r die Einstellungen vergessen...

Страница 58: ...gen gend Zeit haben um das Haus zu verlassen Die Ausgangsverz gerung gilt jeweils f r Aktiv und Intern Aktiv Hinweis Im Status Intern Aktiv werden als Standard alle Aktoren und Sensoren aktiviert aus...

Страница 59: ...h der Anmeldung bekommen Sie eine Verifizierungsanfrage auf Ihr Handy Best tigen Sie diese Geben Sie nun den Schl ssel und Ihre Telefonnummer ein und w hlen Sie das ausgew hlte Programm aus Achtung SM...

Страница 60: ...zu vermeiden Achtung Vergessen Sie nicht f r den Normalbetrieb den Wartungsmodus wieder zu deaktivieren Testmodus Nach Aktivierung des Testmodus erscheint eine Ansicht die alle neuen Ereignisse anzei...

Страница 61: ...t 10 100 Reichweite m Ca 30 in Abh ngigkeit von den rtlichen Gegebenheiten Schalldruck dB Aus Niedrig 70 Hoch 90 Spannungsversorgung V 5 Stromaufnahme mA Max 450 Modelnummer FUHA35000 Funk Steckdose A...

Страница 62: ...ummer FUBW35000 Bewegungsmelder Batterie 3 x AA 1 5V Batterielebensdauer h 2 Jahre Betriebstemperatur C 0 40 Detektionsverfahren W rmeerkennung Energiesparmodus s 120 Nach erkannter Bewegung sendet de...

Страница 63: ...Ja Zeitintervall 3h Modelnummer FUSG35000 Sirene Batterie 4 x C 1 5V Batterielebensdauer h 2 Jahre Betriebstemperatur C 10 50 Frequenz MHz 868 3 Gewicht g 870 Leuchtfarbe Rot Leuchtmittel LED Ma e mm...

Страница 64: ...nsdauer h 2 Jahre Betriebstemperatur C 0 40 Frequenz MHz 868 3 Gewicht g 22 Ma e mm 30 x 60 x 14 Max Luftfeuchtigkeit 80 Montage T r oder Fenstermontage Reichweite m Ca 30 in Abh ngigkeit von den rtli...

Страница 65: ...est User manual You can find important information and FAQs about this and other products online at www abus com Version 1 2 English translation of the original German user manual Retain for future re...

Страница 66: ...nd product descriptions are trademarks of the corresponding owner All rights reserved If you have any questions please contact your specialist installation contractor or specialist dealer Disclaimer T...

Страница 67: ...ee app enabling you to access the alarm panel from anywhere in the world If an alarm is triggered the alarm panel activates its built in high volume 90 dB siren it can also raise the alarm simultaneou...

Страница 68: ...e itself Never grasp the power cable with wet hands as this can cause a short circuit or electric shock Do not place the device itself items of furniture or other heavy objects on the cable and ensure...

Страница 69: ...umidity which may lead to electrical short circuits For all components that are suitable for indoor and outdoor use please ensure that the components are not exposed to excessive shock or vibration th...

Страница 70: ...a result of a malfunction Care and maintenance Maintenance is necessary if the device has been damaged e g damage to the power cable and plug or the housing or if liquids or foreign bodies have got in...

Страница 71: ...nstallation 23 FUAA35000 Smartvest 23 FUHA35000 power switch 24 FUMK35000 magnetic contact 24 FUBW35000 PIR Motion Detector 26 FURM35000 smoke alarm heat detector 27 FUSG35000 siren 28 FUBE35000 Remot...

Страница 72: ...ED Off System is disarmed Yellow On The system is disarmed and there is a fault e g battery dead or magnetic contact is open Blue On System is armed Red On System is armed and in the alarm state norma...

Страница 73: ...to the default settings means that all settings are reset and component pairings are deleted Press the reset button with the alarm control panel turned off and hold it for 10 seconds while turning on...

Страница 74: ...compartment floor then close the battery compartment by replacing the cover Mounting bracket Mounting bracket for wall installation Drill hole spacing 10 cm drilling template provided Loudspeaker Sma...

Страница 75: ...socket type F CEE 7 4 Can be used in the following countries Germany Austria Sweden Netherlands Repeater mode As well as switching consumers the power switch can also be used as a wireless repeater f...

Страница 76: ...32 for power supply up to one year battery life The Smartvest App warns you when the battery is low Follow the instructions in the app Changing the battery Slide the battery compartment cover out in a...

Страница 77: ...e catch on the underside of the PIR Motion Detector and remove the rear panel Remove the dead 3 AA 1 5 V batteries from the compartment and replace with the new 3 AA 1 5 V batteries Make sure they are...

Страница 78: ...y up to two years battery life Changing the battery Loosen both screws on the cover You do not need to completely remove the screws Lift the cover upwards from the bottom and remove In order to access...

Страница 79: ...tton battery CR2032 for power supply up to two years battery life The Smartvest App warns you when the battery is low Follow the instructions in the app Changing the battery Remove the battery compart...

Страница 80: ...martvest Install the Smartvest App Note Please note that the following operating systems are a minimum requirement for running the Smartvest App Apple iOS 7 Android 4 0 Setting up the Smartvest First...

Страница 81: ...ally All further entries must then also be made manually Device security code The standard security code 123456 is already stored When setting it up for the first time press Next If the device securit...

Страница 82: ...to the app Changing the device security code during initial commissioning When completing the initial commissioning or after resetting the alarm control panel to the default settings you will asked t...

Страница 83: ...he bottom left hand corner of the operation view Enter the settings password standard 123456 to access all settings options Standard settings password 123456 You can adjust this in the Advanced settin...

Страница 84: ...Components The settings for your components can also be found in chapter 5 1 Components Repeat these steps for all of your components Note In principle all components send the read in signal as soon...

Страница 85: ...general settings Available systems Add a new Smartvest to the app or select your Smartvest to access the Smartvest s general settings Smartvest details If the security code has been changed or entere...

Страница 86: ...s each time you start the app on your end device If you have forgotten your app PIN you must delete the app and reinstall it Standard app PIN 123456 Disable Automatic log in for the app PIN to ensure...

Страница 87: ...or the installation of the smoke alarm device FUAA35000 Smartvest The Smartvest is only suitable for indoor use For further information please refer to the safety instructions relating to installation...

Страница 88: ...Always install the smaller magnet component on the window or door and the larger transmitter component on the window or door frame Install the magnetic contact so that the two components are a maximum...

Страница 89: ...window itself Installation with screws 1 Open the magnetic contact s smaller magnet component with a thin slotted screwdriver 2 Remove the battery compartment cover from the magnetic contact s larger...

Страница 90: ...e a radiator close to large metallic structures close to power cables or gas lines close to electronic or wireless equipment or closer than 30 mm to the ceiling The detector s detection range is direc...

Страница 91: ...ithout bracket 1 Press the catch on the underside of the motion detector and remove the motion detector s rear panel 2 Use the holes provided on the inside of the rear panel as a drill template for wa...

Страница 92: ...minimum distance of 3 m in order to avoid physical damage e g to hearing The siren is only suitable for use in protected outdoor areas IP44 Ensure that the siren is installed within hand s reach mini...

Страница 93: ...y The Remote Key is only suitable for indoor use Note the information provided in the safety instructions relating to the operating environment Installation Use the keyring to attach the Remote Key to...

Страница 94: ...ed o Active devices o faults overview and activation of your hotkeys overview of your rooms and the status of the room detectors overview and live view of your cameras overview and call contacts overv...

Страница 95: ...ation bar using a colour code Grey System is disarmed Yellow The system is disarmed and there is a fault e g battery dead Blue System is armed Red System is armed and in the alarm state e g magnetic c...

Страница 96: ...tvest to internally armed before you go to bed Smartvest is unarmed ready to arm In this status the system is not live Notifications from most sensors do not trigger an alarm The only exception is the...

Страница 97: ...set for the pre configured hotkeys Should you wish to alter the settings for the hotkey in question you can find the settings under point 5 3 Hotkeys Fault Should any faults occur e g battery dead th...

Страница 98: ...e settings see chapter 5 3 Hotkeys you can add nine further hotkeys in the overview or edit the hotkeys already available To do this simply tap the desired hotkey Pre configured hotkeys There are two...

Страница 99: ...om details Tap the desired room to open the individual room overview All components which have been added to the room are then listed Tap the arrow in the top left hand corner to exit the individual r...

Страница 100: ...36 English...

Страница 101: ...own across the live view Move two fingers away from each other on the screen to zoom in on the camera image Actions Push to Talk Keep this button pressed to speak to people on site via the camera s lo...

Страница 102: ...s are only possible if a microSD card has been inserted in the camera The Rec button will not appear otherwise TVAC16000 Live view Move two fingers away from each other on the screen to zoom in on the...

Страница 103: ...6 Contacts you can add two further contacts in the contact overview or edit the contacts already available Make calls Tapping a contact s number automatically brings up the telephone view for your end...

Страница 104: ...test See chapter 1 4 Motion detector Colour code Components which have triggered an alarm status are marked red in the event overview Components not transmitting a signal to the Smartvest or whose bat...

Страница 105: ...ors are triggered e g sirens and all cameras are recording Standard All cameras are recording Camera overview You can access the live view with the various camera functions by tapping the relevant cam...

Страница 106: ...etting your schedules setting the network and security parameters setting the arm partial arm disarm modes setting the time and firmware activating the test maintenance and remote mode Note Depending...

Страница 107: ...are saved in the app itself Tap the contact that you want to change or tap the plus sign to add a new contact Name Enter a name for the contact Number Enter the contact s telephone number Selected hel...

Страница 108: ...a direct WLAN connection first follow the camera s instructions for setting up the camera on your home network Enter a name for the component Search for the camera within the network Select the camera...

Страница 109: ...e component Open the room list and select the room where the component is installed Tap the arrow to return to the settings Now tap Next Follow the instructions in the app and then complete the proces...

Страница 110: ...ow the instructions in the app and then complete the process Note If the pairing process was not successful tap Pair and press the pair button on the back of the siren Remote control Enter a name for...

Страница 111: ...trol panel in the event of an alarm Room Open the room list and select a room where the Smartvest is mounted Tap the arrow to return to the settings Town To display weather information tap the town ro...

Страница 112: ...e settings Motion detectors Name Enter a name for the component Room Open the room list and select the room where the motion detector is installed Tap the arrow to return to the settings Smoke alarm h...

Страница 113: ...the siren volume Off Low approx 80 dB High approx 100 dB Attention Always maintain a distance of 3 m when the volume is set to 100 dB in order to prevent physical injury e g to hearing Room Open the r...

Страница 114: ...ngs Here you can select the time zone in which the camera is installed If the world time zone uses summer time activate the summer time setting Video Settings Video Quality Select the quality for the...

Страница 115: ...s unsuccessful or incorrect WiFi details were entered press and hold the reset button for 5 seconds to reset the camera to its default settings Recognition mode The settings for motion detection are r...

Страница 116: ...ed hotkeys panic or camera or one of the nine configurable hotkeys in order to configure these Configured hotkeys are separated from non configured hotkeys by a blank line Hotkey settings In the list...

Страница 117: ...switch on the right hand side of the components until you want to reactivate them Scenario settings Tap the plus sign to open the list of actuators Select one or more actuators that you want to add to...

Страница 118: ...ample You could also connect your Christmas lights to a power switch and activate these at night time only using a schedule Schedules In the list of power switches select the power switches for which...

Страница 119: ...DHCP function set to On IP address For the IP addresses available for the Smartvest IP address refer to your router settings Subnet mask The subnet mask is dependent on the network to which you are c...

Страница 120: ...Confirm this again then tap Save Note If you have forgotten your security code or your password for the settings you can reset these to the standard value 123456 To do this press the reset button on...

Страница 121: ...ctivated Entry delay Activate the entry delay so you have enough time to disarm the Smartvest when entering the house Attention The entry delay carries an increased security risk as the alarm panel ca...

Страница 122: ...is used at your own risk ABUS Security Center GmbH Co KG Linker Kreuthweg 5 86444 Affing Germany shall not assume any liability for any possible damage caused as a result of using the service Firmwar...

Страница 123: ...or normal operation Test mode After activating test mode a view appears showing all new events including motion detection Test mode is only available if the system is disarmed Attention Do not forget...

Страница 124: ...ion Network connector Mbit 10 100 Range m approx 30 depending on the local conditions Sound pressure dB Off low 70 high 90 Power supply V 5 Power consumption mA Max 450 Model number FUHA35000 power sw...

Страница 125: ...mber FUBW35000 PIR Motion Detector Battery 3 x AA 1 5 V Battery life h 2 years Operating temperature C 0 40 Type of detection Heat recognition Energy saving mode s 120 after motion is detected the mot...

Страница 126: ...Model number FUSG35000 siren Battery 4 x C 1 5 V Battery life h 2 years Operating temperature C 10 50 Frequency MHz 868 3 Weight g 870 Luminous colour Red Illuminant LED Dimensions mm 112 x 300 x 102...

Страница 127: ...s Operating temperature C 0 40 Frequency MHz 868 3 Weight g 22 Dimensions mm 30 x 60 x 14 Max humidity 80 Installation Door or window installation Range m approx 30 depending on the local conditions T...

Отзывы: