background image


English 

2.2.  Planning, mounting and installation 

The device uses low-power radio signals to communicate with the Z-Wave controller. To achieve the 
best results, please note the following: 


Please do not attach directly to metal planes or metal constructions, as this may limit the range. 


The device has a radio range of up to 40 m. 


The battery life of the device is reduced if the wireless connection to the Z-Wave controller is not 
direct but via a repeater. 


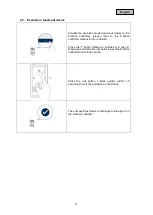
Test mode 

Press the tamper switch 3 times in 1.5 seconds to activate the test mode. The test mode switches off 
automatically after 10 minutes.  

In test mode  


the preset waiting time is ignored and several movement messages are also sent one after the 
other without a reset.  


Every 5 seconds a check is made to see if there is any movement. Accordingly, the LED lights 
up when motion is present and a motion message is sent. If there is no movement, the reset 
message is sent. 


Use the test mode to select the optimal installation location. 


Select installation location 

The detector is only suitable for indoor installation. 

When selecting a position for the detector, the following points should be observed: 


Do not install the detector opposite a window or where it is exposed to direct sunlight. PIR 
detectors are not suitable for use in conservatories due to the high temperature fluctuations. 


Do not install the detector where it is exposed to fans or air conditioners. 


Do not install the detector near a heat source (e.g. fire, radiator, boiler, etc.). 


Do not mount the detector in a position where it is subject to excessive vibration. 


Mounting instructions: 


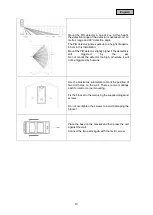
The detector is designed for mounting on a flat wall or 
in a corner. 


If  possible, mount the detector in the corner of the 
room so that the path of a person passes through the 
detection zone. PIR detectors respond more 
effectively to movement through the detection zone 
than to movement towards the sensor. 

Sensitive 

Insensitive 

Содержание PLBW10000

Страница 1: ...PLBW10000 Nexello Dual Motion Detector Important information and FAQs about this product and other products can be found on the website www abus com Manual version 1 2 Firmware version 1 01...

Страница 2: ...eg 5 86444 Affing Germany E mail support abus sc com Phone 49 8207 959 90 0 Opening hours hotline Mon Thu 08 17 h Fri 08 14 h All contained company names and product names are trademarks of their resp...

Страница 3: ...the technical data of the individual devices Ensure that there is always adequate ventilation no direct heat sources are applied to the device no direct sunlight or strong artificial light is applied...

Страница 4: ...st be cleaned Dust deposits in the air slots can be sucked off or blown out If necessary the dust can be removed with a brush The surface can be cleaned with a cloth slightly moistened with soapy wate...

Страница 5: ...w 8 2 1 Inclusion teach in device 8 2 2 Planning mounting and installation 9 2 3 Exclusion teach out device 11 2 4 Reset factory settings 12 2 5 Waking up the device Wake up 12 2 6 Behavior PIR sensor...

Страница 6: ...ower Fresnel Lens For motion detection D Tamper contact Triggers Tamper alarm E Link Button Manual triggering of the wake up command inclusion exclusion and reset F Battery compartment Observe polarit...

Страница 7: ...alarm 1 4 Performance features The device is a battery powered motion detector is due to its design only suitable for wall mounting is Z Wave Plus compatible certified supports the Z Wave S2 standard...

Страница 8: ...device supports automatic inclusion i e it automatically goes into inclusion mode when it is powered and not yet connected to a Z Wave controller The LED starts flashing Alternative manual inclusion...

Страница 9: ...ge is sent If there is no movement the reset message is sent Use the test mode to select the optimal installation location Select installation location The detector is only suitable for indoor install...

Страница 10: ...is still triggered by the pet Do not mount the detector too high otherwise it will not be triggered by humans Use the bracket as a template to mark the position of two drill holes on the wall There ar...

Страница 11: ...e controller manual for more details Press the button Remove Exclusion in your Z Wave app and follow the instructions to set the Z Wave controller to Exclusion mode Press the Link button 3 times quick...

Страница 12: ...settings Hint This procedure should only be used if the primary network controller is not capable of acting If the device is set to factory default the status is set to not included and the associatio...

Страница 13: ...hem again PIR waiting time As soon as motion is detected the device s LED lights up and it sends a motion alarm to the Z Wave controller The device now waits for a preset time waiting time until it re...

Страница 14: ...mmand class Group 1 1 Lifeline General Notification report Battery report Device Reset Locally Notification Sensor Multilevel Report Group 2 4 PIR control Notification Basic set Group 1 Association Z...

Страница 15: ...x01 0x08 Tamper alarm 0x07 0x03 0x00 Tamper alarm reset no Event 0x07 0x00 0x01 0x03 Battery report Value Description 0x14 0x64 20 100 Battery charge level in percentage 0xFF 256 Low battery Sensor Mu...

Страница 16: ...motion alarm to the next triggering Adjustable from 10 3600 in seconds Hexadecimal 0x10 0xE10 3 2 Reset waiting time after motion alarm Association Group 2 180 Waiting time after a movement alarm unti...

Страница 17: ...MWARE_UPDATE_MD Version 4 MANUFACTURER_SPECIFIC Version 2 NOTIFICATION Version 8 POWERLEVEL Version 1 SECURITY Version 1 SECURITY_2 Version 1 SENSOR_MULTILEVEL Version 5 SUPERVISION Version 1 TRANSPOR...

Страница 18: ...DC Type of battery 1x CR123 GP Battery life 2 years based on per day 20x trigger 48 hygrometer multisensor reports 4 wakeup Tamper protection yes Firmware updateable Yes OTA Z Wave Manufacturer ID 0x0...

Отзывы: